电商平台 lnmp 架构之 nginx mysql php 整合(2)
电商平台 lnmp 架构之 nginx mysql php 整合(2)
-
- 1. nginx + php-fpm
- 2. nginx + php-fpm + mysql
- 3. nginx 的高速缓存
在安装好 nginx mysql php 软件之后,如何才能将其高效的运行起来呢?这就需要根据每个软件的特性来将其整合。
开启数据库、php 和 nginx。
[root@server1 php-7.4.12]# /etc/init.d/mysqld start
[root@server1 php-7.4.12]# /etc/init.d/php-fpm start
[root@server1 php-7.4.12]# nginx
1. nginx + php-fpm
由于 nginx 是静态页面, 而 php 是动态语言,当用户访问动态时,nginx 就不能处理,所以先将 php 和 nginx 进行整合。
- 首先,要通知 nginx 当它接收到用户的动态请求时,如何去调用后端的 php 进行处理;
在 nginx 主配置文件的 server 的语句块中,定位到 location,去掉它的注释;并将 php 的发布目录写在前面,默认先去调用 php ,当 php 找不到时在调用别的页面。
[root@server1 nginx-1.18.0]# cd /usr/local/nginx/conf
[root@server1 conf]# vim nginx.conf
42
43 location / {
44 root html;
45 index index.php index.html index.htm;
## 将 php 的发布页面写在最前面,默认先找 php 的发布页面
46 }
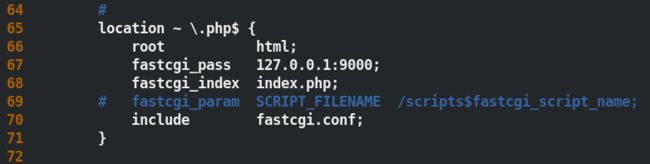
65 location ~ \.php$ {
##打开注释
66 root html;
67 fastcgi_pass 127.0.0.1:9000;
68 fastcgi_index index.php;
69 #fastcgi_param SCRIPT_FILENAME /scripts$fastcgi_script_name;
##两种方法,一种是注释掉这一行,修改下面的文件;第二种是不注释这一行,下面的文件必须是 fastcgi_params
70 include fastcgi.conf;
71 }
由于源码会自动编译,在/usr/local/nginx/conf目录中已经有了 fastcgi.conf文件,fsatcgi.conf里面已经有了这一行参数,所以配置文集中的内容,就可以指定该文件,注释掉文件不同的内容;

- 设定 nginx 的开启自启动
在百度官网查找到了内容: nginx systemd,官方给出了解决办法;
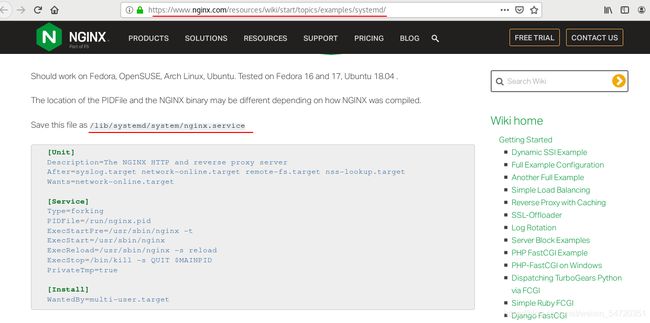
将网站内容数据写入到 /usr/lib/systemd/system/nginx.sevice,pid的位置(和安装的路径相同即可,nginx的默认发布目录下usr/local/nginx)
可以通过脚本开机启动
[root@server1 system]# pwd
/usr/lib/systemd/system
[root@server1 system]# ll -di /usr/lib		##两个链接的第一个地方,写在那个地方都可以
16777312 dr-xr-xr-x. 28 root root 4096 Apr 17 10:55 /usr/lib
[root@server1 system]# ll -di /lib
124 lrwxrwxrwx. 1 root root 7 Apr 11 20:57 /lib -> usr/lib
[root@server1 system]# vim nginx.service
[unit]
Description=The NGINX HTTP and reverse proxy server
After=syslog.target network-online.target remote-fs.target nss-lookup.target
Wants=network-online.target

[Service]
Type=forking
PIDFile=/usr/local/nginx/logs/nginx.pid
##开启进程之后产生的 pid 位置
ExecStartPre=/usr/local/nginx/sbin/nginx -t
##开启之前检测语法
ExecStart=/usr/local/nginx/sbin/nginx	##开启
ExecReload=/usr/local/nginx/sbin/nginx -s reload ##重新加载
ExecStop=/bin/kill -s QUIT $MAINPID		##结束进程
PrivateTmp=true

[Install]
WantedBy=multi-user.target
[root@server1 system]# ll /usr/local/nginx/logs/nginx.pid
##查看编写的进程文件是否存在
-rw-r--r-- 1 root root 5 Apr 20 21:16 /usr/local/nginx/logs/nginx.pid

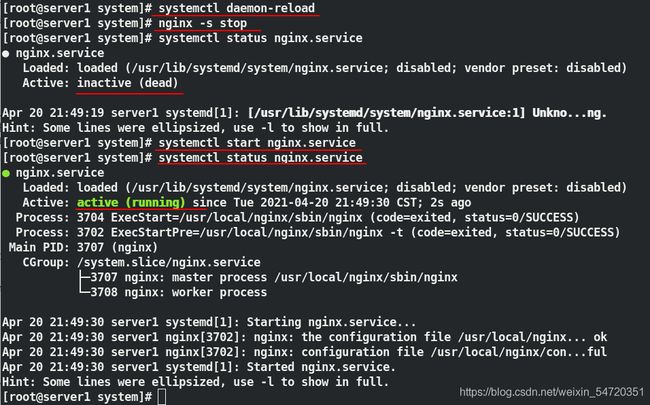
[root@server1 system]# systemctl daemon-reload		##刷新,识别刚才的修改
[root@server1 system]# nginx -s stop 	##停掉nginx
[root@server1 system]# systemctl start nginx.service 	##用 system 的方式打开
[root@server1 system]# systemctl status nginx.service ##查看服务的状态
[root@server1 system]# systemctl enable nginx	##设置开启自启
Created symlink from /etc/systemd/system/multi-user.target.wants/nginx.service to /usr/lib/systemd/system/nginx.service.
- PHP
在systemd之前,启动服务的方式需要用到chkconfig的方式来启动;
level:运行级
3和5:有无图形
[root@server1 ~]# cd /etc/init.d/
[root@server1 init.d]# chkconfig --help		##查看他的帮助
chkconfig version 1.7.4 - Copyright (C) 1997-2000 Red Hat, Inc.
This may be freely redistributed under the terms of the GNU Public License.

usage:   chkconfig [--list] [--type <type>] [name]
         chkconfig --add <name>
         chkconfig --del <name>
         chkconfig --override <name>
         chkconfig [--level <levels>] [--type <type>] <name> <on|off|reset|resetpriorities>
[root@server1 init.d]# chkconfig --list php-fpm 	##查看 php 的启动级别

Note: This output shows SysV services only and does not include native
      systemd services. SysV configuration data might be overridden by native
      systemd configuration.

      If you want to list systemd services use 'systemctl list-unit-files'.
      To see services enabled on particular target use
      'systemctl list-dependencies [target]'.

service php-fpm supports chkconfig, but is not referenced in any runlevel (run 'chkconfig --add php-fpm')
[root@server1 init.d]# chkconfig --level 35 php-fpm on
##设定 php 的启动级别
[root@server1 init.d]# chkconfig --list php-fpm

Note: This output shows SysV services only and does not include native
      systemd services. SysV configuration data might be overridden by native
      systemd configuration.

      If you want to list systemd services use 'systemctl list-unit-files'.
      To see services enabled on particular target use
      'systemctl list-dependencies [target]'.

php-fpm        	0:off	1:off	2:on	3:on	4:on	5:on	6:off
可以看到他提示的还是推荐用的是 systemctl 的方式。
- 设定 php 的启动方式
[root@server1 ~]# cd /root/php-7.4.12/sapi/fpm/
[root@server1 fpm]# cp php-fpm.service /usr/lib/systemd/system
[root@server1 fpm]# cd /usr/lib/systemd/system
[root@server1 system]# vim php-fpm.service
[root@server1 system]# systemctl daemon-reload
[root@server1 system]# systemctl start php-fpm.service
Job for php-fpm.service failed because the control process exited with error code. See "systemctl status php-fpm.service" and "journalctl -xe" for details.
[root@server1 system]#
在配置好 php 时,用 init 的方式启动没有问题,说明配置文件写的正确,此时再次启动时却会报错;
因为用 chkconfig 设定之后就出了问题;
解决办法:通过日志的阅读需要注释 /usr/lib/systemd/system/php-fpm.service的21行
![]()
[root@server1 system]# vim php-fpm.service
[root@server1 system]# systemctl daemon-reload
[root@server1 system]# systemctl start php-fpm.service
[root@server1 system]# systemctl enable php-fpm.service 		##设定开机自启

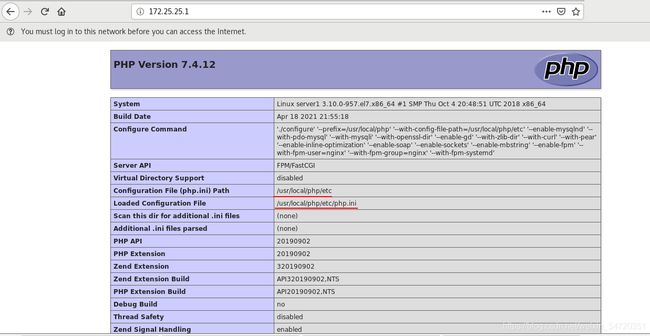
- 测试默认发布目录是否生效
写动态语言,php 函数到默认发布页面
最好进行测试:Firefox:172.25.23.1
[root@server1 conf]# cd /usr/local/nginx/html/
[root@server1 html]# vim index.php
[root@server1 html]# cat index.php

phpinfo()
?>
[root@server1 html]#
修改之后,此时在访问时会默认访问的 php 的发布页面;
修改了 php 的配置内容,此处修改的是时区来观察实验效果;
[root@server1 html]# cd /usr/local/php/etc/
[root@server1 etc]# vim php.ini
[root@server1 etc]# systemctl reload php-fpm ##平滑加载

修改之前默认发布页面时区信息如下:

修改之后默认发布目录时区如下:

- 写入 php 的环境变量
改环境变量之后,直接在命令行键入php就会有结果
键入tuphp -m,可以获取php的模块
[root@server1 ~]# vim .bash_profile
[root@server1 ~]# source .bash_profile
[root@server1 ~]# php -m
##完成之后用命令 php -m 就可看到 php 的模块中有 对应的一些模块
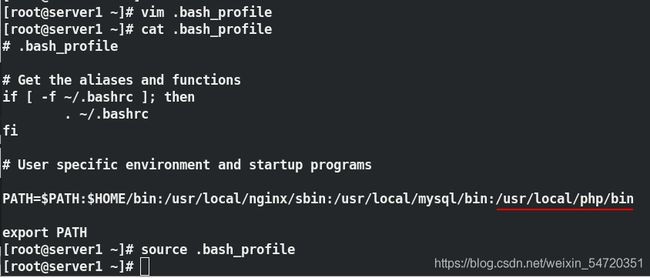
如图中可以看到新加入的模块,此处的 mysqld 便可以和数据库结合使用。

2. nginx + php-fpm + mysql
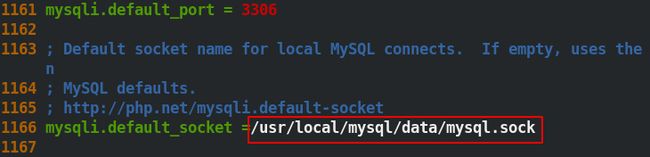
- 编辑 php 的主配置文件
编写默认socket的位置,数据库装在哪里,默认指向它的socket
[root@server1 ~]# cd /usr/local/php/etc/
[root@server1 etc]# ls
pear.conf  php-fpm.conf  php-fpm.conf.default  php-fpm.d  php.ini
[root@server1 etc]# vim php.ini
[root@server1 etc]# systemctl reload php-fpm	##平滑加载
[root@server1 etc]# ll /usr/local/mysql/data/mysql.sock
##检测所写入的目录是否存在,在数据开启之后,目录就存在了
srwxrwxrwx 1 mysql mysql 0 Apr 21 09:31 /usr/local/mysql/data/mysql.sock

- 测试
由于 php 自身带有 mysqlnd 的模块,所以默认 php 的将数据可以放到 MySQL 数据库中;此处使用 php 论坛程序做了测试,但是由于论坛程序版本低,无法用于测试;随后改用phpMyAdmin来进行测试,达到了预期的目标。
php 论坛
[root@server1 ~]# yum install unzip -y ##安装解压工具
[root@server1 ~]# mv upload/ /usr/local/nginx/html/bbs
##将论坛的数据移动并改名为/usr/local/nginx/html/bbs
[root@server1 ~]# cd /usr/local/nginx/html/bbs
admin.php  connect.php      forum.php  member.php  search.php  uc_server
api        cp.php           group.php  misc.php    source      userapp.php
api.php    crossdomain.xml  home.php   plugin.php  static
archiver   data             index.php  portal.php  template
config     favicon.ico      install    robots.txt  uc_client

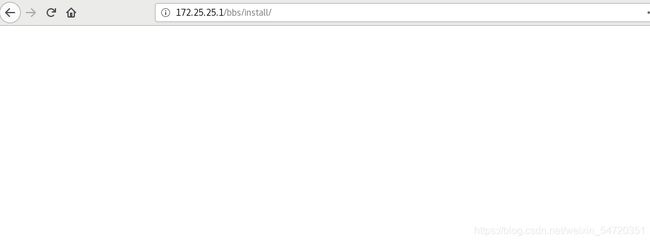
此时测试访问不到:
查看日志:
[root@server1 nginx]# ls
client_body_temp  conf  fastcgi_temp  html  logs  proxy_temp  sbin  scgi_temp  uwsgi_temp
[root@server1 nginx]# cd logs/
[root@server1 logs]# ls
access.log  error.log  nginx.pid
[root@server1 logs]# cat error.log

通过日志信息可以知道,因为我们选择论坛程序版本太低;无法完成测试。
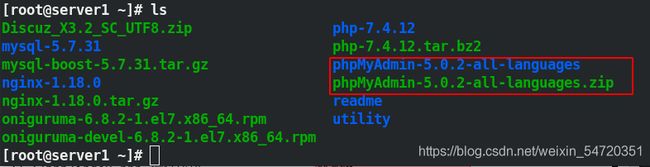
phpMyAdmin
移动 phpMyAdmin 的目录到 /usr/local/nginx/html/phpadmin;
[root@server1 ~]# unzip phpMyAdmin-5.0.2-all-languages.zip
[root@server1 ~]# mv phpMyAdmin-5.0.2-all-languages /usr/local/nginx/html/phpadmin
此时再次访问网页 172.25.25.1/phpadmin 时会访问成功,表示测试成功;

当我们用数据库的用户名和秘密登陆时,发现没有权限登陆数据库;

因为 data 目录默认其他人是没有权限,nginx 和 php 都是用 nginx 的身份运行,所以要修改目录的权限,然后在测试;
[root@server1 ~]# cd /usr/local/mysql/
[root@server1 mysql]# ll
[root@server1 mysql]# chmod 755 data
[root@server1 mysql]# ll -d data/
drwxr-xr-x 5 mysql mysql 4096 Apr 21 09:31 data/
[root@server1 mysql]# ls -ld data/mysql.sock
srwxrwxrwx 1 mysql mysql 0 Apr 21 09:31 data/mysql.sock

此时再访问时便可以进入查看。

注:修改权限之后还是不能访问,可能出现以下问题;
- /usr/local/php/etc/php.ini 中新写入的目录是否正确;
- 目录 data 的权限设定是否正确,确定 nginx 和 php 的身份再去修改权限;
- 火墙是否关闭;
- 端口信息是否正确。
- php 模块的添加
在前面编译 php 是,并不能确定后面会需要那些模块;当编译的模块不够用时,考虑到重新编译的代价高,该如何添加模块?
此时不能在此基础上去安装 rpm 包,两个版本会发生冲突,系统会先找 rpm 包。
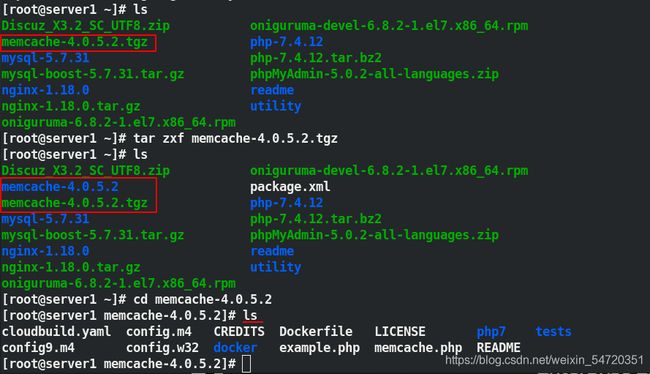
此处加的模块是memcache, 先下载源码包,然后编译
[root@server1 ~]# tar zxf memcache-4.0.5.2.tgz
[root@server1 ~]# cd memcache-4.0.5.2
[root@server1 memcache-4.0.5.2]# ls		##没有 configure,需要用到其他的命令生存configure
cloudbuild.yaml  config.m4   CREDITS  Dockerfile   LICENSE       php7    tests
config9.m4       config.w32  docker   example.php  memcache.php  README
[root@server1 memcache-4.0.5.2]# phpize		##用到的命令
在执行 phpize 命令的时候,提示缺少 autocon ,下载缺失的包再去执行命令;
[root@server1 memcache-4.0.5.2]# phpize
Configuring for:
PHP Api Version:         20190902
Zend Module Api No:      20190902
Zend Extension Api No:   320190902
Cannot find autoconf. Please check your autoconf installation and the
$PHP_AUTOCONF environment variable. Then, rerun this script.

[root@server1 memcache-4.0.5.2]# yum install autoconf		##安装需要的包
当执行完 phpize 命令的时候,就会生成 configure 命令;

此时便可以用来添加对应的模块;
[root@server1 memcache-4.0.5.2]# ./configure --enable-memcache
##添加没有的模块
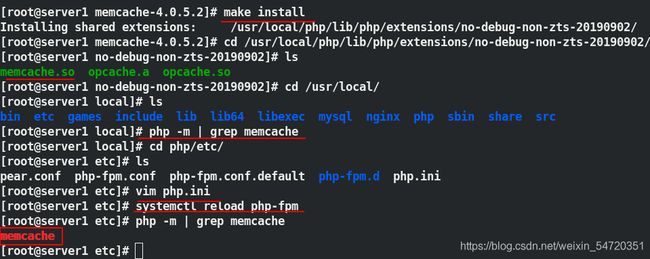
[root@server1 memcache-4.0.5.2]# make
[root@server1 memcache-4.0.5.2]# make install
安装的模块在 /usr/local/php/lib/php/extensions/no-debug-non-zts-20190902/ ;
默认情况下 php 是无法识别到新添加的模块,需要手动的来让其识别到新加入的模块;
[root@server1 no-debug-non-zts-20190902]# cd /usr/local/
[root@server1 local]# ls
bin etc games include lib lib64 libexec mysql nginx php sbin share src
[root@server1 local]# php -m | grep memcache ##默认无法识别
[root@server1 local]# cd php/etc/
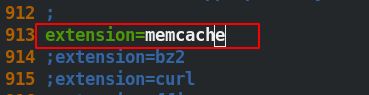
[root@server1 etc]# vim php.ini
[root@server1 etc]# systemctl reload php-fpm
[root@server1 etc]# php -m | grep memcache
memcache
加入一行, php 支持动态扩展;加入之后会自动识别其内容。
php 的工作原理:php ->memcache.so ->memcached,动态数据都是依据相应的模块来完成的;
此处需要安装 memcached 的后台服务,端口是11211;
[root@server1 ~]# yum install memcached -y
[root@server1 ~]# systemctl start memcached
[root@server1 ~]# netstat -antlp | grep memcached
tcp        0      0 0.0.0.0:11211           0.0.0.0:*               LISTEN      6878/memcached
tcp6       0      0 :::11211                :::*                    LISTEN      6878/memcached
[root@server1 ~]# cat /etc/sysconfig/memcached
PORT="11211"
USER="memcached"
MAXCONN="1024"		##最大连接1024
CACHESIZE="64"		##这个程序默认占用系统的64兆内存
OPTIONS=""
[root@server1 ~]# ll /etc/sysconfig/memcached
-rw-r--r-- 1 root root 71 Nov  7  2016 /etc/sysconfig/memcached
发布页面的测试,将 memcache 中的测试文件拷贝到默认发布目录里面进行测试;
[root@server1 ~]# cd memcache-4.0.5.2
[root@server1 memcache-4.0.5.2]# cp example.php /usr/local/nginx/html/
[root@server1 memcache-4.0.5.2]# cd /usr/local/nginx/html/
[root@server1 html]# ls
50x.html  bbs  example.php  index.html  index.php  phpadmin  test.html
此时在本机网页中测试效果如下:

也可以用命令的方式来测试:

从上面的测试中,并不能清楚的看出 memcache 的一些数据特性,下来需要用到其包含的监控页面,来进行测试;
[root@server1 ~]# cd memcache-4.0.5.2
[root@server1 memcache-4.0.5.2]# ls
[root@server1 memcache-4.0.5.2]# cp memcache.php /usr/local/nginx/html
[root@server1 memcache-4.0.5.2]# cd /usr/local/nginx/html
[root@server1 html]# ls
50x.html bbs example.php index.html index.php memcache.php phpadmin test.html
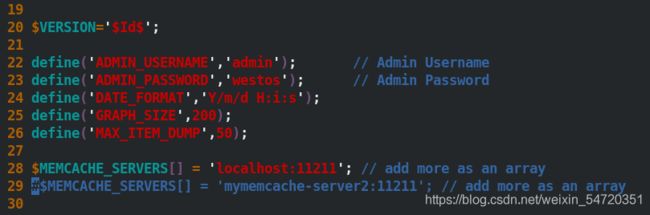
[root@server1 html]# vim memcache.php ##编辑配置文件
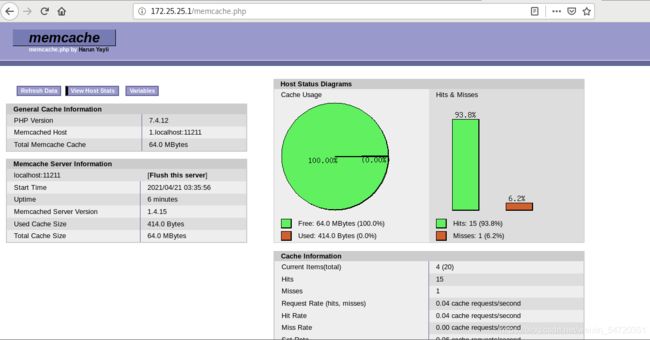
写入其用户名为 admin 密码为 westos ,通过本机去访问,此处也可以写入 IP 或者域名,但是写入域名,一定要写入本地解析文件。
通过设定的用户和密码去访问;
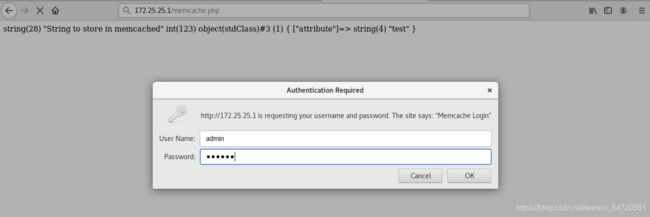
访问效果如图所示:
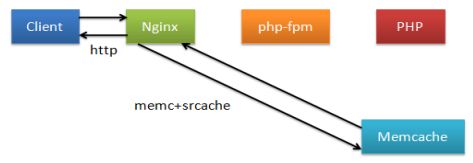
client ->nginx 高并发,高性能 (静态页面)(c10k ,并发过万) -> fstcgi_pass -> php-fpm:9000 ->memcache ->memcached:11211

以上的运行逻辑是nginx 将请求通过 fstcgi_pass 传递给 php-fpm ,php 从缓存 memcache 中去找,memcached 处理数据,处理完成之后最终返回至 nginx 再由 nginx 传递给 client ,这就不能体现出 nginx 的高性能,nginx 必须等待 php 处理完成之后才会将数据输出给 client。
3. nginx 的高速缓存
以上搭建好的服务,虽然理论上没有问题,但是并不能发挥 nginx 的性能;所以就需要搭建 nginx 的高速缓存,让 nginx 直接和memcache 相连,当客户访问时,首先查询自己的缓存,当自己缓存中已经有时,就不用再去往后提交,从而达到高效的目的。
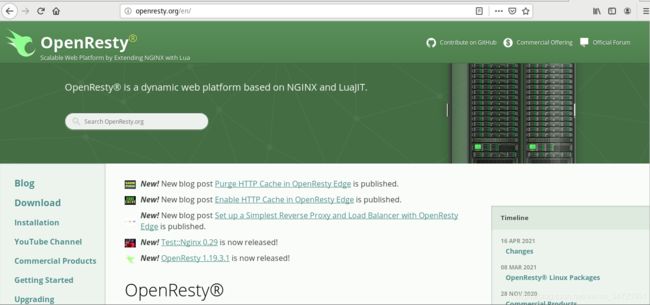
需要给nginx加缓存,此处加载一个 openresty 选择从官网下载模块;
- 解压
[root@server1 ~]# tar zxf openresty-1.19.3.1.tar.gz
注:此处不想编译也可以直接在官网下载 rpm 包来搭建
- 编译
他的编译的和之前的 nginx 的参数都是一致的,也不需要改路径,因为它的路径 在/usr/local/openresty
[root@server1 openresty-1.19.3.1]# ./configure --help		##查看帮助
[root@server1 openresty-1.19.3.1]# ./configure
[root@server1 openresty-1.19.3.1]# gmake
[root@server1 openresty-1.19.3.1]# gmake install
安装完成之后,停掉之前的 nginx,确定没有 80 端口
[root@server1 openresty-1.19.3.1]# cd /usr/local/openresty/
[root@server1 openresty]# ls
bin  COPYRIGHT  luajit  lualib  nginx  pod  resty.index  site
[root@server1 openresty]# cd nginx/
[root@server1 nginx]# ls
conf  html  logs  sbin
[root@server1 nginx]# systemctl stop nginx
[root@server1 nginx]# netstat -antlp | grep nginx	##确定没有之前的 80 端口
修改配置文件
[root@server1 nginx]# pwd
/usr/local/openresty/nginx		##确定所在的路径
[root@server1 nginx]# cd conf/
[root@server1 conf]# vim nginx.conf
修改用户身份;
修改默认发表页面:

修改 server 语句块中本机的 php 内容,由于已经有了fastcgi.conf 文件,所以还是两种修改办法,此处和之前的一样;
由于此处没有 systemctl 的方式,只能用绝对路径的方式来开启;
[root@server1 /]# cd /usr/local/openresty/
[root@server1 openresty]# ls
bin  COPYRIGHT  luajit  lualib  nginx  pod  resty.index  site
[root@server1 openresty]# cd nginx/
[root@server1 nginx]# ls
conf  html  logs  sbin
[root@server1 openresty]# /usr/local/openresty/nginx/sbin/nginx -t ##检测语法结构是否正确
[root@server1 openresty]# /usr/local/openresty/nginx/sbin/nginx
[root@server1 openresty]# netstat -antlp | grep nginx
tcp        0      0 0.0.0.0:80              0.0.0.0:*               LISTEN      15938/nginx: master
##此处也起的是80端口,其实也就是 nginx,所以之前一定要将服务停掉
测试:本机访问 172.25.25.1 来观察实验效果,测试成功。

- 构建高效缓存
在做高效缓存之前做个测试:
还原文件:
[root@server1 conf]# pwd
/usr/local/openresty/nginx/conf
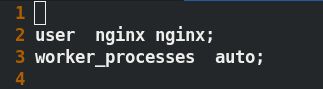
[root@server1 conf]# vim nginx.conf
2 user nginx nginx;
3 worker_processes 1; ##将此内容还原为 1
[root@server1 html]# pwd
/usr/local/openresty/nginx/html
[root@server1 html]# cp ~/memcache-4.0.5.2/example.php .
[root@server1 html]# ls
50x.html example.php index.html

在还是传统的方式下先来做一次测试:
先访问网页,看其文件内容是否正确;

做压测:
[root@foundation39 ~]# ab -c10 -n10000 http://172.25.25.1/example.php
## 模拟10个并发,处理 10000个请求,
This is ApacheBench, Version 2.3 <$Revision: 1843412 $>
Copyright 1996 Adam Twiss, Zeus Technology Ltd, http://www.zeustech.net/
Licensed to The Apache Software Foundation, http://www.apache.org/

Benchmarking 172.25.25.1 (be patient)
Completed 1000 requests
Completed 2000 requests
Completed 3000 requests
Completed 4000 requests
Completed 5000 requests
Completed 6000 requests
Completed 7000 requests
Completed 8000 requests
Completed 9000 requests
Completed 10000 requests
Finished 10000 requests


Server Software:        openresty/1.19.3.1
Server Hostname:        172.25.25.1
Server Port:            80

Document Path:          /example.php
Document Length:        116 bytes

Concurrency Level:      10
Time taken for tests:   9.900 seconds
Complete requests:      10000
Failed requests:        0		##没有错误
Total transferred:      2850000 bytes
HTML transferred:       1160000 bytes
Requests per second:    1010.11 [#/sec] (mean)	##速度只有一千多
Time per request:       9.900 [ms] (mean)
Time per request:       0.990 [ms] (mean, across all concurrent requests)
Transfer rate:          281.13 [Kbytes/sec] received

Connection Times (ms)
              min  mean[+/-sd] median   max
Connect:        0    1   1.3      0      10
Processing:     2    9   3.0      9      26
Waiting:        2    9   3.0      9      25
Total:          2   10   2.9     10      26

Percentage of the requests served within a certain time (ms)
  50%     10
  66%     11
  75%     12
  80%     12
  90%     14
  95%     15
  98%     17
  99%     18
 100%     26 (longest request)
优化为高并发:
[root@server1 conf]# pwd
/usr/local/openresty/nginx/conf
[root@server1 conf]# vim nginx.conf
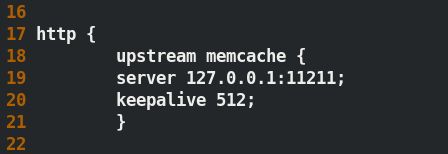
17 http {
18 upstream memcache {
19 server 127.0.0.1:11211;
20 keepalive 512;
21 }
53 location /memc {
54 internal; ##表示只接受内部访问
55 memc_connect_timeout 100ms;
56 memc_send_timeout 100ms;
57 memc_read_timeout 100ms;
58 set $memc_key $query_string; ##使用内置的 $query_string 来作为 key
59 set $memc_exptime 300; ##表示缓存失效时间
60 memc_pass memcache;
61 }
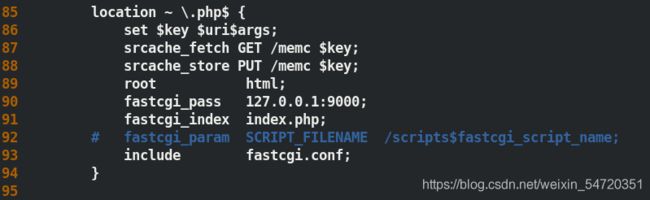
85 location ~ \.php$ {
86 set $key $uri$args;
87 srcache_fetch GET /memc $key;
88 srcache_store PUT /memc $key;
89 root html;
90 fastcgi_pass 127.0.0.1:9000;
91 fastcgi_index index.php;
92 # fastcgi_param SCRIPT_FILENAME /scripts$fastcgi_script_name;
93 include fastcgi.conf;
94 }
[root@server1 conf]# /usr/local/openresty/nginx/sbin/nginx -t ##检测语法
nginx: the configuration file /usr/local/openresty/nginx/conf/nginx.conf syntax is ok
nginx: configuration file /usr/local/openresty/nginx/conf/nginx.conf test is successful
[root@server1 conf]# /usr/local/openresty/nginx/sbin/nginx -s reload ##重载

换成高效缓存模式后,再次进行压力测试;
模拟10个并发,处理10000个请求,没有错误
[root@foundation39 ~]# ab -c10 -n10000 http://172.25.25.1/example.php
This is ApacheBench, Version 2.3 <$Revision: 1843412 $>
Copyright 1996 Adam Twiss, Zeus Technology Ltd, http://www.zeustech.net/
Licensed to The Apache Software Foundation, http://www.apache.org/

Benchmarking 172.25.25.1 (be patient)
Completed 1000 requests
Completed 2000 requests
Completed 3000 requests
Completed 4000 requests
Completed 5000 requests
Completed 6000 requests
Completed 7000 requests
Completed 8000 requests
Completed 9000 requests
Completed 10000 requests
Finished 10000 requests


Server Software:        nginx/1.18.0
Server Hostname:        172.25.25.1
Server Port:            80

Document Path:          /example.php
Document Length:        31 bytes

Concurrency Level:      10
Time taken for tests:   4.076 seconds
Complete requests:      10000
Failed requests:        0		##没有错误
Total transferred:      1940000 bytes
HTML transferred:       310000 bytes
Requests per second:    2453.26 [#/sec] (mean)		##速度为两千四百多
Time per request:       4.076 [ms] (mean)
Time per request:       0.408 [ms] (mean, across all concurrent requests)
Transfer rate:          464.78 [Kbytes/sec] received

Connection Times (ms)
              min  mean[+/-sd] median   max
Connect:        0    0   0.2      0       4
Processing:     1    4   0.8      4      21
Waiting:        1    4   0.8      4      21
Total:          2    4   0.8      4      21

Percentage of the requests served within a certain time (ms)
  50%      4
  66%      4
  75%      4
  80%      5
  90%      5
  95%      5
  98%      6
  99%      6
 100%     21 (longest request)
以上高速缓存便搭建完成
至此 lnmp 架构基础搭建已经完成。