<1>输入属性
定义:组件的输入属性,是指被@input装饰器注解的属性,用来从父组件接收数据
实例
1.新建order子组件
ng g component order
2.修改子组件控制器order.component.ts
/* 2.引入Input */
import { Component, OnInit,Input } from '@angular/core';

@Component({
  selector: 'app-order',
  templateUrl: './order.component.html',
  styleUrls: ['./order.component.css']
})
export class OrderComponent implements OnInit {
    /* 1.定义属性,用@Input装饰器注入 */
    @Input()
    stockCode:string;
    @Input()
    amount:number;

  constructor() { }
  ngOnInit() {
  }
}
3.修改子组件模版order.component.html
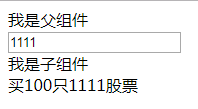
我是子组件

    买{{amount}}只{{stockCode}}股票
4.修改父组件控制器app.component.ts
import { Component } from '@angular/core';

@Component({
  selector: 'app-root',
  templateUrl: './app.component.html',
  styleUrls: ['./app.component.css']
})
export class AppComponent {
/* 4.定义父组件stock */
  stock = "";
}
5.修改父组件模版
我是父组件
若报错:Can't bind to 'ngModel' since it isn't a known property of 'input'
解决方式:修改app.module.ts
import { BrowserModule } from '@angular/platform-browser';
import { NgModule } from '@angular/core';
import { AppComponent } from './app.component';
import { OrderComponent } from './order/order.component';

/* 重要:导入FormsModule */
import { FormsModule } from '@angular/forms';

@NgModule({
  declarations: [
    AppComponent,
    OrderComponent,
  ],
  imports: [
    BrowserModule,
    FormsModule//2.此处添加FormsModule
  ],
  providers: [],
  bootstrap: [AppComponent]
})
export class AppModule { }
6.结果
<2>输出属性
实例
step1:
1.新建一个price子组件
ng g component price
2.修改price.component.ts
import { Component, OnInit } from '@angular/core';
@Component({
  selector: 'app-price',
  templateUrl: './price.component.html',
  styleUrls: ['./price.component.css']
})
export class PriceComponent implements OnInit {
//2.定义两个对象,代码和价格
stockCode:string = "IBM";
price:number;
  constructor(){
    setInterval(()=>{
        /* 3.new一个Price对象 */
        let pr:Price = new Price(this.stockCode,100*Math.random());
        /* 4.将获取到的最后一次的价格赋值给price */
        this.price = pr.lastPrice;
    },1000)
   }
  ngOnInit() {
  }
}
/* 1.定义一个报价对象 */
export class Price {
    constructor(public stockCode:string,
                public lastPrice:number
    ){}
}
2.修改price.component.html模版
    这里是报价组件


    //用了number管道进行数据处理
    股票代码是{{stockCode}},股票价格是{{price | number:'2.2-2'}}
3.结果
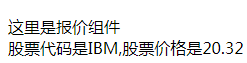
其中价格每隔一秒变化一次
step2:
将价格属性输出,让外部组件可以订阅,即在子组件中将信息发射出来,然后在父组件中接收到这个信息
4.修改price.component.ts文件
import { Component, OnInit,EventEmitter,Output } from '@angular/core';

@Component({
  selector: 'app-price',
  templateUrl: './price.component.html',
  styleUrls: ['./price.component.css']
})
export class PriceComponent implements OnInit {
stockCode:string = "IBM";
price:number;
//1.EventEmitter对象可以发射和订阅事件
@Output()
lastPrice:EventEmitter = new EventEmitter();
  constructor(){
    setInterval(()=>{
        let pr:Price = new Price(this.stockCode,100*Math.random());
        this.price = pr.lastPrice;
      //2.用emit方法往外发射事件,其中发射的变量是泛型Price指定的,在这里即是pr
      this.lastPrice.emit(pr);
    },1000)
   }

  ngOnInit() {
  }

}
export class Price {
    constructor(public stockCode:string,
                public lastPrice:number
    ){}
}
5.修改app.component.ts--父组件
import { Component } from '@angular/core';
import {Price} from "./price/price.component"


@Component({
  selector: 'app-root',
  templateUrl: './app.component.html',
  styleUrls: ['./app.component.css']
})
export class AppComponent {

  stock = "";
  //1.声明一个Price类型的属性,因为子组件里面发射出来的是Price类型的
  price:Price = new Price("",0);
}
6.修改app.component.html
我是父组件
7.修改app.component.ts
import { Component } from '@angular/core';
import {Price} from "./price/price.component"


@Component({
  selector: 'app-root',
  templateUrl: './app.component.html',
  styleUrls: ['./app.component.css']
})
export class AppComponent {

  stock = "";
  //1.声明一个Price类型的属性,因为子组件里面发射出来的是Price类型的
  price:Price = new Price("",0);

  //2.声明priceHandle方法,在这个方法里接收一个event,这个event是Prive类型的
    //即这个类型是子组件emit方法发射出来东西的类型,即Price
  priceHandle(event:Price){
    this.price = event;
  }
}
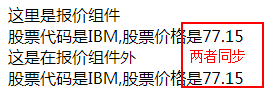
8.结果
<3>中间人模式
中间人负责从一个组件中接收数据,并将其传递给另一个组件

如上图所示:
顶级中间人是1,组件1可使2、3、6互相通讯,是组件2、3、6的中间人;同理,组件2是4、5的中间人;组件3是7、8的中间人。
1.修改price.component.html
    这里是报价组件


    股票代码是{{stockCode}},股票价格是{{price | number:'2.2-2'}}
2.修改price.component.ts
import { Component, OnInit,EventEmitter,Output } from '@angular/core';

@Component({
  selector: 'app-price',
  templateUrl: './price.component.html',
  styleUrls: ['./price.component.css']
})
export class PriceComponent implements OnInit {
stockCode:string = "IBM";
price:number;

@Output()
lastPrice:EventEmitter = new EventEmitter();

//1.点击按钮时要把当前的价格发射出去
@Output()
buy:EventEmitter = new EventEmitter();

  constructor(){
    setInterval(()=>{
        let pr:Price = new Price(this.stockCode,100*Math.random());
        this.price = pr.lastPrice;
      this.lastPrice.emit(pr);
    },1000)
   }
   //2.定义buyStock方法,用buy的emit方法把当前价格信息发射出去
   buyStock(event){
     this.buy.emit(new Price(this.stockCode,this.price));
   }

  ngOnInit() {
  }

}
export class Price {
    constructor(public stockCode:string,
                public lastPrice:number
    ){}
}
3.修改order.component.ts--下单组件
/* 2.引入Input */
import { Component, OnInit,Input } from '@angular/core';

@Component({
  selector: 'app-order',
  templateUrl: './order.component.html',
  styleUrls: ['./order.component.css']
})
export class OrderComponent implements OnInit {
    /* 1.定义价格属性,用@Input装饰器注入 */
    @Input()
    price:Price;
  constructor() { }

  ngOnInit() {
  }

}
4.修改order.component.html
我是下单组件

    买100只{{price.stockCode}}股票,价格是{{price.lastPrice | number:'2.2-2'}}
5.修改app.component.ts:用来接收price组件发射出来的价格和给order组件发送price信息
import { Component } from '@angular/core';
import {Price} from "./price/price.component"


@Component({
  selector: 'app-root',
  templateUrl: './app.component.html',
  styleUrls: ['./app.component.css']
})
export class AppComponent {

  stock = "";
  //1.声明一个Price类型的属性,因为子组件里面发射出来的是Price类型的
  price:Price = new Price("",0);

  //2.声明priceHandle方法,在这个方法里接收一个event,这个event是Prive类型的
    //即这个类型是子组件emit方法发射出来东西的类型
  priceHandle(event:Price){
    this.price = event;
  }
//3.声明buyHandle方法
  buyHandle(event:Price){
    this.price = event;
  }
}
6.修改app.component.html
7.结果
点击购买按钮前

点击购买按钮后

<4>组件生命周期钩子

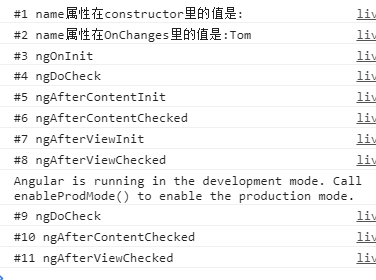
下面具体示例在项目中每个钩子的调用顺序
1.新建一个live组件
ng g component live
2.修改live.component.ts
import { Component, OnInit,OnChanges,DoCheck,AfterContentInit,
    AfterContentChecked,AfterViewInit,AfterViewChecked,OnDestroy,
    SimpleChanges,Input } from '@angular/core';

let logId:number = 1;

@Component({
  selector: 'app-live',
  templateUrl: './live.component.html',
  styleUrls: ['./live.component.css']
})
export class LiveComponent implements OnInit,OnChanges,
DoCheck,AfterContentInit,AfterContentChecked,
AfterViewInit,AfterViewChecked,OnDestroy {
    @Input()
    name:string;
    logIt(msg:string){
        console.log(`#${logId++} ${msg}`);
    }
  constructor() {
    this.logIt("name属性在constructor里的值是:"+name);
  }
  ngOnInit() {
    this.logIt("ngOnInit");
  }
  ngOnChanges(changes:SimpleChanges):void{
    let name = changes['name'].currentValue;
    this.logIt("name属性在OnChanges里的值是:"+name);
  }
  ngDoCheck():void{
    this.logIt("ngDoCheck");
  }
  ngAfterContentInit():void{
    this.logIt("ngAfterContentInit");
  }
  ngAfterContentChecked():void{
    this.logIt("ngAfterContentChecked");
  }
  ngAfterViewInit():void{
    this.logIt("ngAfterViewInit");
  }
  ngAfterViewChecked():void{
    this.logIt("ngAfterViewChecked");
  }
  ngOnDestroy():void{
    this.logIt("ngOnDestroy");
  }

}
3.修改app.component.html
app组件
4.结果
<5>OnChanges钩子
这个钩子会在父组件初始化或修改子组件的输入参数时会被调用
可变对象和不可变对象
在javascript中,字符串是不可变的,当一个字符串被创建在内存中时,它的值永远不会改变;而对象是可以改变的。例如:
var greeting = "hello";
//在内存中创建了一个值为hello的字符串
greeting = "hello world";
//在不改变第一个字符串的值的前提下创建了第二个值为“hello world”的字符串,这两个字符串都是不可变的,但是对于greeting这个变量来说,这个值是改变的,它指向的内存地址从第一个字符串的地址变为了指向第二个字符串的地址
var user = {"name",""tom};
//对象user的name属性指向了内存中值为"tom"的字符串。
user.name = "jane";
//一个新的字符串“jane”在另一个内存地址被创建,user的name属性指向了新的地址,但是user对象本身还是指向被创建时的内存地址。即改的是user对象的内容,而user指向的地址并没有变。上面的greeting是改变了指向的内存地址,这就是可变对象和不可变对象的区别。
示例
1.修改child.component.ts
import { Component, OnInit,Input,OnChanges,SimpleChanges } from '@angular/core';

@Component({
  selector: 'app-child',
  templateUrl: './child.component.html',
  styleUrls: ['./child.component.css']
})
export class ChildComponent implements OnInit,OnChanges {

  //1.定义三个属性,其中前两个是输入属性
  @Input()
  greeting:string;

  @Input()
  user:{name:string}

  mess:string = "初始化信息";
  constructor() { }

  ngOnInit() {
  }
  ngOnChanges(changes:SimpleChanges):void {
    console.log(JSON.stringify(changes, null, 2));
  }
}
2.修改child.component.html模版
    我是子组件
    问候语:{{greeting}}
    姓名:{{user.name}}

    消息:
要在app.module.ts中添加FormsModule
import { FormsModule } from '@angular/forms';
imports: [
    BrowserModule,
    FormsModule //此处添加
  ]
3.父组件需要给子组件传那两个输入属性,修改app.component.ts
import { Component } from '@angular/core';

@Component({
  selector: 'app-root',
  templateUrl: './app.component.html',
  styleUrls: ['./app.component.css']
})
export class AppComponent {
  greeting:string = "hello";
  user:{name:string} = {name:"tom"};
}
4.将那两个属性绑定到父组件模版中,修改app.component.html
    我是父组件


        问候语:


        姓名:
结果


只有改变greeting时才会调用Onchanges


<6>变更检测和DoCheck钩子
DoCheck作用:保证组件属性的变化和页面的变化是一致的,浏览器中发生的任何异步事件都会触发变更检测
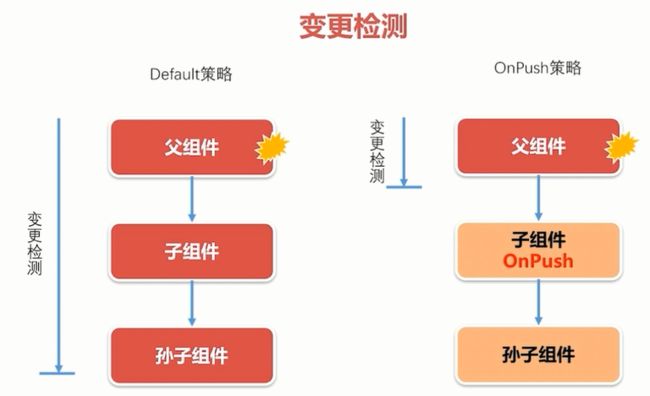
default策略:只要发生了变化,整个组件数都会被检查一遍
onpush策略:发生变化时,而子组件是onpush策略,就不会对
子组件进行检查,而是只有当子组件的输入属性发生改变时才会进行检查;
1.修改child.component.ts
import { Component, OnInit,Input,OnChanges,SimpleChanges,DoCheck } from '@angular/core';

@Component({
  selector: 'app-child',
  templateUrl: './child.component.html',
  styleUrls: ['./child.component.css']
})
//1.实现一个docheck钩子
export class ChildComponent implements OnInit,OnChanges,DoCheck {
  @Input()
  greeting:string;

  @Input()
  user:{name:string}

  mess:string = "初始化信息";


  oldUser:string;
  change:boolean = false;
nochange:number = 0;
  constructor() { }

  ngOnInit() {
  }
  ngOnChanges(changes:SimpleChanges):void {
    console.log(JSON.stringify(changes, null, 2));
  }
  ngDoCheck():void {
    if (this.user.name !== this.oldUser) {
        this.change = true;
        console.log("DoCheck:user.name从"+this.oldUser+"变为"+this.user.name);
        this.oldUser = this.user.name;
    }
    if(this.change){
        this.nochange = 0;
    }else {
        this.nochange = this.nochange + 1;
        console.log("docheck:user.name没变化时ngDocheck方法已经被调用"+this.nochange+"次");
    }
    this.change = false;
  }
}
结果
当点击父组件input框时,就会调用一次docheck,所以实现诸如带有check的钩子时要非常小心,实现要轻量级。


<7>view钩子
新的装饰器:@ViewChild
以下例子实现如何让父组件调用子组件的方法。
1.新建一个子组件
ng g component child2
2.修改child2.component.ts
import { Component, OnInit } from '@angular/core';

@Component({
  selector: 'app-child2',
  templateUrl: './child2.component.html',
  styleUrls: ['./child2.component.css']
})
export class Child2Component implements OnInit {

  constructor() { }

  ngOnInit() {
  }
  //1.写在子组件的方法
  greeting(name:string) {
    console.log("hello"+name);
  }

}
3.修改app.component.html
4.修改app.component.ts
import { Component,ViewChild} from '@angular/core';
import {Child2Component} from "./child2/child2.component"
@Component({
  selector: 'app-root',
  templateUrl: './app.component.html',
  styleUrls: ['./app.component.css']
})
export class AppComponent {
  //2.通过ViewChild装饰器+模版变量的名字来调用子组件的方法
  @ViewChild("childone")
  childone:Child2Component;

  ngOnInit():void {
    this.childone.greeting("tom");
  }

}
5.结果
控制台中可以看出父组件成功调用了子组件的greeing方法
方法二:在父组件的模版中调用子组件的方法
1.修改app.component.html
2.结果
点击按钮时控制台中打印:hellojane
view钩子
这两个钩子会在组件模版内容都组装完,组件的内容已经呈现给用户看之后,被调用。
1.在父组件中实现这两个钩子,修改app.component.ts
import { Component,ViewChild,OnInit,AfterViewInit,AfterViewChecked} from '@angular/core';
import {Child2Component} from "./child2/child2.component"
@Component({
  selector: 'app-root',
  templateUrl: './app.component.html',
  styleUrls: ['./app.component.css']
})
export class AppComponent implements OnInit,AfterViewInit,AfterViewChecked{
  title = 'Tom';
  greeting:string = "hello";
  user:{name:string} = {name:"tom"};

  //2.通过模版变量的名字来调用子组件的方法
  @ViewChild("childone")
  childone:Child2Component;

  ngOnInit():void {

     //定时调用子组件的greeting方法
     setInterval(() => {
       this.childone.greeting("tom");
     },5000 );
  }
  ngAfterViewInit():void {
    console.log("父组件的视图初始化完毕");
  }
  ngAfterViewChecked():void {
    console.log("父组件的视图变更检测完毕");
  }
}
2.在子组件中实现这两个钩子,修改child2.component.ts
import { Component, OnInit,AfterViewInit,AfterViewChecked } from '@angular/core';

@Component({
  selector: 'app-child2',
  templateUrl: './child2.component.html',
  styleUrls: ['./child2.component.css']
})
export class Child2Component implements OnInit,AfterViewInit,AfterViewChecked {

  constructor() { }

  ngOnInit() {
  }

  ngAfterViewInit():void {
    console.log("子组件的视图初始化完毕");
  }
  ngAfterViewChecked():void {
    console.log("子组件的视图变更检测完毕");
  }


  greeting(name:string) {
    console.log("hello"+name);
  }

}
3.结果
控制台中,子组件的组件先被组装好,childone和childtwo组件被组装好之后,父组件才被组装好。ngAfterViewInit只会被调用一次。当每隔5秒,父组件调用子组件greeting方法时,触发变更检测机制,两个子组件和父组件的ngAfterViewChecked又被调用。
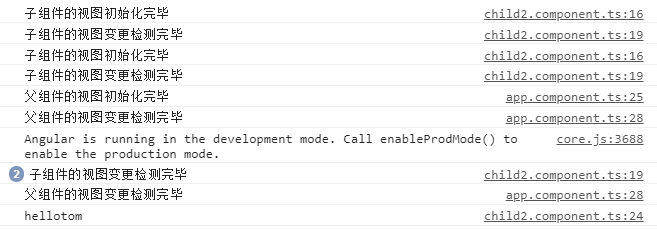
注意:不要在这两个方法中改变视图中绑定的数据,否则会抛出异常

解决方案:放到另一个javascript的运行周期中,例如:

<8>ngContent指令
说在前面:投影
当希望运行时动态改变模版的内容,就可以用ngContent指令将父组件模版中的任意片段投影到子组件上。
示例1:当投影单个片段时
1.在子组件中,修改child.component.html
下面是子组件内容
2.父组件中,修改app.component.html
  下面是父组件内容


      这里是父组件投影到子组件的内容
示例2:当投影多个片段时
1.修改app.component.html
下面是父组件内容
这是页头,是父组件投影到子组件的内容
2.修改child.component.html
下面是子组件内容
3.结果

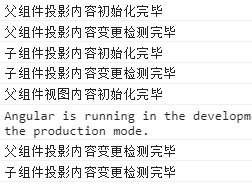
<9>AfterContentInit和AfterContentChecked指令
AfterContentInit和AfterContentChecked是被投影的内容被组装完毕时调用的,与AfterViewInit不同的是,在AfterContentInit中可以改变视图中绑定的数据。
示例:
1.修改app.component.ts
import { Component,AfterContentInit,AfterContentChecked,AfterViewInit } from '@angular/core';

@Component({
  selector: 'app-root',
  templateUrl: './app.component.html',
  styleUrls: ['./app.component.css']
})
export class AppComponent implements AfterContentInit,AfterContentChecked,AfterViewInit {
message = "hi";
    ngAfterContentInit():void {
console.log("父组件投影内容初始化完毕");
//此处改变了视图中绑定的数据,控制台中不报错
this.message = "jane";
}
ngAfterContentChecked():void {
console.log("父组件投影内容变更检测完毕");
}
ngAfterViewInit():void {
console.log("父组件视图内容初始化完毕");
}

  title = 'app';
}
2.修改child.component.ts
import { Component, OnInit,AfterContentInit,AfterContentChecked } from '@angular/core';

@Component({
  selector: 'app-child',
  templateUrl: './child.component.html',
  styleUrls: ['./child.component.css']
})
export class ChildComponent implements OnInit,AfterContentInit,AfterContentChecked {
ngAfterContentInit():void {
console.log("子组件投影内容初始化完毕");
}
ngAfterContentChecked():void {
console.log("子组件投影内容变更检测完毕");
}
  constructor() { }

  ngOnInit() {
  }

}
3.结果
<10>ngOnDestroy
当从一个路由地址跳往另一个路由地址时,前一个路由地址对应的组件会被销毁,而后一个路由地址对应的组件会被创建。
示例:
1.新建一个项目,并创建两个子组件
ng new destroyPro
ng g component child
ng g component child2
2.修改app.module.ts,定义一些路由
import { BrowserModule } from '@angular/platform-browser';
import { NgModule } from '@angular/core';


import { AppComponent } from './app.component';
import { ChildComponent } from './child/child.component';
import { Child2Component } from './child2/child2.component';
//3.引入routes和RouterModule
import  {Routes,RouterModule} from "@angular/router";


//1.当路径为空时,显示child组件内容,当路径为child2时显示child2内容
var routeCongif:Routes = [
  {path:'',component:ChildComponent},
  {path:'child2',component:Child2Component}

]

@NgModule({
  declarations: [
    AppComponent,
    ChildComponent,
    Child2Component
  ],
  //2.把路由配置导入模块
  imports: [
    BrowserModule,
    RouterModule.forRoot(routeCongif)
  ],
  providers: [],
  bootstrap: [AppComponent]
})
export class AppModule { }
3.修改app.component.html
child
child2
4.修改child.component.ts和child2.component.ts,实现OnDestroy方法
import { Component, OnInit,OnDestroy } from '@angular/core';

@Component({
  selector: 'app-child',
  templateUrl: './child.component.html',
  styleUrls: ['./child.component.css']
})
export class ChildComponent implements OnInit,OnDestroy {

ngOnDestroy():void {
    console.log("child组件已被销毁");
}
  constructor() { }

  ngOnInit() {
  }

}
import { Component, OnInit,OnDestroy } from '@angular/core';

@Component({
  selector: 'app-child2',
  templateUrl: './child2.component.html',
  styleUrls: ['./child2.component.css']
})
export class Child2Component implements OnInit,OnDestroy {
ngOnDestroy():void {
    console.log("child2组件已被销毁");
}
  constructor() { }

  ngOnInit() {
  }

}
5.结果
当点击路由切换时
