开篇:搞定 Go 开发环境
开门见山,搞定一个合乎心意的 Go 开发环境一定要包括一个简单的 Linux 开发环境来适配生产环境,一个称心的编辑器/IDE来编写代码,一个 Go 代理屏蔽糟糕的国内网络环境。
在开篇我会使用 Vagrant 来创建一个简单的 Linux 虚拟机,然后使用 VS Code 作为编辑器,使用 Go Proxy 来对 Go 进行加速代理,最终完成 Go Hello world 的编写
使用 Vagrant 搞定 Linux 虚拟机
Linux 可以说是世界上使用最广泛的服务器平台,众多服务器应用和工具也是围绕 Linux 进行开发,所以我们一定要使用 Linux 作为我们的开发环境。从接触编程开始我就在选择快速的创建 Linux 虚拟机的方法。后面接触到了 Vagrant,通过 Vagrant 无须操作复杂的虚拟化软件界面,仅靠一个 Vagrantfile 就能够快速的创建一个 Linux 虚拟机,非常的方便。最重要的是 Vagrant 创建虚拟机的方法在 Windows 和 Mac 上都能复用。
安装 VirtualBox
登录 VirtualBox 官网,然后点击下载,无脑下一步即可完成 VirtualBox 的下载
安装 Vagrant
登录 Vagrant 网站,点击下载,然后也是无脑下一步
创建虚拟机
mkdir ./vagrant && cd ./vagrant
vagrant plugin install --plugin-clean-sources --plugin-source https://gems.ruby-china.com/  vagrant-vbguest
vagrant init ubuntu-bionic https://mirrors.tuna.tsinghua.edu.cn/ubuntu-cloud-images/bionic/current/bionic-server-cloudimg-amd64-vagrant.box
vagrant up
上述命令都使用了国内源加速,如果使用原始地址的话,下载速度会非常慢。
整理 Linux 环境
创建完成虚拟机之后直接使用下面命令即可进入虚拟机
vagrant ssh
Tips: 使用 Windows 的话可能会出现
[email protected]: Permission denied (publickey).报错,可参考 vagrant在virtualbox安装centos/7虚拟机,ssh登陆报错 解决
使用 VSCode Remote Dev 连接到虚拟机
使用下列命令将 vagrant 的 ssh-config 导出
vagrant ssh-config > ./ssh-config
在下图第三步的时候将文件的绝对路径输入
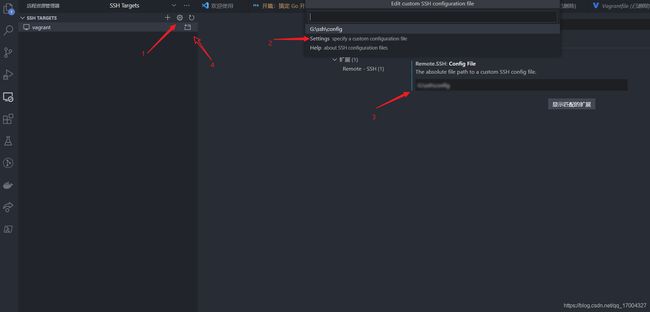
然后按照点击第四步完成 Remote SSH 的初始化工作完成登录主机,畅享丝滑的远程开发体验。

Tips: 在 Windows 上要注意换行符,将 CRLF 换成 LF
使用 Go Proxy 搞定 Go 网络环境
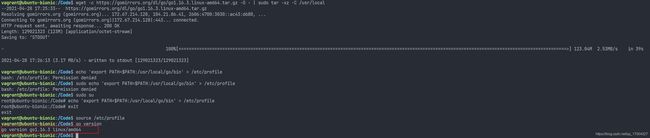
安装 Go 环境
- 下载 Go 安装包并解压
wget -c https://gomirrors.org/dl/go/go1.16.3.linux-amd64.tar.gz -O - | sudo tar -xz -C /usr/local
- 设置环境变量
sudo su
echo 'export PATH=$PATH:/usr/local/go/bin' > /etc/profile
exit
source /etc/profile
- 验证安装
go version
- 设置 GoProxy
sudo su
echo 'export GOPROXY=https://goproxy.io,direct' > /etc/profile
echo 'export GOPROXY=https://goproxy.io,direct' > /etc/profile
exit
source /etc/profile
- 安装 VS Code Go 插件

Tips: 上述过程可以在 Vagrantfile 中一步到位完成,后面会放出一份一步到位的 Vagrantfile,直接创建出建完就能用的 Linux Go 编程环境虚拟机。
Hello World
- 在 VS Code 窗口创建一个 helloworld.go 文件,这时会跳出提示需要安装插件,选在
Install All即可
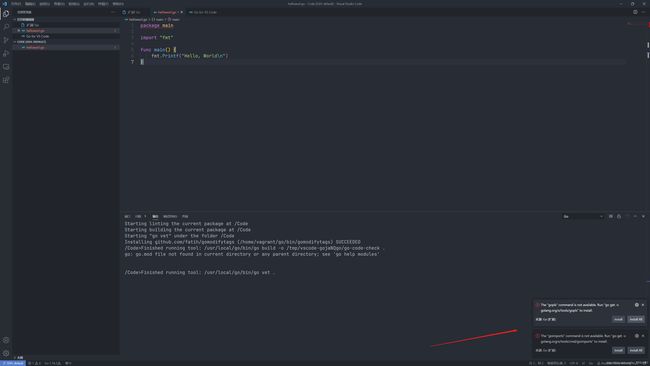
Tips: 得益于之前设置的 GoProxy Install All 能够一次性完成,如果没有设置 GoProxy,由于国内的网络原因会安装失败
- 在 VS Code 中输入 hello world 代码
package main

import "fmt"

func main() {

	fmt.Printf("Hello, World\n")
}
go run helloworld.go

附:一步到位 Vagrantfile
Tips: 不一定适用所有人
# -*- mode: ruby -*-
# vi: set ft=ruby :

# All Vagrant configuration is done below. The "2" in Vagrant.configure
# configures the configuration version (we support older styles for
# backwards compatibility). Please don't change it unless you know what
# you're doing.
Vagrant.configure("2") do |config|
  # The most common configuration options are documented and commented below.
  # For a complete reference, please see the online documentation at
  # https://docs.vagrantup.com.

  # Every Vagrant development environment requires a box. You can search for
  # boxes at https://vagrantcloud.com/search.
  config.vm.box = "ubuntu-bionic"

  # The url from where the 'config.vm.box' box will be fetched if it
  # doesn't already exist on the user's system.
  config.vm.box_url = "https://mirrors.tuna.tsinghua.edu.cn/ubuntu-cloud-images/bionic/current/bionic-server-cloudimg-amd64-vagrant.box"

  # Create a forwarded port mapping which allows access to a specific port
  # within the machine from a port on the host machine. In the example below,
  # accessing "localhost:8080" will access port 80 on the guest machine.
  # NOTE: This will enable public access to the opened port
  # config.vm.network "forwarded_port", guest: 80, host: 8080

  # Create a forwarded port mapping which allows access to a specific port
  # within the machine from a port on the host machine and only allow access
  # via 127.0.0.1 to disable public access
  # config.vm.network "forwarded_port", guest: 80, host: 8080, host_ip: "127.0.0.1"

  # Create a private network, which allows host-only access to the machine
  # using a specific IP.
  # config.vm.network "private_network", ip: "192.168.33.10"

  # Create a public network, which generally matched to bridged network.
  # Bridged networks make the machine appear as another physical device on
  # your network.
  # config.vm.network "public_network"

  # Share an additional folder to the guest VM. The first argument is
  # the path on the host to the actual folder. The second argument is
  # the path on the guest to mount the folder. And the optional third
  # argument is a set of non-required options.
  # config.vm.synced_folder "../data", "/vagrant_data"

  # Provider-specific configuration so you can fine-tune various
  # backing providers for Vagrant. These expose provider-specific options.
  # Example for VirtualBox:
  #
  config.vm.synced_folder "./Code", "/Code"
  config.vm.provider "virtualbox" do |vb|
    # Display the VirtualBox GUI when booting the machine
    vb.gui = false
    # Customize the amount of memory on the VM:
    vb.memory = "4096"
  end
  #
  # View the documentation for the provider you are using for more
  # information on available options.

  # Enable provisioning with a shell script. Additional provisioners such as
  # Ansible, Chef, Docker, Puppet and Salt are also available. Please see the
  # documentation for more information about their specific syntax and use.
  config.vm.provision "shell", inline: <<-SHELL
    wget -c https://gomirrors.org/dl/go/go1.16.3.linux-amd64.tar.gz -O - | sudo tar -xz -C /usr/local
    echo 'export PATH=$PATH:/usr/local/go/bin' > /etc/profile
    echo 'export GOPROXY=https://goproxy.io,direct' > /etc/profile
    echo 'export GOPROXY=https://goproxy.io,direct' > /etc/profile
    source /etc/profile
  SHELL
end