最近做的是蓝牙的项目在开发过程中有了很多或深或浅的认识,这里分享给大家,共勉!
这里的基础篇主要讲一下最基础的iOS蓝牙开发。
蓝牙连接可以大致分为以下几个步骤
1.建立一个Central Manager实例进行蓝牙管理
2.搜索外围设备
3.连接外围设备
4.获得外围设备的服务
5.获得服务的特征
6.从外围设备读数据
7.给外围设备发送数据
第一步:建立中心管理者进行蓝牙管理
在使用蓝牙的地方导入#import
并签订协议CBCentralManagerDelegate,CBPeripheralDelegate
- (void)useBlueTooth
{
    //初始化
    //CBCentralManager是蓝牙中心的管理类,控制着蓝牙的扫描,连接,蓝牙状态的改变。
    self.centralManager = [[CBCentralManager alloc]initWithDelegate:self queue:nil options:nil];
    //扫描设备
  [self.centralManager scanForPeripheralsWithServices:nil options:nil];
 }
#pragma mark CBCentralManagerDelegate
- (void)centralManagerDidUpdateState:(CBCentralManager *)central
{
    CBManagerState state = central.state;
    NSString *stateString = nil;
    switch(state)
    {
        case CBManagerStateResetting:
            stateString = @"CBManagerStateResetting";
            break;
        case CBManagerStateUnsupported:
            stateString = @"CBManagerStateUnsupported";
            break;
        case CBManagerStateUnauthorized:
            stateString = @"CBManagerStateUnauthorized";
            break;
        case CBManagerStatePoweredOff:
            stateString = @"CBManagerStatePoweredOff";
            break;
        case CBManagerStatePoweredOn:
            stateString = @"CBManagerStatePoweredOn";
            break;
        case CBManagerStateUnknown:
        default:
            stateString = @"CBManagerStateUnknown";
    }
    NSLog(@"蓝牙状态:%@",stateString);
}
打印结果:
what?
[CoreBluetooth] API MISUSE:
查阅资料:https://stackoverflow.com/questions/23338767/ios-core-bluetooth-getting-api-misuse-warning
只有在确定蓝牙打开的情况下,才可以调用扫描的方法
那下面那就又是什么鬼?
[CoreBluetooth] XPC connection invalid
查阅资料:http://www.jianshu.com/p/ec659ffcacfe
发现创建出的CBCentralManager实例必须被VC所持有,如果是封装出来的类,该实例也必须被VC所持有,
使用时:
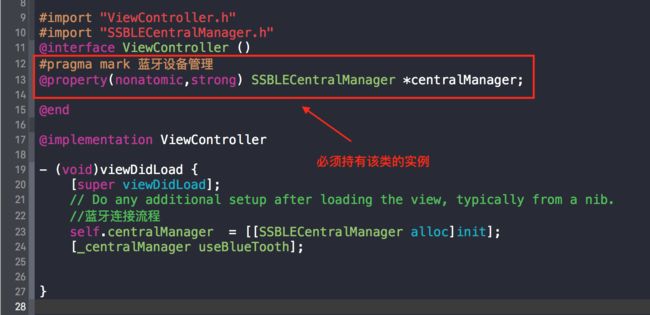
从打印结果可以看出现在可以了

第二步:搜索外设
根据上面的试验,要在确认蓝牙连接的情况下,扫描并打印外设
#pragma mark 扫描外设
- (void)scan
{
        [self.centralManager scanForPeripheralsWithServices:nil options:nil];

}
//扫描到设备会调用
- (void)centralManager:(CBCentralManager *)central didDiscoverPeripheral:(CBPeripheral *)peripheral advertisementData:(NSDictionary *)advertisementData RSSI:(NSNumber *)RSSI
{
       NSLog(@"peripheral:%@",peripheral);

}
这里扫描外设会看到这种各样的蓝牙外设,还会有自己的笔记本电脑
注意:蓝牙连接过的设备扫描不上,需要在设置—蓝牙—忽略该设备
第三步:蓝牙连接
扫描到设备后,如果有目标设备,就需要蓝牙连接该设备,但是扫描到的设备很多很多,而且会有重复的,这里可以通过设备的名字来匹配是否是目标设备,然后选择是否连接。一般APP中会让用户自己选择连接哪个手环。
#pragma mark CBCentralManagerDelegate
//连接成功的回调
- (void)centralManager:(CBCentralManager *)central didConnectPeripheral:(CBPeripheral *)peripheral
{
    NSLog(@"连接成功peripheral:%@",peripheral);

    //连接成功之后寻找服务,传nil会寻找所有服务
    [peripheral discoverServices:nil];
    self.peripheral = peripheral;
    peripheral.delegate = self;
}
//连接失败的回调
- (void)centralManager:(CBCentralManager *)central didFailToConnectPeripheral:(CBPeripheral *)peripheral error:(NSError *)error
{
    NSLog(@"连接失败peripheral:%@",peripheral);

}
//断开连接的回调
- (void)centralManager:(CBCentralManager *)central didDisconnectPeripheral:(CBPeripheral *)peripheral error:(NSError *)error
{
    NSLog(@"断开连接peripheral:%@",peripheral);
}
//扫描到设备会调用
- (void)centralManager:(CBCentralManager *)central didDiscoverPeripheral:(CBPeripheral *)peripheral advertisementData:(NSDictionary *)advertisementData RSSI:(NSNumber *)RSSI
{
//    NSLog(@"peripheral:%@",peripheral);
    //手环测试
    if ([peripheral.name isEqualToString:@"NAME"]) {
        NSLog(@"扫描到peripheral:%@,advertisementData:%@",peripheral,advertisementData);

        //发起连接
        [self.centralManager connectPeripheral:peripheral options:nil];

        //必须引用要不会报错
        self.peripheral = peripheral;
    }

}

连接状态的回调也可以清楚的看到,连接成功的话,我们就可以搜索外设的服务;连接失败会回调,可以打印查看为何失败。
第四步:获得蓝牙的服务
连接成功后,可以获得蓝牙的服务
蓝牙的各个服务,可以理解为蓝牙提供的数据分类,特征是具体的各个数据
#pragma mark CBCentralManagerDelegate
//连接成功的回调
- (void)centralManager:(CBCentralManager *)central didConnectPeripheral:(CBPeripheral *)peripheral
{
    NSLog(@"连接成功peripheral:%@",peripheral);

    //连接成功之后寻找服务,传nil会寻找所有服务
    [peripheral discoverServices:nil];
    self.peripheral = peripheral;
    peripheral.delegate = self;
}

//发现服务的回调
- (void)peripheral:(CBPeripheral *)peripheral didDiscoverServices:(NSError *)error
{
    NSLog(@"self.peripheral.services:%@",peripheral.services);

    NSLog(@"error:%@",error);
}

这里具体的服务定义要看蓝牙协议,其中的UUID是唯一识别服务的。
第五步:获得蓝牙的特征
发现服务后我们可以搜索服务下的特征,一般一个服务下都包含多个特征
//发现服务的回调
- (void)peripheral:(CBPeripheral *)peripheral didDiscoverServices:(NSError *)error
{
    NSLog(@"self.peripheral.services:%@",peripheral.services);

    NSLog(@"error:%@",error);
    if (!error) {
        for (CBService *service in peripheral.services) {
//            NSLog(@"发现服务serviceUUID:%@", service.UUID.UUIDString);
                //发现特定服务的特征值
                [service.peripheral discoverCharacteristics:nil forService:service];

        }

    }
}
//发现特征回调
- (void)peripheral:(CBPeripheral *)peripheral didDiscoverCharacteristicsForService:(CBService *)service error:(NSError *)error
{
    for (CBCharacteristic *characteristic in service.characteristics) {
          NSLog(@"发现特征:%@",characteristic);
        //订阅
        [self.peripheral setNotifyValue:YES forCharacteristic:characteristic];


    }
}
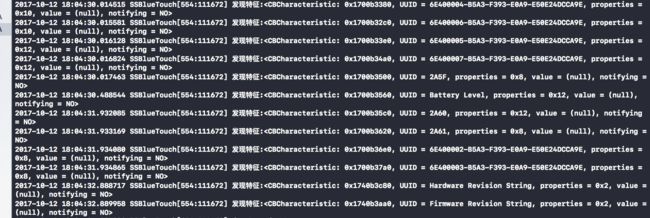
特征也包含唯一识别的UUID
第六步:获得蓝牙数据,解析蓝牙数据
无论是read还是notify都是在这个方法获得数据
//数据接收的回调
- (void)peripheral:(CBPeripheral *)peripheral didUpdateValueForCharacteristic:(CBCharacteristic *)characteristic error:(NSError *)error {
        //获取订阅特征回复的数据
    NSData *data = characteristic.value;
    //获得数据的字节长度
    NSUInteger dataLength = data.length;

    NSLog(@"dataLength:%lu",dataLength);
    NSLog(@"UDID:%@,data:%@",characteristic.UUID,data);

}

这里我们已经获得了蓝牙的部分数据,但是这一串的是个什么鬼?原来蓝牙传过来的数据并不是我们平时的10进制数据,是16进制的数据,我们需要根据蓝牙协议进行解析,如果没有协议,那就看代码吧!跟我一样,哈哈!
比如分段计步的蓝牙数据是这样的。每2位数代表一个字节的16进制数据,蓝牙协议规定分段计步是14个字节,这里总共是28位数。
第七步:蓝牙数据的写入
这里我们试一下里程、热量是否显示的设置的写
数据的写入也是要看协议的,如果没有协议,看代码吧。
//发现特征回调
- (void)peripheral:(CBPeripheral *)peripheral didDiscoverCharacteristicsForService:(CBService *)service error:(NSError *)error
{
for (CBCharacteristic *characteristic in service.characteristics) {
NSLog(@"发现特征:%@",characteristic);
//订阅
[self.peripheral setNotifyValue:YES forCharacteristic:characteristic];

](http://upload-images.jianshu.io/upload_images/2519635-379e65d2cc1e2f9f.png?imageMogr2/auto-orient/strip%7CimageView2/2/w/1240)
](http://upload-images.jianshu.io/upload_images/2519635-cb9c524dfd1ddb53.png?imageMogr2/auto-orient/strip%7CimageView2/2/w/1240)
](http://upload-images.jianshu.io/upload_images/2519635-1a3d5be07e58b248.png?imageMogr2/auto-orient/strip%7CimageView2/2/w/1240)
](http://upload-images.jianshu.io/upload_images/2519635-de9772803e8d6909.png?imageMogr2/auto-orient/strip%7CimageView2/2/w/1240)
](http://upload-images.jianshu.io/upload_images/2519635-115bade4a14ca3ee.png?imageMogr2/auto-orient/strip%7CimageView2/2/w/1240)
NSString *settingString = [NSString stringWithFormat:@"4|%d|%d|%d|0000000", 0, 0,0];
NSData *sendData = [settingString dataUsingEncoding:NSUTF8StringEncoding];
//该设置的服务UUID
CBUUID *timeSyncServiceUUID = [CBUUID UUIDWithString:@"1820"];
//该特征的UUID
CBUUID *timeSyncCharacteristicUUID = [CBUUID UUIDWithString:@"6e400003-b5a3-f393-e0a9-e50e24dcca9e"];
for(CBService *service in self.peripheral.services)
{
// NSLog(@"self.peripheral.services:%@",service);
if ([service.UUID isEqual: timeSyncServiceUUID]) {
for(CBCharacteristic *characteristic in service.characteristics)
{
if([characteristic.UUID isEqual:timeSyncCharacteristicUUID])
{
// NSLog(@"sendData:%@",sendData);
//写入数据
[peripheral writeValue:sendData forCharacteristic:characteristic type:CBCharacteristicWriteWithResponse];
}
}
}
}
}
}
//是否写入成功的代理
- (void)peripheral:(CBPeripheral *)peripheral didWriteValueForCharacteristic:(CBCharacteristic *)characteristic error:(NSError *)error{
if (error) {
NSLog(@"===写入错误:%@",error);
}else{
NSLog(@"===写入成功%@",characteristic);
}
}

蓝牙授权的问题
根据苹果文档中所说的,APP没有蓝牙授权是无法访问外设数据,然而我发现我们有授权APP,APP依然可以访问外设的数据,为什么?

感谢以下博客的作者的分享!
参考资料
基础:http://www.cocoachina.com/ios/20150915/13454.html
实现:http://www.jianshu.com/p/f7a53b3a0fc8
解析:http://www.jianshu.com/p/1f41e6fe06bf
http://www.jianshu.com/p/1b3c8fc6995a
苹果:https://developer.apple.com/bluetooth/
https://developer.apple.com/hardwaredrivers/BluetoothDesignGuidelines.pdf
https://learn.adafruit.com/introduction-to-bluetooth-low-energy?view=all
https://race604.com/gatt-profile-intro/