Python 支持向量机
学习目标:
Python代码实现向量机
学习内容:
支持向量机,是属于统计学习中的一种常见算法,但这种算法如果使用计算器计算的话也是浪费时间,哪怕是用计算机计算,也会很麻烦,所以使用代码来进行计算,简单快捷。
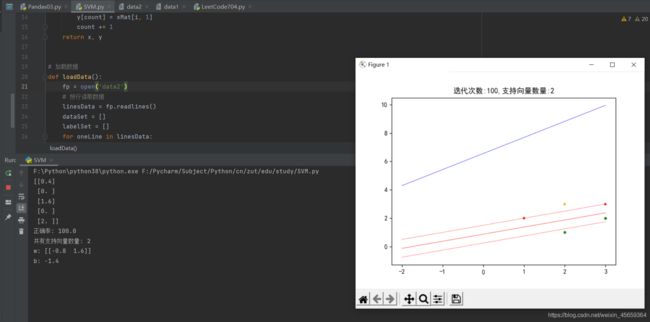
要实现的功能也很简单,我们传入一个文件,文件中写有相关数据,然后代码自动计算w和b在,以及其它的一些参数,如下图,是我们的实现结果

代码实现:
直接上代码吧
from numpy import *
import matplotlib.pyplot as plt
from sklearn import svm


def getDataArray(lists, xMat):
    x = np.ndarray(len(lists))
    y = np.ndarray(len(lists))
    count = 0
    for i in lists:
        x[count] = xMat[i, 0]
        y[count] = xMat[i, 1]
        count += 1
    return x, y


# 加载数据
def loadData():
    fp = open('data2')
    # 按行读取数据
    linesData = fp.readlines()
    dataSet = []
    labelSet = []
    for oneLine in linesData:
        oneLine = oneLine.split(',')
        dataSet.append([float(oneLine[0].strip()), float(oneLine[1].strip())])
        labelSet.append(float(oneLine[2].strip()))
    return dataSet, labelSet


class SVM:
    def __init__(self, xSet, yArray, C=None, floatingPointError=0.0001):
        self.xMat = np.mat(xSet)  # (48,2)
        self.yMat = np.mat(yArray).T  # (48,1)
        self.rows = self.xMat.shape[0]
        self.cols = self.xMat.shape[1]
        self.alpha = np.mat(np.zeros(self.rows)).T  # (48,1)
        self.w = None  # 最后返回,计算过程不需要
        self.b = 0
        self.C = C  # C=None时表示hard margin
        self.fpe = floatingPointError

        self.trainCount = 0  # 记录训练次数
        self.K = np.matmul(self.xMat, self.xMat.transpose())
        # Ei 缓存
        self.EiCatch = np.zeros(self.rows)
        self.updateEi_catch()

    def predict(self, xArray):
        resultList = []
        for i in range(len(xArray)):
            v = np.sum(np.multiply(xArray[i], self.w)) + self.b
            if v > 0:
                resultList.append(1)
            else:
                resultList.append(-1)
        return resultList

    def score(self, xArray, yArray):
        resultList = self.predict(xArray)
        count = 0
        for i in range(len(yArray)):
            if resultList[i] == yArray[i]:
                count += 1
        return round(count / len(yArray) * 100, 2)

    def train(self, maxCount, debug):
        self.trainCount = 0
        while self.trainCount < maxCount:
            self.update_allPoints(debug)
            self.trainCount += 1
        # 打印alpha信息
        print(self.alpha)

        return self.w, self.b

    def update_allPoints(self, debug=None):
        count = 0
        for alpha2_index in range(self.rows):
            if self.check_alpha2_needUpdate(alpha2_index):
                alpha1_index = self.selectAlpha1_index(alpha2_index)
                self.update_alpha_and_b(alpha1_index, alpha2_index)

                # 计算w
                self.w = np.matmul(np.multiply(self.yMat, self.alpha).T, self.xMat)
                if debug:
                    # 打印alpha信息
                    print(self.alpha)
                    # 画图
                    self.classifyDataAndPlot()
                    print("调整次数:{}".format(count + 1))
                    count += 1
                    # 打印ei信息
                    print(self.EiCatch)

    def check_alpha2_needUpdate(self, alpha2_index):
        Ei = self.EiCatch[alpha2_index]
        yi = self.yMat[alpha2_index, 0]
        alpha2 = self.alpha[alpha2_index, 0]
        fx = self.cal_Fx(alpha2_index)

        if alpha2 < 0 or alpha2 > self.C:
            return True

        if yi == 1 and fx >= 1:
            return False
        elif yi == -1 and fx <= -1:
            return False

        # 再来看看是否有足够的空间调整
        # Ei不为零的,alpha应该是0如果不是就要调整,alpha2调整量就是 -yi*Ei,如果是正的, alpha增加,但如果已经是C的话就不用处理了

        alpha2_change_direction = -yi * Ei
        if alpha2_change_direction > self.fpe and alpha2 < self.C:
            return True
        elif alpha2_change_direction < -self.fpe and alpha2 > 0:
            return True
        else:
            return False

    def update_alpha_and_b(self, alpha1_index, alpha2_index):
        alpha1_old = self.alpha[alpha1_index, 0]
        alpha2_old = self.alpha[alpha2_index, 0]
        y1 = self.yMat[alpha1_index, 0]
        y2 = self.yMat[alpha2_index, 0]

        alpha2_new_chiped = self.get_alpha2_new_chiped(alpha1_index, alpha2_index)
        alpha1_new = alpha1_old + y1 * y2 * (alpha2_old - alpha2_new_chiped)
        b_new = self.get_b_new(alpha1_index, alpha2_index, alpha1_new, alpha2_new_chiped)
        # 最后更新数据
        alpha2_new_chiped = round(alpha2_new_chiped, 5)
        alpha1_new = round(alpha1_new, 5)
        b_new = round(b_new, 5)

        self.alpha[alpha1_index, 0], self.alpha[alpha2_index, 0] = alpha1_new, alpha2_new_chiped
        self.b = b_new
        # 更新EiCatch
        self.updateEi_catch()
        return True

    def get_b_new(self, alpha1_index, alpha2_index, alpha1_new, alpha2_new_chiped):
        alpha1_old = self.alpha[alpha1_index, 0]
        alpha2_old = self.alpha[alpha2_index, 0]
        y1 = self.yMat[alpha1_index, 0]
        y2 = self.yMat[alpha2_index, 0]
        K11 = self.K[alpha1_index, alpha1_index]
        K12 = self.K[alpha1_index, alpha2_index]
        K22 = self.K[alpha2_index, alpha2_index]
        E1 = self.EiCatch[alpha1_index]
        E2 = self.EiCatch[alpha2_index]
        b1New = self.b - E1 + y1 * K11 * (alpha1_old - alpha1_new) + y2 * K12 * (alpha2_old - alpha2_new_chiped)
        b2New = self.b - E2 + y1 * K12 * (alpha1_old - alpha1_new) + y2 * K22 * (alpha2_old - alpha2_new_chiped)
        # 只有符合的alpha_new用来调整b
        if self.C is None:
            alpha1_valid = True if 0 < alpha1_new < self.fpe else False
            alpha2_valid = True if 0 < alpha2_new_chiped else False
        else:
            alpha1_valid = True if 0 < alpha1_new < self.C else False
            alpha2_valid = True if 0 < alpha2_new_chiped < self.C else False
        if alpha1_valid:
            b = b1New
        elif alpha2_valid:
            b = b2New
        else:
            b = (b1New + b2New) / 2
        return b

    def check_kkt_status(self):
        # yi和alpha的乘积和为0
        if not (-self.fpe < np.sum(np.multiply(self.yMat, self.alpha)) < self.fpe):
            return False
        # 然后检查每个alpha
        for i in range(len(self.alpha)):
            if self.check_satisfiy_kkt_onePoint(i) == False:
                return False
        return True

    def cal_Ei(self, index):
        v = self.cal_Fx(index) - self.yMat[index, 0]
        return round(v, 5)

    def cal_Fx(self, index):
        # (1,48) * (48,1)=1
        v = float(np.multiply(self.alpha, self.yMat).T * self.K[:, index] + self.b)
        return round(v, 5)

    def updateEi_catch(self):
        # alpha变动的时候更新
        for i in range(self.rows):
            v = self.cal_Ei(i)
            self.EiCatch[i] = v
        return True

    def check_alpha2_vaild(self, alpha1_index, alpha2_index, Ei_list):
        # 计算更新量是否足够
        if alpha1_index == alpha2_index:
            return False
        alpha2_new_chiped = self.get_alpha2_new_chiped(alpha1_index, alpha2_index, Ei_list)
        alpha2_old = self.alpha[alpha2_index, 0]
        if None == alpha2_new_chiped:
            return False
        else:
            if abs(alpha2_new_chiped - alpha2_old) > self.fpe:
                return True
            else:
                return False

    def get_alpha2_new_chiped(self, alpha1_index, alpha2_index):
        alpha2_old = self.alpha[alpha2_index, 0]
        y2 = self.yMat[alpha2_index, 0]
        E1 = self.EiCatch[alpha1_index]
        E2 = self.EiCatch[alpha2_index]
        eta = self.K[alpha1_index, alpha1_index] + self.K[alpha2_index, alpha2_index] - 2.0 * self.K[
            alpha1_index, alpha2_index]
        if eta == 0:
            return None
        try:
            alpha2_new_unc = alpha2_old + (y2 * (E1 - E2) / eta)
            alpha2_new_chiped = self.get_alpha2_chiped(alpha2_new_unc, alpha1_index, alpha2_index)
        except:
            print()

        return alpha2_new_chiped

    def get_alpha2_chiped(self, alpha2_new_unc, alpha1_index, alpha2_index):
        y1 = self.yMat[alpha1_index, 0]
        y2 = self.yMat[alpha2_index, 0]
        alpha1 = self.alpha[alpha1_index, 0]
        alpha2 = self.alpha[alpha2_index, 0]

        if self.C is None:
            # hard margin
            if y1 == y2:
                H = alpha1 + alpha2
                L = 0
            else:
                H = None
                L = max(0, alpha2 - alpha1)
        else:
            # soft margin
            if y1 == y2:
                H = min(self.C, alpha1 + alpha2)
                L = max(0, alpha1 + alpha2 - self.C)
            else:
                H = min(self.C, self.C - alpha1 + alpha2)
                L = max(0, alpha2 - alpha1)

        alpha2_new_chiped = None
        if alpha2_new_unc < L:
            alpha2_new_chiped = L
        else:
            if H is None:
                alpha2_new_chiped = alpha2_new_unc
            else:
                if alpha2_new_unc > H:
                    alpha2_new_chiped = H
                else:
                    alpha2_new_chiped = alpha2_new_unc
        return alpha2_new_chiped

    def classifyDataAndPlot(self):
        # 把支持向量取出来
        sv_array = []
        for i in range(self.rows):
            if 0 < self.alpha[i] < self.C:
                sv_array.append(i)
        print("共有支持向量数量:", len(sv_array))

        # 把点区分为四种,正负例并区分是否是支持向量
        sv_positive_list = []
        sv_negtive_list = []
        no_sv_negtive_list = []
        no_sv_positive_list = []

        for i in range(self.rows):
            yi = self.yMat[i, 0]
            if i in sv_array:
                if yi == 1:
                    sv_positive_list.append(i)
                else:
                    sv_negtive_list.append(i)
            else:
                if yi == 1:
                    no_sv_positive_list.append(i)
                else:
                    no_sv_negtive_list.append(i)

        # 画点
        sv_p_x, sv_p_y = getDataArray(sv_positive_list, self.xMat)
        sv_n_x, sv_n_y = getDataArray(sv_negtive_list, self.xMat)
        nosv_p_x, nosv_p_y = getDataArray(no_sv_positive_list, self.xMat)
        nosv_n_x, nosv_n_y = getDataArray(no_sv_negtive_list, self.xMat)

        plt.scatter(sv_p_x, sv_p_y, s=20, marker="+", c="r")
        plt.scatter(sv_n_x, sv_n_y, s=20, marker="*", c="blue")
        plt.scatter(nosv_p_x, nosv_p_y, s=20, marker="+", c="orange")
        plt.scatter(nosv_n_x, nosv_n_y, s=20, marker="*", c="g")

        # 画线
        # w0=self.w[0,0].flatten
        print("w:", self.w)
        print("b:", self.b)

        # 画 wx+b=0的实线
        X1 = np.linspace(-2, 3, 2).reshape(2, 1)
        X2_0 = (0 - self.b - self.w[0, 0] * X1) / self.w[0, 1]
        plt.plot(X1, X2_0, color='red', linewidth=0.5, linestyle="-")

        # 画wx+b=+1和wx+b=-1的虚线
        X2_positive = (1 - self.b - self.w[0, 0] * X1) / self.w[0, 1]
        X2_negtive = (-1 - self.b - self.w[0, 0] * X1) / self.w[0, 1]
        plt.plot(X1, X2_positive, color='red', linewidth=0.5, linestyle="--")
        plt.plot(X1, X2_negtive, color='red', linewidth=0.5, linestyle="--")

        # sklearn,数据是跑sklearn出来的 用这个方法 runWithSkleran
        sk = [-0.93105886, 0.82281036]
        skLearnW = np.array(sk)
        skLearnB = -5.39363898
        X2_sklearn = (0 - skLearnB - skLearnW[0] * X1) / skLearnW[1]
        plt.plot(X1, X2_sklearn, color='blue', linewidth=0.5, linestyle="-")

        # # 在我的 notebook 里,要设置下面两行才能显示中文
        plt.rcParams['font.family'] = ['sans-serif']
        # 如果是在 PyCharm 里,只要下面一行,上面的一行可以删除
        plt.rcParams['font.sans-serif'] = ['SimHei']
        plt.rcParams['axes.unicode_minus'] = False  # 解决保存图像是负号'-'显示为方块的问题
        title = "迭代次数:" + str(self.trainCount) + ",支持向量数量:" + str(len(sv_array))
        plt.title(title)

        plt.show()

    def selectJrand(self, i):
        j = i
        while i == j:
            j = int(np.random.uniform(0, self.rows))
        return j

    def selectAlpha1_index(self, alpha2_index):
        # 非零alpha的是sv的几率大
        E2 = self.EiCatch[alpha2_index]
        nonZeroList = []
        for i in range(self.rows):
            alpha = self.alpha[i, 0]
            if 0 < alpha < self.C:
                nonZeroList.append(i)

        if len(nonZeroList) == 0:
            return self.selectJrand(alpha2_index)
        else:
            maxDiff = 0
            j = -1
            for i in range(len(nonZeroList)):
                row = nonZeroList[i]
                if row == alpha2_index:
                    continue
                else:
                    E1 = self.EiCatch[row]
                    if abs(E1 - E2) > maxDiff:
                        maxDiff = abs(E1 - E2)
                        j = row
            if j == -1:
                return self.selectJrand(alpha2_index)
            else:
                return j


def runWithSkleran(trainX, trainY):
    classifier = svm.SVC(kernel='linear')

    classifier.fit(trainX, trainY)
    value_predict = classifier.predict(trainX)
    count = 0
    errIndex = []
    for i in range(len(value_predict)):
        predict = value_predict[i]
        if predict == trainY[i]:
            count += 1
        else:
            errIndex.append(i)

    print("准确率{:.2%}".format(count / len(trainY)))
    print("err:", errIndex)
    print('Coefficients:%s, intercept %s' % (classifier.coef_, classifier.intercept_))
    print('Score: %.2f' % classifier.score(trainX, trainY))

    return classifier.coef_[0], classifier.intercept_[0]


def runMySvm():
    xSet, ySet = loadData()
    classifier = SVM(xSet, ySet, C=2)

    # debug模式每次迭代更新一次图,可以看动画的效果
    w, b = classifier.train(100, debug=False)
    score = classifier.score(xSet, ySet)
    print("正确率:", score)
    classifier.classifyDataAndPlot()


def runSklearn():
    trainX, trainY = loadData()
    w, b = runWithSkleran(trainX, trainY)
    print("w", w)
    print("b", b)


if __name__ == '__main__':
    import sys

    runMySvm()
    sys.exit()
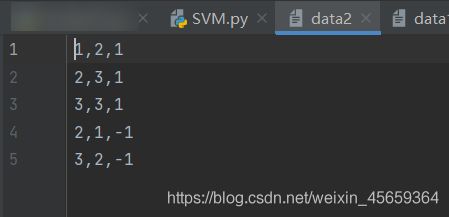
代码很复杂,我们在开头传入一个data2文件,数据格式如下图

提示,data2文件和代码文件要放在同一级目录下
学习总结:
支持向量机是很麻烦的一种统计方法,计算繁琐,所以可以使用代码来进行计算,相较于朴素贝叶斯、决策树这些算法,个人认为支持向量机很难