安装
前提:安装了python,我这里是python3
下载
按照官网:
pip3 install apache-airflow
包太多,下载太慢
改为清华的镜像:
pip3 install -i https://pypi.tuna.tsinghua.edu.cn/simple apache-airflow
又有包找不到
最后用豆瓣的镜像(注意要加trusted):
pip3 install apache-airflow -i http://pypi.douban.com/simple/ --trusted-host pypi.douban.com
下载非常快。
【报错】
unable to execute 'gcc': No such file or directory
error: command 'gcc' failed with exit status 1
【解决办法】
yum install -y zlib-devel bzip2-devel openssl-devel ncurses-devel sqlite-devel readline-devel tk-devel gcc make
【报错】
psutil/_psutil_common.c:9:20: fatal error: Python.h: No such file or directory
#include
^
compilation terminated.
error: command 'gcc' failed with exit status 1
【解决办法】
yum install python3-devel
修改后台数据库
- 首次运行
安装完以后,先运行一次:
airflow initdb
这时会创建好默认的配置文件,在~/airflow.cfg。 - 修改配置
将~/airflow.cfg中的:
1.executor = LocalExecutor
2.sql_alchemy_conn =  mysql://root:[email protected]/airflow?charset=utf8mb4
(**注意:需要提前在mysql中把数据库airflow创建好**)
(如果用pgsql,连接串为:postgresql+psycopg2://user:password@hostname/database_name)
- 然后再次initdb
airflow initdb
【报错】
ModuleNotFoundError: No module named 'MySQLdb'
【解决办法】
pip3 install mysqlclient
【又报错】
OSError: mysql_config not found
【解决办法】
yum install mysql-devel
pip install mysqlclient
启动web GUI
airflow webserver -p 8090 -D
(因为8080被占用了)

这时候就可以在web页面管理了:登录http://127.0.0.1:8090
启动调度器
airflow scheduler -D

启停
重启webserver和scheduler
su airflow
ps -ef|egrep 'scheduler|airflow-webserver'|grep -v grep|awk '{print $2}'|xargs kill -9
rm -rf /root/airflow/airflow-scheduler.pid
airflow webserver -p 8080 -D
airflow scheduler -D
tail -f /root/airflow/airflow-scheduler.err
重启worker
su airflow
ps -ef|egrep 'serve_logs|celeryd'|grep -v grep
rm -rf /home/airflow/airflow/airflow-worker.pid
airflow worker -D
tail -f /home/airflow/airflow/airflow-worker.err 什么也不打印就是没有问题
command layout: command subcommand dag_id task_id date
命令格式: 命令 子命令 dagid 命令id 日期
创建第一个DAG
我的数仓是建设在clickhouse上面的,所以这里我就用一个ETL任务来实验。
- 注意到在配置文件中,有如下配置
[core]
dags_folder = /root/airflow/dags
所以在/root/airflow/目录下创建dags这个目录,然后把脚本放进去(包括python脚本和shell,sql等都放进去,方便调度):

- 照着官方的教学编写第一个dag python,我这里取名叫dag_jw.py:
#
# Licensed to the Apache Software Foundation (ASF) under one
# or more contributor license agreements.  See the NOTICE file
# distributed with this work for additional information
# regarding copyright ownership.  The ASF licenses this file
# to you under the Apache License, Version 2.0 (the
# "License"); you may not use this file except in compliance
# with the License.  You may obtain a copy of the License at
#
#   http://www.apache.org/licenses/LICENSE-2.0
#
# Unless required by applicable law or agreed to in writing,
# software distributed under the License is distributed on an
# "AS IS" BASIS, WITHOUT WARRANTIES OR CONDITIONS OF ANY
# KIND, either express or implied.  See the License for the
# specific language governing permissions and limitations
# under the License.

"""
### Tutorial Documentation
Documentation that goes along with the Airflow tutorial located
[here](https://airflow.apache.org/tutorial.html)
"""
# [START ]
from datetime import timedelta,datetime

# [START import_module]
# The DAG object; we'll need this to instantiate a DAG
from airflow import DAG
# Operators; we need this to operate!
from airflow.operators.bash_operator import BashOperator
from airflow.utils.dates import days_ago

import pendulum

local_tz = pendulum.timezone("Asia/Shanghai")

# [END import_module]

# [START default_args]
# These args will get passed on to each operator
# You can override them on a per-task basis during operator initialization
default_args = {
    'owner': 'airflow',
    'start_date': datetime(2020, 2, 25, tzinfo=local_tz),
    'retries': 1,
    'retry_delay': timedelta(minutes=5),
    # 'queue': 'bash_queue',
    # 'pool': 'backfill',
    # 'priority_weight': 10,
    # 'end_date': datetime(2016, 1, 1),
    # 'wait_for_downstream': False,
    # 'dag': dag,
    # 'sla': timedelta(hours=2),
    # 'execution_timeout': timedelta(seconds=300),
    # 'on_failure_callback': some_function,
    # 'on_success_callback': some_other_function,
    # 'on_retry_callback': another_function,
    # 'sla_miss_callback': yet_another_function,
    # 'trigger_rule': 'all_success'
}
# [END default_args]

# [START instantiate_dag]
dag = DAG(
    'dag_jw',
    default_args=default_args,
    description='clickhouse ETL jobs',
    schedule_interval=timedelta(days=1),
    tags=['order'],
)
# [END instantiate_dag]

# t1, t2 and t3 are examples of tasks created by instantiating operators
# [START basic_task]
t1 = BashOperator(
    task_id='imp_ods_dwd_jw_querydoc_order_ps_d',
    bash_command='sh ./scripts/imp_ods_dwd_jw_querydoc_order_ps_d.sh %s'%datetime.now(tz=local_tz).strftime("%Y-%m-%d"),
    dag=dag,
)

t2 = BashOperator(
    task_id='imp_dwd_dws_jw_order_ps_d_querydoc',
    depends_on_past=False,
    bash_command='sh ./scripts/imp_dwd_dws_jw_order_ps_d_querydoc.sh %s'%datetime.now(tz=local_tz).strftime("%Y-%m-%d"),
    retries=3,
    dag=dag,
)
# [END basic_task]

# [START documentation]
dag.doc_md = __doc__

t1.doc_md = """\
#### Task Documentation
订单类别:querydoc
step:ods层导入dwd
"""
# [END documentation]

t1 >> [t2]
# [END ]
在这个脚本中,我创建了两个task:t1和t2 , 分别调用了./script下面的两个shell。
shell脚本类似于:
#!/usr/bin/bash
dt=$1
echo ${dt}
clickhouse-client --host=192.168.11.100 --user=default --password=XX66xxx123 -m --multiquery -q"
insert into dws.v_dws_jw_order_ps_d(
    dt
    ,order_type
    ,order_id
...
"
我这里贴出来主要是为了备忘CK的命令行执行SQL的参数(-m -n -q "")。
然后这两个脚本的依赖关系是t2依赖于t1(因为先要从ODS层导入数据到DWD层,再从DWD导数据到DWS,这只是个简化流程,用于测试)
另外请忽略我在脚本中直接使用明文密码。
- 编好python脚本后,就执行它:
python3 dag_jw.py
【报错】
注意,如果这里遇到报错说
无法导入from airflow.operators.bash import BashOperator,
就照着我上面改:
from airflow.operators.bash_operator import BashOperator
执行完毕后,可以用:
airflow list dags看到刚刚创建的dag:
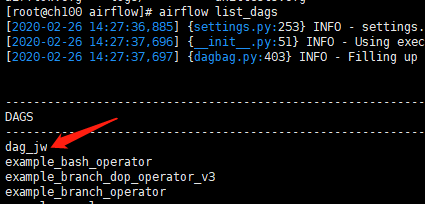
这样就创建成功了。
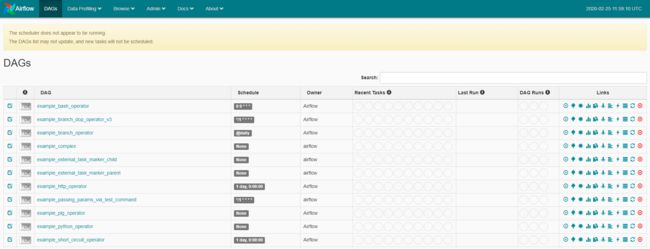
当然,去web上面看更方便:
注意到,这里显示的时间跟我在py文件中定义的时间相差8小时,没关系,因为官方文档上说目前web server只支持UTC时区。 所以看的时候心里面+8小时就行了。
调试
非常尴尬的是,正在我写此文的时候,作业跑完了,但是failed了。我去看看先。
在/root/airflow/logs下面可以找到相关日志(当然在web上也可以):

原来是我在python中使用的相对目录找不到。看来是我理解错误,那个.py脚本仅仅是用来创建DAG的,并不是实际运行的,所以我还是改成绝对目录试试。
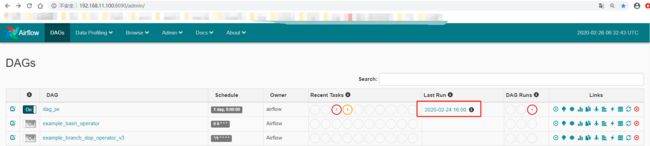
-
首先在web上把failed的dag删了,然后重新执行python3 dag_jw.py:
 完美收官
完美收官
好了,Airflow初次体验,完美收官。