SpringBoot整合Swagger2(完整版)
写在前面: 从2018年底开始学习SpringBoot,也用SpringBoot写过一些项目。这里对学习Springboot的一些知识总结记录一下。如果你也在学习SpringBoot,可以关注我,一起学习,一起进步。
相关文章:
【Springboot系列】Springboot入门到项目实战
文章目录
-
- Swagger简介
-
- 1、为什么要用Swagger
- 2、Swagger简介
- Springboot整合Swagger
-
- 1、项目结构
- 2、Swagger依赖
- 3、Swagger配置文件
- 4、测试控制器
- 5、Swagger页面访问
- 6、SpringSecurity中配置
Swagger简介
1、为什么要用Swagger
在平时开发中,一个好的API文档可以减少大量的沟通成本,还可以帮助新加入项目的同事快速上手业务。大家都知道平时开发时,接口变化总是很多,有了变化就要去维护,也是一件比较头大的事情。尤其是现在前后端分离情况,更容易造成文档和代码不一致。这时,我们可以通过Swagger2来使接口规范,方便维护。
2、Swagger简介
Swagger是一款Restful接口的文档在线自动生成和功能测试功能软件。
Swagger是一个规范和完整的框架,用于生成、描述、调用和可视化Restful风格的Web服务。总体目标是使客户端和文件系统作为服务器以同样的速度来更新文件的方法,参数和模型紧密集成到服务器端的代码,允许API来始终保持同步。
Springboot整合Swagger
1、项目结构
2、Swagger依赖
    io.springfox
    springfox-swagger-ui
    2.9.2


    io.springfox
    springfox-swagger2
    2.9.2
3、Swagger配置文件
import org.springframework.beans.factory.annotation.Value;
import org.springframework.context.annotation.Bean;
import org.springframework.context.annotation.Configuration;
import springfox.documentation.builders.ApiInfoBuilder;
import springfox.documentation.builders.PathSelectors;
import springfox.documentation.builders.RequestHandlerSelectors;
import springfox.documentation.service.ApiInfo;
import springfox.documentation.spi.DocumentationType;
import springfox.documentation.spring.web.plugins.Docket;
import springfox.documentation.swagger2.annotations.EnableSwagger2;

/**
 1. swagger配置类
 */
@Configuration
@EnableSwagger2
public class SwaggerConfig {
    @Bean
    public Docket createRestApi() {
        return new Docket(DocumentationType.SWAGGER_2)
                .apiInfo(apiInfo())
                //是否开启 (true 开启  false隐藏。生产环境建议隐藏)
                //.enable(false)
                .select()
                //扫描的路径包,设置basePackage会将包下的所有被@Api标记类的所有方法作为api
                .apis(RequestHandlerSelectors.basePackage("com.mcy.springbootswagger.controller"))
                //指定路径处理PathSelectors.any()代表所有的路径
                .paths(PathSelectors.any())
                .build();
    }

    private ApiInfo apiInfo() {
        return new ApiInfoBuilder()
                //设置文档标题(API名称)
                .title("SpringBoot中使用Swagger2接口规范")
                //文档描述
                .description("接口说明")
                //服务条款URL
                .termsOfServiceUrl("http://localhost:8080/")
                //版本号
                .version("1.0.0")
                .build();
    }
}
【注】@Configuration注解,配置文件,就不多解释了。@EnableSwagger2的作用是启用Swagger2相关功能。
Docket对象包含三个方面信息:
2. 整个API的描述信息,即ApiInfo对象包括的信息,这部分信息会在页面上展示。
3. 指定生成API文档的包名。
4. 指定生成API的路径。
4、测试控制器
import com.mcy.springbootswagger.User.User;
import com.mcy.springbootswagger.service.UserService;
import io.swagger.annotations.Api;
import io.swagger.annotations.ApiImplicitParam;
import io.swagger.annotations.ApiOperation;
import org.springframework.beans.factory.annotation.Autowired;
import org.springframework.web.bind.annotation.*;

@RestController
@RequestMapping("/user")
//说明接口文件
@Api(value = "测试接口", tags = "用户管理相关的接口", description = "用户测试接口")
public class UserController {
    @Autowired
    private UserService userService;

    /**
     * 保存数据
     * @param user
     * @return
     */
    @PostMapping(value = "/save")
    //方法参数说明,name参数名;value参数说明,备注;dataType参数类型;required 是否必传;defaultValue 默认值
    @ApiImplicitParam(name = "user", value = "新增用户数据")
    //说明是什么方法(可以理解为方法注释)
    @ApiOperation(value = "添加用户", notes = "添加用户")
    public String saveUser(User user){
        userService.save(user);
        return "保存成功";
    }

    /**
     * 根据id查询用户
     * @param id
     * @return
     */
    @GetMapping(value = "findById")
    @ApiOperation(value = "根据id获取用户信息", notes = "根据id查询用户信息")
    public User getUser(Integer id){
        return userService.findById(id);
    }

    @DeleteMapping(value = "deleteById")
    @ApiOperation(value = "根据id删除数据", notes = "删除用户")
    public String delete(Integer id){
        userService.deleteById(id);
        return "删除成功";
    }
}
【注】上述代码注解的含义注释已经写的很清楚了,这里就不多解释了。其中Service层中的代码就是对数据的操作,就不多说了。
5、Swagger页面访问
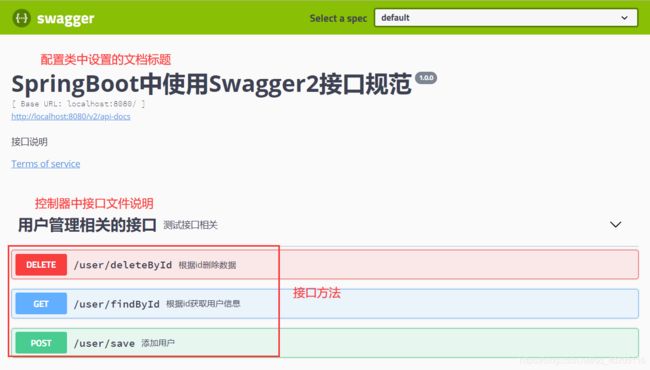
运行项目,输入http://localhost:8080/swagger-ui.html访问Swagger页面,页面如下:


点击需要测试的接口方法,如图:

可以看到接口需要的参数,请求地址及接口说明信息。点击右上角的Try it out即可对接口进行测试。

查询结果:

这里这些了部分接口进行测试,可以根据项目需求自行添加其他接口。
6、SpringSecurity中配置
如果Spring Boot项目中集成了Spring Security,接口会被拦截,需要在Spring Security的配置类中重写configure方法,对接口进行过滤一下。代码如下:
@Override
public void configure(WebSecurity web) throws Exception {
    web.ignoring()
            .antMatchers("/swagger-ui.html")
            .antMatchers("/v2/**")
            .antMatchers("/swagger-resources/**");
}
最后有什么不足之处,欢迎大家指出,期待与你的交流。
