ElasticSearch(三):ElasticSearch在SpringBoot中的使用(超详细)
ElasticSearch在SpringBoot中的使用
- 说明
- 使用
-
- 一、新建项目并添加依赖
- 二、添加配置类
- 三、测试
-
- 1、创建索引
- 2、获取索引
- 3、删除索引
- 4、创建文档
- 5、获取文档
- 6、更新文档
- 7、删除文档
- 8、批量插入
- 9、查询
说明
1、使用前请安装ElasticSearch(必要,否则测试过程中会出错)。如果没有安装ElasticSearch,可参考ElasticSearch及其head插件的安装
2、可以选择安装elasticsearch-head插件(非必要,只是为了方便测试)。如果需要,可参考ElasticSearch及其head插件的安装
使用
一、新建项目并添加依赖
创建一个SpringBoot项目,并在
pom.xml文件中添加以下依赖.注意版本号一定要与自己在本地安装的ElasticSearch版本保持一致。
<dependency>
    <groupId>org.elasticsearch.clientgroupId>
    <artifactId>elasticsearch-rest-high-level-clientartifactId>
    <version>7.9.0version>
dependency>
二、添加配置类
新建
ElasticSearchConfig.java配置类,并在该配置类中配置一个RestHighLevelClient对象
@Configuration
public class ElasticSearchConfig {


    /**
     * 配置RestHighLevelClient对象
     * 将该对象交给Spring容器去管理
     *
     * @return RestHighLevelClient对象
     */
    @Bean
    public RestHighLevelClient restHighLevelClient() {

        return new RestHighLevelClient(
                RestClient.builder(
                		//若有多个,可以传一个数组
                        new HttpHost("127.0.0.1", 9200, "http")));
    }
}
三、测试
测试前提是你的ElasticSearch已成功启动
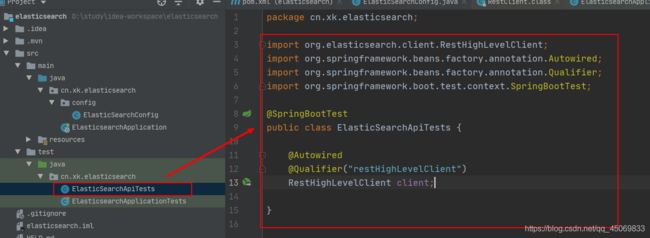
在test包下创建测试类,并注入
RestHighLevelClient用于测试以下案例
1、创建索引
代码
/**
 * 创建索引测试
 */
@Test
void createIndex() throws IOException {

    //1、构建 创建索引的请求
    CreateIndexRequest request = new CreateIndexRequest("xk_index");//索引名
    //2、客户端执行请求,获取响应
    CreateIndexResponse response = client.indices().create(request, RequestOptions.DEFAULT);
    //3、打印
    System.out.println("创建成功,创建的索引名为:" + response.index());
}
结果
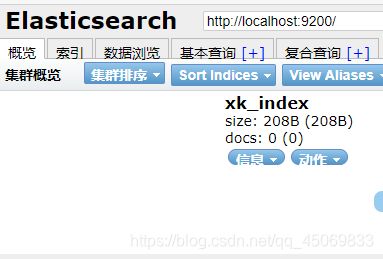
同时,在
head插件界面也可看到刚才创建的索引,如下:
2、获取索引
代码
/**
 * 获取索引测试
 */
@Test
void getIndex() throws IOException {

    //1、构建 获取索引的请求
    GetIndexRequest request = new GetIndexRequest("xk_index");
    //2、客户端判断该索引是否存在
    boolean exists = client.indices().exists(request, RequestOptions.DEFAULT);
    //3、打印
    System.out.println("该索引是否存在:"+exists);
}
结果
3、删除索引
代码
/**
 * 删除索引测试
 */
@Test
void deleteIndex() throws IOException {

    //1、构建 删除索引请求
    DeleteIndexRequest request = new DeleteIndexRequest("xk_index");
    //2、客户段执行删除的请求
    AcknowledgedResponse response = client.indices().delete(request, RequestOptions.DEFAULT);
    //3、打印
    System.out.println("是否删除成功:"+response.isAcknowledged());
}
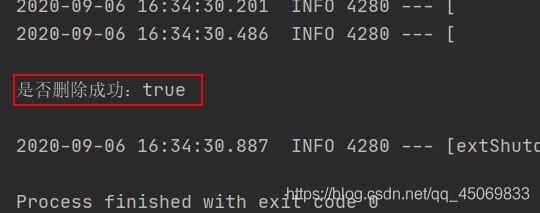
结果如下,同时,刷新
head插件界面,可以看到之前创建的索引已没有了
4、创建文档
创建文档就相当于我们所学过的在数据库中添加一条记录,因此,在这里,我们首先新建一个实体类User,一个User对象就相当于一个文档。
@Data
@Accessors(chain = true)
public class User {

    private Integer id;
    private String username;
}
然后,在测试类中进行测试,添加文档,代码如下:
/**
 * 创建文档
 */
@Test
void createDocument() throws IOException {

    User user = new User().setId(1).setUsername("张三");

    //1、构建请求
    IndexRequest request = new IndexRequest("user_index");

    //2、设置规则  PUT /user_index/user/_doc/1
    request.id("1");//设置id
    request.timeout(TimeValue.timeValueSeconds(1));//设置超时时间

    //3、将数据放入到请求中,以JSON的格式存放
    request.source(JSONObject.toJSONString(user), XContentType.JSON);

    //4、客户端发送请求,获取响应结果
    IndexResponse response = client.index(request, RequestOptions.DEFAULT);

    //5、打印
    System.out.println("响应结果:"+response.toString());
}
结果如下:
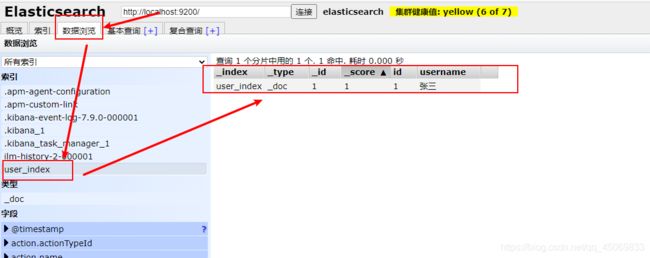
同时,在
head插件界面中。我们也可以看到刚才添加的数据:
5、获取文档
代码
/**
 * 获取文档
 */
@Test
void getDocument() throws IOException {

    //获取id为1的文档的信息
    GetRequest request = new GetRequest("user_index","1");

    boolean exists = client.exists(request, RequestOptions.DEFAULT);
    System.out.println("文档是否存在:"+exists);
    //如果存在,获取文档信息
    if (exists){

        GetResponse response = client.get(request, RequestOptions.DEFAULT);
        System.out.println("文档内容为:"+response.getSourceAsString());
    }
}
结果
6、更新文档
代码
/**
 * 更新文档
 */
@Test
void updateDocument() throws IOException {

    //更新id为1的文档的信息
    UpdateRequest request = new UpdateRequest("user_index", "1");

    User user = new User().setUsername("李四");
    request.doc(JSONObject.toJSONString(user), XContentType.JSON);

    //客户端执行更新请求
    UpdateResponse response = client.update(request, RequestOptions.DEFAULT);
    System.out.println("更新状态:" +response.status());
}
结果
同时,在
head插件界面中。我们也可以看到更新后的数据:
7、删除文档
代码
/**
 * 删除文档
 */
@Test
void deleteDocument() throws IOException {

    //构建删除请求
    DeleteRequest request = new DeleteRequest("user_index", "1");
    //客户端执行删除请求,并获取响应结果
    DeleteResponse response = client.delete(request, RequestOptions.DEFAULT);
    //打印
    System.out.println("删除状态:"+response.status());
}
结果,同时,在
head插件界面中。我们也可以看到该数据已不存在
8、批量插入
代码
/**
 * 批量插入数据
 */
@Test
void createBulkDocument() throws IOException {

    //构建批量插入的请求
    BulkRequest request = new BulkRequest();
    //设置超时时间
    request.timeout("10s");

    //设置数据
    List<User> list = new ArrayList<>();
    list.add(new User().setId(1).setUsername("张三"));
    list.add(new User().setId(2).setUsername("李四"));
    list.add(new User().setId(3).setUsername("王五"));
    list.add(new User().setId(4).setUsername("赵六"));

    //批量插入请求设置
    for (int i = 0; i < list.size(); i++) {

        request.add(
                new IndexRequest("user_index")//设置索引
                .id(String.valueOf(i+1))//设置文档的id,如果没有指定,会随机生成,自己测试
                .source(JSONObject.toJSONString(list.get(i)), XContentType.JSON)//设置要添加的资源,类型为JSON
        );
    }
    BulkResponse response = client.bulk(request, RequestOptions.DEFAULT);
    System.out.println("批量插入是否失败:"+response.hasFailures());
}
结果为false,代表没有失败,即插入成功
同时,在
head插件界面中。我们也可以看到批量插入后的数据:
9、查询
代码(
这里以精确匹配为例)
/**
 * 查询
 */
@Test
void query() throws IOException {

    //1、构建搜索请求
    SearchRequest request = new SearchRequest("user_index");

    //2、设置搜索条件,使用该构建器进行查询
    SearchSourceBuilder builder = new SearchSourceBuilder();//生成构建器

    //查询条件我们可以用工具类QueryBuilders来构建
    //QueryBuilders.termQuery():精确匹配
    //QueryBuilders.matchAllQuery():全文匹配

    //构建精确匹配查询条件
        //构建精确匹配查询条件
        TermQueryBuilder termQueryBuilder = QueryBuilders.termQuery("username.keyword", "李四");
//        MatchAllQueryBuilder matchAllQueryBuilder = QueryBuilders.matchAllQuery();
//        WildcardQueryBuilder wildcardQueryBuilder = QueryBuilders.wildcardQuery("username", "张");
    builder.query(termQueryBuilder);

    //3、将搜索条件放入搜索请求中
    request.source(builder);
    //4、客户端执行搜索请求
    SearchResponse response = client.search(request, RequestOptions.DEFAULT);

    //5、打印测试
    SearchHit[] hits = response.getHits().getHits();
    System.out.println("共查询到"+hits.length+"条数据");
    System.out.println("查询结果:");
    for (int i = 0; i < hits.length; i++) {

        System.out.println(hits[i].getSourceAsString());
    }
}
结果
到此,关于ElasticSearch的简单API使用就到此为止。


