
前言:推送功能为了提醒用户或者提高应用留活率。关于推送有很多第三方,比如极光,融云,信鸽,其原理也是相同利用APNS推送机制 。今天写这篇文章的主要目的是为了推送,但是关于推送的文章、博客很多,所以重点还是讲推送后续-------推送后的页面跳转功能。
主要以极光推送为例
准备条件:极光账号、苹果开发账号、一部手机、一个xcode
虽然使用的第三方推送我们也要明白其原理啦
苹果APNS推送原理:

Provider就是我们自己程序的后台服务器,APNS是Apple Push Notification Service的缩写,也就是苹果的推送服务器。
上图可以分为三个阶段:
第一阶段:应用程序的服务器端把要发送的消息、目的iPhone的标识打包,发给APNS。
第二阶段:APNS在自身的已注册Push服务的iPhone列表中,查找有相应标识的iPhone,并把消息发送到iPhone。
第三阶段:iPhone把发来的消息传递给相应的应用程序,并且按照设定弹出Push通知。

从上图可以看出,JPush iOS Push 包括 2 个部分,APNs 推送(代理),与 JPush 应用内消息。红色部分是 APNs 推送,JPush 代理开发者的应用(需要基于开发者提供的应用证书),向苹果 APNs 服务器推送。由 APNs Server 推送到 iOS 设备上。蓝色部分是 JPush 应用内推送部分,即 App 启动时,内嵌的 JPush SDK 会开启长连接到 JPush Server,从而 JPush Server 可以推送消息到 App 里。
第一步:申请一个极光账号;https://www.jiguang.cn/
第二步:创建推送证书:https://docs.jiguang.cn/jpush/client/iOS/ios_cer_guide/
第三步:在极光推送后台创建一个应用,并将自己创建的推送证书放上去。
第四步:导入极光推送的SDK并配置环境https://docs.jiguang.cn/jpush/client/iOS/ios_guide_new/
如果后期发现自己收不到推送消息,检查2、3、4步是否证书有效、证书的bundleid是否与程序配置一样、是否开启Application Target的Capabilities->Push Notifications选项、是否支持Http传输方法
NSAppTransportSecurity

    NSAllowsArbitraryLoads
第五步:代码时刻
1.在 AppDelegate.m 引用头文件
// 引入JPush功能所需头文件
#import "JPUSHService.h"
// iOS10注册APNs所需头文件
#ifdef NSFoundationVersionNumber_iOS_9_x_Max
#import
#endif
2.添加Delegate
@interface AppDelegate ()

@end
3.添加初始化APNs代码、JPush代码
 -(BOOL)application:(UIApplication *)application didFinishLaunchingWithOptions:(NSDictionary *)launchOptions{
//初始化APNs代码
 JPUSHRegisterEntity * entity = [[JPUSHRegisterEntity alloc] init];
  entity.types = JPAuthorizationOptionAlert|JPAuthorizationOptionBadge|JPAuthorizationOptionSound;
  if ([[UIDevice currentDevice].systemVersion floatValue] >= 8.0) {
    // 可以添加自定义categories
    // NSSet *categories for iOS10 or later
    // NSSet *categories for iOS8 and iOS9
  }
  [JPUSHService registerForRemoteNotificationConfig:entity delegate:self];
//JPush代码
// 如需继续使用pushConfig.plist文件声明appKey等配置内容,请依旧使用[JPUSHService setupWithOption:launchOptions]方式初始化。

  [JPUSHService setupWithOption:launchOptions appKey:appKey
                        channel:channel
               apsForProduction:isProduction
          advertisingIdentifier:advertisingId];
//初始化控制器代码
//...
   return;
}
- appKey
- 选择 Web Portal上 的应用 ,点击“设置” 获取其 appkey 值。请确保应用内配置的 appkey 与 Portal 上创建应用后生成的 appkey 一致。
- channel
- 指明应用程序包的下载渠道,为方便分渠道统计,具体值由你自行定义,如:App Store。
- apsForProduction
- 1.3.1版本新增,用于标识当前应用所使用的APNs证书环境。
- 0 (默认值)表示采用的是开发证书,1 表示采用生产证书发布应用。
- 注:此字段的值要与Build Settings的Code Signing配置的证书环境一致。
- advertisingIdentifier
- 详见关于IDFA。
4.请在AppDelegate.m实现该回调方法并添加回调方法中的代码
//注册APNs成功并上报DeviceToken
- (void)application:(UIApplication *)application
didRegisterForRemoteNotificationsWithDeviceToken:(NSData *)deviceToken {

  /// Required - 注册 DeviceToken
  [JPUSHService registerDeviceToken:deviceToken];
}
//实现注册APNs失败接口
- (void)application:(UIApplication *)application didFailToRegisterForRemoteNotificationsWithError:(NSError *)error {
  //Optional
  NSLog(@"did Fail To Register For Remote Notifications With Error: %@", error);
}

#pragma mark- JPUSHRegisterDelegate

// iOS 10 Support
- (void)jpushNotificationCenter:(UNUserNotificationCenter *)center willPresentNotification:(UNNotification *)notification withCompletionHandler:(void (^)(NSInteger))completionHandler {
  // Required
  NSDictionary * userInfo = notification.request.content.userInfo;
  if([notification.request.trigger isKindOfClass:[UNPushNotificationTrigger class]]) {
    [JPUSHService handleRemoteNotification:userInfo];
  }
  completionHandler(UNNotificationPresentationOptionAlert); // 需要执行这个方法,选择是否提醒用户,有Badge、Sound、Alert三种类型可以选择设置
}

// iOS 10 Support
- (void)jpushNotificationCenter:(UNUserNotificationCenter *)center didReceiveNotificationResponse:(UNNotificationResponse *)response withCompletionHandler:(void (^)())completionHandler {
  // Required
  NSDictionary * userInfo = response.notification.request.content.userInfo;
  if([response.notification.request.trigger isKindOfClass:[UNPushNotificationTrigger class]]) {
    [JPUSHService handleRemoteNotification:userInfo];
  }
  completionHandler();  // 系统要求执行这个方法
}

- (void)application:(UIApplication *)application didReceiveRemoteNotification:(NSDictionary *)userInfo fetchCompletionHandler:(void (^)(UIBackgroundFetchResult))completionHandler {

  // Required, iOS 7 Support
  [JPUSHService handleRemoteNotification:userInfo];
  completionHandler(UIBackgroundFetchResultNewData);
}

- (void)application:(UIApplication *)application didReceiveRemoteNotification:(NSDictionary *)userInfo {

  // Required,For systems with less than or equal to iOS6
  [JPUSHService handleRemoteNotification:userInfo];
}
//清除角标
- (void)applicationWillEnterForeground:(UIApplication *)application {
   [application setApplicationIconBadgeNumber:0];
    //设置服务器角标为0
    [JPUSHService setBadge:0];

}
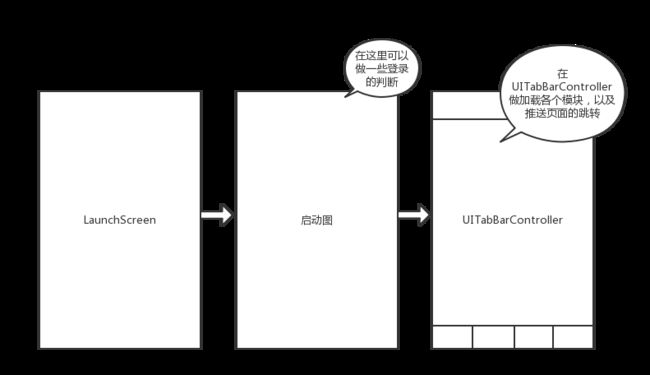
5.根据不同参数进行页面跳转。关于这个跳转有很多方法,自己也尝试过很多种,以前通常在AppDelegate跳转,但推送页面返回时候效果不够好,所以我现在基本上在AppDelegate接受推送消息后以通知方式传给TabBarViewController,TabBarViewController(如果页面中没有用到TabBarViewController,也可以使用其他ViewController作为过度跳转)监听到通知后进行页面跳转和交互。
例如:一个APP有启动页面、有推送、有登录操作
主要代码片段
AppDelegate.m内收到推送消息时发送出通知
//用户点击了通知进入app
- (void)jpushNotificationCenter:(UNUserNotificationCenter *)center didReceiveNotificationResponse:(UNNotificationResponse *)response withCompletionHandler:(void (^)())completionHandler NS_AVAILABLE_IOS(10.0){
    NSDictionary * userInfo = response.notification.request.content.userInfo;

    if([response.notification.request.trigger isKindOfClass:[UNPushNotificationTrigger class]]) {
        [JPUSHService handleRemoteNotification:userInfo];
        [[NSNotificationCenter defaultCenter] postNotificationName:@"PresentView" object:self userInfo:userInfo];

    } else {
        // 判断为本地通知
    }
}

//基于iOS 7 及以上的系统版本,如果是使用 iOS 7 的 Remote Notification 特性那么处理函数需要使用
- (void)application:(UIApplication *)application didReceiveRemoteNotification:(NSDictionary *)userInfo fetchCompletionHandler:(void (^)(UIBackgroundFetchResult))completionHandler {

    // Required, iOS 7 Support
    [JPUSHService handleRemoteNotification:userInfo];
    completionHandler(UIBackgroundFetchResultNewData);
    if ([UIApplication sharedApplication].applicationState != UIApplicationStateActive) {
        //应用不属于前台
        [[NSNotificationCenter defaultCenter] postNotificationName:@"PresentView" object:self userInfo:userInfo];
    }else{
        //应用属于前台
    }

}
BaseTabBarViewController.h内监听通知
- (void)viewDidLoad {
    [super viewDidLoad];
    [self addChildViewControllerWithClassname:[HomeViewController description] imagename:@"home_noselect" selectedimagename:@"home_select" title:@"主页"];
    [self addChildViewControllerWithClassname:[NewViewController description] imagename:@"new_noselect" selectedimagename:@"new_select"title:@"资讯"];
    [self addChildViewControllerWithClassname:[MeViewController description] imagename:@"me_noselect" selectedimagename:@"me_select" title:@"我的"];
    //消息推送通知
    [[NSNotificationCenter defaultCenter] addObserver:self selector:@selector(presentView:) name:@"PresentView" object:nil];
}
- (void)presentView:(NSNotification *)notification{
    NSLog(@"推送--------------%@", notification.userInfo);
    if ([notification.userInfo[@"push_id"] isEqualToString:@"1"]) {
        PushDetailOneViewController *oneVC = [[PushDetailOneViewController alloc] init];
        oneVC.idStr = notification.userInfo[@"push_id"];
        UINavigationController *nav = self.viewControllers[self.selectedIndex];
        [nav pushViewController:oneVC animated:YES];

    }else if ([notification.userInfo[@"push_id"] isEqualToString:@"2"]){
        PushDetailTwoViewController *twoVC = [[PushDetailTwoViewController alloc] init];
        twoVC.idStr = notification.userInfo[@"push_id"];
        UINavigationController *nav = self.viewControllers[self.selectedIndex];
        [nav pushViewController:twoVC animated:YES];
    }else if ([notification.userInfo[@"push_id"] isEqualToString:@"3"]){
        PushDetailThressViewController *thressVC = [[PushDetailThressViewController alloc] init];
        thressVC.idStr = notification.userInfo[@"push_id"];
        UINavigationController *nav = self.viewControllers[self.selectedIndex];
        [nav pushViewController:thressVC animated:YES];
    }
}
demo:https://github.com/guofeifeifei/jpush
推送原理参考文章:https://blog.csdn.net/yuxiang19876021/article/details/52217187