What is Apache Shiro?
Apache Shiro是一个功能强大、灵活的,开源的安全框架。它可以干净利落地处理身份验证、授权、企业会话管理和加密。
Apache Shiro的首要目标是易于使用和理解。安全通常很复杂,甚至让人感到很痛苦,但是Shiro却不是这样子的。一个好的安全框架应该屏蔽复杂性,向外暴露简单、直观的API,来简化开发人员实现应用程序安全所花费的时间和精力。
Shiro能做什么呢?
- 验证用户身份
- 用户访问权限控制,比如:1、判断用户是否分配了一定的安全角色。2、判断用户是否被授予完成某个操作的权限
- 在非 web 或 EJB 容器的环境下可以任意使用Session API
- 可以响应认证、访问控制,或者 Session 生命周期中发生的事件
- 可将一个或以上用户安全数据源数据组合成一个复合的用户 “view”(视图)
- 支持单点登录(SSO)功能
- 支持提供“Remember Me”服务,获取用户关联信息而无需登录
…
等等——都集成到一个有凝聚力的易于使用的API。
Shiro 致力在所有应用环境下实现上述功能,小到命令行应用程序,大到企业应用中,而且不需要借助第三方框架、容器、应用服务器等。当然 Shiro 的目的是尽量的融入到这样的应用环境中去,但也可以在它们之外的任何环境下开箱即用。
Apache Shiro Features 特性
Apache Shiro是一个全面的、蕴含丰富功能的安全框架。下图为描述Shiro功能的框架图:
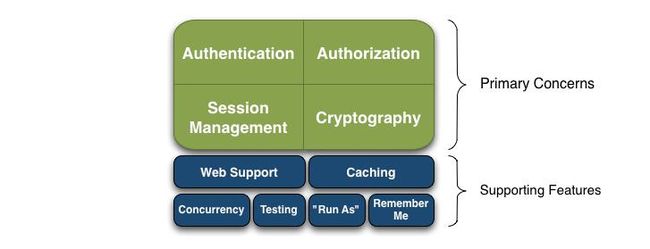
Authentication(认证), Authorization(授权), Session Management(会话管理), Cryptography(加密)被 Shiro 框架的开发团队称之为应用安全的四大基石。那么就让我们来看看它们吧:
- Authentication(认证):用户身份识别,通常被称为用户“登录”
- Authorization(授权):访问控制。比如某个用户是否具有某个操作的使用权限。
- Session Management(会话管理):特定于用户的会话管理,甚至在非web 或 EJB 应用程序。
- Cryptography(加密):在对数据源使用加密算法加密的同时,保证易于使用。
还有其他的功能来支持和加强这些不同应用环境下安全领域的关注点。特别是对以下的功能支持
- Web支持:Shiro 提供的 web 支持 api ,可以很轻松的保护 web 应用程序的安全。
- 缓存:缓存是 Apache Shiro 保证安全操作快速、高效的重要手段。
- 并发:Apache Shiro 支持多线程应用程序的并发特性。
- 测试:支持单元测试和集成测试,确保代码和预想的一样安全。
- “Run As”:这个功能允许用户假设另一个用户的身份(在许可的前提下)。
- “Remember Me”:跨 session 记录用户的身份,只有在强制需要时才需要登录。
注意: Shiro不会去维护用户、维护权限,这些需要我们自己去设计/提供,然后通过相应的接口注入给Shiro
High-Level Overview 高级概述
在概念层,Shiro 架构包含三个主要的理念:Subject,SecurityManager和 Realm。下面的图展示了这些组件如何相互作用,我们将在下面依次对其进行描述。
- Subject:当前用户,Subject 可以是一个人,但也可以是第三方服务、守护进程帐户、时钟守护任务或者其它–当前和软件交互的任何事件。
- SecurityManager:管理所有Subject,SecurityManager 是 Shiro 架构的核心,配合内部安全组件共同组成安全伞。
- Realms:用于进行权限信息的验证,我们自己实现。Realm 本质上是一个特定的安全 DAO:它封装与数据源连接的细节,得到Shiro 所需的相关的数据。在配置 Shiro 的时候,你必须指定至少一个Realm 来实现认证(authentication)和/或授权(authorization)。
我们需要实现Realms的Authentication 和 Authorization。其中 Authentication 是用来验证用户身份,Authorization 是授权访问控制,用于对用户进行的操作授权,证明该用户是否允许进行当前操作,如访问某个链接,某个资源文件等。
快速上手
pom.xml
            org.springframework.boot
            spring-boot-starter-data-jpa


            org.springframework.boot
            spring-boot-starter-thymeleaf


            net.sourceforge.nekohtml
            nekohtml
            1.9.22


            org.springframework.boot
            spring-boot-starter-web


            org.apache.shiro
            shiro-spring
            1.4.0


            mysql
            mysql-connector-java
            runtime
Shiro 配置
@Configuration
public class ShiroConfig {
    @Bean
    public ShiroFilterFactoryBean shirFilter(SecurityManager securityManager) {
        System.out.println("ShiroConfiguration.shirFilter()");
        ShiroFilterFactoryBean shiroFilterFactoryBean = new ShiroFilterFactoryBean();
        shiroFilterFactoryBean.setSecurityManager(securityManager);
        //拦截器.
        Map filterChainDefinitionMap = new LinkedHashMap();
        // 配置不会被拦截的链接 顺序判断
        filterChainDefinitionMap.put("/static/**", "anon");
        //配置退出 过滤器,其中的具体的退出代码Shiro已经替我们实现了
        filterChainDefinitionMap.put("/logout", "logout");
        //:这是一个坑呢,一不小心代码就不好使了;
        //
        filterChainDefinitionMap.put("/**", "authc");
        // 如果不设置默认会自动寻找Web工程根目录下的"/login.jsp"页面
        shiroFilterFactoryBean.setLoginUrl("/login");
        // 登录成功后要跳转的链接
        shiroFilterFactoryBean.setSuccessUrl("/index");

        //未授权界面;
        shiroFilterFactoryBean.setUnauthorizedUrl("/403");
        shiroFilterFactoryBean.setFilterChainDefinitionMap(filterChainDefinitionMap);
        return shiroFilterFactoryBean;
    }

    @Bean
    public MyShiroRealm myShiroRealm(){
        MyShiroRealm myShiroRealm = new MyShiroRealm();
        return myShiroRealm;
    }


    @Bean
    public SecurityManager securityManager(){
        DefaultWebSecurityManager securityManager =  new DefaultWebSecurityManager();
        securityManager.setRealm(myShiroRealm());
        return securityManager;
    }
}
Filter Chain定义说明:
- 一个URL可以配置多个Filter,使用逗号分隔
- 当设置多个过滤器时,全部验证通过,才视为通过
- 部分过滤器可指定参数,如perms,roles
Shiro内置的FilterChain:
| Filter Name | Class |
|---|---|
| anon | org.apache.shiro.web.filter.authc.AnonymousFilter |
| authc | org.apache.shiro.web.filter.authc.FormAuthenticationFilter |
| authcBasic | org.apache.shiro.web.filter.authc.BasicHttpAuthenticationFilter |
| perms | org.apache.shiro.web.filter.authz.PermissionsAuthorizationFilter |
| port | org.apache.shiro.web.filter.authz.PortFilter |
| rest | org.apache.shiro.web.filter.authz.HttpMethodPermissionFilter |
| roles | org.apache.shiro.web.filter.authz.RolesAuthorizationFilter |
| ssl | org.apache.shiro.web.filter.authz.SslFilter |
| user | org.apache.shiro.web.filter.authc.UserFilter |
- anon:所有url都都可以匿名访问
- authc: 需要认证才能进行访问
- user:配置记住我或认证通过可以访问
登录认证实现
在认证、授权内部实现机制中都有提到,最终处理都将交给Real进行处理。因为在Shiro中,最终是通过Realm来获取应用程序中的用户、角色及权限信息的。通常情况下,在Realm中会直接从我们的数据源中获取Shiro需要的验证信息。可以说,Realm是专用于安全框架的DAO.
Shiro的认证过程最终会交由Realm执行,这时会调用Realm的getAuthenticationInfo(token)方法。
该方法主要执行以下操作:
- 检查提交的进行认证的令牌信息
- 根据令牌信息从数据源(通常为数据库)中获取用户信息
- 对用户信息进行匹配验证。
- 验证通过将返回一个封装了用户信息的AuthenticationInfo实例。
- 验证失败则抛出AuthenticationException异常信息。
而在我们的应用程序中要做的就是自定义一个Realm类,继承AuthorizingRealm抽象类,重载doGetAuthenticationInfo(),重写获取用户信息的方法。
doGetAuthenticationInfo的重写
@Override
protected AuthenticationInfo doGetAuthenticationInfo(AuthenticationToken token)
        throws AuthenticationException {
    System.out.println("MyShiroRealm.doGetAuthenticationInfo()");
    //获取用户的输入的账号.
    String username = (String)token.getPrincipal();
    System.out.println(token.getCredentials());
    //通过username从数据库中查找 User对象,如果找到,没找到.
    //实际项目中,这里可以根据实际情况做缓存,如果不做,Shiro自己也是有时间间隔机制,2分钟内不会重复执行该方法
    UserInfo userInfo = userInfoService.findByUsername(username);
    System.out.println("----->>userInfo="+userInfo);
    if(userInfo == null){
        return null;
    }
    SimpleAuthenticationInfo authenticationInfo = new SimpleAuthenticationInfo(
            userInfo, //用户名
            userInfo.getPassword(), //密码
            ByteSource.Util.bytes(userInfo.getCredentialsSalt()),//salt=username+salt
            getName()  //realm name
    );
    return authenticationInfo;
}
链接权限的实现
shiro的权限授权是通过继承AuthorizingRealm抽象类,重载doGetAuthorizationInfo()当访问到页面的时候,链接配置了相应的权限或者shiro标签才会执行此方法否则不会执行,所以如果只是简单的身份认证没有权限的控制的话,那么这个方法可以不进行实现,直接返回null即可。在这个方法中主要是使用类:SimpleAuthorizationInfo进行角色的添加和权限的添加。
@Override
protected AuthorizationInfo doGetAuthorizationInfo(PrincipalCollection principals) {
    System.out.println("权限配置-->MyShiroRealm.doGetAuthorizationInfo()");
    SimpleAuthorizationInfo authorizationInfo = new SimpleAuthorizationInfo();
    UserInfo userInfo  = (UserInfo)principals.getPrimaryPrincipal();
    for(SysRole role:userInfo.getRoleList()){
        authorizationInfo.addRole(role.getRole());
        for(SysPermission p:role.getPermissions()){
            authorizationInfo.addStringPermission(p.getPermission());
        }
    }
    return authorizationInfo;
}
当然也可以添加set集合:roles是从数据库查询的当前用户的角色,stringPermissions是从数据库查询的当前用户对应的权限
authorizationInfo.setRoles(roles);
authorizationInfo.setStringPermissions(stringPermissions);
就是说如果在shiro配置文件中添加了 filterChainDefinitionMap.put(“/add”, “perms[权限添加]”) 就说明访问 /add 这个链接必须要有“权限添加”这个权限才可以访问,如果在shiro配置文件中添加了 filterChainDefinitionMap.put(“/add”, “roles[100002],perms[权限添加]”) 就说明访问 /add 这个链接必须要有“权限添加”这个权限和具有“100002”这个角色才可以访问。
参考附录:
- Apache Shiro中文手册
- SpringBoot Shiro权限管理【从零开始学Spring Boot】
- SpringBoot+Shiro整合学习之登录认证和权限控制
- SpringBoot整合shiro-登录认证和权限管理