SpringBoot知识点一网打尽(内附面试必问)
文章目录
- 一、SpringBoot入门
-
- 1.1、SpringBoot介绍
- 1.2、JavaConfig
-
- 1.2.1、项目准备
- 1.2.2、配置类替代配置文件之控制反转
-
- 1.2.2.1、创建Bean
- 1.2.2.2、创建配置类
- 1.2.2.3、测试
- 1.2.3、配置类替代配置文件之组件扫描
-
- 1.2.3.1、Bean组件扫描
- 1.2.4、@Bean注解详解
-
- 1.2.4.1、创建一个OneBean类
- 1.2.4.2、书写配置类
- 1.2.4.3、总结
- 1.2.5、配置类替代配置文件之依赖注入
-
- 1.2.5.1、创建新类
- 1.2.5.1、实现方式一
- 1.2.5.2、**实现方式二**
- 1.2.6、配置文件互相导入
-
- 1.2.6.1、@import
- 1.2.6.2、@ImportResource
- 1.2.7、配置文件的加载与取值
-
- 1.2.7.1、加载
- 1.2.7.2、取值
-
- 1.2.7.2.1、创建db.properties
- 1.2.7.2.2、定义一个类
- 1.2.7.2.3、接收值
- 1.3、SpringBoot自动装配原理
-
- 1.3.1、SpringBoot的核心注解
- 1.3.2、SpringBoot自动装配原理。
-
- 1.3.2.1、综述
- 1.3.2.2、AutoConfigurationImportSelector
- 1.3.2.3、SpringFactoriesLoader
- 1.2.3.4、RedisAutoConfiguration分析
- 1.4、注意
-
- 1.4.1、为什么打成war包不是jar包
- 1.4.2、pom.xml文件中的spring-boot-starter的作用
- 1.4.3、mave中强大的功能——继承
- 1.4.4、DepencyManagement & dependencies区别
- 1.4.5、SpringBoot在没有Tomcat的情况下如何启动
- 1.4.6、SpringBoot的启动类的main方法中SpringApplication.run(..)详解
- 二、SpringBoot配置文件语法
-
- 2.1、SpringBoot配置文件概述
- 2.2、Properties语法
- 2.3、YML
- 三、SpringBoot整合
-
- 3.1、连接数据库
-
- 3.1.1、引入依赖
- 3.1.2、Hikari数据源
-
- 3.1.2.1、概述
- 3.1.2.2、修改application.properties
- 3.1.3、Druid数据源
-
- 3.1.3.1、概述
- 3.1.3.2、引入依赖
- 3.1.3.3、修改application.properties
- 3.1.3.4、注意
- 3.2、集成MyBatis
-
- 3.2.1、引入依赖
- 3.2.2、配置接口扫描
- 3.2.3、配置属性
- 3.3、事务管理
-
- 3.3.1、引入依赖
- 3.3.2、XML方式配置事务
- 3.3.3、注解方式配置事务
- 3.4、SpringBoot中静态资源的处理
-
- 3.4.1、静态资源的位置
- 3.4.2、路径映射配置
- 3.5、统一异常处理
-
- 3.5.1、SpringBoot默认方式
- 3.5.2、控制器增强的方式
- 3.6、过滤器
-
- 3.6.1、过滤器概述
- 3.6.2、过滤器实现方式
- 3.6.3、@WebFilter
-
- 3.6.3.1、概述
- 3.6.3.2、代码实现
- 3.6.4、FilterRegistrationBean 实现
- 3.7、拦截器
-
- 3.7.1、概述
- 3.7.2、拦截器方法概述
- 3.7.3、代码实现
- 3.7.4、测试
- 3.8、日志
-
- 3.8.1、日志介绍
-
- 3.8.1.1、SpringBoot中的日志介绍
- 3.8.1.2、输出日志的两种方式
- 3.8.1.3、Logback配置文件的使用
- 3.9、集成前端
-
- 3.9.1、集成JSP
-
- 3.9.1.1、引入依赖
- 3.9.1.2、编辑 project Structure
- 3.9.1.3、Spring Mvc 视图解析器配置
- 3.9.1.4、总结
- 3.9.2、集成FreeMarker
-
- 3.9.2.1、底层原理
- 3.9.2.2、常见属性配置
- 3.9.3、整合 Thymeleaf
-
- 3.9.3.1、创建项目
- 3.9.3.2、Spring Mvc 视图解析器配置
- 3.9.3.3、测试
一、SpringBoot入门
1.1、SpringBoot介绍
SpringBoot是由Pivotal团队提供的全新框架,其设计目的是用来简化新Spring应用的初始搭建以及开发过程。该框架使用了特定的方式来进行配置,从而使开发人员不再需要定义样板化的配置。通过这种方式,Spring Boot致力于在蓬勃发展的快速应用开发领域(rapid application development)成为领导者。
SpringBoot能够快发开发的原因是因为配置文件从xml转移到了java文件中,减少了配置文件的书写。
1.2、JavaConfig
JavaConfig的技术是用于替代目前繁琐的xml文件的配置,他最为重要的替代方式就是使用了大量的注解。
1.2.1、项目准备
<properties>
        <spring.version>5.0.8.RELEASEspring.version>
        <project.build.sourceEncoding>UTF-8project.build.sourceEncoding>
        <maven.compiler.source>11maven.compiler.source>
        <maven.compiler.target>11maven.compiler.target>
properties>
<dependencies>
    <dependency>
        <groupId>org.springframeworkgroupId>
        <artifactId>spring-testartifactId>
        <version>${spring.version}version>
    dependency>
    <dependency>
        <groupId>org.projectlombokgroupId>
        <artifactId>lombokartifactId>
        <version>1.16.22version>
        <scope>providedscope>
    dependency>
    <dependency>
        <groupId>junitgroupId>
        <artifactId>junitartifactId>
        <version>4.12version>
    dependency>
    <dependency>
        <groupId>org.springframeworkgroupId>
        <artifactId>spring-context-supportartifactId>
        <version>${spring.version}version>
    dependency>
dependencies>
1.2.2、配置类替代配置文件之控制反转
1.2.2.1、创建Bean
public class OneBean {

}
1.2.2.2、创建配置类
// 配置类注解,贴上表明这个类是一个配置类
@Configuration
public class AppConfig {
// Bean实例注解,贴有该注解的方法为实例方法,在功能上等价于:1.2.2.3、测试
@RunWith(SpringRunner.class)
// 引用配置类的注解
@ContextConfiguration(classes = AppConfig.class)
public class App {

    @Autowired
    private ApplicationContext ctx;
    @Test
    public void testApp(){

        OmeBean omeBean = ctx.getBean("omeBean", SomeBean.class);
        System.out.println(omeBean);
    }
}
1.2.3、配置类替代配置文件之组件扫描
1.2.3.1、Bean组件扫描
学习spring框架时, Spring有4个版型标签(代表的含义相同,仅仅只是为了标注表示的对象不同)。当spring容器扫描器扫描到贴有版型标签的类,会自动创建这些类的实例对象,并交给容器管理。
@Controller  //标记控制层
public class EmployeeController{

}
@Service    //标记服务层
public class EmployeeServiceImpl{

}
@Repository  //标记持久层
public class EmployeeDAOImpl{

}
@Component   //其他类
public class EmployeeListener{

}
我们除了使用上述注解,还需要在xml文件中进行配置。
<context:component-scan base-package="指定扫描的包路径">context:component-scan>
换成了JavaConfig,我们需要贴注解来告诉Spring需要扫描这个类并且创建对象。
@Component  //版型标签
public class OmeBean {

}
spring组件扫描注解, 扫描basePackages属性指定包及其子包下所有的贴有版型标签类,并创建对象交给Spring容器管理。如果不指定basePackages属性,表示扫描当前类所有包及其子包。
@Configuration
//组件扫描标签
@ComponentScan(basePackages ="cn.linstudy.config")
public class AppConfig {

}
1.2.4、@Bean注解详解
1.2.4.1、创建一个OneBean类
@Setter
@Getter
public class OneBean {

    public OneBean() {

        System.out.println("OneBean被创建");
    }
    public void init() {

        System.out.println("OneBean被初始化");
    }
    public void destroy() {

        System.out.println("OneBean被销毁");
    }
}
1.2.4.2、书写配置类
@Scope("singleton")
@Bean(value = "ob",initMethod = "init", destroyMethod = "destroy")
public OomeBean oomeBean(){

    return new OomeBean();
}
1.2.4.3、总结
- bean标签中的name属性 = @Bean注解中的name/value属性。
- bena标签中的id属性 = 实例方法的方法名。
- bean标签中的init-method = @Bean注解中的initMethod属性。
- bean标签中destroy-method属性 = @Bean注解中destroyMethod属性。
- bean标签中scope属性 = 实例方法中的@Scope注解
1.2.5、配置类替代配置文件之依赖注入
1.2.5.1、创建新类
public class TwoBean {

}
@Setter
@Getter
public class OneBean {

    private Two twoBean;
}
1.2.5.1、实现方式一
我们可以直接调用实例方法来实现依赖注入。
JavaConfig实现传统依赖注意需要注意:
- omeBean对象可以从容器中获取。
- twoBean可以从容器中获取。
- omeBean对象通过getTwoBean()方法获得的bean应该从容器获取的twoBean对象相等。
@Configuration
public class AppConfig {

    @Bean
    public OmeBean omeBean(){

        OmeBean omeBean = new OmeBean();
        OmeBean.setTwoBean(twoBean());
        return someBean;
    }
    @Bean
    public TwoBean twoBean(){

        return new TwoBean();
    }
}
需要注意的点:
- 多次调用twoBean()方法, spring容器只会执行一次twoBean对象的构建,原因:twoBean()方法被spring容器代理了,每次调用前都会执行容器bean检查,当发现容器中已经有了,直接从容器中拿。如果没有,则执行方法,并将返回值放置到容器中。
1.2.5.2、实现方式二
方式二是可以通过注入实例对象的方式来实现依赖注入。
@Configuration
public class AppConfig {

    @Bean
    public OneBean omeBean(TwoBean twoBean){

        OneBean omeBean = new OneBean();
        omeBean.setTwoBean(twoBean);
        return omeBean;
    }
    @Bean
    public TwoBean twoBean(){

        return new TwoBean();
    }
}
1.2.6、配置文件互相导入
1.2.6.1、@import
配置类导入注解,贴在配置类上,作用等价于:
1.2.6.2、@ImportResource
配置文件导入注解,贴在配置类上,作用等价于:
1.2.7、配置文件的加载与取值
1.2.7.1、加载
我们可以使用@PropertySource这个注解来进行资源配置文件加载注解,贴在配置类上,用于将properties类型文件加载到spring容器中。
<context:property-placeholder location="classpath:xxx.perperties"/>
1.2.7.2、取值
当加载了一个配置文件的时候,如果我们需要取值,可以使用@Value注解从properties配置中获取配置的数据。
1.2.7.2.1、创建db.properties
jdbc.driverClassName=com.mysql.jdbc.Driver
jdbc.url=jdbc:mysql://192.168.126.129:3306/car_crm
jdbc.username=root
jdbc.password=123456
1.2.7.2.2、定义一个类
@Setter
@Getter
@ToString
public class MyDataSource {

    private String driverClassName;
    private String url;
    private String username;
    private String password;
}
1.2.7.2.3、接收值
@PropertySource("classpath:db.properties")
@Configuration
public class AppConfig {


    @Value("${jdbc.driverClassName}")
    private String driverClassName;
    @Value("${jdbc.url}")
    private String url;
    @Value("${jdbc.username}")
    private String username;
    @Value("${jdbc.password}")
    private String password;

    @Bean
    public MyDataSource myDataSource(){

        MyDataSource source = new MyDataSource();
        source.setDriverClassName(driverClassName);
        source.setUrl(url);
        source.setUsername(username);
        source.setPassword(password);
        return source;
    }
}
1.3、SpringBoot自动装配原理
1.3.1、SpringBoot的核心注解
SpringBoot的核心是@SpringBootApplication这个注解。
@Target(ElementType.TYPE)
@Retention(RetentionPolicy.RUNTIME)
@Documented
@Inherited
@SpringBootConfiguration
@EnableAutoConfiguration
@ComponentScan(excludeFilters = {

        @Filter(type = FilterType.CUSTOM, classes = TypeExcludeFilter.class),
        @Filter(type = FilterType.CUSTOM, classes = AutoConfigurationExcludeFilter.class) })
public @interface SpringBootApplication {
1.3.2、SpringBoot自动装配原理。
1.3.2.1、综述
SpringBoot启动会加载大量的自动配置类。@SpringBootApplication包含以下三个注解:
@SpringBootConfiguration:我们点进去以后可以发现底层是Configuration注解,说白了就是支持JavaConfig的方式来进行配置(使用Configuration配置类等同于XML文件)。@EnableAutoConfiguration:开启自动配置功能。@ComponentScan:这个就是扫描注解,默认是扫描当前类下的package。将@Controller/@Service/@Component/@Repository等注解加载到IOC容器中。
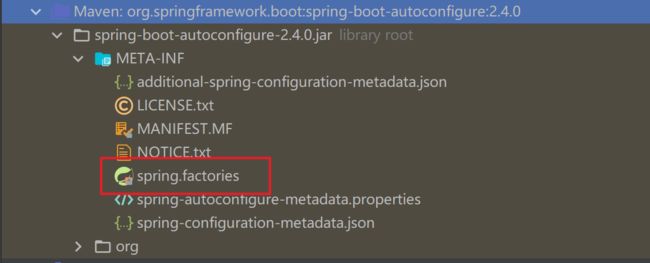
我们进入到@EnableAutoConfiguration,就会发现他导入了@implort注解导入了AutoConfigurationImportSelector配置类,该类有一个getCandidateConfiguration方法获取候选的配置方法,可以读取依赖中META-INF/spring.factories中各种候选的配置类,根据你引入的依赖作为条件引入预先设置好的各种配置。
1.3.2.2、AutoConfigurationImportSelector
@EnableAutoConfiguration注解导入了一个AutoConfigurationImportSelector自动配置类选择器,该类可以实现配置类批量载入spring容器。其核心方法是getCandidateConfigurations目的是在于候选的配置。
protected List<String> getCandidateConfigurations(
    AnnotationMetadata metadata, AnnotationAttributes attributes) {

    List<String> configurations = SpringFactoriesLoader.loadFactoryNames(
        getSpringFactoriesLoaderFactoryClass(),getBeanClassLoader());
    Assert.notEmpty(configurations,
                    "No auto configuration classes found in META-INF/spring.factories. If you "
                    + "are using a custom packaging, make sure that file is correct.");
    return configurations;
}
1.3.2.3、SpringFactoriesLoader
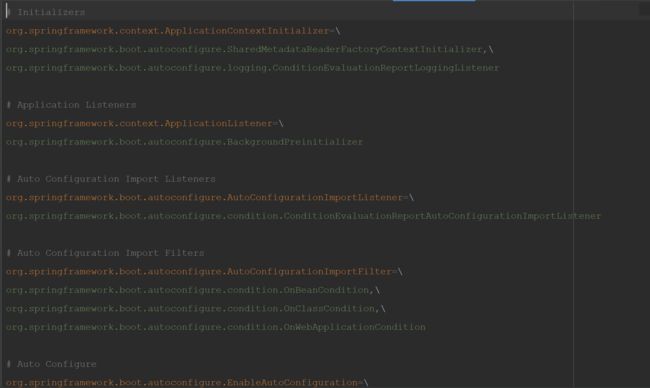
getCandidateConfigurations方法作用是委托SpringFactoriesLoader去读取jar包中的META-INF/spring.factories文件, 并加载里面配置的自动配置对象。这是自动装配的核心。
写启动器需要遵循SpringBoot的规范,都需要编写META-INF/spring.factories,里面指定启动器的自动配置类,告诉SpringBoot需要提前放置哪些配置,等满足条件就直接加载。
1.2.3.4、RedisAutoConfiguration分析
我们以RedisAutoConfiguration配置类分析。
@Configuration:表示这个类是一个配置类。@ConditionalOnWebApplication(type = Type.SERVLET):表示在满足项目的类是是Type.SERVLET类型。@ConditionalOnMissingBean({RepositoryRestMvcConfiguration.class}):表示如果环境中没有RepositoryRestMvcConfiguration这个Bean对象才生效。这个就是自定义配置的入口。@ConditionalOnClass({RepositoryRestMvcConfiguration.class}):表示满足容器中存在RepositoryRestMvcConfiguration这个Bean对象的时候才会生效。
@Configuration(
  proxyBeanMethods = false
)
@ConditionalOnWebApplication(
  type = Type.SERVLET
)
@ConditionalOnMissingBean({
     RepositoryRestMvcConfiguration.class})
@ConditionalOnClass({
     RepositoryRestMvcConfiguration.class})
@AutoConfigureAfter({
     HttpMessageConvertersAutoConfiguration.class, JacksonAutoConfiguration.class})
@EnableConfigurationProperties({
     RepositoryRestProperties.class})
@Import({
     RepositoryRestMvcConfiguration.class})
public class RepositoryRestMvcAutoConfiguration {

  public RepositoryRestMvcAutoConfiguration() {

  }

  @Bean
  public SpringBootRepositoryRestConfigurer springBootRepositoryRestConfigurer() {

    return new SpringBootRepositoryRestConfigurer();
  }
}
1.4、注意
1.4.1、为什么打成war包不是jar包
SpringBoot的默认打包方式是jar包。
在以前的开发中,Tomcat猫和web项目是独立的,必须满足一定的规则,Tomcat猫才可以部署war包。但是SpringBoot的项目是内嵌Tomcat,部署和运行一气呵成,所以就打成jar包方便。
1.4.2、pom.xml文件中的spring-boot-starter的作用
我们在创建SpringBoot项目的时候,可以发现引入了很多的start,他收集了市面上常用的jar包以及各种依赖,并且对这些依赖进行了版本管理,避免了很多的版本冲突问题,大大简化了我们的开发,在后续的项目中我们如果需要引入某个依赖,只需引入他的start即可,依赖的版本无需引入。列举额一些SpringBoot的常用的启动器:
spring-boot-starter: 核心启动器 , 提供了自动配置,日志和YAML配置支持

spring-boot-starter-aop: 支持使用 `Spring AOP` 和 `AspectJ` 进行切面编程。

spring-boot-starter-freemarker: 支持使用 `FreeMarker` 视图构建Web 应用

spring-boot-starter-test: 支持使用 `JUnit`, 测试 `Spring Boot` 应用

spring-boot-starter-web: 支持使用 `Spring MVC` 构建 Web 应用,包括 `RESTful` 应用,使用 `Tomcat` 作为默认的嵌入式容器。

spring-boot-starter-actuator: 支持使用 Spring Boot Actuator 提供生产级别的应用程序监控和管理功能。

spring-boot-starter-logging:  提供了对日志的支持 , 默认使用Logback
1.4.3、mave中强大的功能——继承
继承是 Maven 中很强大的一种功能,继承可以使得子POM可以获得 parent 中的部分配置(groupId,version,dependencies,build,dependencyManagement等),可以对子pom进行统一的配置和依赖管理。
1.4.4、DepencyManagement & dependencies区别
在SpringBoot的pom文件中,dependencies是放在DepencyManagement中的,那么这两者的区别何在:
- dependencies:即使在子项目中不写该依赖项,那么子项目仍然会从父项目中继承该依赖项(全部继承)。
- dependencyManagement:里只是声明依赖,并不实现引入,因此子项目需要显示的声明需要用的依赖。如果不在子项目中声明依赖,是不会从父项目中继承下来的;只有在子项目中写了该依赖项,并且没有指定具体版本,才会从父项目中继承该项,并且version和scope都读取自父pom;另外如果子项目中指定了版本号,那么会使用子项目中指定的jar版本(部分继承)。
1.4.5、SpringBoot在没有Tomcat的情况下如何启动
springboot使用嵌入式tomcat,编程实现,默认端口是8080,可以在application.properties中使用server.port进行设置。
1.4.6、SpringBoot的启动类的main方法中SpringApplication.run(…)详解
启动类中的主方法有四个作用:
- 启动SpringBoot程序。
- 加载自定义的配置类,完成自动装配。
- 将当前项目部署到内嵌的Tomcat中。
- 启动Tomcat运行项目。
二、SpringBoot配置文件语法
2.1、SpringBoot配置文件概述
当我们使用spring 初始化器构建完一个Spring Boot项目后,只需引入一个web启动器的依赖,它就变成一个web项目了,而我们什么都没有配置就能通过localhost:8080进行访问了,这是因为Spring Boot在底层已经把配置信息都给我们自动配置好了。
那我们怎么去修改默认配置信息?在使用Spring 初始化器创建一个Springboot项目的时候会在resources目录下自动生成一个文件 application.properties,这是一个空文件,它的作用是提供我们修改默认配置信息的入口。
Spring Boot还提供给我们另外一种风格的配置文件 application.yml,虽然是两个不同的文件但是本质是一样的,区别只是其中的语法略微不同。
2.2、Properties语法
application.properties 配置文件比较简单,他不需要空格进行区分,父属性和子属性之间是以.进行区分的。
# key = value
server.port=8080
2.3、YML
他是一种全新的语法格式,虽然书写略微繁琐但是他确实SpringBoot官方推荐的配置文件的格式,因为他可以存储比roperties配置文件更复杂的类型。他的语法特点:
- 大小写敏感。
- k:(空格)v:表示一对键值对(空格必须有),以空格的缩进来控制层级关系。
- 只要是左对齐的一列数据,则表示都是同一个层级的。
- “#” 表示注释,从这个字符一直到行尾,都会被解析器忽略。
server:
port: 8080
三、SpringBoot整合
SpringBoot最重要是整合各种框架,包括我们熟悉的Mybatis、Shiro等。
3.1、连接数据库
3.1.1、引入依赖
<dependency>
    <groupId>mysqlgroupId>
    <artifactId>mysql-connector-javaartifactId>
dependency>

<dependency>
    <groupId>org.springframework.bootgroupId>
    <artifactId>spring-boot-starter-jdbcartifactId>
dependency>
3.1.2、Hikari数据源
3.1.2.1、概述
在springboot2.0之后 , 采用的默认连接池就是Hikari, 号称"史上最快的连接池", 所以我们没有添加依赖也能直接用, springboot的自动配置中含有DataSourceAutoConfiguration配置类, 会先检查容器中是否已经有连接池对象, 没有则会使用默认的连接池, 并根据特定的属性来自动配置连接池对象, 用到的属性值来源于DataSourceProperties对象。
3.1.2.2、修改application.properties
spring.datasource.driver-class-name=com.mysql.cj.jdbc.Driver
spring.datasource.url=jdbc:mysql:///ssm_carbusiness?useUnicode=true&characterEncoding=utf8&serverTimezone=GMT%2B8
spring.datasource.username=root
spring.datasource.password=123456
3.1.3、Druid数据源
3.1.3.1、概述
虽然SpringBoot官方推荐的是Hikari数据源,但是如果我们想使用Druid数据源的话,也很简单。只需要添加依赖即可, 此时加的是Druid的springboot自动配置包, 里面包含了DruidDataSourceAutoConfigure自动配置类,会自动创建druid的连接池对象, 所以springboot发现已经有连接池对象了,则不会再使用Hikari。
3.1.3.2、引入依赖
<dependency>
    <groupId>com.alibabagroupId>
    <artifactId>druid-spring-boot-starterartifactId>
    <version>1.2.5version>
dependency>
3.1.3.3、修改application.properties
spring.datasource.druid.driver-class-name=com.mysql.jdbc.Driver
spring.datasource.druid.url=jdbc:mysql:///ssm_carbusiness?useUnicode=true&characterEncoding=utf8&serverTimezone=GMT%2B8
spring.datasource.druid.username=root
spring.datasource.druid.password=123456
3.1.3.4、注意
如果我们在写代码的时候不小心引错了包,引入了普通的依赖(不带start的普通依赖,只有Druid自身的依赖),并不是自动的配置包。那么SpringBoot就不会去进行解析还是需要我们去手动配置才可以生效。我们只需在application.properties中添加一行配置即可。
spring.datasource.type=com.alibaba.druid.pool.DruidDataSource
3.2、集成MyBatis
3.2.1、引入依赖
<dependency>
    <groupId>org.mybatis.spring.bootgroupId>
    <artifactId>mybatis-spring-boot-starterartifactId>
    <version>2.1.4version>
dependency>
3.2.2、配置接口扫描
在传统的SSM项目中,我们可以在配置文件中告诉Spring我的Mapper接口的位置,从而可以创建Mapper接口实现类的代理对象,在SpringBoot中没有了这个配置文件,那么我们只需在SpringBoot的启动类中添加一行配置即可。
@SpringBootApplication
// 添加这一行配置,告诉SpringBoot我的Mapper接口的位置在哪里
@MapperScan("cn.linstudy.mapper")
public class App {

	public static void main(String[] args) {

		SpringApplication.run(App.class, args);
	}
}
3.2.3、配置属性
在以前我们需要在application.xml中配置一些属性,从而更好地使用MyBatis,比如说mapper.xml文件的位置、是否开启懒加载、以及别名等等信息,现在这些信息都要在application.properties中进行配置,如果业务中无需使用,也可以不需要配置。
# 是否1开启懒加载
mybatis.configuration.lazy-loading-enabled=true
# 开启懒加载的方法
mybatis.configuration.lazy-load-trigger-methods=clone
# mapper.xml文件的配置
mybatis.mapper-locations=classpath:cn/wolfcode/*/mapper/*Mapper.xml
# 配置别名
mybatis.type-aliases-package=cn.wolfcode.sb.domain
#打印SQL日志
logging.level.cn.linstudy.mapper=trace
3.3、事务管理
3.3.1、引入依赖
<dependency>
    <groupId>org.springframework.bootgroupId>
    <artifactId>spring-boot-starter-aopartifactId>
dependency>
3.3.2、XML方式配置事务
采取配置类和XML混用的策略, 在配置类上使用@ImportResource(“classpath:spring-tx.xml”),我们在这个xml文件中书写事务、切面、切入点表达式。不推荐使用。
3.3.3、注解方式配置事务
SpringBoot的自动配置中提供了TransactionAutoConfiguration事务注解自动配置类,我们在引入依赖后,直接在业务层实现类上或者其方法上直接贴@Transactional注解即可,推荐使用。切记在使用之前一定要看看数据库的引擎是否支持事务。
SpringBoot默认使用的是CGLIB的动态代理,如果想要使用JDK的动态代理,那么仅需在application.properties中写一行配置即可。
#优先使用JDK代理
spring.aop.proxy-target-class=false
3.4、SpringBoot中静态资源的处理
3.4.1、静态资源的位置
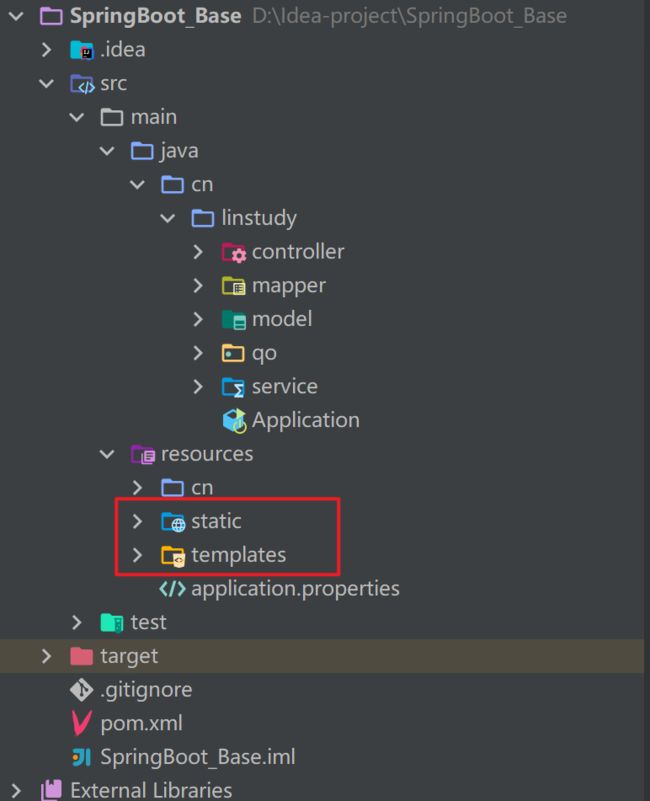
SpringBoot的标准目录和1传统的SSM的maven目录是不一样的,他在resources下还有两个目录专门来存放静态资源:
- static:用来存放CSS、JS等样式。
- templates:用来存放页面模板。
- 默认情况下,Springboot会从classpath下的
/static、/public、/resources、/META-INF/resources中四个位置下加载静态资源。
-
可以在application.properties中配置spring.resources.staticLocations属性来修改静态资源加载地址。
-
因为SpringBoot默认对
static下静态资源的映射路径为/,所以我们引入的时候无需写static。3.4.2、路径映射配置
在SpringBoot自动装配中,WebMvcAutoConfiguration的自动配置类导入了DispatcherServletAutoConfiguration的配置对象,会自动创建DispatcherServlet前端控制器,默认的< url-pattern > 是 /。
3.5、统一异常处理
3.5.1、SpringBoot默认方式
SpringBoot默认情况下,会把所有错误都交给BasicErrorController类完成处理,错误的视图导向到 classpath:/static/error/和 classpath:/templates/error/**路径上,http状态码就是默认视图的名称,如果出现了404错误,那么对应的模板为404.html。
如果我们想自己写一个错误页面,那么我们只需在默认的路径下创建一个同名的模板文件即可。
3.5.2、控制器增强的方式
自己定义一个控制器增强器,专门用于统一异常处理,该方式一般用于5xx类错误
@ControllerAdvice //控制器增强器
public class ExceptionControllerAdvice {

    @ExceptionHandler(RuntimeException.class) //处理什么类型的异常
    public String handlException(RuntimeException e, Model model) {

        return "errorView"; //错误页面视图名称
    }
}
3.6、过滤器
3.6.1、过滤器概述
过滤器是基于Servlet 技术实现的, 简单的来说,过滤器就是起到过滤的作用,在web项目开发中帮我们过滤一些指定的 url做一些特殊的处理,他主要的功能如下:
- 过滤掉一些不需要的东西,例如一些错误的请求。
- 可以修改请求和相应的内容。
- 可以拿来过滤未登录用户。
3.6.2、过滤器实现方式
主要有两种实现方式:
- 第一种是使用
@WebFilter。 - 第二种是使用
FilterRegistrationBean。
3.6.3、@WebFilter
3.6.3.1、概述
@WebFilter 用于将一个类声明为过滤器,该注解将会在部署时被容器处理,容器将根据具体的属性配置将相应的类部署为过滤器。
| 属性名 | 类型 | 描述 |
|---|---|---|
| filterName | String | 指定该Filter的名称 |
| urlPatterns | String | String |
| value | String | 与 urlPatterns 一致 |
3.6.3.2、代码实现
创建一个MyFilter.java实现Filter接口
import org.springframework.stereotype.Component;
import javax.servlet.*;
import javax.servlet.annotation.WebFilter;
import javax.servlet.http.HttpServletRequest;
import java.io.IOException;
@WebFilter(urlPatterns = "/api/*",filterName = "myFilter")
@Order(1)//指定过滤器的执行顺序,值越大越靠后执行
public class MyFilter implements Filter {

@Override
public void init(FilterConfig filterConfig) throws ServletException {

	System.out.println("初始化过滤器");
}
@Override
public void doFilter(ServletRequest servletRequest, ServletResponse servletResponse,
	FilterChain filterChain) throws IOException, ServletException {

	HttpServletRequest request= (HttpServletRequest) servletRequest;
	String uri=request.getRequestURI();
	String method=request.getMethod();
	System.out.println(uri+" "+method+"哈哈我进入了 MyFilter 过滤器了");
	filterChain.doFilter(servletRequest,servletResponse);
	}
}
启动类加上 @ServletComponentScan 注解
创建一个 FilterController 接口
import org.springframework.web.bind.annotation.GetMapping;
import org.springframework.web.bind.annotation.RestController;

@RestController
@RequestMapping("/api")
public class HelloController {

	@GetMapping("/user/filter")
	public String hello(){

		return "哈哈我通过了过滤器";
	}
}
3.6.4、FilterRegistrationBean 实现
创建 FilterConfig
import com.yingxue.lesson.filter.MyFilter;
import org.springframework.boot.web.servlet.FilterRegistrationBean;
import org.springframework.context.annotation.Bean;
import org.springframework.context.annotation.Configuration;
@Configuration
public class FilterConfig {

@Bean
public MyFilter myFilter(){

return new MyFilter();
}
@Bean
public FilterRegistrationBean getFilterRegistrationBean(MyFilter myFilter){

        FilterRegistrationBean filterRegistrationBean=new FilterRegistrationBean();
        /**
        * 设置过滤器
        */
        filterRegistrationBean.setFilter(MyFilter());
        /**
        * 拦截路径
        */
        filterRegistrationBean.addUrlPatterns("/api/*");
        /**
        * 设置名称
        */
        filterRegistrationBean.setName("myFilter");
        /**
        * 设置访问优先级 值越小越高
        */
        filterRegistrationBean.setOrder(1);
	return filterRegistrationBean;
	}
}
修改 MyFilter.java
//@WebFilter(urlPatterns ={"/api/*"},filterName = "myFilter")
修改启动类
//@ServletComponentScan
3.7、拦截器
3.7.1、概述
简单的来说,就是一道阀门,在某个方法被访问之前,进行拦截,然后在之前或之后加入某些操作,拦截器是AOP 的一种实现策略,他的主要功能是对正在运行的流程进行干预。
3.7.2、拦截器方法概述
拦截器也主要有三个方法:
- preHandle是在请求之前就进行调用,如果该请求需要被拦截,则返回false,否则true。
- postHandle是在请求之后进行调用,无返回值。
- afterCompletion是在请求结束的时候进行调用,无返回值。
3.7.3、代码实现
创建拦截器类并实现 HandlerInterceptor 接口
public class MyInterceptor implements HandlerInterceptor {

	@Value("${open.url}")
	private String openUrl;
	@Override
	public boolean preHandle(HttpServletRequest request, HttpServletResponse response, Object handler) throws Exception {

		System.out.println("MyInterceptor....在请求处理之前进行调用(Controller方法调用之前)");
		String requestUrl=request.getRequestURI();
		System.out.println("过滤器MyFilter拦截了请求为"+requestUrl);
		return true;
	}
    @Override
	public void postHandle(HttpServletRequest request, HttpServletResponse response, Object handler, ModelAndView modelAndView) throws Exception {

		System.out.println("MyInterceptor...请求处理之后进行调用,但是在视图被渲染之前(Controller方法调用之后)");
	}
	@Override
	public void afterCompletion(HttpServletRequest request, HttpServletResponse response, Object handler, Exception ex) throws Exception {

		System.out.println("MyInterceptor....在整个请求结束之后被调用,也就是在DispatcherServlet 渲染了对应的视图之后执行(主要是用于进行资源清理工作)");
	}
}
修改 application.properties
我们需要在application.properties中添加一行代码加入开发接口通配地址,表示放行的代码
#凡是请求地址层级带有 open 都放行
open.url=/**/open/**
创建一个 Java 实现 WebMvcConfigurer,并重写 addInterceptors 方法
@Configuration
public class WebAppConfig implements WebMvcConfigurer {

	@Value("${open.url}")
	private String openUrl;
	@Bean
	public MyInterceptor getMyInterceptor(){

		return new MyInterceptor();
	}
	@Override
	public void addInterceptors(InterceptorRegistry registry) {

registry.addInterceptor(getMyInterceptor()).addPathPatterns("/api/**").excludePathPatterns(openUrl);
	}
}
3.7.4、测试
@RestController
@RequestMapping("/api")
public class InterceptorController {

	@GetMapping("/home/open/info")
	public String home(){

		return "欢迎来到首页";
	}
	@GetMapping("/user/interceptor")
	public String interceptor(){

		return "我被拦截了并通过了拦截器";
	}
}
3.8、日志
日志对于我们的系统测试和调试时有着很重要的地位,我们在系统开发的时候,以前时经常使用System.out.print()这句话来输出一些系统的信息,但是在实际的工作中却不会用到这种方法来输出日志,原因大概有以下几点:
- 比起System.out.println,日志框架更为灵活,可以把日志的输出和代码分离。
- 日志框架可以方便的定义日志的输出环境,控制台,文件,数据库。
- 日志框架可以方便的定义日志的输出格式和输出级别。
3.8.1、日志介绍
3.8.1.1、SpringBoot中的日志介绍
我们在SpringBoot启动的时候就可以看到时默认开启了日志的。从左往右分别为:时间 、日志级别 线程ID 、 线程名称、 日志类、 日志说明。
日志级别,级别越高,输出的内容越少, 如果设置的级别为info, 则debug以及trace级别的都无法显示trace < debug < info < warn < error
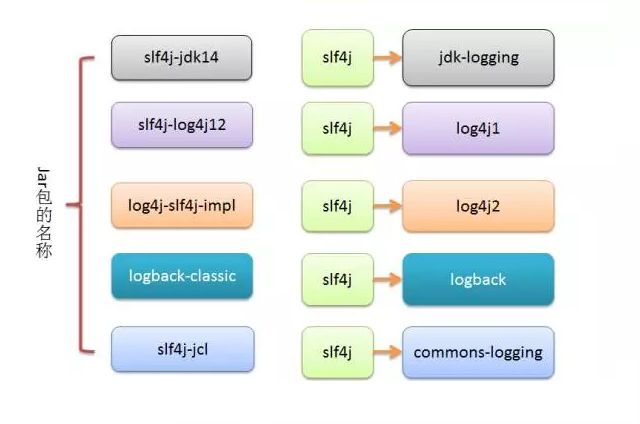
Springboot默认选择Logback作为日志框架,也能选择其他日志框架,但是没有必要
3.8.1.2、输出日志的两种方式
在类中定义一个静态Logger对象
// 这里传入当前类的作用是方便输出日志时可以清晰地看到该日志信息是属于哪个类的
private static final Logger log = LoggerFactory.getLogger(当前类.class);
使用lombok提供的
@Slf4j注解
@Slf4j
@Service
public class PermissionServiceImpl implements IPermissionService {
     }
    //输出日志中有变量可以使用{}作为占位符
    log.info("删除id为{}的数据", id);
    log.debug("权限插入成功:{}",expression);
    log.info("权限插入成功:{}",expression);
    log.warn("权限插入成功:{}",expression);
}
3.8.1.3、Logback配置文件的使用
Logback框架默认会自动加载classpath:logback.xml,作为框架的配置文件。在SpringBoot中使用时,还会额外的支持自动加载classpath:logback-spring.xml。所以推荐使用logback-spring.xml,功能更强大些。
<configuration scan="true" scanPeriod="60 second" debug="false">
    <property name="appName" value="springboot demo" />
    <contextName>${appName}contextName>


    <appender name="STDOUT" class="ch.qos.logback.core.ConsoleAppender">
        <encoder>
            <pattern>%d{yyyy-MM-dd-HH:mm:ss} %level [%thread]-%logger{35} >> %msg %npattern>
     encoder>
   appender>


   <root level="info">
        <appender-ref ref="STDOUT" />
    root>


configuration>
3.9、集成前端
3.9.1、集成JSP
提起 Java 不得不说的一个开发场景就是 Web 开发,说到 Web 开发绕不开的一个技术就是 JSP,SpringBoot官方虽然已经不推荐使用JSP了,但是集成JSP还是很重要的。
3.9.1.1、引入依赖
<dependency>
	<groupId>javax.servletgroupId>
	<artifactId>jstlartifactId>
dependency>

<dependencys>
	<groupId>org.apache.tomcat.embedgroupId>
	<artifactId>tomcat-embed-jasperartifactId>
dependency>
3.9.1.2、编辑 project Structure
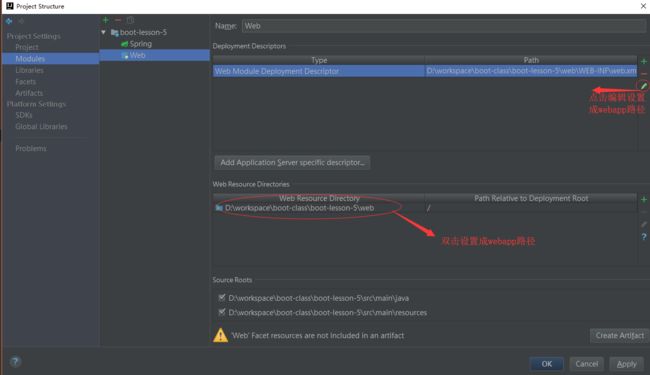
3.9.1.3、Spring Mvc 视图解析器配置
我们需要修改application .properties,加入Spring Mvc 视图解析器配置
spring.mvc.view.prefix=/WEB-INF/jsp/
spring.mvc.view.suffix=.jsp
3.9.1.4、总结
所以我们在以后遇到,老旧的项目升级成Spring Boot 项目时候,首先得配置好 webapp 这个跟路径、配置好 web、再配置 ORM 所需的一些配置,最后记得配置视图解析器。所需的配置配置好后就可以直接把代码拷入新的项目了。
3.9.2、集成FreeMarker
在传统的SpringMVC中集成FreeMarker需要把FreeMarkerConfigurer和FreeMarkerViewResolve两个对象配置到Spring容器中,同时两个对象都要分别配置一些属性,还是比较麻烦的,在SpringBoot中,依靠自动配置功能,我们可以非常轻松的实现集成FreeMarker,只需要引入一个依赖即可。
<dependency>
    <groupId>org.springframework.bootgroupId>
    <artifactId>spring-boot-starter-freemarkerartifactId>
dependency>
3.9.2.1、底层原理
SpringBoot的自动配置中含有FreeMarkerAutoConfiguration配置对象,该配置对象又导入了FreeMarkerReactiveWebConfiguration配置对象,在里面创建了FreeMarkerConfigurer和FreeMarkerViewResolve两个对象交给Spring管理,并且设置了默认的属性值,这些属性值来源于FreeMarkerProperties对象
3.9.2.2、常见属性配置
# 是否开启freemarker支持
spring.freemarker.enabled=true
# 模板编码
spring.freemarker.charset=UTF-8
# 模板contenttype
spring.freemarker.content-type=text/html
# 是否开启session属性暴露,默认false
spring.freemarker.expose-session-attributes = false
# 加载模板时候的前缀
spring.freemarker.prefix: templates
# 模板文件后缀,SpringBoot2.X默认是ftlh,有时候我们的模板后缀是ftl
spring.freemarker.suffix: ftl
# 模板加载地址
spring.freemarker.template-loader-path=classpath:/templates/

#一般我们会做3个配置,其余默认
# 暴露session对象的属性
spring.freemarker.expose-session-attributes=true
# 配置为传统模式,空值自动处理
spring.freemarker.settings.classic_compatible=true
# 重新指定模板文件后缀 springboot 2.2.x 后 默认后缀为 .ftlh
spring.freemarker.suffix=.ftl
3.9.3、整合 Thymeleaf
Thymeleaf是一款用于渲染XML/XHTML/HTML5内容的模板引擎。类似JSP,FreeMaker等, 它也可以轻易的与 Web 框架进行集成作。
为 Web 应用的模板引擎。与其它模板引擎相比, Thymeleaf 最大的特点是能够直接在浏览器中打开并正确显示模板页面,而不需要启动整个Web应用。
thymeLeaf支持Spring Expression Language语言作为方言,也就是SpEL,SpEL是可以用于Spring中的一种EL表达式。
它与我们使用过的JSP不同,thymeleaf是使用html的标签来完成逻辑和数据的传入进行渲染。可以说用 thymeleaf 完全替代 jsp 是可行的。
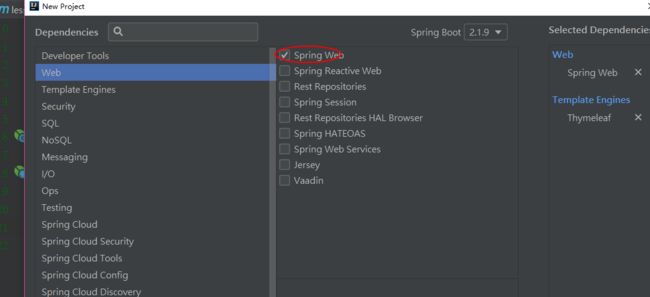
3.9.3.1、创建项目
3.9.3.2、Spring Mvc 视图解析器配置
#thymeleaf
# 前缀 默认读取classpath:/templates/
#无需配置
#spring.thymeleaf.prefix=classpath:/templates/
# 后缀
spring.thymeleaf.suffix=.html
spring.thymeleaf.charset=UTF-8
spring.thymeleaf.servlet.content-type=text/html
3.9.3.3、测试
在templates下创建一个hello.html 必须加入xmlns:th=“http://www.thymeleaf.org” Thymeleaf声明空间。
