Vue知识(二)组件化开发
组件化开发
- 组件化开发(上)
-
- 注册组件
- 父组件和子组件
- 注册组件语法糖
- 组件模板template的抽离写法
- 组件数据
- 父子组件通信
- 组件化开发(下)
-
- 概述
- 编译作用域
- 使用Slot
- 指定名称的slot
- 父子组件之间的访问
-
- $children示例
- $refs示例
- $parent示例
组件化开发(上)
将一个复杂的问题,拆分成很多歌可以处理的小问题,再将其放在整体当中。
组件化也是类似的思想:
- 如果我们将一个页面中所有的处理逻辑全部放在一起,处理起来就会变得非常复杂,而且不利于后续的管理以及扩展。
- 但如果,我们讲一个页面拆分成一个个小的功能块,每个功能块完成属于自己这部分独立的功能,那么之后整个页面的管理和维护就变得非常容易了。

组件化是Vue.js中的重要思想
- 它提供了一种抽象,让我们可以开发出一个个独立可复用的小组件来构造我们的应用。
- 任何的应用都会被抽象成一颗组件树。

注册组件
注册组件的基本步骤
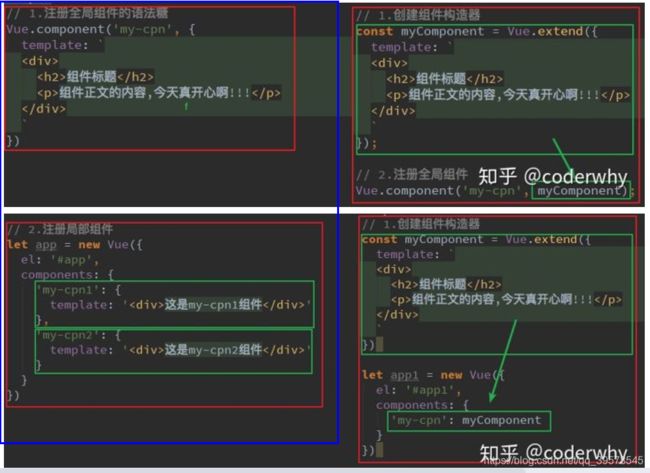
- 创建组件构造器
- 注册组件
- 使用组件。
注意:注册组件的第一个参数不能使用驼峰命名

注册组件步骤解析
1.Vue.extend():
- 调用Vue.extend()创建的是一个组件构造器。
- 通常在创建组件构造器时,传入template代表我们自定义组件的模板。
- 该模板就是在使用到组件的地方,要显示的HTML代码。
- 事实上,这种写法在Vue2.x的文档中几乎已经看不到了,它会直接使用下面我们会讲到的语法糖,但是在很多资料还是会提到这种方式,而且这种方式是学习后面方式的基础。
2.Vue.component():
- 调用Vue.component()是将刚才的组件构造器注册为一个组件,并且给它起一个组件的标签名称。
- 所以需要传递两个参数:1、注册组件的标签名 2、组件构造器
3.组件必须挂载在某个Vue实例下,否则它不会生效。(见下页)
- 我们来看下面我使用了三次
- 而第三次其实并没有生效:

全局组件和局部组件
当我们通过调用Vue.component()注册组件时,组件的注册是全局的。
- 这意味着该组件可以在任意Vue示例下使用。
如果我们注册的组件是挂载在某个vue的实例中, 那么就是一个局部组件。

父组件和子组件
子组件放在父组件下进行注册,Child组件是在Parent组件中注册的,它只能在Parent组件中使用,确切地说:子组件只能在父组件的template中使用。

父子组件错误用法:以子标签的形式在Vue实例中使用。
<div id="app">
	<parent-component>
		<child-component>child-component>
	parent-component>
div>
有以下四点原因
- 当子组件注册到父组件的components时,Vue会编译好父组件的模块
- 模板的内容已经决定了父组件将要渲染的HTML(相当于父组件中已经有了子组件中的内容了)
- 类似这种用法,
注册组件语法糖
在上面注册组件的方式,可能会有些繁琐。
- Vue为了简化这个过程,提供了注册的语法糖。
- 主要是省去了调用Vue.extend()的步骤,而是可以直接使用一个对象来代替。
之前方式:
<body>
<div id="app">
<cpn1>cpn1>
div>
<script src="../js/vue.js">script>
<script>
// 1.创建组件构造器
const cpn1 = Vue.extend({
template: `我是标题2
`
});
// 2.注册组件
Vue.component('cpn1', cpn1)
script>
<script>
const app = new Vue({
el: '#app', // 用于挂载要管理的元素
})
script>
body>
语法糖注册全局组件和局部组件:
全局组件
Vue.component()的第1个参数是标签名称,第2个参数是一个选项对象,使用选项对象的template属性定义组件模板。
使用这种方式,Vue在背后会自动地调用Vue.extend()。
<div id="app">
<cpn1>cpn1>
div>
<script src="../js/vue.js">script>
<script>
// 一起调用 1.创建组件构造器 2.注册组件
Vue.component('cpn1', {
template: `我是标题2
`
})
script>
<script>
const app = new Vue({
el: '#app', // 用于挂载要管理的元素
})
script>
局部组件
在选项对象的components属性中实现局部注册:
<div id="app">
<cpn2>cpn2>
div>
<script src="../js/vue.js">script>
<script>
const app = new Vue({
el: '#app', // 用于挂载要管理的元素
components: {
'cpn2': {
template: `我是局部组件
`
}
}
})
script>
组件模板template的抽离写法
如果我们能将其中的HTML分离出来写,然后挂载到对应的组件上,必然结构会变得非常清晰。
Vue提供了两种方案来定义HTML模块内容:
- 使用script标签
- 使用template标签

组件数据
以下做法是错误的:组件内部是不能访问Vue实例的。

组件中的data必须是函数
传入Vue构造器的多数选项也可以用在 Vue.extend() 或Vue.component()中,不过有两个特例: data 和el。
Vue.js规定:在定义组件的选项时,data和el选项必须使用函数。
- 组件对象也有一个data属性(也可以有methods等属性,下面我们有用到)
- 只是这个data属性必须是一个函数,为了保证组件实例有各自空间对象来保存自己的状态,避免共享变量。(不是函数会报错)
- 这个函数返回一个对象,对象内部保存着数据,函数每次执行都会创建新的对象空间

父子组件通信
在开发中,往往一些数据确实需要从上层传递到下层:
- 比如在一个页面中,我们从服务器请求到了很多的数据。
- 其中一部分数据,并非是我们整个页面的大组件来展示的,而是需要下面的子组件进行展示。
- 这个时候,并不会让子组件再次发送一个网络请求,而是直接让大组件(父组件) 将数据传递给小组件(子组件)。
如何进行父子组件间的通信呢?Vue官方提到
- 通过props向子组件传递数据
- 通过事件向父组件发送消息

props基本用法
在组件中,使用选项props来声明需要从父级接收到的数据。
props的值有两种方式:
- 方式一:字符串数组,数组中的字符串就是传递时的名称。
- 方式二:对象,对象可以设置传递时的类型,也可以设置默认值等。
父传子
在下面的代码中,我直接将Vue实例当做父组件,并且其中包含子组件来简化代码。
真实的开发中,Vue实例和子组件的通信和父组件和子组件的通信过程是一样的。

props数据验证
在前面,我们的props选项是使用一个数组。
除了数组之外,我们也可以使用对象,当需要对props进行类型等验证时,就需要对象写法了。
验证都支持哪些数据类型呢?
String、Number、Boolean、Array、Object、Date、Function、Symbol
props基础示例
下面的代码定义了一个子组件my-component,在Vue实例中定义了data选项。
var vm = new Vue({
	el: '#app',
	data: {
		name: 'keepfool',
		age: 28
	},
	components: {
		'my-component': {
			template: '#myComponent',
			props: ['myName', 'myAge']
		}
	}
})
为了便于理解,你可以将这个Vue实例看作my-component的父组件。
如果我们想使用父组件的数据,则必须先在子组件中定义props属性,也就是props: ['myName', 'myAge']这行代码。
定义子组件的HTML模板:
<template id="myComponent">
	<table>
		<tr>
			<th colspan="2">
				子组件数据
			th>
		tr>
		<tr>
			<td>my nametd>
			<td>{
    { myName }}td>
		tr>
		<tr>
			<td>my agetd>
			<td>{
    { myAge }}td>
		tr>
	table>
template>
将父组件数据通过已定义好的props属性传递给子组件:
<div id="app">
	<my-component v-bind:my-name="name" v-bind:my-age="age">my-component>
div>
注意:在子组件中定义prop时,使用了camelCase命名法。由于HTML特性不区分大小写,camelCase的prop用于特性时,需要转为 kebab-case(短横线隔开)。例如,在prop中定义的myName,在用作特性时需要转换为my-name。
父组件是如何将数据传给子组件的呢?相信看了下面这图,也许你就能很好地理解了。
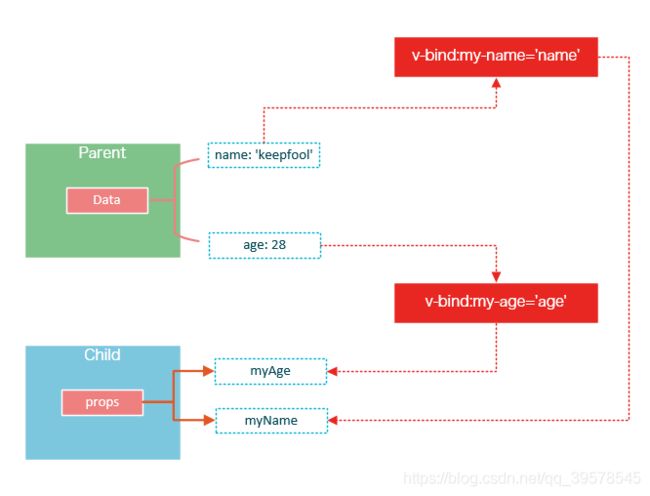
在父组件中使用子组件时,通过以下语法将数据传递给子组件:
当我们有自定义构造函数时,验证也支持自定义的类型

prop的绑定类型
单向绑定
既然父组件将数据传递给了子组件,那么如果子组件修改了数据,对父组件是否会有所影响呢?
我们将子组件模板和页面HTML稍作更改:
var vm = new Vue({
	el: '#app',
	data: {
		name: 'keepfool',
		age: 28
	},
	components: {
		'my-component': {
			template: '#myComponent',
			props: ['myName', 'myAge']
		}
	}
})
<div id="app">

	<table>
		<tr>
			<th colspan="3">父组件数据td>
		tr>
		<tr>
			<td>nametd>
			<td>{
    { name }}td>
			<td><input type="text" v-model="name" />td>
		tr>
		<tr>
			<td>agetd>
			<td>{
    { age }}td>
			<td><input type="text" v-model="age" />td>
		tr>
	table>

	<my-component v-bind:my-name="name" v-bind:my-age="age">my-component>
div>

<template id="myComponent">
	<table>
		<tr>
			<th colspan="3">子组件数据td>
		tr>
		<tr>
			<td>my nametd>
			<td>{
    { myName }}td>
			<td><input type="text" v-model="myName" />td>
		tr>
		<tr>
			<td>my agetd>
			<td>{
    { myAge }}td>
			<td><input type="text" v-model="myAge" />td>
		tr>
	table>
template>
修改了父组件的数据,同时影响了子组件。
prop默认是单向绑定:当父组件的属性变化时,将传导给子组件,但是反过来不会。这是为了防止子组件无意修改了父组件的状态

双向绑定
可以使用.sync显式地指定双向绑定,这使得子组件的数据修改会回传给父组件。
单次绑定
可以使用.once显式地指定单次绑定,单次绑定在建立之后不会同步之后的变化,这意味着即使父组件修改了数据,也不会传导给子组件。
示例
<html>

	<head>
		<meta charset="UTF-8">
		<title>title>
		<link rel="stylesheet" href="styles/demo.css" />
	head>

	<body>
		<div id="app">
			<div id="searchBar">
				Search <input type="text" v-model="searchQuery" />
			div>
			<simple-grid :data="gridData" :columns="gridColumns" :filter-key="searchQuery">
			simple-grid>
		div>

		<template id="grid-template">
			<table>
				<thead>
					<tr>
						<th v-for="col in columns">
							{
    { col | capitalize}}
						th>
					tr>
				thead>
				<tbody>
					<tr v-for="entry in data | filterBy filterKey">
						<td v-for="col in columns">
							{
    {entry[col]}}
						td>
					tr>
				tbody>
			table>
		template>

	body>
	<script src="js/vue.js">script>
	<script>
		Vue.component('simple-grid', {

			template: '#grid-template',
			props: {

				data: Array,
				columns: Array,
				filterKey: String
			}
		})

		var demo = new Vue({

			el: '#app',
			data: {

				searchQuery: '',
				gridColumns: ['name', 'age', 'sex'],
				gridData: [{

					name: 'Jack',
					age: 30,
					sex: 'Male'
				}, {

					name: 'Bill',
					age: 26,
					sex: 'Male'
				}, {

					name: 'Tracy',
					age: 22,
					sex: 'Female'
				}, {

					name: 'Chris',
					age: 36,
					sex: 'Male'
				}]
			}
		})
	script>
html>
1.prop验证
props: {
	data: Array,
	columns: Array,
	filterKey: String
}
这段代码表示:父组件传递过来的data和columns必须是Array类型,filterKey必须是字符串类型。
2.filterBy过滤器
可以根据指定的字符串过滤数据
组件化开发(下)
概述
在子组件中定义props,可以让父组件的数据传递下来,这就好比子组件告诉父组件:“嘿,老哥,我开通了一个驿站,你把东西放到驿站我就可以拿到了。”
今天我们将着重介绍slot和父子组件之间的访问和通信,slot是一个非常有用的东西,它相当于一个内容插槽,它是我们重用组件的基础。Vue的事件系统独立于原生的DOM事件,它用于组件之间的通信。
本文的主要内容如下:
- 组件的编译作用域
- 在组件template中使用
- 使用
$children, $refs, $parent实现父子组件之间的实例访问 - 在子组件中,使用
$dispatch向父组件派发事件;在父组件中,使用$broadcast向子组件传播事件 - 结合这些基础知识,我们一步一步实现一个CURD的示例
编译作用域
尽管使用组件就像使用一般的HTML元素一样,但它毕竟不是标准的HTML元素,为了让浏览器能够识别它,组件会被解析为标准的HTML片段,然后将组件的标签替换为该HTML片段。
<div id="app">
	<my-component>
	my-component>
div>

<template id="myComponent">
	<div>
		<h2>{
    { msg }}h2>
		<button v-on:click="showMsg">Show Messagebutton>
	div>
template>
<script src="js/vue.js">script>
<script>
	new Vue({
		el: '#app',
		components: {
			'my-component': {
				template: '#myComponent',
				data: function() {
					return {
						msg: 'This is a component!'
					}
				},
				methods: {
					showMsg: function() {
						alert(this.msg)
					}
				}
			}
		}
	})
这段代码定义了一个my-component组件,
那么Vue是如何让浏览器理解

在创建一个Vue实例时,除了将它挂载到某个HTML元素下,还要编译组件,将组件转换为HTML片段。
除此之外,Vue实例还会识别其所挂载的元素下的
组件在使用前,经过编译已经被转换为HTML片段了,组件是有一个作用域的,那么组件的作用域是什么呢?
你可以将它理解为组件模板包含的HTML片段,组件模板内容之外就不是组件的作用域了。
例如,my-component组件的作用域只是下面这个小片段。

父组件模板的内容在父组件作用域内编译;子组件模板的内容在子组件作用域内编译
通俗地讲,在子组件中定义的数据,只能用在子组件的模板。在父组件中定义的数据,只能用在父组件的模板。如果父组件的数据要在子组件中使用,则需要子组件定义props。
使用Slot
为了让组件可以组合,我们需要一种方式来混合父组件的内容与子组件自己的模板。这个处理称为内容分发,Vue.js 实现了一个内容分发 API,使用特殊的
单个Slot
下面的代码在定义my-component组件的模板时,指定了一个
<div id="app">
	<my-component>
		<h1>Hello Vue.js!h1>
	my-component>

	<my-component>
	my-component>
div>
<template id="myComponent">
	<div class="content">
		<h2>This is a component!h2>
		<slot>如果没有分发内容,则显示slot中的内容slot>
		<p>Say something...p>
	div>
template>
<script src="js/vue.js">script>
<script>
	Vue.component('my-component', {

		template: '#myComponent'
	})

	new Vue({

		el: '#app'
	})
script>

第一个Hello Vue.js!

第二个
指定名称的slot
上面这个示例是一个匿名slot,它只能表示一个插槽。如果需要多个内容插槽,则可以为slot元素指定name属性。
多个slot一起使用时,会非常有用。例如,对话框是HTML常用的一种交互方式。
在不同的运用场景下,对话框的头部、主体内容、底部可能是不一样的。

这时,使用不同名称的slot就能轻易解决这个问题了。
<template id="dialog-template">
	<div class="dialogs">
		<div class="dialog" v-bind:class="{ 'dialog-active': show }">
			<div class="dialog-content">
				<div class="close rotate">
					<span class="iconfont icon-close" @click="close">span>
				div>
				<slot name="header">slot>
				<slot name="body">slot>
				<slot name="footer">slot>
			div>
		div>
		<div class="dialog-overlay">div>
	div>
template>

<script src="js/vue.js">script>
<script>
	Vue.component('modal-dialog', {

		template: '#dialog-template',
		props: ['show'],
		methods: {

			close: function() {

				this.show = false
			}
		}
	})

	new Vue({

		el: '#app',
		data: {

			show: false
		},
		methods: {

			openDialog: function() {

				this.show = true
			},
			closeDialog: function() {

				this.show = false
			}
		}
	})
script>
在定义modal-dialog组件的template时,我们使用了3个slot,它们的name特性分别是header、body和footer。
在
<div id="app">
	<modal-dialog v-bind:show.sync="show">

		<header class="dialog-header" slot="header">
			<h1 class="dialog-title">提示信息h1>
		header>

		<div class="dialog-body" slot="body">
			<p>你想在对话框中放什么内容都可以!p>
			<p>你可以放一段文字,也可以放一些表单,或者是一些图片。p>
		div>

		<footer class="dialog-footer" slot="footer">
			<button class="btn" @click="closeDialog">关闭button>
		footer>
	modal-dialog>

	<button class="btn btn-open" @click="openDialog">打开对话框button>
div>
对话框的标题内容、主体内容、底部内容,完全由我们自定义,而且这些内容就是一些简单的HTML元素!

父子组件之间的访问
有时候我们需要父组件访问子组件,子组件访问父组件,或者是子组件访问根组件。
针对这几种情况,Vue.js都提供了相应的API:
父组件访问子组件:使用$children或$refs
子组件访问父组件:使用$parent
子组件访问根组件:使用$root
$children示例
下面这段代码定义了3个组件:父组件parent-component,两个子组件child-component1和child-component2。
在父组件中,通过this.$children可以访问子组件。
this.$children是一个数组,它包含所有子组件的实例。
<div id="app">
	<parent-component>parent-component>
div>

<template id="parent-component">
	<child-component1>child-component1>
	<child-component2>child-component2>
	<button v-on:click="showChildComponentData">显示子组件的数据button>
template>

<template id="child-component1">
	<h2>This is child component 1h2>
template>

<template id="child-component2">
	<h2>This is child component 2h2>
template>

<script src="js/vue.js">script>
<script>
	Vue.component('parent-component', {

		template: '#parent-component',
		components: {

			'child-component1': {

				template: '#child-component1',
				data: function() {

					return {

						msg: 'child component 111111'
					}
				}
			},
			'child-component2': {

				template: '#child-component2',
				data: function() {

					return {

						msg: 'child component 222222'
					}
				}
			}
		},
		methods: {

			showChildComponentData: function() {

				for (var i = 0; i < this.$children.length; i++) {

					alert(this.$children[i].msg)
				}
			}
		}
	})

	new Vue({

		el: '#app'
	})
script>

$refs示例
组件个数较多时,我们难以记住各个组件的顺序和位置,通过序号访问子组件不是很方便。
在子组件上使用v-ref指令,可以给子组件指定一个索引ID:
<template id="parent-component">
	<child-component1 v-ref:cc1>child-component1>
	<child-component2 v-ref:cc2>child-component2>
	<button v-on:click="showChildComponentData">显示子组件的数据button>
template>
在父组件中,则通过$refs.索引ID访问子组件的实例:
showChildComponentData: function() {
	alert(this.$refs.cc1.msg);
	alert(this.$refs.cc2.msg);
}
$parent示例
下面这段代码定义了两个组件:child-component和它的父组件parent-component。
在子组件中,通过this.$parent可以访问到父组件的实例。
<div id="app">
	<parent-component>parent-component>
div>

<template id="parent-component">
	<child-component>child-component>
template>

<template id="child-component">
	<h2>This is a child componenth2>
	<button v-on:click="showParentComponentData">显示父组件的数据button>
template>

<script src="js/vue.js">script>
<script>
	Vue.component('parent-component', {

		template: '#parent-component',
		components: {

			'child-component': {

				template: '#child-component',
				methods: {

					showParentComponentData: function() {

						alert(this.$parent.msg)
					}
				}
			}
		},
		data: function() {

			return {

				msg: 'parent component message'
			}
		}
	})
	new Vue({

		el: '#app'
	})
script>

注意:尽管可以访问父链上任意的实例,不过子组件应当避免直接依赖父组件的数据,尽量显式地使用 props 传递数据。另外,在子组件中修改父组件的状态是非常糟糕的做法,因为:
1.这让父组件与子组件紧密地耦合;
2.只看父组件,很难理解父组件的状态。因为它可能被任意子组件修改!理想情况下,只有组件自己能修改它的状态。
说到底,组件的API主要来源于以下三部分:
- prop 允许外部环境传递数据给组件;
- 事件 允许组件触发外部环境的 action;
- slot 允许外部环境插入内容到组件的视图结构内。