Day15:数据采集工具Flume与Sqoop
-
- 知识点01:回顾
- 知识点02:目标
- 知识点03:Flume的功能与应用
- 知识点04:Flume的基本组成
- 知识点05:Flume的开发规则
- 知识点06:Flume开发测试
- 知识点07:常用Source:Exec
- 知识点08:常用Source:Taildir
- 知识点09:常用Channel:file和mem
- 知识点10:常用Sink:HDFS
- 知识点11:Sqoop的功能与应用
- 知识点12:Sqoop导入:HDFS
- 知识点13:Sqoop导入:Hive
- 知识点14:Sqoop导入:增量
- 知识点15:Sqoop导出:全量
- 知识点16:Sqoop导出:增量
- 知识点17:Sqoop Job
- 知识点18:Sqoop密码问题与脚本封装
知识点01:回顾
-
在线教育项目中的需求和模块是什么?
- 需求
- step1:基于各个维度统计分析转化率
- 访问、咨询、意向、报名
- step2:基于各个维度统计分析考勤指标
- 出勤率、迟到率、旷课率、请假率
- step1:基于各个维度统计分析转化率
- 模块
- 访问与咨询分析模块
- 意向分析模块
- 报名分析模块
- 考勤分析模块
- 需求
-
整个项目架构中使用到了哪些技术?
- 数据生成:MySQL
- 访问与咨询:客服系统
- 意向与报名:CRM系统
- 考勤分析:学员管理系统
- 数据采集:Sqoop
- 数据存储:Hive【数据仓库】
- 数据处理:HiveQL:MapReduce
- 数据应用
- 结果:MySQL
- 报表:FineBI
- 可视化交互:Hue
- 任务流调度:Oozie
- 集群管理:CM
- 数据生成:MySQL
-
常用的数据源有哪些?
- 业务数据:MySQL
- 本次项目所有数据都来自于业务系统
- 用户行为数据:日志文件
- 基于埋点,监听用户的行为,将用户行为的数据发送给日志服务器
- 爬虫数据
- 运维数据
- 第三方数据
- 业务数据:MySQL
知识点02:目标
- 实时数据流采集工具:Flume
- 整个大数据平台中:Flume几乎都会是一个必选项
- 核心:实现实时数据采集
- 目标:掌握怎么使用Flume
- 根据自己的需求和官方文档,学会自己开发Flume程序
- 基于Hadoop的数据库同步工具:Sqoop
- 项目中以及工作中依旧会用到
- 核心:Sqoop未来必然会被淘汰,底层必须依赖于MapReduce
- 目标:掌握Sqoop的使用
- 记住Sqoop的功能和常用参数
知识点03:Flume的功能与应用
-
目标:掌握Flume的功能与应用场景
-
路径
- step1:功能
- step2:特点
- step3:应用
-
实施
- 功能
- 数据采集:将数据从一个地方采集到另外一个地方
- 将数据进行了复制
- 大数据中的数据采集:将各种需要处理的数据源复制到大数据数据仓库中
- 实现**分布式实时数据流**的数据采集,可以将各种各样不同数据源的数据实时采集到各种目标地中
- 数据源:文件、网络端口
- Flume:实时
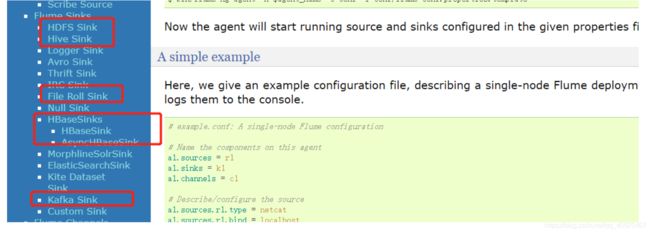
- 目标地:HDFS、Hbase、Hive、Kafka
- 数据采集:将数据从一个地方采集到另外一个地方
- 特点
- 功能全面
- 所有的读取和写入的程序,都已经封装好了
- 只需要配置从哪读,写入哪里,就可以实现采集
- 允许自定义开发
- 如果功能不能满足实际的业务需求,Flume提供各种接口,允许自定义开发
- 基于Java开发的应用程序
- 开发相对简单
- 所有功能都封装好了,只要调用即可
- 写一个配置文件:从哪读,读谁,写到哪里去
- 可以实现分布式采集
- 分布式采集:每一台机器都可以用Flume进行采集
- 注意:自己不是分布式架构
- 功能全面
- 应用
- 应用于实时数据流采集场景
- 基于**文件或者网络协议端口**的数据流采集
- 美团的Flume设计架构
- https://tech.meituan.com/2013/12/09/meituan-flume-log-system-architecture-and-design.html
- 应用于实时数据流采集场景
- 功能
-
小结
- Flume的功能是什么?
- 功能:实现分布式实时数据流的数据采集
- 应用:实时采集文件或者网络端口
知识点04:Flume的基本组成
-
目标:掌握Flume的基本组成
-
路径
- step1:Agent
- step2:Source
- step3:Channel
- step4:Sink
- step5:Event
-
实施
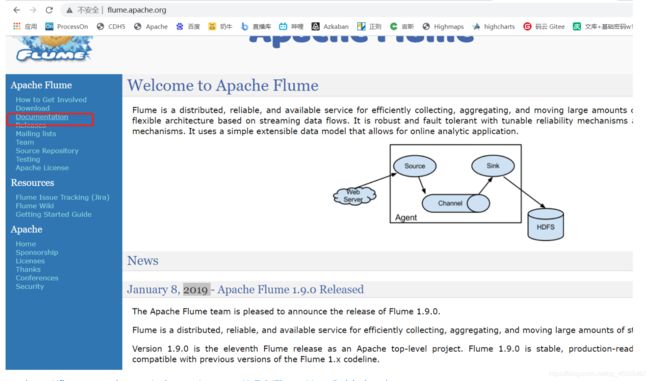
- 官方:flume.apache.org
- http://flume.apache.org/releases/content/1.7.0/FlumeUserGuide.html
-
Agent:每个Agent就是一个Flume的程序,每个Agent由三个部分组成:source、channel、sink
-
Source:负责读取数据,Source会动态的监听数据源,将数据源新增的数据实时采集变成Event数据流,将每个Event发送到Channel中
- 每一条数据会变成一个Event
- 实时监听数据源
-
Channel:临时缓存数据,将source发送过来的event的数据缓存起来,供Sink取数据
- 内存、文件【磁盘】
-
Sink:负责发送数据,从Channel中读取采集到的数据,将数据写入目标地
- Sink主动到Channel中取数据的
-
Event:用于构建每一条数据的对象,每一条数据就会变成一个Event,进行传递,最终写入目标
-
组成
- head:定义一些KV属性和配置,默认head是空的
- body:数据就存在body中
-
理解
Event{
	Map head;
	byte[] body;--每一条数据的字节流
}
-
-
小结
- Flume中的Agent是什么,由什么组成?
- 一个Agent就是一个Flume程序
- 组成:source、channel、sink
- Source、Channel、Sink的功能分别是什么?
- source:负责读取数据源的数据
- channel:负责临时缓存source采集到的数据
- sink:负责从channel中读取数据,发送到目标地
- Flume中的Agent是什么,由什么组成?
知识点05:Flume的开发规则
-
目标:掌握Flume的基本开发规则
-
实施
-
step1:开发一个Flume的参数配置文件
-
properties格式的文件
#step1:定义一个agent:agent的名称、定义source、channel、sink
#step2:定义source:读什么、读哪
#step3:定义channel:缓存在什么地方
#step4:定义sink:写入什么地方
-
-
step2:运行flume的agent程序
flume-ng Usage: bin/flume-ng[options]... - 为什么叫flume-ng?
- flume-og:老的版本,架构非常麻烦,性能非常差,后来不用了
- flume-ng:现在用的版本
flume-ng agent --conf,-c--conf-file,-f --name,-n - agent:表示要运行一个Flume程序
- –conf,-c :指定Flume的配置文件目录
- –conf-file,-f :要运行哪个文件
- –name,-n :运行的agent的名字是什么
- 一个程序文件中可以有多个agent程序,通过名字来区别
- 为什么叫flume-ng?
-
-
小结
-
如何开发一个Flume程序?
-
step1:先开发一个配置文件:properties
- 定义agent
- 定义source
- 定义channel
- 定义sink
-
step2:运行这个文件
flume-ng agent -c -f -n
-
-
知识点06:Flume开发测试
-
目标:实现Flume程序的开发测试
-
实施
-
需求:采集Hive的日志、临时缓存在内存中、将日志写入Flume的日志中并打印在命令行
- source:采集一个文件数据
-
  - Exec Source
    - 功能:执行一条Linux的命令来实现采集
    - 命令:搭配tail -f

- channel:Flume提供了各种channel用于缓存数据
  - memory channel:将数据缓存在内存中


- sink:Flume提供了很多种sink
-
开发
-
创建测试目录
cd /export/server/flume-1.6.0-cdh5.14.0-bin mkdir usercase -
复制官方示例
cp conf/flume-conf.properties.template usercase/hive-mem-log.properties -
开发配置文件
-
      # The configuration file needs to define the sources,
      # the channels and the sinks.

    # Sources, channels and sinks are defined per a1,
      # in this case called 'a1'
      #define the agent
      a1.sources = s1
      a1.channels = c1
      a1.sinks = k1

      #define the source
      a1.sources.s1.type = exec
      a1.sources.s1.command = tail -f /export/server/hive-1.1.0-cdh5.14.0/logs/hiveserver2.log

      #define the channel
      a1.channels.c1.type = memory
      a1.channels.c1.capacity = 10000

      #define the sink
      a1.sinks.k1.type = logger

      #bond
      a1.sources.s1.channels = c1
      a1.sinks.k1.channel = c1
-
运行
flume-ng agent -c conf/ -f usercase/hive-mem-log.properties -n a1 -Dflume.root.logger=INFO,console- -Dflume.root.logger=INFO,console:将flume的日志打印在命令行
-
结果
-
小结
- 实现测试即可
知识点07:常用Source:Exec
-
目标:掌握Exec Source的功能与应用场景
-
路径
- step1:功能与应用场景
- step2:测试实现
-
实施
-
功能与应用场景
- 功能:通过执行一条Linux命令来实现数据动态采集
- 固定搭配tail -f命令来使用
- 功能:通过执行一条Linux命令来实现数据动态采集
-
应用场景:实现动态监听采集单个文件的数据
-
测试实现
- 需求:动态采集hiveserver的日志文件,输出在Flume的日志并打印在命令行中
- 开发:参考知识点06
-
-
小结
- Exec Source的功能与应用场景是什么?
- 功能:通过执行Linux 命令实现数据的采集
- 一般搭配tail -f
- 应用:只能动态监听采集单个文件
知识点08:常用Source:Taildir
-
目标:掌握Taildir Source的功能与应用场景
-
路径
- step1:功能与应用场景
- step2:测试实现
-
实施
-
功能与应用场景
-
应用场景
-
需求:当前日志文件是一天一个,需要每天将数据实时采集到HDFS上
-
数据:Linux
/tomcat/logs/2020-01-01.log 2020-01-02.log …… 2020-11-10.log -
问题:能不能exec source进行采集?
- 不能,exec只能简单单个文件
-
解决:Taildir Source
-
-
功能:从Apache Flume1.7版本开始支持,动态监听采集多个文件
- 如果用的是1.5或者1.6,遇到这个问题,需要自己手动编译这个功能
-
-
测试实现
-
需求:让Flume动态监听一个文件和一个目录下的所有文件
-
准备
-
-
      cd /export/server/flume-1.6.0-cdh5.14.0-bin
      mkdir position
      mkdir -p /export/data/flume
      echo " " >> /export/data/flume/bigdata01.txt
      mkdir  -p /export/data/flume/bigdata
-
开发
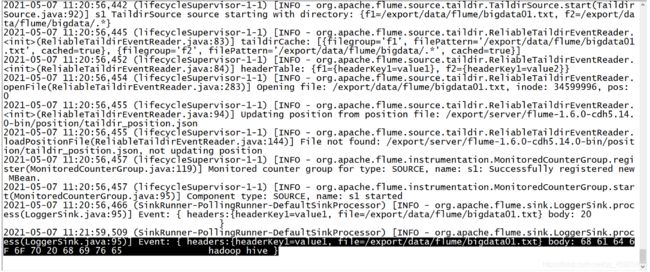
# define sourceName/channelName/sinkName for the agent a1.sources = s1 a1.channels = c1 a1.sinks = k1 # define the s1 a1.sources.s1.type = TAILDIR #指定一个元数据记录文件 a1.sources.s1.positionFile = /export/server/flume-1.6.0-cdh5.14.0-bin/position/taildir_position.json #将所有需要监控的数据源变成一个组,这个组内有两个数据源 a1.sources.s1.filegroups = f1 f2 #指定了f1是谁:监控一个文件 a1.sources.s1.filegroups.f1 = /export/data/flume/bigdata01.txt #指定f1采集到的数据的header中包含一个KV对 a1.sources.s1.headers.f1.headerKey1 = value1 #指定f2是谁:监控一个目录下的所有文件 a1.sources.s1.filegroups.f2 = /export/data/flume/bigdata/.* #指定f2采集到的数据的header中包含一个KV对 a1.sources.s1.headers.f2.headerKey1 = value2 a1.sources.s1.fileHeader = true # define the c1 a1.channels.c1.type = memory a1.channels.c1.capacity = 1000 a1.channels.c1.transactionCapacity = 100 # def the k1 a1.sinks.k1.type = logger #source、channel、sink bond a1.sources.s1.channels = c1 a1.sinks.k1.channel = c1- 结果
-
元数据文件的功能:/export/server/flume-1.6.0-cdh5.14.0-bin/position/taildir_position.json
-
问题:如果Flume程序故障,重启Flume程序,已经被采集过的数据还要不要采集?
-
需求:不需要,不能导致数据重复
-
功能:记录Flume所监听的每个文件已经被采集的位置
[
{
         "inode":34599996,"pos":14,"file":"/export/data/flume/bigdata01.txt"},{
         "inode":67595704,"pos":19,"file":"/export/data/flume/bigdata/test01.txt"},{
         "inode":67805657,"pos":7,"file":"/export/data/flume/bigdata/test02.txt"}
]
-
-
补充:工作中可能会见到其他的source
- Kafka Source:监听读取Kafka数据
- Spooldir Source:监控一个目录,只要这个目录中产生一个文件,就会采集一个文件
- 缺点:不能动态监控文件,被采集的文件是不能发生变化的
-
小结
- taildir Source的功能与应用场景是什么?
- 功能:实现动态监听多个文件
- 应用:数据划分多个文件动态变化存储
知识点09:常用Channel:file和mem
-
目标:掌握file channel与mem channel的功能与应用
-
实施
-
mem Channel:将数据缓存在内存中
-
特点:读写快、容量小、安全性较差
-
应用:小数据量的高性能的传输
-
-
file Channel:将数据缓存在文件中
-
特点:读写相对慢、容量大、安全性较高
-
应用:数据量大,读写性能要求不高的场景下
-
-
常用属性
- capacity:缓存大小:指定Channel中最多存储多少条event
- transactionCapacity:每次传输的大小
- 每次source最多放多少个event和每次sink最多取多少个event
- 这个值一般为capacity的十分之一,不能超过capacity
-
-
小结
- mem channel的功能与应用?
- 功能:将数据存在内存
- 应用:数据量小,性能高
- file channel的功能与应用?
- 功能:将数据缓存在磁盘
- 应用:数据量大,性能要求不高
- mem channel的功能与应用?
知识点10:常用Sink:HDFS
-
目标:掌握HDFS Sink的功能与应用
-
路径
- step1:HDFS sink的功能
- step2:指定文件大小
- step3:指定分区
-
实施
-
HDFS sink的功能
-
常用的SINk
- kafka SInk
- HDFS SInk
-
问题:为什么离线采集不直接写入Hive,使用Hive sink
- 原因1:很多场景下,需要对数据提前做一步ETL,将ETL以后的结果再入库
- 原因2:Hive Sink有严格的要求,表必须为桶表,文件类型必须为orc
- 解决:如果要实现将数据直接放入Hive表?
- 用HDFS sink代替Hive sink
-
功能:将Flume采集的数据写入HDFS
-
问题:Flume作为HDFS客户端,写入HDFS数据
- Flume必须知道HDFS地址
- Flume必须拥有HDFS的jar包
-
解决
-
方式一:Flume写地址的时候,指定HDFS的绝对地址
hdfs://node1:8020/nginx/log- 手动将需要的jar包放入Flume的lib目录下
-
方式二:在Flume中配置Hadoop的环境变量,将core-site和hdfs-site放入Flume的配置文件目录
-
-
-
需求:将Hive的日志动态采集写入HDFS
# The configuration file needs to define the sources,
# the channels and the sinks.
# Sources, channels and sinks are defined per a1,
# in this case called 'a1'


#定义当前的agent的名称,以及对应source、channel、sink的名字
a1.sources = s1
a1.channels = c1
a1.sinks = k1

#定义s1:从哪读数据,读谁
a1.sources.s1.type = exec
a1.sources.s1.command = tail -f /export/server/hive-1.1.0-cdh5.14.0/logs/hiveserver2.log

#定义c1:缓存在什么地方
a1.channels.c1.type = memory
a1.channels.c1.capacity = 1000


#定义k1:将数据发送给谁
a1.sinks.k1.type = hdfs
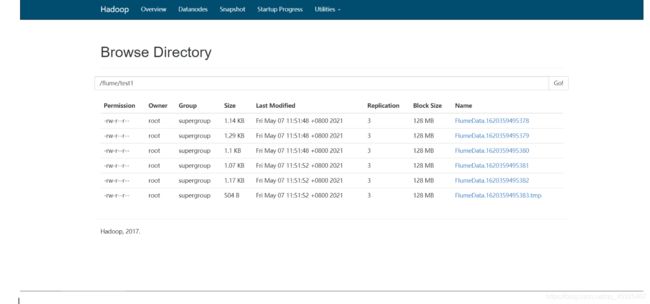
a1.sinks.k1.hdfs.path = hdfs://node1:8020/flume/test1


#s1将数据给哪个channel
a1.sources.s1.channels = c1
#k1从哪个channel中取数据
a1.sinks.k1.channel = c1
-
-
指定文件大小
-
问题:Flume默认写入HDFS上会产生很多小文件,都在1KB左右,不利用HDFS存储
-
解决:指定文件大小
hdfs.rollInterval	30			每隔多长时间产生一个文件,单位为s
hdfs.rollSize		1024		每个文件多大产生一个文件,字节
hdfs.rollCount		10			多少个event生成一个文件
如果不想使用某种规则,需要关闭,设置为0
-
-
      # The configuration file needs to define the sources,
      # the channels and the sinks.
      # Sources, channels and sinks are defined per a1,
      # in this case called 'a1'


      #定义当前的agent的名称,以及对应source、channel、sink的名字
      a1.sources = s1
      a1.channels = c1
      a1.sinks = k1

      #定义s1:从哪读数据,读谁
      a1.sources.s1.type = exec
      a1.sources.s1.command = tail -f /export/server/hive-1.1.0-cdh5.14.0/logs/hiveserver2.log

      #定义c1:缓存在什么地方
      a1.channels.c1.type = memory
      a1.channels.c1.capacity = 1000


    #定义k1:将数据发送给谁
      a1.sinks.k1.type = hdfs
      a1.sinks.k1.hdfs.path = hdfs://node1:8020/flume/test1
      #指定按照时间生成文件,一般关闭
      a1.sinks.k1.hdfs.rollInterval = 0
      #指定文件大小生成文件,一般120 ~ 125M对应的字节数
    a1.sinks.k1.hdfs.rollSize = 10240
      #指定event个数生成文件,一般关闭
      a1.sinks.k1.hdfs.rollCount = 0

      #s1将数据给哪个channel
      a1.sources.s1.channels = c1
      #k1从哪个channel中取数据
      a1.sinks.k1.channel = c1

-
指定分区
-
问题:如何实现分区存储,每天一个或者每小时一个目录?
-
解决:添加时间标记目录
# The configuration file needs to define the sources,
# the channels and the sinks.
# Sources, channels and sinks are defined per a1,
# in this case called 'a1'


#定义当前的agent的名称,以及对应source、channel、sink的名字
a1.sources = s1
a1.channels = c1
a1.sinks = k1

#定义s1:从哪读数据,读谁
a1.sources.s1.type = exec
a1.sources.s1.command = tail -f /export/server/hive-1.1.0-cdh5.14.0/logs/hiveserver2.log

#定义c1:缓存在什么地方
a1.channels.c1.type = memory
a1.channels.c1.capacity = 1000


#定义k1:将数据发送给谁
a1.sinks.k1.type = hdfs
a1.sinks.k1.hdfs.path = hdfs://node1:8020/flume/log/daystr=%Y%m%d
#指定按照时间生成文件,一般关闭
a1.sinks.k1.hdfs.rollInterval = 0
#指定文件大小生成文件,一般120 ~ 125M对应的字节数
a1.sinks.k1.hdfs.rollSize = 10240
#指定event个数生成文件,一般关闭
a1.sinks.k1.hdfs.rollCount = 0
a1.sinks.k1.hdfs.useLocalTimeStamp = true


#s1将数据给哪个channel
a1.sources.s1.channels = c1
#k1从哪个channel中取数据
a1.sinks.k1.channel = c1
-
-
其他参数
#指定生成的文件的前缀 a1.sinks.k1.hdfs.filePrefix = nginx #指定生成的文件的后缀 a1.sinks.k1.hdfs.fileSuffix = .log #指定写入HDFS的文件的类型:普通的文件 a1.sinks.k1.hdfs.fileType = DataStream -
小结
- HDFS sink的功能与应用?
- 功能:将Flume采集的数据写入HDFS
- 应用:离线数据仓库平台:直接将数据采集到HDFS,或者将数据采集到Hive
-
Flume补充:自己回去看,只要知道有这个东西即可
-
Flume架构
- 多SINK
-
-
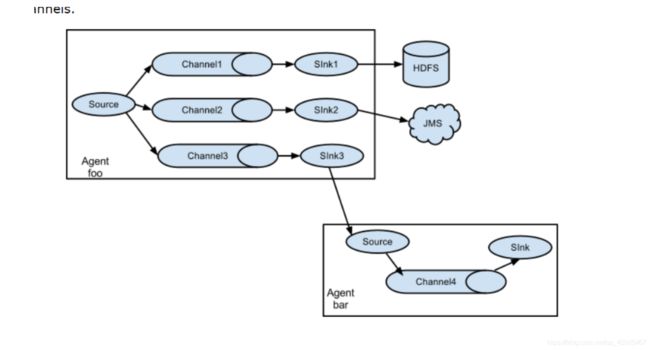
一个agent中可以有多个source、channel、sink
a1.sources = s1 a1.channels = c1 c2 a1.sinks = k1 k2- 多个sink架构中,为了每个sink都有一份完整数据,每个sink必须对应一个独立的channel
-
Collect架构
-
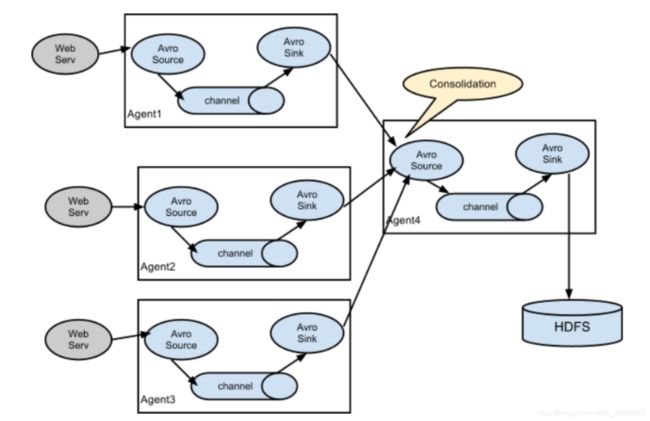
两层Flume架构:如果大量并发直接写入HDFS,导致HDFS的IO负载比较高
-
第一层
- source:taildir source
- sink:avro sink
-
第二层
- source:avro source
- sink:HDFS sink
-
高级组件
-
Flume Channel Selectors
-
功能:用于决定source怎么将数据给channel
-
规则
-
默认:source默认将数据给每个channel一份
- Replicating Channel Selector (default)
-
选择:根据event头部的key值不同,给不同的channel
-
Multiplexing Channel Selector
a1.sources = r1
a1.channels = c1 c2 c3 c4
a1.sources.r1.selector.type = multiplexing
a1.sources.r1.selector.header = state
a1.sources.r1.selector.mapping.CZ = c1
a1.sources.r1.selector.mapping.US = c2 c3
a1.sources.r1.selector.default = c4
-
-
-
-
Flume Interceptors:拦截器
-
功能:可以给event的头部添加KV,还可以对数据进行过滤
-
提供
-
Timestamp Interceptor:自动在每个event头部添加一个KV
-
key:timestamp
-
value:event产生的时间
a1.sources = r1
a1.channels = c1
a1.sources.r1.channels =  c1
a1.sources.r1.type = seq
a1.sources.r1.interceptors = i1
a1.sources.r1.interceptors.i1.type = timestamp
-
-
Host Interceptor:自动在每个event头部添加一个KV
- key:host
- value:这个event所在的机器的名称
-
Static Interceptor:自动在每个event头部添加一个KV
- KV由用户自己指定
-
Regex Filtering Interceptor:正则过滤拦截器,判断数据是否符合正则表达式,不符合就直接过滤,不采集
- 不用掌握
-
-
-
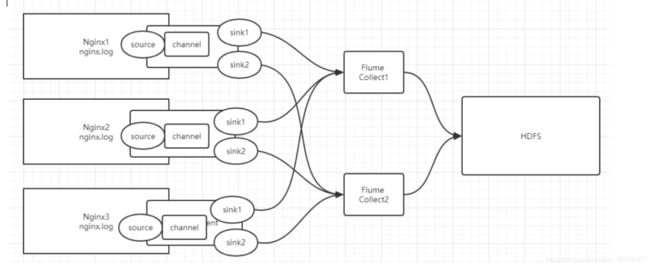
Sink processor
-
功能:实现collect架构中的高可用和负载均衡
-
高可用failover:两个sink,一个工作,一个不工作
a1.sinkgroups = g1 a1.sinkgroups.g1.sinks = k1 k2 a1.sinkgroups.g1.processor.type = failover a1.sinkgroups.g1.processor.priority.k1 = 5 a1.sinkgroups.g1.processor.priority.k2 = 10 a1.sinkgroups.g1.processor.maxpenalty = 10000- priority:权重越大,就先工作
-
负载均衡load_balance:两个sink,一起工作
a1.sinkgroups = g1 a1.sinkgroups.g1.sinks = k1 k2 a1.sinkgroups.g1.processor.type = load_balance a1.sinkgroups.g1.processor.selector = random- 分配策略:round_robin
,random
- 分配策略:round_robin
-
-
-
- 第一层必须有两个sink,作为一个整体,称为sink group
知识点11:Sqoop的功能与应用
-
目标:掌握Sqoop的功能与应用场景
-
路径
- step1:功能
- step2:本质
- step3:应用
- step4:测试
-
实施
-
功能
- 用于实现MySQL等RDBMS数据库与HDFS之间的数据导入与导出
- 导入与导出相对HDFS而言的
- 导入:将MySQL的数据导入到HDFS
- 导出:将HDFS的数据导出到MySQL
-
本质
- 底层就是MapReduce程序:大多数都是三大阶段的MapReduce
- 将Sqoop的程序转换成了MapReduce程序,提交给YARN运行,实现分布式采集
- 导入:MySQL =》 HDFS
- Input:DBInputFormat:读MySQL
- Output:TextOutputFormat:写HDFS
- 导出:HDFS =》 MySQL
- Input:TextInputFormat:读HDFS
- Output:DBOutputFormat:写MySQL
-
特点
- 必须依赖于Hadoop:MapReduce + YARN
- MapReduce是离线计算框架,Sqoop离线数据采集的工具,只能适合于离线业务平台
-
应用
- 数据同步:定期将离线的数据进行采集同步到数据仓库中
- 全量:每次都采集所有数据
- 增量:每次只采集最新的数据,大部分都是增量处理
- 数据迁移:将历史数据【MySQL、Oracle】存储到HDFS中
- 全量:第一次一定是全量的
- 数据同步:定期将离线的数据进行采集同步到数据仓库中
-
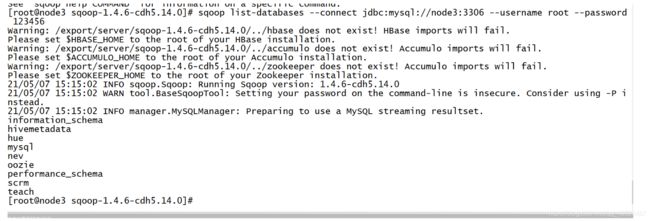
测试
sqoop list-databases --connect jdbc:mysql://node3:3306 --username root --password 123456
-
-
小结
- Sqoop的功能与应用场景?
- 功能:用于实现RDBMS与HDFS之间的数据的导入和导出
- 本质:底层就是MapReduce程序
- 应用
- 数据同步:增量同步
- 数据迁移:全量同步
知识点12:Sqoop导入:HDFS
-
目标:实现Sqoop导入数据到HDFS中
-
路径
- step1:准备数据
- step2:导入语法
- step3:测试导入
- step4:常用参数
-
实施
-
准备数据
-
MySQL创建数据库==【在MySQL中执行】==
create database sqoopTest; use sqoopTest; -
MySQL创建数据表==【在MySQL中执行】==
CREATE TABLE `tb_tohdfs` ( `id` int(11) NOT NULL AUTO_INCREMENT, `name` varchar(100) NOT NULL, `age` int(11) NOT NULL, PRIMARY KEY (`id`) ) ENGINE=InnoDB DEFAULT CHARSET=utf8; -
MySQL插入数据==【在MySQL中执行】==
insert into tb_tohdfs values(null,"laoda",18);
insert into tb_tohdfs values(null,"laoer",19);
insert into tb_tohdfs values(null,"laosan",20);
insert into tb_tohdfs values(null,"laosi",21);
-
-
导入语法
sqoop import --help usage: sqoop import [GENERIC-ARGS] [TOOL-ARGS]- 指定数据源:MySQL
- url
- username
- password
- table
- 指定目标地:HDFS
- 指定写入的位置
- 指定数据源:MySQL
-
测试导入
-
常用参数
- 需求2:将tb_tohdfs表的id和name导入HDFS的/sqoop/import/test01目录,并且用制表符分隔
-
    sqoop import \
      --connect jdbc:mysql://node3:3306/sqoopTest \
    --username root \
      --password 123456 \
    --table tb_tohdfs \
      --columns id,name \
      --delete-target-dir  \
      --target-dir /sqoop/import/test01 \
      --fields-terminated-by '\t' \
      -m 1
- -m:指定MapTask的个数
- –fields-terminated-by:用于指定输出的分隔符
- –columns:指定导入哪些列
- –delete-target-dir :提前删除输出目录
- 需求3:将tb_tohdfs表中的id >2的数据导入HDFS的/sqoop/import/test01目录中
      sqoop import \
      --connect jdbc:mysql://node3:3306/sqoopTest \
      --username root \
      --password 123456 \
      --table tb_tohdfs \
      --where 'id > 2' \
      --delete-target-dir  \
      --target-dir /sqoop/import/test01 \
    --fields-terminated-by '\t' \
      -m 1
- –where :用于指定行的过滤条件
-
需求4:将tb_tohdfs表中的id>2的数据中id和name两列导入/sqoop/import/test01目录中
-
方案一
sqoop import \ --connect jdbc:mysql://node3:3306/sqoopTest \ --username root \ --password 123456 \ --table tb_tohdfs \ --columns id,name \ --where 'id > 2' \ --delete-target-dir \ --target-dir /sqoop/import/test01 \ --fields-terminated-by '\t' \ -m 1 -
方案二
sqoop import \ --connect jdbc:mysql://node3:3306/sqoopTest \ --username root \ --password 123456 \ -e 'select id,name from tb_tohdfs where id > 2 and $CONDITIONS' \ --delete-target-dir \ --target-dir /sqoop/import/test01 \ --fields-terminated-by '\t' \ -m 1- -e,–query :使用SQL语句读取数据.只要使用SQL语句,必须在where子句中加上$CONDITIONS
-
-
小结
- 实现导入HDFS即可
知识点13:Sqoop导入:Hive
-
目标:实现Sqoop导入MySQL数据到Hive表中
-
路径
- step1:准备数据
- step2:直接导入
- step3:hcatalog导入
-
实施
-
准备数据:在Hive 中创建一张表
use default; create table fromsqoop( id int, name string, age int ); -
直接导入
sqoop import \ --connect jdbc:mysql://node3:3306/sqoopTest \ --username root \ --password 123456 \ --table tb_tohdfs \ --hive-import \ --hive-database default \ --hive-table fromsqoop \ --fields-terminated-by '\001' \ -m 1- –hive-import \:表示导入Hive表
- –hive-database default \:表示指定导入哪个Hive的数据库
- –hive-table fromsqoop \:表示指定导入哪个Hive的表
- –fields-terminated-by ‘\001’ \:指定Hive表的分隔符,一定要与Hive表的分隔符一致
- 原理
- step1:将MySQL的数据通过MapReduce先导入HDFS
- step2:将HDFS上导入的这个文件通过load命令加载到了Hive表中
-
-
hcatalog导入
sqoop import \ --connect jdbc:mysql://node3:3306/sqoopTest \ --username root \ --password 123456 \ --table tb_tohdfs \ --hcatalog-database default \ --hcatalog-table fromsqoop \ --fields-terminated-by '\001' \ -m 1- 原理
- step1:先获取Hive表的元数据
- step2:将Hive表的目录直接作为MapReduce输出
- 原理
-
小结
- 实现导入Hive表
知识点14:Sqoop导入:增量
-
目标:掌握Sqoop如何实现增量导入
-
路径
- step1:增量需求
- step2:Sqoop中的两种增量方式
- step3:append
- step4:lastmodifield
- step5:特殊方式
-
实施
-
增量需求
-
第一天:产生数据
+----+--------+-----+ | 1 | laoda | 18 | | 2 | laoer | 19 | | 3 | laosan | 20 | | 4 | laosi | 21 | -
第二天的0点:采集昨天的数据
sqoop import --connect jdbc:mysql://node3:3306/sqoopTest --username root --password 123456 --table tb_tohdfs --target-dir /sqoop/import/test02 -m 1 +----+--------+-----+ | 1 | laoda | 18 | | 2 | laoer | 19 | | 3 | laosan | 20 | | 4 | laosi | 21 | -
第二天:产生新的数据
| 5 | laowu | 22 | | 6 | laoliu | 23 | | 7 | laoqi | 24 | | 8 | laoba | 25 | +----+--------+-----+ -
第三天:采集昨天的数据
sqoop import --connect jdbc:mysql://node3:3306/sqoopTest --username root --password 123456 --table tb_tohdfs --target-dir /sqoop/import/test02 -m 1 -
问题:每次导入都是所有的数据,每次都是全量
- 数据重复
-
-
Sqoop中的两种增量方式
-
设计:用于对某一列值进行判断,只要大于上一次的值就会被导入
-
参数
Incremental import arguments: --check-columnSource column to check for incremental change --incremental Define an incremental import of type 'append' or 'lastmodified' --last-value Last imported value in the incremental check column -
–check-column :按照哪一列进行增量导入
-
–last-value:用于指定上一次的值
-
–incremental:增量的方式
-
append
-
lastmodified
-
-
-
-
append
-
要求:必须有一列自增的值,按照自增的int值进行判断
-
特点:只能导入新增的数据,无法导入更新的数据
-
测试
-
第一次导入
sqoop import \ --connect jdbc:mysql://node3:3306/sqoopTest \ --username root \ --password 123456 \ --table tb_tohdfs \ --target-dir /sqoop/import/test02 \ --fields-terminated-by '\t' \ --check-column id \ --incremental append \ --last-value 1 \ -m 1 -
第二次产生新的数据
insert into tb_tohdfs values(null,"laowu",22); insert into tb_tohdfs values(null,"laoliu",23); insert into tb_tohdfs values(null,"laoqi",24); insert into tb_tohdfs values(null,"laoba",25); -
第二次导入
sqoop import \
--connect jdbc:mysql://node3:3306/sqoopTest \
--username root \
--password 123456 \
--table tb_tohdfs \
--target-dir /sqoop/import/test02 \
--fields-terminated-by '\t' \
--incremental append \
--check-column id \
--last-value 4 \
-m 1
-
-
-
lastmodifield
-
要求:必须包含动态时间变化这一列,按照数据变化的时间进行判断
-
特点:既导入新增的数据也导入更新的数据
-
测试
-
MySQL中创建测试数据
CREATE TABLE `tb_lastmode` ( `id` int(11) NOT NULL AUTO_INCREMENT, `word` varchar(200) NOT NULL, `lastmode` timestamp NOT NULL DEFAULT CURRENT_TIMESTAMP ON UPDATE CURRENT_TIMESTAMP, PRIMARY KEY (`id`) ) ENGINE=InnoDB DEFAULT CHARSET=utf8; insert into tb_lastmode values(null,'hadoop',null); insert into tb_lastmode values(null,'spark',null); insert into tb_lastmode values(null,'hbase',null); -
第一次采集
sqoop import \ --connect jdbc:mysql://node3:3306/sqoopTest \ --username root \ --password 123456 \ --table tb_lastmode \ --target-dir /sqoop/import/test03 \ --fields-terminated-by '\t' \ --incremental lastmodified \ --check-column lastmode \ --last-value '2021-05-06 16:09:32' \ -m 1 -
数据发生变化
insert into tb_lastmode values(null,'hive',null); update tb_lastmode set word = 'sqoop' where id = 1; -
第二次采集
sqoop import \ --connect jdbc:mysql://node3:3306/sqoopTest \ --username root \ --password 123456 \ --table tb_lastmode \ --target-dir /sqoop/import/test03 \ --fields-terminated-by '\t' \ --merge-key id \ --incremental lastmodified \ --check-column lastmode \ --last-value '2021-05-07 16:10:38' \ -m 1- –merge-key :按照id进行合并
-
-
-
特殊方式
sqoop import \ --connect jdbc:mysql://node3:3306/sqoopTest \ --username root \ --password 123456 \ -e 'select id,name from tb_tohdfs where id > 12 and $CONDITIONS' \ --delete-target-dir \ --target-dir /sqoop/import/test01 \ --fields-terminated-by '\t' \ -m 1- 要求:必须每次将最新导入的数据放到一个目录单独存储,不能相同
-
-
小结
-
Sqoop中如何实现增量导入?
- append
- 要求:必须有一列自增的int值
- 特点:只导入新增的数据
- lastmodifield
- 要求:必须有一列标记时间的列
- 特点:既能导入新增的数据,也能导入更新的数据
- 直接通过where过滤
- 要求:每次导入的目录不能一样
-
知识点15:Sqoop导出:全量
-
目标:实现Sqoop全量导出数据到MySQL
-
路径
- step1:准备数据
- step2:全量导出
-
实施
-
准备数据
-
MySQL中创建测试表
use sqoopTest; CREATE TABLE `tb_url` ( `id` int(11) NOT NULL, `url` varchar(200) NOT NULL, PRIMARY KEY (`id`) ) ENGINE=InnoDB DEFAULT CHARSET=utf8; -
Hive中创建表,并加载数据
vim /export/datas/lateral.txt
1	http://facebook.com/path/p1.php?query=1
2	http://www.baidu.com/news/index.jsp?uuid=frank
3	http://www.jd.com/index?source=baidu

use default;
create table tb_url(
id int,
url string
) row format delimited fields terminated by '\t';

load data local inpath '/export/data/lateral.txt' into table tb_url;
-
-
全量导出
sqoop export \ --connect jdbc:mysql://node3:3306/sqoopTest \ --username root \ --password 123456 \ --table tb_url \ --export-dir /user/hive/warehouse/tb_url \ --input-fields-terminated-by '\t' \ -m 1- –export-dir:指定导出的HDFS目录
- –input-fields-terminated-by :用于指定导出的HDFS文件的分隔符是什么
-
-
小结
- 实现导出即可
知识点16:Sqoop导出:增量
-
目标:实现Sqoop增量导出到MySQL
-
路径
- step1:增量导出场景
- step2:增量导出方式
- step3:updateonly
- step4:allowinsert
-
实施
-
增量导出场景
-
Hive中有一张结果表:存储每天分析的结果
--第一天:10号处理9号 id daystr UV PV IP 1 2020-11-09 1000 10000 500 insert into result select id,daystr,uv,pv ,ip from datatable where daystr=昨天的日期 --第二天:11号处理10号 id daystr UV PV IP 1 2020-11-09 1000 10000 500 2 2020-11-10 2000 20000 1000 -
MySQL:存储每一天的结果
1 2020-11-09 1000 10000 500
-
-
增量导出方式
- updateonly:只增量导出更新的数据
- allowerinsert:既导出更新的数据,也导出新增的数据
-
updateonly
-
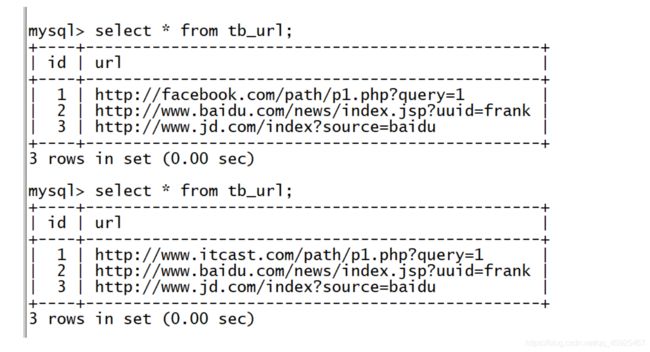
修改lateral.txt数据
1 http://www.itcast.com/path/p1.php?query=1 2 http://www.baidu.com/news/index.jsp?uuid=frank 3 http://www.jd.com/index?source=baidu 4 http://www.heima.com -
重新加载覆盖
load data local inpath '/export/data/lateral.txt' overwrite into table tb_url; -
增量导出
sqoop export \
--connect jdbc:mysql://node3:3306/sqoopTest \
--username root \
--password 123456 \
--table tb_url \
--export-dir /user/hive/warehouse/tb_url \
--input-fields-terminated-by '\t' \
--update-key id \
--update-mode updateonly \
-m 1
-
-
-
allowerinsert
-
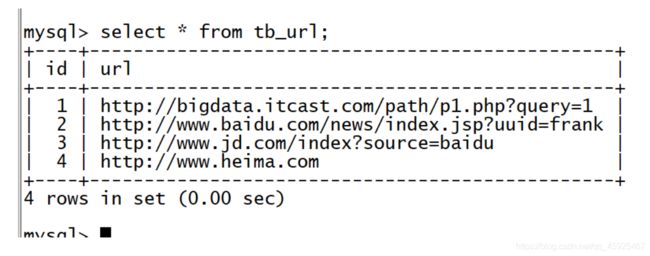
修改lateral.txt
1 http://bigdata.itcast.com/path/p1.php?query=1 2 http://www.baidu.com/news/index.jsp?uuid=frank 3 http://www.jd.com/index?source=baidu 4 http://www.heima.com -
覆盖表中数据
load data local inpath '/export/data/lateral.txt' overwrite into table tb_url; -
增量导出
sqoop export \
--connect jdbc:mysql://node3:3306/sqoopTest \
--username root \
--password 123456 \
--table tb_url \
--export-dir /user/hive/warehouse/tb_url \
--input-fields-terminated-by '\t' \
--update-key id \
--update-mode allowinsert \
-m 1
-
-
小结
- Sqoop如何实现增量导出?
- updateonly:只导出更新的数据
- allowerinsert:既能导出更新的,也能导出新增的
知识点17:Sqoop Job
-
目标:了解Sqoop Job的功能与应用
-
路径
- step1:增量导入的问题
- step2:Sqoop Job的使用
-
实施
-
增量导入的问题
-
增量导入每次都要手动修改上次的值执行,怎么解决?
sqoop import \
--connect jdbc:mysql://node3:3306/sqoopTest \
--username root \
--password 123456 \
--table tb_tohdfs \
--target-dir /sqoop/import/test04 \
--fields-terminated-by '\t' \
--incremental append \
--check-column id \
--last-value 4 \
-m 1
-
-
Sqoop Job的使用
-
MySQL插入数据
insert into tb_tohdfs values(null,'laojiu',26); insert into tb_tohdfs values(null,'laoshi',27); -
创建job
sqoop job --create job01 \ -- import \ --connect jdbc:mysql://node3:3306/sqoopTest \ --username root \ --password 123456 \ --table tb_tohdfs \ --target-dir /sqoop/import/test04 \ --fields-terminated-by '\t' \ --incremental append \ --check-column id \ --last-value 8 \ -m 1- 创建job,不会运行程序,只是在元数据中记录信息
-
列举job
sqoop job --list -
查看job的信息
sqoop job --show jobName -
运行job
sqoop job --exec jobName -
删除job
sqoop job --delete jobName
-
-
-
小结
- 了解即可
知识点18:Sqoop密码问题与脚本封装
-
目标:了解Sqoop密码的问题及脚本的封装
-
路径
- step1:Sqoop中的数据库密码
- step2:Sqoop封装脚本
-
实施
-
Sqoop中的数据库密码
-
如何解决手动输入密码和密码明文问题?
-
方式一:在sqoop的sqoop-site.xml中配置将密码存储在客户端中,比较麻烦,一般不用
-
方式二:将密码存储在文件中,通过文件的权限来管理密码
sqoop job --create job02 \ -- import \ --connect jdbc:mysql://node3:3306/sqoopTest \ --username root \ --password-file file:///export/data/sqoop.passwd \ --table tb_tohdfs \ --target-dir /sqoop/import/test05 \ --fields-terminated-by '\t' \ --incremental append \ --check-column id \ --last-value 4 \ -m 1-
–password-file
-
读取的是HDFS文件,这个文件中只能有一行密码
-
-
-
-
Sqoop封装脚本
-
如何封装Sqoop的代码到文件中?
-
step1:将代码封装到一个文件中
vim /export/data/test.sqoopimport --connect jdbc:mysql://node3:3306/sqoopTest --username root --password-file file:///export/data/sqoop.passwd --table tb_tohdfs --target-dir /sqoop/import/test05 --fields-terminated-by '\t' -m 1- 要求:一行只放一个参数
-
step2:运行这个文件
-
sqoop --options-file /export/data/test.sqoop
-
小结
- 了解即可
