PaddlePaddle——基于PaddleDection和PaddleOCR在Windows端实现公交车车牌的检测和具体车牌内容的识别
本项目基于PaddleDetection实现公交车车牌的检测和定位,在识别后对识别区域的进行目标区域的图像预处理,最后采用PaddleOCR对数字进行具体识别,实现本项目的预期任务。
文章目录
- 基于PaddleDection实现公交车牌的检测定位
- 制作VOC数据集
- 1.数据集采集和标注
- 2.修改PD中相应模型配置文件参数
- 上传至AI studio进行模型训练并导出模型
- Windows本地部署PD模型实现视频流实时检测
- PaddleDetection环境准备
- 安装PaddlePaddle环境
- 下载PaddleDetection
- 本地部署预测代码
- 基于PaddleOCR实现公交车车牌数字的具体识别
- 目标图像的预处理
- 将识别后的矩形框作为roi进行截取图片
- PaddleOCR文字识别
- 安装paddleocr库
- 使用文本识别模型推理测试
- 通过本地代码加载模型对预处理后的图片进行推理预测
- 将ocr封装为一个子函数加入视频流预测代码中实现实时推理
- 项目完整代码
- 项目效果:实时视频流的公交车车牌的识别预测
基于PaddleDection实现公交车牌的检测定位
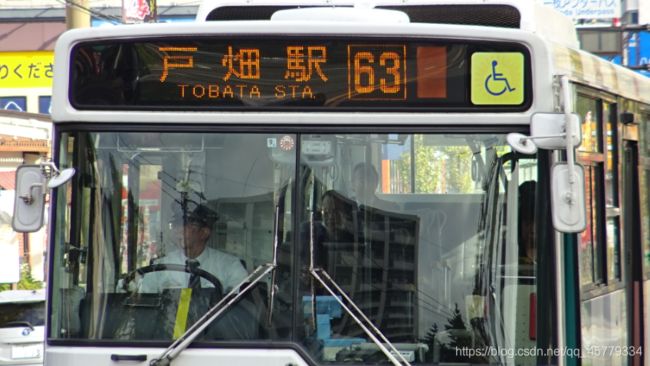
效果图:
AI studio 项目地址:日本公交车牌识别,可以直接fork。
制作VOC数据集
1.数据集采集和标注
采用labelimg进行标注。
并制作成VOC格式数据集即可。
2.修改PD中相应模型配置文件参数
博主采用yolov3_darknet模型进行训练,所以直接修改configs/yolov3_darknet_voc.yml文件即可。
参考文章:PaddleDetection——使用(jpg + xml)制作VOC数据集并建立PD包
上传至AI studio进行模型训练并导出模型
参考文章:PaddleDetcion——红绿灯检测:PaddleDetection-SSD_Mobilenet-VOCdataset
需要注意的是,读者在参考上文操作步骤的同时,需要将模型文件修改为自己的模型配置文件。
Windows本地部署PD模型实现视频流实时检测
PaddleDetection环境准备
安装PaddlePaddle环境
快速安装
下载PaddleDetection
建议使用稳定的0.3版本:
git clone https://gitee.com/paddlepaddle/PaddleDetection.git
本地部署预测代码
代码中有三种预测方式,分别为单张图片预测、本地视频读取预测和摄像头实时预测方式。
import numpy as np
import time
import cv2
import paddle.fluid as fluid
from PIL import Image
from PIL import ImageDraw
# 画图展示目标物体边界框
import matplotlib.pyplot as plt
import matplotlib.patches as patches
from matplotlib.image import imread
import math
import os


train_parameters = {

    "label_dict": {
     0:"HS",1:"DS",2:"B",3:"SMac",4:"TelP",5:"HSN",6:"DSN",7:"Number of TelP",8:"Unclear"},
    "use_gpu": True,
    "anchors": [[12, 16], [19, 36], [40, 28], [36, 75], [76, 55],[72, 146], [142, 110], [192, 243], [459, 401]],
    "anchor_mask": [[0, 1, 2], [3, 4, 5], [6, 7, 8]],
    "input_size": [3, 608, 608],    # 原版的边长大小为608,为了提高训练速度和预测速度,此处压缩为448
    #shape = (-1, 3, 608, 608), but received fed shape [1, 3, 1080, 1920] on each device
}

target_size = train_parameters['input_size']
anchors = train_parameters['anchors']
anchor_mask = train_parameters['anchor_mask']
label_dict = train_parameters['label_dict']
print(label_dict[1])

place = fluid.CUDAPlace(0) if train_parameters['use_gpu'] else fluid.CPUPlace()
exe = fluid.Executor(place)
path=r"G:\Python\out_preject\200920CarLinsence_Recg\dataset\10_28\PaddleDetection\output\yolov3_darknet_voc"##存放步骤1导出模型的路径
[inference_program, feed_target_names, fetch_targets] = fluid.io.load_inference_model(dirname=path, executor=exe,model_filename='__model__', params_filename='__params__')


class inference():
    def __init__(self):
        print("init ready!")

    def draw_bbox_image(self, img, boxes, labels,scores):
        """
        给图片画上外接矩形框
        :param img:
        :param boxes:
        :param labels:
        :return: img, box:
        """
        draw = ImageDraw.Draw(img)

        colors = ['red', 'green', 'blue', 'violet', 'yellow', 'darkblue', 'purple','orange','brown']
        for box, label,score in zip(boxes, labels, scores):
            print(box, label, score)
            #当识别的score高于哪个阈值时,才画框
            if(score >0.5):
                xmin, ymin, xmax, ymax = box[0], box[1], box[2], box[3]
                draw.rectangle((xmin, ymin, xmax, ymax), fill=None, outline=colors[label],width=2)
                draw.text((xmin, ymin), label_dict[label], colors[label])
        return img, box

    def resize_img(self, img, target_size):#将图片resize到target_size
        """
        保持比例的缩放图片
        :param img:
        :param target_size:
        :return: img
        """
        img = img.resize(target_size[1:], Image.BILINEAR)
        return img


    def read_image(self,img_path):

        origin = Image.open(img_path)

        #改变输入图片尺寸
        img = self.resize_img(origin, target_size)
        resized_img = img.copy()
        if img.mode != 'RGB':
            img = img.convert('RGB')
        img = np.array(img).astype('float32').transpose((2, 0, 1))  # HWC to CHW 让矩阵进行方向的转置
        img = img / 255.0
        img[0, :, :] -= 0
        img[1, :, :] -= 0
        img[2, :, :] -= 0

        img[0, :, :] /=1
        img[1, :, :] /=1
        img[2, :, :] /=1
        img = img[np.newaxis, :]
        return origin, img

    def infer(self, image_path):
        """
        预测,将结果保存到一副新的图片中
        :param image_path:
        :return: result_img, box:
        """

        origin, tensor_img = self.read_image(image_path)

        input_w, input_h = origin.size[0], origin.size[1]
        image_shape = np.array([input_h, input_w], dtype='int32')
        t1 = time.time()
        batch_outputs = exe.run(inference_program,
                                feed={
     feed_target_names[0]: tensor_img,
                                      feed_target_names[1]: image_shape[np.newaxis, :]},
                                fetch_list=fetch_targets,
                                return_numpy=False)

        period = time.time() - t1
        print("predict cost time:{0}".format("%2.2f sec" % period))
        bboxes = np.array(batch_outputs[0])
        #没检测到目标物体
        if bboxes.shape[1] != 6:
            print("No object found in {}".format(image_path))
            img = cv2.imread(image_path)
            return img, np.array([])
        labels = bboxes[:, 0].astype('int32')
        scores = bboxes[:, 1].astype('float32')
        boxes = bboxes[:, 2:].astype('float32')

        # print("show origin!")
        result_img, box = self.draw_bbox_image(origin, boxes, labels, scores)
        return result_img, box

def img_show(origin_img,processed_img, box):
    #将numpy转换为list
    box.tolist()
    print(len(box))
    for i in box:
        i.tolist()
    if len(box) >= 4:
        #将PIL的图像格式转换为OPENCV格式
        img = cv2.cvtColor(np.asarray(processed_img),cv2.COLOR_RGB2BGR)
        cv2.resize(img, (640, 480))
        cv2.imshow("img", img)
    else:
        cv2.resize(origin_img, (640, 480))
        cv2.imshow("img", origin_img)

if __name__ == '__main__':
    a=inference()

    #1.预测单张图片
    # image_path= "PaddleDetection/dataset/voc/JPEGImages/0.jpg"
    # img1 = cv2.imread(image_path)
    #2.预测实时视频流
    cap = cv2.VideoCapture(0)
    # 3.预测本地视频
    # cap = cv2.VideoCapture(r"G:\Python\out_preject\200920CarLinsence_Recg\dataset\手持\C0161.mp4")

    while cap.isOpened():
        try:
            print("open!")
            # 读取视频帧,ret标志读取的结果,frame为读取到的视频帧图像
            ret , frame = cap.read()
            cv2.imwrite("temp.jpg", frame)
            # cv2.imshow("frame", frame)  #真实摄像头画面
            result, box = a.infer("temp.jpg")
            img_show(frame, result, box)  #预测后的显示函数

        except TypeError:
            pass
        if cv2.waitKey(1) &0xFF ==ord('q'):
            break

    # 释放资源
    cap.release()
    cv2.destroyAllWindows()
效果展示:
参考文章:
基于PaddleDetection进行视频检测
python中PIL.Image和OpenCV图像格式相互转换
基于PaddleOCR实现公交车车牌数字的具体识别
识别测试图片:
目标图像的预处理
将识别后的矩形框作为roi进行截取图片
def roi_process(img, box):
    """
    提取出检测后的框体区域,并进行图像处理
    :param img: 检测后的图片
    :param box:  为框体的left, bottom, right, top
    """
    left, bottom, right, top = int(box[0]), int(box[1]), int(box[2]), int(box[3])
    # print(x, y, w, h)
    print("get roi!")
	#按照识别后框体的left, bottom, right, top进行切割图像,并保存为cut
    cut = img[bottom:top, left:right]
    print("cut!")

    cv2.imwrite("cut.jpg", cut)

    w = cut.shape[1]
    cut_num = cut[:, int(3/5*w):int(4/5*w)]
    cv2.imshow("cut_num", cut_num)
    cv2.imwrite("cut_num.jpg", cut_num)
    print("wirte!")
    # cv2.imshow('cut.jpg', cut)
截取效果:

并根据车牌的固定位置进行二次截取(固定截取图像的3/5—4/5的部分):
PaddleOCR文字识别
采用OCR实现对二次截取后数字的精确识别。
安装paddleocr库
pip install paddleocr
使用文本识别模型推理测试
将二次截取后的图像送入模型进行推理。
python tools/infer/predict_rec.py --image_dir="gs_frame.jpg" --rec_model_dir="./inference/ch_rec_r34_vd_crnn/"

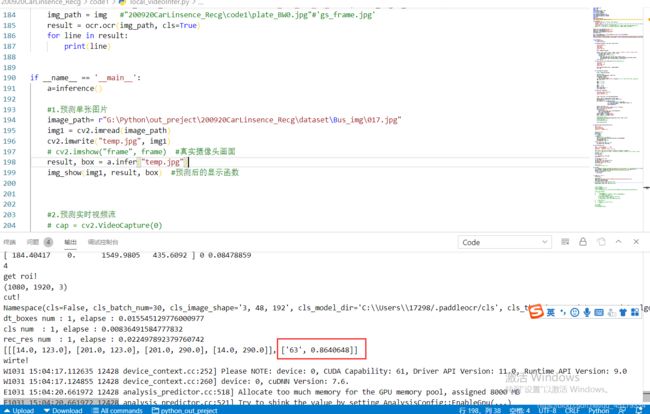
经测试后得出:OCR可以较为可靠地完成该任务,所以利用代码进行本地推理任务。
通过本地代码加载模型对预处理后的图片进行推理预测
from paddleocr import PaddleOCR, draw_ocr
# 模型路径下必须含有model和params文件  #det_model_dir='{your_det_model_dir}', cls_model_dir='{your_cls_model_dir}', rec_char_dict_path='{your_rec_char_dict_path}',
ocr = PaddleOCR( rec_model_dir='PaddleOCR\inference\ch_rec_r34_vd_crnn',  use_angle_cls=True)
img_path = "PaddleOCR\plate1.jpg"#'gs_frame.jpg'
result = ocr.ocr(img_path, cls=True)
for line in result:
    print(line)
使用该图进行预测:
将ocr封装为一个子函数加入视频流预测代码中实现实时推理
def ocr(img):
    # 模型路径下必须含有model和params文件  #det_model_dir='{your_det_model_dir}', cls_model_dir='{your_cls_model_dir}', rec_char_dict_path='{your_rec_char_dict_path}',
    ocr = PaddleOCR( rec_model_dir='PaddleOCR\inference\ch_rec_r34_vd_crnn',  use_angle_cls=True)  #rec_model_dir需要改成自己的
    img_path = img   #"200920CarLinsence_Recg\code1\plate_BW0.jpg"#'gs_frame.jpg'
    result = ocr.ocr(img_path, cls=True)
    for line in result:
        print(line)
项目完整代码
import numpy as np
import time
import cv2
import paddle.fluid as fluid
from PIL import Image
from PIL import ImageDraw
import matplotlib.pyplot as plt
import matplotlib.patches as patches
from matplotlib.image import imread
import math
import os
import multiprocessing
from paddleocr import PaddleOCR, draw_ocr


train_parameters = {

    "label_dict": {
     0:"plate"}, #此处为你的label
    "use_gpu": False,
    "anchors": [[12, 16], [19, 36], [40, 28], [36, 75], [76, 55],[72, 146], [142, 110], [192, 243], [459, 401]],
    "anchor_mask": [[0, 1, 2], [3, 4, 5], [6, 7, 8]],
    "input_size": [3, 608, 608],    # 原版的边长大小为608,为了提高训练速度和预测速度,此处压缩为448
}

target_size = train_parameters['input_size']
anchors = train_parameters['anchors']
anchor_mask = train_parameters['anchor_mask']
label_dict = train_parameters['label_dict']
print(label_dict)

place = fluid.CUDAPlace(0) if train_parameters['use_gpu'] else fluid.CPUPlace()
exe = fluid.Executor(place)
path = r"G:\Python\out_preject\200920CarLinsence_Recg\dataset\10_28\PaddleDetection\output\yolov3_darknet_voc" #需要修改!存放步骤1导出模型的路径
[inference_program, feed_target_names, fetch_targets] = fluid.io.load_inference_model(dirname=path, executor=exe,model_filename='__model__', params_filename='__params__')


class inference():
    def __init__(self):
        print("init ready!")

    def draw_bbox_image(self, img, boxes, labels,scores):
        """
        给图片画上外接矩形框
        :param img:
        :param boxes:
        :param labels:
        :return: img, box:
        """
        draw = ImageDraw.Draw(img)

        colors = ['red', 'green', 'blue', 'violet', 'yellow', 'darkblue', 'purple','orange','brown']
        for box, label,score in zip(boxes, labels, scores):
            print(box, label, score)
            #当识别的score高于哪个阈值时,才画框
            if(score >0.5):
                xmin, ymin, xmax, ymax = box[0], box[1], box[2], box[3]
                draw.rectangle((xmin, ymin, xmax, ymax), fill=None, outline=colors[label],width=2)
                draw.text((xmin, ymin), label_dict[label], colors[label])
        return img, box

    def resize_img(self, img, target_size):#将图片resize到target_size
        """
        保持比例的缩放图片
        :param img:
        :param target_size:
        :return: img
        """
        img = img.resize(target_size[1:], Image.BILINEAR)
        return img


    def read_image(self,img_path):

        origin = Image.open(img_path)

        #改变输入图片尺寸
        img = self.resize_img(origin, target_size)
        resized_img = img.copy()
        if img.mode != 'RGB':
            img = img.convert('RGB')
        img = np.array(img).astype('float32').transpose((2, 0, 1))  # HWC to CHW 让矩阵进行方向的转置
        img = img / 255.0

        img[0, :, :] -= 0
        img[1, :, :] -= 0
        img[2, :, :] -= 0

        img[0, :, :] /=1
        img[1, :, :] /=1
        img[2, :, :] /=1
        img = img[np.newaxis, :]
        return origin, img

    def infer(self, image_path):
        """
        预测,将结果保存到一副新的图片中
        :param image_path:
        :return: result_img, box:
        """

        origin, tensor_img = self.read_image(image_path)

        input_w, input_h = origin.size[0], origin.size[1]
        image_shape = np.array([input_h, input_w], dtype='int32')
        t1 = time.time()
        batch_outputs = exe.run(inference_program,
                                feed={
     feed_target_names[0]: tensor_img,
                                      feed_target_names[1]: image_shape[np.newaxis, :]},
                                fetch_list=fetch_targets,
                                return_numpy=False)

        period = time.time() - t1
        print("predict cost time:{0}".format("%2.2f sec" % period))
        bboxes = np.array(batch_outputs[0])  # bbox是四个点的坐标
        #没检测到目标物体
        if bboxes.shape[1] != 6:
            print("No object found in {}".format(image_path))
            img = cv2.imread(image_path)
            return img, np.array([])
        labels = bboxes[:, 0].astype('int32')
        scores = bboxes[:, 1].astype('float32')
        boxes = bboxes[:, 2:].astype('float32')

        # print("show origin!")
        result_img, box = self.draw_bbox_image(origin, boxes, labels, scores)
        # print("show result_img!")
        # result_img.show()
        # plt.imshow(result_img)

        return result_img, box

def img_show(origin_img,processed_img, box):
    """
    最终图像的显示
    :param origin_img:
    :param processed_img:
    :param box:  传入的box为np格式
    """

    #将numpy转换为list
    box.tolist()
    print(len(box))
    for i in box:
        i.tolist()
    if len(box) >= 4:
        #将PIL的图像格式转换为OPENCV格式
        img = cv2.cvtColor(np.asarray(processed_img),cv2.COLOR_RGB2BGR)
        roi_process(img, box)
        cv2.resize(img, (640, 480))
        cv2.imshow("img", img)
    else:
        cv2.resize(origin_img, (640, 480))
        cv2.imshow("img", origin_img)

def roi_process(img, box):
    """
    提取出检测后的框体区域,并进行图像处理
    :param img: 检测后的图片
    :param box:  为框体的left, bottom, right, top
    """
    left, bottom, right, top = int(box[0]), int(box[1]), int(box[2]), int(box[3])
    print("get roi!")
    print(img.shape)

    cut = img[bottom:top, left:right]
    print("cut!")

    cv2.imwrite("cut.jpg", cut)
    w = cut.shape[1]
    cut_num = cut[:, int(3/5*w):int(4/5*w)]
    cv2.imshow("cut_num", cut_num)
    cv2.imwrite("cut_num.jpg", cut_num)
    ocr("cut_num.jpg")

    print("wirte!")
    # cv2.imshow('cut.jpg', cut)

def ocr(img):
    # 模型路径下必须含有model和params文件  #det_model_dir='{your_det_model_dir}', cls_model_dir='{your_cls_model_dir}', rec_char_dict_path='{your_rec_char_dict_path}',
    ocr = PaddleOCR( rec_model_dir='PaddleOCR\inference\ch_rec_r34_vd_crnn',  use_angle_cls=True)  #rec_model_dir需要改成自己的
    img_path = img   #"200920CarLinsence_Recg\code1\plate_BW0.jpg"#'gs_frame.jpg'
    result = ocr.ocr(img_path, cls=True)
    for line in result:
        print(line)


if __name__ == '__main__':
    a=inference()

    #1.预测单张图片
    # image_path= r"G:\Python\out_preject\200920CarLinsence_Recg\dataset\Bus_img\017.jpg"
    # img1 = cv2.imread(image_path)
    # cv2.imwrite("temp.jpg", img1)
    # result, box = a.infer("temp.jpg")
    # img_show(img1, result, box)  #预测后的显示函数


    # 2.预测本地视频
    cap = cv2.VideoCapture(r"G:\Python\out_preject\200920CarLinsence_Recg\dataset\手持\C0161.mp4")

    #3.预测实时视频流
    # cap = cv2.VideoCapture(0)

    while cap.isOpened():
        try:
            print("open!")
            # 读取视频帧,ret标志读取的结果,frame为读取到的视频帧图像
            ret , frame = cap.read()
            cv2.imwrite("temp.jpg", frame)
            # cv2.imshow("frame", frame)  #真实摄像头画面
            result, box = a.infer("temp.jpg")
            img_show(frame, result, box)  #预测后的显示函数

        except TypeError:
            pass
        if cv2.waitKey(1) &0xFF ==ord('q'):
            break

    # 释放资源
    cap.release()
    cv2.destroyAllWindows()
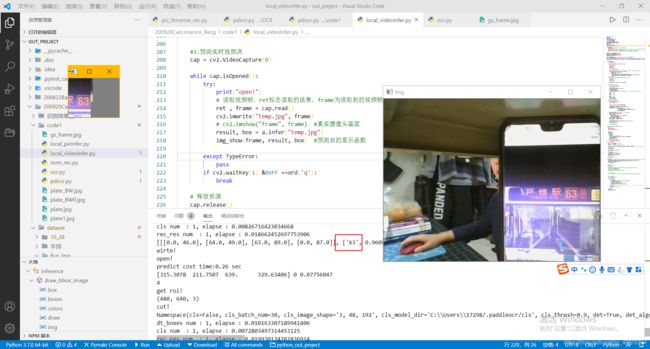
项目效果:实时视频流的公交车车牌的识别预测
利用手机显示该图片进行视频流预测:


