title: 第一个Spring Boot项目
tags: Spring Boot,后台,凌宇
grammar_cjkRuby: true
搭建第一个Spring Boot项目
[toc]
环境搭建
使用工具:Idea
软件环境:java version "1.8.0_131" maven "3.39"
项目搭建
新建项目
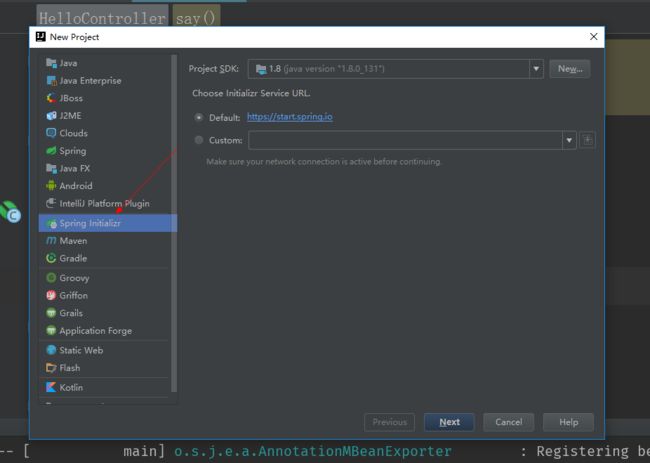
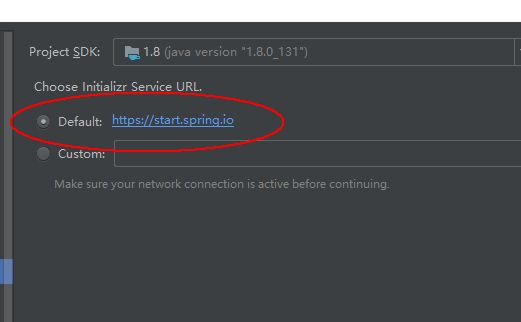
选择默认的Service Url
点击next 配置其他属性

点击next 选择

点击finish 完成项目搭建,初次搭建会根据依赖下载jar,会耗时很久,如果可以可以换成ali的maven的setting文件

代码小试牛刀
搭建完成后的项目目录如下:
可以看到省却了springmvc那一套死鬼麻烦的配置什么的,我们手动编写一个Controller来进行测试:
代码如下:
package com.girl;

import org.springframework.web.bind.annotation.RequestMapping;
import org.springframework.web.bind.annotation.RequestMethod;
import org.springframework.web.bind.annotation.RestController;

/**
 * Created by Ly on 2017/6/30.
 */
@RestController
public class HelloController {

    @RequestMapping(value = "hello",method = RequestMethod.GET)
    public String  say(){
        return "Hello Spring Boor";
    }
}
配置好tomcat以后,我们运行项目可以得到

配置文件

默认打开里面是空白的,我们手动添加如下代码:
server.port=8081
server.context-path=/girl
其中server.port指的是项目所跑的端口号
其中server.context-path可以认为是项目名
OK,这样讲不明白,我们做个对比:
当application.properties文件为空白时,则我们的服务器端口为之前创建tomcat时所配置的(以我为例,端口是8080 项目名是"/")
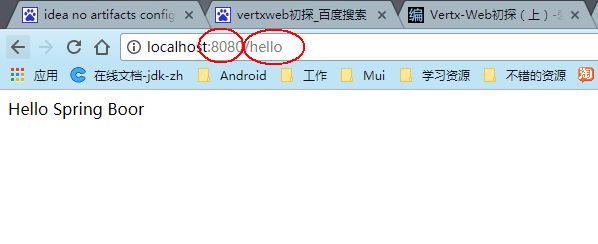
而修改了application.properties,加上上述代码后,我们需要进行这个网址访问:

当然,我们更推荐使用yml文件,通过更简便的语法来进行配置:

server:
  port: 8081
  context-path: /girl
通过@Value注解拿到配置文件里面的值
例如我们在配置文件中添加:
server:
  port: 8082
  context-path: /girl

  age : 12
在我们的Controller里面我们补充代码如下:
package com.girl;

import org.springframework.beans.factory.annotation.Value;
import org.springframework.web.bind.annotation.RequestMapping;
import org.springframework.web.bind.annotation.RequestMethod;
import org.springframework.web.bind.annotation.RestController;

/**
 * Created by Ly on 2017/6/30.
 */
@RestController
public class HelloController {
    @Value("${age}")
    private Integer port;
    @RequestMapping(value = "hello",method = RequestMethod.GET)
    public String  say(){
        return "Hello Spring Boor"+port;
    }
}
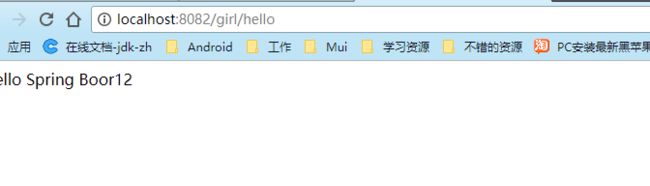
运行可以得到:
批量使用多个注解
通过@Value 我们可以拿到写在配置文件的值,但是如果有100个呢?是不是我们要通过100个注解来进行获取呢?
修改yml文件:
server:
  port: 8082
  context-path: /girl
girl:
  age: 12
  name: "Ly"
添加类包:

根据application.yml文件的值编写我们的javabean对象:
package com.girl.properties;

import org.springframework.boot.context.properties.ConfigurationProperties;
import org.springframework.stereotype.Component;

/**
 * Created by Ly on 2017/7/1.
 */
@Component
@ConfigurationProperties(prefix = "girl")
public class GirlProperties {
    private Integer age;
    private String name;

    @Override
    public String toString() {
        return "GirlProperties{" +
                "age=" + age +
                ", name='" + name + '\'' +
                '}';
    }

    public Integer getAge() {
        return age;
    }

    public void setAge(Integer age) {
        this.age = age;
    }

    public String getName() {
        return name;
    }

    public void setName(String name) {
        this.name = name;
    }
}
其中注意我们的2个注解:
@Component
@ConfigurationProperties(prefix = "girl")
这时候我们可以会出现错误:

这时候我们要在maven依赖文件中添加:
            org.springframework.boot
            spring-boot-configuration-processor
            true
这时候整个pom.xml文件:
    4.0.0

    com.girl
    girl
    0.0.1-SNAPSHOT
    jar

    girl
    Demo project for Spring Boot


        org.springframework.boot
        spring-boot-starter-parent
        1.5.4.RELEASE


        UTF-8
        UTF-8
        1.8


            org.springframework.boot
            spring-boot-starter-web


            org.springframework.boot
            spring-boot-starter-test
            test


            org.springframework.boot
            spring-boot-configuration-processor
            true


                org.springframework.boot
                spring-boot-maven-plugin
修改我们HelloController.java为:
package com.girl;

import com.girl.properties.GirlProperties;
import org.springframework.beans.factory.annotation.Autowired;
import org.springframework.beans.factory.annotation.Value;
import org.springframework.web.bind.annotation.RequestMapping;
import org.springframework.web.bind.annotation.RequestMethod;
import org.springframework.web.bind.annotation.RestController;

/**
 * Created by Ly on 2017/6/30.
 */
@RestController
public class HelloController {

    @Autowired
    private GirlProperties girlProperties;

    @RequestMapping(value = "hello",method = RequestMethod.GET)
    public String  say(){
        return "Hello Spring Boor"+girlProperties.toString();
    }
}
运行结果为:

运行配置 进行生产环境和开发环境的切换
添加2个配置文件如下:

application-dev.yml 开发环境
server:
  port: 8082
  context-path: /girl
girl:
  age: 19
  name: "lht"
application-prod.yml 生产环境
server:
  port: 8082
  context-path: /girl
girl:
  age: 12
  name: "Ly"
application.yml 控制切换版本
spring:
  profiles:
    active: dev
active: dev 为开发版本

active: prod 为生产版本

Controller的使用
基本概述:
@Controller的初步使用
修改HelloController代码如下:
package com.girl;

import org.springframework.stereotype.Controller;
import org.springframework.web.bind.annotation.RequestMapping;
import org.springframework.web.bind.annotation.RequestMethod;

/**
 * Created by Ly on 2017/6/30.
 */
@Controller
public class HelloController {
    @RequestMapping(value = "hello",method = RequestMethod.GET)
    public String  say(){
        return "index";
    }
}
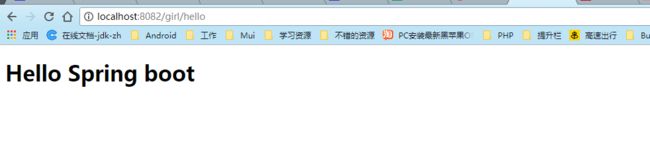
把@RestController修改为@Controller,返回一个String,指的是返回的一个html或者jsp路径
在templates目录下新增一个html文件:

index.html文件如下:
    Title


Hello Spring boot
在pom.xml文件中添加如下依赖:
            org.springframework.boot
            spring-boot-starter-thymeleaf
目前的pom.xml代码如下:
pom.xml
    4.0.0

    com.girl
    girl
    0.0.1-SNAPSHOT
    jar

    girl
    Demo project for Spring Boot


        org.springframework.boot
        spring-boot-starter-parent
        1.5.4.RELEASE


        UTF-8
        UTF-8
        1.8


            org.springframework.boot
            spring-boot-starter-web


            org.springframework.boot
            spring-boot-starter-test
            test


            org.springframework.boot
            spring-boot-configuration-processor
            true


            org.springframework.boot
            spring-boot-starter-thymeleaf


                org.springframework.boot
                spring-boot-maven-plugin
运行代码如下:
@Controller+@ResponseBody
@Controller+@ResponseBody=@RestController
/**
 * Created by Ly on 2017/6/30.
 */
@Controller
@ResponseBody
public class HelloController {
    @Autowired
    private GirlProperties girlProperties;
    @RequestMapping(value = "hello",method = RequestMethod.GET)
    public String  say(){
        return girlProperties.toString();
    }
}
效果等同于:
/**
 * Created by Ly on 2017/6/30.
 */
@RestController
public class HelloController {

    @Autowired
    private GirlProperties girlProperties;

    @RequestMapping(value = "hello",method = RequestMethod.GET)
    public String  say(){
        return "Hello Spring Boor"+girlProperties.toString();
    }
}
@RequestMapping
@RequestMapping可以修改为多个url,
修改HelloController文件如下:
/**
 * Created by Ly on 2017/6/30.
 */
@RestController
public class HelloController {
    @Autowired
    private GirlProperties girlProperties;
    @RequestMapping(value = {"hello","hi"},method = RequestMethod.GET)
    public String  say(){
        return girlProperties.toString();
    }
}


@RequestMapping可以为整个Controller类进行注解
/**
 * Created by Ly on 2017/6/30.
 */
@RestController
@RequestMapping(value = "Ly")
public class HelloController {
    @Autowired
    private GirlProperties girlProperties;
    @RequestMapping(value = {"hello","hi"},method = RequestMethod.GET)
    public String  say(){
        return girlProperties.toString();
    }
}
这时候我们需要通过如下路径才能进行访问:

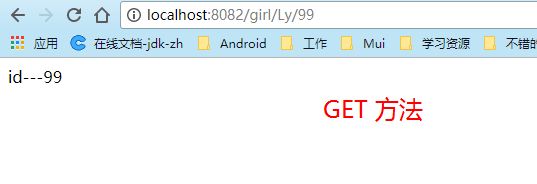
@PathVariable @RequestParam @GetMapping

@PathVariable是用来对指定请求的URL路径里面的变量
例如:
POST方法
    @RequestMapping(value = "Ly/{id}", method = RequestMethod.POST)
    public String sayLy(@PathVariable("id") Integer id) {
        return "id---" + id;
    }
GET方法
    @RequestMapping(value = "Ly/{id}", method = RequestMethod.GET)
    public String sayLy(@PathVariable("id") Integer id) {
        return "id---" + id;
    }
结果如下:

@RequestParam用来获得静态的URL请求参数
如果我们想用传统的方法利用get来传参数:http://localhost:8082/girl/Ly?id=121
可以参考:
 @RequestMapping(value = "ByGet", method = RequestMethod.GET)
    public String salLyByGet(@RequestParam(value = "id", required = false, defaultValue = "0") Integer id) {
        return "id----"+id;
    }
数据库使用
搭建数据库使用的环境
- 在application中配置数据库配置信息
  datasource:
      driver-class-name: com.mysql.jdbc.Driver
      url: jdbc:mysql://127.0.0.1:3306/dbgirl
      username: root
      password: root
  jpa:
    hibernate:
      ddl-auto: create
    show-sql: true
这时候整个的application.yml文件为:
spring:
  profiles:
    active: dev
  datasource:
      driver-class-name: com.mysql.jdbc.Driver
      url: jdbc:mysql://127.0.0.1:3306/dbgirl
      username: root
      password: root
  jpa:
    hibernate:
      ddl-auto: create
    show-sql: true
- maven 添加相应的配置文件:
            org.springframework.boot
            spring-boot-starter-test


            mysql
            mysql-connector-java
这时候整个xml文件为:
    4.0.0

    com.girl
    girl
    0.0.1-SNAPSHOT
    jar

    girl
    Demo project for Spring Boot


        org.springframework.boot
        spring-boot-starter-parent
        1.5.4.RELEASE


        UTF-8
        UTF-8
        1.8


            org.springframework.boot
            spring-boot-starter-web


            org.springframework.boot
            spring-boot-starter-test
            test


            org.springframework.boot
            spring-boot-configuration-processor
            true


            org.springframework.boot
            spring-boot-starter-thymeleaf


            org.springframework.boot
            spring-boot-starter-test


            mysql
            mysql-connector-java


            org.springframework.boot
            spring-boot-starter-data-jpa


                org.springframework.boot
                spring-boot-maven-plugin
- 我们不用在数据库中创建tables,其实我们所要做的只是创建一个databases,然后创建一个class,添加相应注解:
package com.girl;

import javax.persistence.Entity;
import javax.persistence.GeneratedValue;
import javax.persistence.Id;

/**
 * Created by Shinelon on 2017/7/3.
 */
@Entity
public class Girl {
    @Id
    @GeneratedValue
    private Integer id;
    private String cupSize;
    private Integer age;

    public Girl() {
    }

    public Integer getId() {
        return id;
    }

    public void setId(Integer id) {
        this.id = id;
    }

    public String getCupSize() {
        return cupSize;
    }

    public void setCupSize(String cupSize) {
        this.cupSize = cupSize;
    }

    public Integer getAge() {
        return age;
    }

    public void setAge(Integer age) {
        this.age = age;
    }
}

事务管理
使用 @Transactional 进行 事务的注解
添加GirlService代码:
@Service
public class GirlService {
     @Autowired
     GrilRepositoty grilRepositoty;
    @Transactional
     public void insertTwo(){
         Girl girl=new Girl();
         girl.setAge(11);
         girl.setCupSize("f");
         grilRepositoty.save(girl);
         Girl gir2=new Girl();
         gir2.setAge(3);
         gir2.setCupSize("A-Cpu");
         grilRepositoty.save(gir2);
     }
}
在GirlController中添加添加代码:
    @Autowired
    private GirlService girlService;
  @PostMapping(value = "doInsertTwoGirl")
    public void doInsertTwoGirl(){
        girlService .insertTwo();
    }
所谓事务,就是在多条数据库增删改查中,如果某一条发生了错误,那么数据库会提供一个回滚的机制。

这样就可以保证只有2条数据同时插入成功时,才是真的插入成功,否则会回滚到未插入之前的状态。