Git 入门到精通,大厂程序员呕心沥血强力推荐
目录
Git介绍
Git 安装配置
一.Yum安装
二.源码安装
三.Git配置说明
Git的工作流程
Git创建仓库
1.git init
2.git clone
3.配置
Git基本操作
1.创建仓库命令
2.提交与修改
3.提交日志
4.远程操作
Git分支管理
1.Git分支管理
查看提交历史
1.git log
2.git blame
Git标签
1.示例打标签
2.关于标签的常用命令
Git介绍
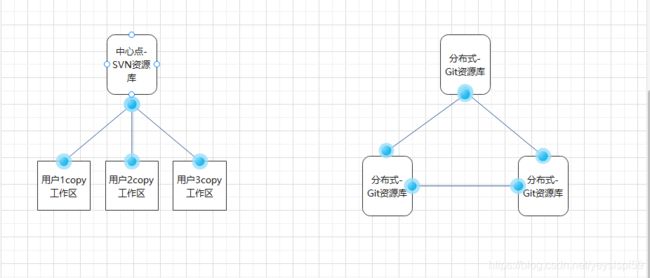
大部分介绍在 Git本地代码仓库的简单配置与使用 都已说明,这里补充下缺省的部分。说明下Git与SVN的区别。Git 不仅仅是个版本控制系统,它也是个内容管理系统(CMS),工作管理系统等。如果你是一个具有使用 SVN 背景的人,你需要做一定的思想转换,来适应 Git 提供的一些概念和特征。
Git与SVN的区别点:
- Git 是分布式的,SVN 不是:这是 Git 和其它非分布式的版本控制系统,例如 SVN,CVS 等,最核心的区别。
- Git 把内容按元数据方式存储,而 SVN 是按文件:所有的资源控制系统都是把文件的元信息隐藏在一个类似 .svn、.cvs 等的文件夹里。
- Git 分支和 SVN 的分支不同:分支在 SVN 中一点都不特别,其实它就是版本库中的另外一个目录。
- Git 没有一个全局的版本号,而 SVN 有:目前为止这是跟 SVN 相比 Git 缺少的最大的一个特征。
- Git 的内容完整性要优于 SVN:Git 的内容存储使用的是 SHA-1 哈希算法。这能确保代码内容的完整性,确保在遇到磁盘故障和网络问题时降低对版本库的破坏。
Git 安装配置
一.Yum安装
[root@gitlab ~]# yum -y install git
二.源码安装
1.在官网下载指定版本源码包,下面是源码包下载地址
https://git-scm.com/download
2.安装需要的依赖包
[root@gitlab ~]# yum -y install curl-devel expat-devel gettext-devel openssl-devel zlib-devel gcc gcc-c++
3.上传解压安装下载的源码包
[root@gitlab ~]# ll
总用量 4368
-rw-r--r--. 1 root root 4470916 5月  11 10:48 git-1.8.3.1.tar.gz
[root@gitlab ~]# tar xzf git-1.8.3.1.tar.gz
[root@gitlab git-1.8.3.1]# cd git-1.8.3.1
[root@gitlab git-1.8.3.1]# make prefile=/usr/local/ all
[root@gitlab git-1.8.3.1]# make prefix=/usr/local install
三.Git配置说明
Git 提供了一个叫做 git config 的工具,专门用来配置或读取相应的工作环境变量。
这些环境变量,决定了 Git 在各个环节的具体工作方式和行为。这些变量可以存放在以下三个不同的地方:
/etc/gitconfig文件:系统中对所有用户都普遍适用的配置。若使用git config时用--system选项,读写的就是这个文件。~/.gitconfig文件:用户目录下的配置文件只适用于该用户。若使用git config时用--global选项,读写的就是这个文件。- 当前项目的 Git 目录中的配置文件(也就是工作目录中的
.git/config文件):这里的配置仅仅针对当前项目有效。每一个级别的配置都会覆盖上层的相同配置,所以.git/config里的配置会覆盖/etc/gitconfig中的同名变量。
1.用户信息
配置个人的用户名称和邮箱地址
[root@gitlab gitbackup]# git config --global user.name hya
[root@gitlab gitbackup]# git config --global user.email [email protected]
[root@gitlab gitbackup]# cat ~/.gitconfig
[user]
	email = [email protected]
	name = hya
##如果用了 --global 选项,那么更改的配置文件就是位于你用户主目录下的那个,以后你所有的项目都会默认使用这里配置的用户信息。
如果要在某个特定的项目中使用其他名字或者电邮,只要去掉 --global 选项重新配置即可,新的设定保存在当前项目的 .git/config 文件里。
2.文本编辑器
设置Git默认使用的文本编辑器, 一般可能会是 Vi 或者 Vim。如果你有其他偏好,比如 Eclipse 的话,可以重新设置:
[root@gitlab gitbackup]# git config --global core.editor Eclipse
3.差异分析工具
解决合并冲突时使用哪种差异分析工具。比如要改用 vimdiff 的话:
[root@gitlab gitbackup]# git config --global merge.tool vimdiff
#Git 可以理解 kdiff3,tkdiff,meld,xxdiff,emerge,vimdiff,gvimdiff,ecmerge,和 opendiff 等合并工具的输出信息。
4.查看配置信息
检查已有的配置信息,可以使用 git config --list 命令:
[root@gitlab gitbackup]# git config --list
[email protected]
user.name=hya
core.editor=Eclipse
merge.tool=vimdiff
#有时候会看到重复的变量名,那就说明它们来自不同的配置文件(比如 /etc/gitconfig 和 ~/.gitconfig),不过最终 Git 实际采用的是最后一个。这些配置我们也可以在 ~/.gitconfig 或 /etc/gitconfig 看到。
也可以直接查阅某个环境变量的设定,只要把特定的名字跟在后面即可,如下
[root@gitlab gitbackup]# git config user.name
hya
[root@gitlab gitbackup]# git config user.email
[email protected]
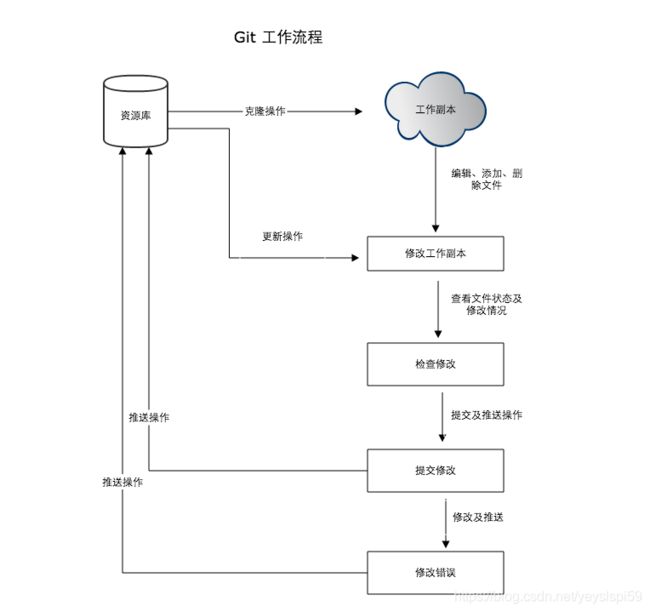
Git的工作流程
如下:
- 克隆 Git 资源作为工作目录。
- 在克隆的资源上添加或修改文件。
- 如果其他人修改了,你可以更新资源。
- 在提交前查看修改。
- 提交修改。
- 在修改完成后,如果发现错误,可以撤回提交并再次修改并提交。
Git创建仓库
1.git init
Git 使用 git init 命令来初始化一个 Git 仓库,Git 的很多命令都需要在 Git 的仓库中运行,所以 git init 是使用 Git 的第一个命令。
在执行完成 git init 命令后,Git 仓库会生成一个 .git 目录,该目录包含了资源的所有元数据,其他的项目目录保持不变
-------------------------------------------------------------------------------------------
[root@gitlab]# git init    #命令执行完后会在当前目录生成一个.git目录

[root@gitlab ~]# git init data/   #指定目录作为git仓库
初始化空的 Git 版本库于 /root/data/.git/

------------------------------------------------------------------------------------------
初始化后,会在 data 目录下会出现一个名为 .git 的目录,所有 Git 需要的数据和资源都存放在这个目录中。
如果当前目录下有几个文件想要纳入版本控制,需要先用 git add 命令告诉 Git 开始对这些文件进行跟踪,然后提交:
[root@gitlab data]# touch hello.txt
[root@gitlab data]# echo "this is first file" >> hello.txt
[root@gitlab data]# git add ./*
[root@gitlab data]# git commit -m "V1:初始化项目版本"   #将当前目录下所有的文件提交到仓库中 -m “这里跟的是提交说明”
[master(根提交) 77b74f1] V1:初始化项目版本
 1 file changed, 1 insertion(+)
 create mode 100644 hello.txt
2.git clone
克隆仓库的命令格式为:
git clone

如果我们需要克隆到指定的目录,可以使用以下命令格式:
git clone

参数说明:
repo:Git 仓库。
directory:本地目录。
------------------------------------------------------------------------------------------
示例:克隆gitlab仓库的项目到本地
[root@gitlab ~]# git clone [email protected]:root/hya-project.git
正克隆到 'hya-project'...
remote: Enumerating objects: 3, done.
remote: Counting objects: 100% (3/3), done.
remote: Total 3 (delta 0), reused 0 (delta 0), pack-reused 0
接收对象中: 100% (3/3), done.
[root@gitlab ~]# ls
data  hya-project  mydata  sdb1
3.配置
Git的设置使用git config命令
显示当前的git配置信息:
[root@gitlab data]# git config --list
user.name=hya
[email protected]
core.repositoryformatversion=0
core.filemode=true
core.bare=false
core.logallrefupdates=true

编辑git配置文件:
[root@gitlab data]# git config -e     #针对当前仓库
或者
[root@gitlab data]# git config -e --global  #针对系统上的所有仓库

设置提交代码时的用户信息:
git config --global user.name "用户名"
git config --global user.email 用户邮箱    #如果去掉--global参数则只会对当前仓库生效
Git基本操作
Git 的工作就是创建和保存你项目的快照及与之后的快照进行对比。Git 常用的是以下 6 个命令:git clone、git push、git add 、git commit、git checkout、git pull
说明:
- workspace:工作区
- staging area:暂存区/缓存区
- local repository:版本库或本地仓库
- remote repository:远程仓库
简单的操作步骤:
 git init
 git add .
 git commit

git init - 初始化仓库。
git add . - 添加文件到暂存区。
git commit - 将暂存区内容添加到仓库中
1.创建仓库命令
命令	     说明
git init	初始化仓库
git clone	copy远程仓库的项目到本地
2.提交与修改
命令          说明
git add	    添加文件到仓库
git status	查看仓库当前的状态,显示有变更的文件。
git diff	比较文件的不同,即暂存区和工作区的差异。
git commit	提交暂存区到本地仓库。
git reset	回退版本。
git rm	    删除工作区文件。
git mv	    移动或重命名工作区文件。
3.提交日志
命令                   说明
git log	            查看历史提交记录
git blame 	以列表形式查看指定文件的历史修改记录
4.远程操作
命令          说明
git remote	远程仓库操作
git fetch	从远程获取代码库
git pull	下载远程代码并合并
git push	上传远程代码并合并
Git分支管理
几乎每一种版本控制系统都以某种形式支持分支。使用分支意味着你可以从开发主线上分离开来,然后在不影响主线的同时继续工作。有人把 Git 的分支模型称为必杀技特性,而正是因为它,将 Git 从版本控制系统家族里区分出来。
创建分支命令:
git branch (branchname)

切换分支命令:
git checkout (branchname)
当你切换分支的时候,Git 会用该分支的最后提交的快照替换你的工作目录的内容, 所以多个分支不需要多个目录。

合并分支命令:
git merge
你可以多次合并到统一分支, 也可以选择在合并之后直接删除被并入的分支。
------------------------------------------------------------------------------------------
示例:
先创建一个测试目录:
[root@gitlab ~]# mkdir ceshi
[root@gitlab ~]# cd ceshi/
[root@gitlab ceshi]# git init
初始化空的 Git 版本库于 /root/ceshi/.git/
[root@gitlab ceshi]# touch first.txt
[root@gitlab ceshi]# git add first.txt
[root@gitlab ceshi]# git commit -m "v1:第一次版本提交"
[master(根提交) 567f076] v1:第一次版本提交
 1 file changed, 0 insertions(+), 0 deletions(-)
 create mode 100644 first.txt
1.Git分支管理
列出分支
列出分支命令:
git branch        #不加参数默认列出本地的分支
[root@gitlab ceshi]# git branch
* master
————————————————————————————————————————————————————————————————————————————————————

创建分支
[root@gitlab ceshi]# git branch test   #加上test就代表手动新建了一个分支
[root@gitlab ceshi]# git branch
* master
  test
————————————————————————————————————————————————————————————————————————————————————

切换分支
方式1:
[root@gitlab ceshi]# git checkout master
已经位于 'master'
[root@gitlab ceshi]# ls
first.txt
[root@gitlab ceshi]# git checkout test
切换到分支 'test'
方式2:
[root@gitlab ceshi]# git checkout -b newtest   #创建一个新分支并立即切换到该分支下
切换到一个新分支 'newtest'
————————————————————————————————————————————————————————————————————————————————————

删除分支命令
git branch -d (branchname)
[root@gitlab ceshi]# git branch
  master
* newtest
  test
[root@gitlab ceshi]# git branch -d test    #删除test这个分支
已删除分支 test(曾为 567f076)。
—————————————————————————————————————————————————————————————————————————————————————

合并分支
一旦某分支有了独立内容,我们会希望将它合并回到你的主分支。 可以使用以下命令将任何分支合并到当前分支中去:
git merge
[root@gitlab ceshi]# git merge newtest   #合并newtest分支到主分支中
Already up-to-date.
[root@gitlab ceshi]# git branch -d newtest
已删除分支 newtest(曾为 567f076)。
[root@gitlab ceshi]# git branch
* master
————————————————————————————————————————————————————————————————————————————————————————

合并冲突
合并不仅仅是简单的文件添加、移除的操作,Git也会合并修改,大白话就是当一个文件正在进行写入等系列操作,同时进行合并就会发生冲突  https://git-scm.com/book/zh/v2/Git-%E5%B7%A5%E5%85%B7-%E9%AB%98%E7%BA%A7%E5%90%88%E5%B9%B6 这里有详细说明
查看提交历史
Git提交历史一般用两个命令:
- git log - 查看历史提交记录
- git blame
-以列表的形势查看指定文件的历史修改记录
1.git log
在使用 Git 提交了若干更新之后,又或者克隆了某个项目,想回顾下提交历史,我们可以使用 git log 命令查看。使用 git log 命令列出历史提交记录如下:
[root@gitlab ceshi]# git log
commit 567f076b5844eed6076fc8125cc3a7a22a9b7b7e
Author: hya
Date:   Tue May 11 15:20:57 2021 +0800

    v1:第一次版本提交

--oneline 选项可以查看历史记录的简介版本
[root@gitlab ceshi]# git log --oneline
567f076 v1:第一次版本提交

--graph 选项可以查看历史中什么时候出现了分支,合并
[root@gitlab ceshi]# git log --graph
* commit 567f076b5844eed6076fc8125cc3a7a22a9b7b7e
  Author: hya
  Date:   Tue May 11 15:20:57 2021 +0800

      v1:第一次版本提交

--reverse 参数可以逆向显示所有日志
[root@gitlab ceshi]# git log --reverse --oneline

--author 可以查找指定用户提交的日志
[root@gitlab ceshi]# git log --author=hya --oneline
567f076 v1:第一次版本提交

--since --before  或者 --until --after 可以指定日期
[root@gitlab ceshi]# git log --oneline --before={1.weeks.ago} --after={2021-05-11} --no-merges   #--no-merges 选项以隐藏合并提交
2.git blame
查看指定文件修改记录可以使用git blame,git blame 是以列表形势显示修改记录的
git blame Git标签
如果需要记住特别的提交版本,可以使用git tag打上标签,但是这个标签不会记录是什么时候打的谁打的,命令如下:
git tag -a 标签名1.示例打标签
[root@gitlab ceshi]# touch hya.txt
[root@gitlab ceshi]# echo "this is hya" >> hya.txt
[root@gitlab ceshi]# git add hya.txt
[root@gitlab ceshi]# git commit -m "v2:创建hya.txt"
[root@gitlab ceshi]# git tag -a v1.0版本
[root@gitlab ceshi]# git tag -a v1.0版本
[root@gitlab ceshi]# git log --decorate
commit 83876d8c73fc61a31ca774a7e92322b0475fda61 (HEAD, tag: v1.0版本, master)
Author: hya
Date:   Tue May 11 16:26:17 2021 +0800

    v2:创建hya.txt

commit 567f076b5844eed6076fc8125cc3a7a22a9b7b7e
Author: hya
Date:   Tue May 11 15:20:57 2021 +0800

    v1:第一次版本提交
###如果是已经提交上去忘记打标签,也可以通过commit 这个编号追加标签
2.关于标签的常用命令
git tag                                          查看所有标签
git tag -d  标签                                 可以指定删除标签
git tag -a  -m "runoob.com标签"         指定标签信息命令
git tag -s  -m "runoob.com标签"         PGP签名标签命令:
版权声明:部分内容摘录自网络.


