iOS应用开发视频教程笔记(九)Table Views
今天讲的是TableViews,它可用于呈现动态数据列表,也可用于静态数据。
UITableView
tableView是个一维表,这是一个UIScrollView的子类,所以它是一个滚动列表。它可以高度定制化,它从它的两个不同的delegation中获取所有的定制化信息,有data source和delegate这两个不同的properties,data source负责提供表中的数据,delegate负责数据显示。如果想显示多维数据,就是有行和列,可以使用sections或者可以把它放进一个navigation controller。
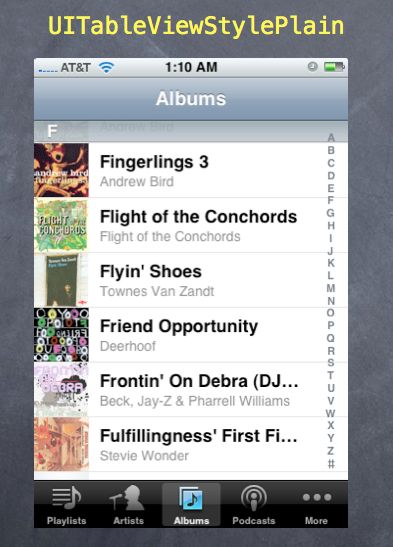
 这个是plain风格的tableVeiw的样子,顶部的F是section header,底部的东西是tab bar controller,和tableVeiw没关系。
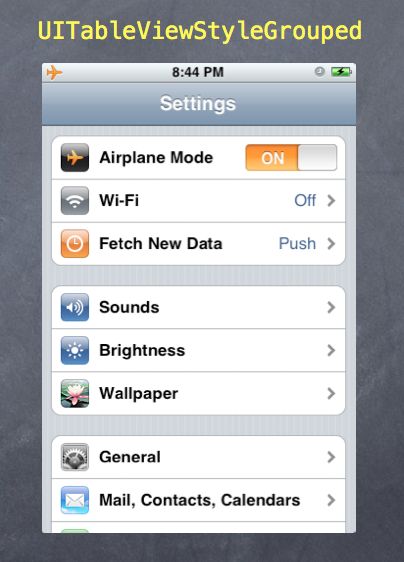
 这是group风格,group风格往往是为固定tableVeiw使用。
listView往往用来查询,查看动态数据。
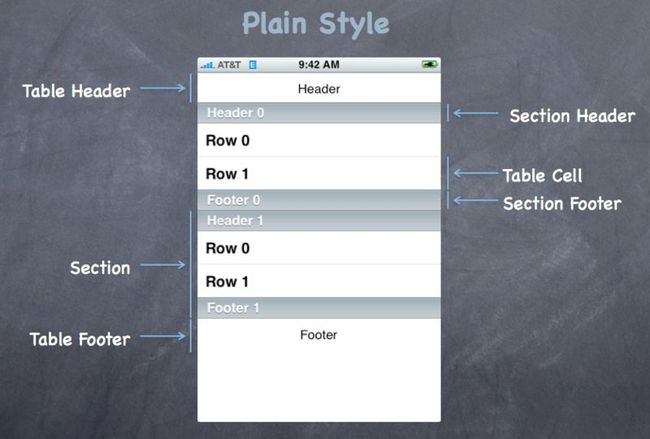
描述plain风格的tableVeiw的各个部分的术语:
最顶上的东西叫header,那是一个UIView,可以添加到表中,它可以是任何你想要的东西。在底部有个footer,也是个UIView。这些被分组的东西叫section,蓝条叫section header,可以用字符串设置或者可以用view,表中的每个row都是一个UIView,叫这个UIView为tableVeiw cell。
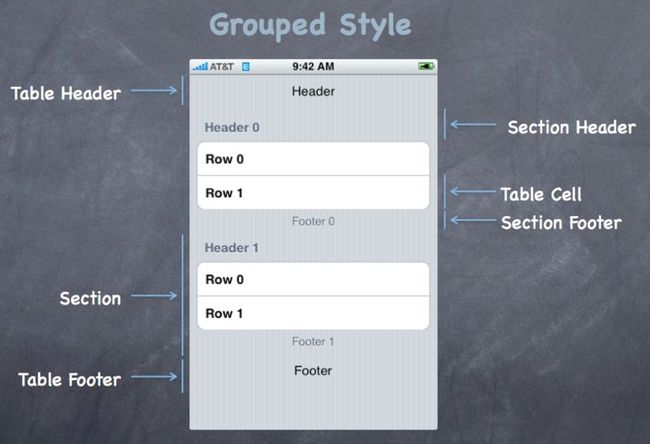
使用完全相同的术语描述group风格的tableVeiw:
当有section时,建立tableVeiw并实现data source时得告诉tableVeiw有多少section,然后它会问你每个section里有多少row。
cell有四个基本显示类型:
Subtitle有粗体的标题,然后下面有灰色的副标题;basic类型就是下面没有东西;right detail和subtitle一样,只是东西的排列不同,这是侧面和蓝色的;left detail也一样,只是左右换一下。
创建TableView MVC
tableVeiw来自xcode里的一个UITableViewController类,所以ios有controller的类,然后还有view的类,把它们作为一个单元从object library里拖出来。通常不会在一个通用的UITableViewController里用这个东西,通常会子类它,让子类controller成为delegate里的data source还有实现这些方法。这就是让tableVeiw做你想做的事情。
如何创建一个新类并使这个TableViewController不是一个通用的UITableViewController?去new file点击UIViewController,接着得确保你设置你自定义的controller类的父类为tableVeiw,ios中的UITableViewController类做了一些事情来帮助你的tableVeiw挂接到你的子类,然后还要确保在storyboard,你inspect该controller的identity inspect,并设置了正确的类。
在选中cell时,可以控制出现在cell右侧的小东西即accessory,accessory为Detail Disclosure Accessory时,把蓝色小按钮连接起来的方式是你的tableVeiw delegate,你得实现这个方法:
- (void)tableView:(UITableView *)tv accessoryTappedForRowAtIndexPath:(NSIndexPath *)ip;
当有人点击蓝色小按钮,这个方法会被调用。
在做动态时,有个非常重要的区域叫做reuse identifier,你需要在代码中指定,它才知道要创建的副本的原型是什么。为什么它还需要该字符串?可能有多个场景或tableVeiw,你拖动的UITableViewController实例来自同一个自定义子类,但它们可能有不同的cell原型,因此为cell命名。通常情况下,我们会把reuse identifier用来形容这个cell是什么。
UITableViewDataSource
这一切是如何工作的?如何得到这个UI?数据是如何来回流动的?这些都是通过protocols。tableVeiw有两种不同的delegate,一个叫delegate,一个叫data source,它们都是protocols。UITableViewController类会自动设置内部tableVeiw的delegate和data source,因此当我们拖出TableViewController,它已经有一个tableVeiw了,子类controller是默认的delegate和data source。这几乎总是你使用tableVeiw的方式。为什么做这个delegation?因为view不能和它们的controller对话,除了通过不可见通讯,也就是protocol,通过protocol可以来回发消息。所以tableVeiw是这个controller的view,它只能回应target action或delegate的对话,UITableViewController有个property指向这个tableVeiw。
要成为动态的,要实现此data source protocol。那么在这个data source protocol里都有什么方法?有三个要实现的非常重要的方法,一个是表明表里有多少section,二是每个section有多少row,第三个是返回要绘制的每个row的UITableView cell。来看最后一个方法,这是该方法的的样子:
- (UITableViewCell *)tableView:(UITableView *)sender cellForRowAtIndexPath:(NSIndexPath *)indexPath
{
   // get a cell to use (instance of UITableViewCell)
   UITableViewCell *cell;
   cell = [self.tableView dequeueReusableCellWithIdentifier:@“My Table View Cell”];
   if (!cell) {
        cell = [[UITableViewCell alloc] initWithStyle:UITableViewCellStyleSubtitle
                                      reuseIdentifier:@“My Table View Cell”];
   }
   cell.textLabel.text = [self getMyDataForRow:indexPath.row inSection:indexPath.section];
   return cell;
}
tableVeiw把自己作为第一个参数传递,然后第二个参数是一个indexPath。静态的cell不用实现这个方法。NSIndexPath要做的就是封装section和row,因此它有两个属性,一个叫section,一个叫row,section会告诉你当前是什么section,row会告诉你这个是当前section里的哪个row,因此这个方法只是说,给我一个用来画这个section里的这个row的UITableView。
这个方法中的代码通常有两部分:第一部分,让自己得到一个cell,然后设置cell里的property,tableVeiw有个神奇的方法叫做dequeueReusableCellWithIdentifier,这是为了效率,tableVeiw就像一个管理这些UITableViewCell的池子,当UITableVeiw离开屏幕,它就把它们放进池子,然后其中一个需要去到屏幕上时,它就进入池中找出一个来,这就是它是如何重用它们。当它们进出屏幕,我们只是一直在重用和复位,有关重用,reuse identifier指定了要用的池子的名字,当我们做了xcode原型cell,这里我们键入它的名字,因为当你做一个xcode的原型cell,如果它到达到重用池而池子是空的,比如第一次启动的时候,它会创建一个,并用原型把它放进去,这就是原型cell的作用,当重用池是空的时候,它会填进去,只要它是空的,就由原型的副本填充。所以这个字符串必须和xcode里的一样,如果你想要填充原型的话。如果这里返回nil,会发生什么?我们没有指定与xcode中相同的字符串,因此它不能使用原型副本,所以不能得到任何东西,它返回nil。接着会放些安全代码在这,alloc/init一个cell。
接下来只要设置property,比如cell有个property叫做text label,这里写了个方法getMyDataForRow:inSection:可以用来获取字符串之类的事情。然后返回这个cell。可以有交替的cell机制,但需要两个不同的池。
在tableVeiw中要有多少section和row,它有两个简单的方法,问它的data source这个tableVeiw里有多少section和这个section里有多少row,你只要回答这些问题:
- (NSInteger)numberOfSectionsInTableView:(UITableView *)sender;
- (NSInteger)tableView:(UITableView *)sender numberOfRowsInSection:(NSInteger)section;
通常是没有section的,也就是整体就是一个大的section。但是section里的row数量没有默认值,你必须给出section有多少row。静态表不必实现任何这些方法。
UITableViewDelegate
UITableView delegate控制如何绘制表,不是表中的数据,而是如何显示,比如像cell多高之类。常常data source和delegate是同一个对象,是这个UITableViewController,delegate有很多did/will happen方法,最重要的是它会通知你,当有人点击row的时候。
当有人点击row,我们可以做两件事:一是segueing,可以control drag一个row,甚至是prototype row,到其他东西,然后segue。如果从prototype cell处control drag,所有的cell都会做一样的事,所以我们就必须确保并根据选择的row准备segue的viewController,该cell被点击了,并得到一个delegate方法,如果不做segue或自己想做segue,就用手动segue这个方法。每当cell被点击didSelectRowAtIndexPath都会被调用,它会传递indexPath,你基于给予的信息做些什么:
- (void)tableView:(UITableView *)sender didSelectRowAtIndexPath:(NSIndexPath *)path {
     // go do something based on information
     // about my data structure corresponding to indexPath.row in indexPath.section
}
Table View Segues
如果表有个原型cell,直接control drag到一些其他的viewController,那么会问想要什么样的segue。当你prepare for segue,所以你在做segue,prepareForSegue会被发送到你的TableViewController,你要准备segueing的东西:
- (void)prepareForSegue:(UIStoryboardSegue *)segue sender:(id)sender {
     NSIndexPath *indexPath = [self.tableView indexPathForCell:sender];
     // prepare segue.destinationController to display based on information
     // about my data structure corresponding to indexPath.row in indexPath.section
}
通常会使用indexPathForCell这个方法,因为prepareForSegue里的sender是这个cell,被点击的UITableViewCell,所以通常会调用indexPathForCell得到indexPath,基于被点击的row,去model里查找要传递的数据。
如果model改变了呢?可以调用方法reloadData,reloadData重新加载整个表,它会知道表里有多少section及每个section有多少row,它会为所有的section调用此方法,然后它会为每个可见的cell调用cellForRowAtIndexPath:方法,所以reloadData不是轻量级的。
Demo
做一个计算器的例子,主要包括:
1.在NSUserDefaults存储一个property list;
2.建立一个UITableViewController及其自定义子类;
3.实现data source protocol;
4.创建一个新的delegate,在delegate实现的地方做一件事:如果有一个popover,通过popover放一个viewController,在popover里发生了什么,它需要回过去和controller通信,它不能直接和controller通信,由于popover是view的一部分,view不能直接回应它的controller,它必须使用delegation;
5.在graph view里添加一个按钮,它要做的是拿起这个graph,把它添加到NSUserDefaults里的一个列表里;
6.在graph view里添加另一个按钮,它要使用popover segue带来了一个全新的MVC,这是一个tableVeiw驱动的MVC,就是popover里有一个表,表里是一个其他所有favorite program的列表,当你点击其中一个,它会更新graph,显示favorite graph。
CalculatorGraphViewController.m文件的代码:
#import "CalculatorGraphViewController.h"
#import "CalculatorBrain.h"
#import "CalculatorProgramsTableViewController.h"

@interface CalculatorGraphViewController() <CalculatorProgramsTableViewControllerDelegate>
@property (nonatomic, strong) UIPopoverController *popoverController; // added after lecture to prevent multiple popovers
@end

@implementation CalculatorGraphViewController

@synthesize popoverController;

#define FAVORITES_KEY @"CalculatorGraphViewController.Favorites"

- (IBAction)addToFavorites:(id)sender
{
    NSUserDefaults *defaults = [NSUserDefaults standardUserDefaults];
    NSMutableArray *favorites = [[defaults objectForKey:FAVORITES_KEY] mutableCopy];
    if (!favorites) favorites = [NSMutableArray array];
    [favorites addObject:self.calculatorProgram];
    [defaults setObject:favorites forKey:FAVORITES_KEY];
    [defaults synchronize];
}

- (void)prepareForSegue:(UIStoryboardSegue *)segue sender:(id)sender
{
    if ([segue.identifier isEqualToString:@"Show Favorite Graphs"]) {
        // this if statement added after lecture to prevent multiple popovers
        // appearing if the user keeps touching the Favorites button over and over
        // simply remove the last one we put up each time we segue to a new one
        if ([segue isKindOfClass:[UIStoryboardPopoverSegue class]]) {
            UIStoryboardPopoverSegue *popoverSegue = (UIStoryboardPopoverSegue *)segue;
            [self.popoverController dismissPopoverAnimated:YES];
            self.popoverController = popoverSegue.popoverController; // might want to be popover's delegate and self.popoverController = nil on dismiss?
        }
        NSArray *programs = [[NSUserDefaults standardUserDefaults] objectForKey:FAVORITES_KEY];
        [segue.destinationViewController setPrograms:programs];
        [segue.destinationViewController setDelegate:self];
    }
}

- (void)calculatorProgramsTableViewController:(CalculatorProgramsTableViewController *)sender
                                 choseProgram:(id)program
{
    self.calculatorProgram = program;
    // if you wanted to close the popover when a graph was selected
    // you could uncomment the following line
    // you'd probably want to set self.popoverController = nil after doing so
    // [self.popoverController dismissPopoverAnimated:YES];
    [self.navigationController popViewControllerAnimated:YES]; // added after lecture to support iPhone
}

// added after lecture to support deletion from the table
// deletes the given program from NSUserDefaults (including duplicates)
// then resets the Model of the sender

- (void)calculatorProgramsTableViewController:(CalculatorProgramsTableViewController *)sender
                               deletedProgram:(id)program
{
    NSString *deletedProgramDescription = [CalculatorBrain descriptionOfProgram:program];
    NSMutableArray *favorites = [NSMutableArray array];
    NSUserDefaults *defaults = [NSUserDefaults standardUserDefaults];
    for (id program in [defaults objectForKey:FAVORITES_KEY]) {
        if (![[CalculatorBrain descriptionOfProgram:program] isEqualToString:deletedProgramDescription]) {
            [favorites addObject:program];
        }
    }
    [defaults setObject:favorites forKey:FAVORITES_KEY];
    [defaults synchronize];
    sender.programs = favorites;
}

@end
在storyboard中拖出TableViewController,接着创建一个自定义子类,这是一个UITableViewController子类,叫做CalculatorProgramsTableViewController,接下来在storyboard里去到identity inspector为TableViewController指定类为CalculatorProgramsTableViewController。
创建一个按钮segue到TableViewController,拖出一个barButton到graphView,然后从它control drag到TableViewController,选择popover segue,设置它的identifier为Show Favorite Graphs。
在自定义的TableViewController里面,设置cell属性,将style修改为basic,将identifier设为Calculator Program Description。如果不希望TableViewController出现在popover时太大,需要选中这个controller,使popover属性是200x200。
delegation的5个步骤:
1.创建protocol,是会被用来描述protocol,还有要干嘛;
2.添加property,不管是data source或delegate,通常都在公共接口里;
3.在delegator的实现内部使用这个delegate property,它需要那里的信息或它要和其他对象通信;
4.要在delegate里设置delegate property,是delegate而不是delegator,是接收这些消息的人;
5.它需要设置自己为delegate,它需要实现protocol里它需要的方法。
CalculatorProgramsTableViewController.h文件的代码:
#import <UIKit/UIKit.h>

@class CalculatorProgramsTableViewController;

@protocol CalculatorProgramsTableViewControllerDelegate <NSObject> // added <NSObject> after lecture so we can do respondsToSelector: on the delegate
@optional
- (void)calculatorProgramsTableViewController:(CalculatorProgramsTableViewController *)sender
                                 choseProgram:(id)program;
- (void)calculatorProgramsTableViewController:(CalculatorProgramsTableViewController *)sender
                                 deletedProgram:(id)program; // added after lecture to support deleting from table
@end

@interface CalculatorProgramsTableViewController : UITableViewController
@property (nonatomic, strong) NSArray *programs; // of CalculatorBrain programs
@property (nonatomic, weak) id <CalculatorProgramsTableViewControllerDelegate> delegate;
@end
CalculatorProgramsTableViewController.m文件的代码:
#import "CalculatorProgramsTableViewController.h"
#import "CalculatorBrain.h"

@implementation CalculatorProgramsTableViewController

@synthesize programs = _programs;
@synthesize delegate = _delegate;

// added after lecture to be sure table gets reloaded if Model changes
// you should always do this (i.e. reload table when Model changes)
// the Model getting out of synch with the contents of the table is bad

- (void)setPrograms:(NSArray *)programs
{
    _programs = programs;
    [self.tableView reloadData];
}

- (BOOL)shouldAutorotateToInterfaceOrientation:(UIInterfaceOrientation)interfaceOrientation
{
    return YES;
}

#pragma mark - UITableViewDataSource

- (NSInteger)tableView:(UITableView *)tableView numberOfRowsInSection:(NSInteger)section
{
    return [self.programs count];
}

- (UITableViewCell *)tableView:(UITableView *)tableView cellForRowAtIndexPath:(NSIndexPath *)indexPath
{
    static NSString *CellIdentifier = @"Calculator Program Description";

    UITableViewCell *cell = [tableView dequeueReusableCellWithIdentifier:CellIdentifier];
    if (cell == nil) {
        cell = [[UITableViewCell alloc] initWithStyle:UITableViewCellStyleDefault reuseIdentifier:CellIdentifier];
    }

    // Configure the cell...
    id program = [self.programs objectAtIndex:indexPath.row];
    cell.textLabel.text = [@"y = " stringByAppendingString:[CalculatorBrain descriptionOfProgram:program]];

    return cell;
}

// this method added after lecture to support deletion
// simply delegates deletion

- (void)tableView:(UITableView *)tableView commitEditingStyle:(UITableViewCellEditingStyle)editingStyle forRowAtIndexPath:(NSIndexPath *)indexPath
{
    if (editingStyle == UITableViewCellEditingStyleDelete) {
        id program = [self.programs objectAtIndex:indexPath.row];
        [self.delegate calculatorProgramsTableViewController:self deletedProgram:program];
    }
}

// added after lecture
// don't allow deletion if the delegate does not support it too!

- (BOOL)tableView:(UITableView *)tableView canEditRowAtIndexPath:(NSIndexPath *)indexPath
{
    return [self.delegate respondsToSelector:@selector(calculatorProgramsTableViewController:deletedProgram:)];
}

#pragma mark - UITableViewDelegate

- (void)tableView:(UITableView *)tableView didSelectRowAtIndexPath:(NSIndexPath *)indexPath
{
    id program = [self.programs objectAtIndex:indexPath.row];
    [self.delegate calculatorProgramsTableViewController:self choseProgram:program];
}

@end


