我的第一个 Python 小项目,开放完整代码
你好,我是zhenguo
这是4月29日,我发布的第一个Python小项目,文本句子基于关键词的KWIC显示,没看到粉丝朋友可以看看下面介绍,知道的,直接跳到文章的求解分析和代码部分。
把所学知识应用于实际问题,才能真正加深对它的认识和理解,这就是实践出真知。从此最基本点出发,我设计了一个小项目,蛮有意思,也有一定实际应用价值。
此小项目我会同步在github库 python-small-examples中,目前近6100个star,欢迎提交pull request,有机会成为此库的第13位贡献者。
https://github.com/jackzhenguo/python-small-examples
进行中Python小项目
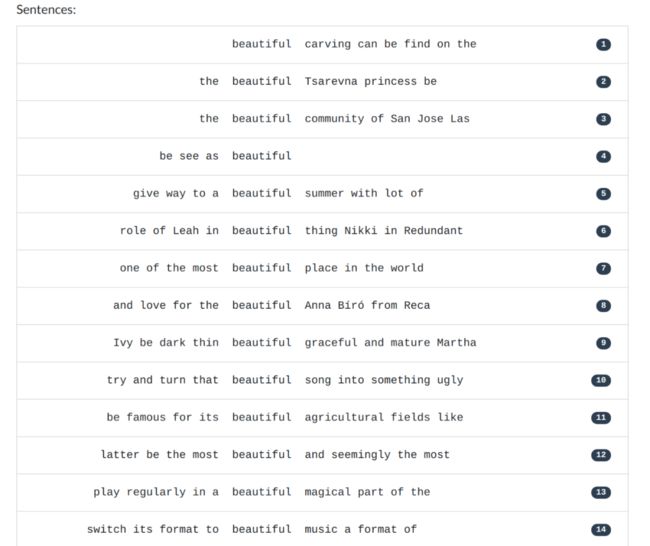
上下文关键字(KWIC, Key Word In Context)是最常见的多行协调显示格式。
此小项目描述:输入一系列句子,给定一个给定单词,每个句子中至少会出现一次给定单词。目标输出,给定单词按照KWIC显示,KWIC显示的基本要求:待查询单词居中,前面pre序列右对齐,后面post序列左对齐,待查询单词前和后长度相等,若输入句子无法满足要求,用空格填充。
输入参数:输入句子sentences, 待查询单词selword, 滑动窗口长度window_len
举例,输入如下六个句子,给定单词secure,输出如下字符串:
               pre keyword    post

     welfare , and secure  the blessings of
     nations , and secured immortal glory with
       , and shall secure  to you the
    cherished . To secure  us against these
     defense as to secure  our cities and
          I can to secure  economy and fidelity
请补充实现下面函数:
def kwic(sentences: List[str], selword: str, window_len: int) -> str:
    """
    :type: sentences: input sentences
    :type: selword: selected word
    :type: window_len: window length
    """
更多KWIC显示参考如下:
http://dep.chs.nihon-u.ac.jp/english_lang/tukamoto/kwic_e.html
此项目的完整代码和分析已发布在我创建的 Python中文网 http://zglg.work 中,欢迎点击文章最下的阅读原文,直达网页。
以下代码都经过测试,完整可运行。
# encoding: utf-8
"""
@file: kwic_service.py
@desc: providing functions about KWIC presentation
@author: group3
@time: 5/9/2021
"""

import re
from typing import List
获取关键词sel_word的窗口,默认窗口长度为5
def get_keyword_window(sel_word: str, words_of_sentence: List, length=5) -> List[str]:
    """
    find the index of sel_word at sentence, then decide words of @length size
    by backward and forward of it.
    For example: I am very happy to this course of psd if sel_word is happy, then
    returning: [am, very, happy, to, this]

    if length is even, then returning [very, happy, to, this]

    remember: sel_word being word root
    """
    if length <= 0 or len(words_of_sentence) <= length:
        return words_of_sentence
    index = -1
    for iw, word in enumerate(words_of_sentence):
        word = word.lower()
        if len(re.findall(sel_word.lower(), word)) > 0:
            index = iw
            break

    if index == -1:
        # log.warning("warning: cannot find %s in sentence: %s" % (sel_word, words_of_sentence))
        return words_of_sentence
    # backward is not enough
    if index < length // 2:
        back_slice = words_of_sentence[:index]
        # forward is also not enough,
        # showing the sentence is too short compared to length parameter
        if (length - index) >= len(words_of_sentence):
            return words_of_sentence
        else:
            return back_slice + words_of_sentence[index: index + length - len(back_slice)]
    # forward is not enough
    if (index + length // 2) >= len(words_of_sentence):
        forward_slice = words_of_sentence[index:len(words_of_sentence)]
        # backward is also not enough,
        # showing the sentence is too short compared to length parameter
        if index - length <= 0:
            return words_of_sentence
        else:
            return words_of_sentence[index - (length - len(forward_slice)):index] + forward_slice

    return words_of_sentence[index - length // 2: index + length // 2 + 1] if length % 2 \
        else words_of_sentence[index - length // 2 + 1: index + length // 2 + 1]
KWIC显示逻辑,我放在另外一个方法中,鉴于代码长度,放在这里文章显示太长了,所以完整代码全部归档到这里:
http://www.zglg.work/Python-20-topics/python-project1-kwic/
测试代码
# encoding: utf-8
"""
@file: test_kwic_show.py
@desc:
@author: group3
@time: 5/3/2021
"""
from src.feature.kwic import kwic_show

if __name__ == '__main__':
    words = ['I', 'am', 'very', 'happy', 'to', 'this', 'course', 'of', 'psd']

    print(kwic_show('English', words, 'I', window_size=1)[0])
    print(kwic_show('English', words, 'I', window_size=5)[0])

    print(kwic_show('English', words, 'very', token_space_param=5)[0])
    print(kwic_show('English', words, 'very', window_size=6, token_space_param=5)[0])
    print(kwic_show('English', words, 'very', window_size=1, token_space_param=5)[0])

    # test boundary
    print(kwic_show('English', words, 'stem', align_param=20)[0])
    print(kwic_show('English', words, 'stem', align_param=100)[0])
    print(kwic_show('English', words, 'II', window_size=1)[0])
    print(kwic_show('English', words, 'related', window_size=10000)[0])
打印结果
                                  I
                                  I am very happy to
                        I am     very     happy to this course of psd
                        I am     very     happy to this
                                 very
None
None
None
None
我正在做一个关于KWIC显示的web工具,目前还在自测中,先给大家看一下显示效果,后面部署完成后,开放给大家去体验:
点击下方 阅读原文,查看所有完整代码
