原文首发与『程序员精进』博客,原文链接:混沌工程实践 - Spring Boot 微服务应用使用 Chaos Monkey
我们中有多少人在生产环境下遇到了系统崩溃或是故障?当然答案是所有人,暂时未遇到的日后也会遇到。如果我们不能避免故障,看起来可行的方案就是在肯定会故障的状态下维护我们的系统。Netflix 基于这个概念发明了用于测试他们 IT 基础设施韧性(可恢复能力)的工具——Chaos Monkey。
今天我们将在 Spring Boot 应用中使用 Codecentric Chaos Monkey 库,并且在一个由多个微服务构成的示例项目中实现混沌工程。Chaos Monkey 库目前与 Spring Boot 2.0 搭配的最新 release 版本是 1.0.1. 但在本次示例项目中将使用 2.0.0-SNAPSHOT 版本,因为新的这个版本有更多的有趣功能。
1. 应用中启用 Chaos Monkey
在 Spring Boot 应用中开启 Chaos Monkey 支持仅需要两步,首先在项目依赖中添加在 chaos-monkey-spring-boot。
    de.codecentric
    chaos-monkey-spring-boot
    2.0.0-SNAPSHOT
再然后,我们在应用启动时激活 chaos-monkey 的 profile。
$ java -jar target/order-service-1.0-SNAPSHOT.jar --spring.profiles.active=chaos-monkey
2. 示例项目架构
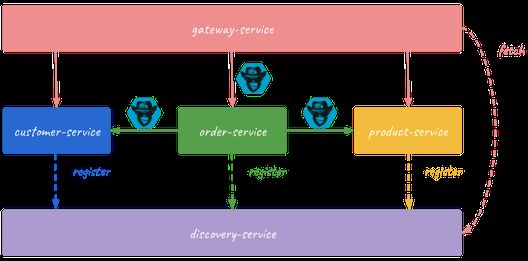
示例项目由三个微服务组成,每个微服务启动两个实例,另外再加一个服务发现服务。微服务在服务发现服务注册自己,然后彼此间通过 HTTP API 通信。每个运行中的微服务实例都引入了 Chaos Monkey 库,服务发现服务不引入。下面架构图显示了这个示例项目的组成。
本示例项目的代码已经放在了 GitHub 上,代码仓库名为 sample-spring-chaosmonkey ( https://github.com/piomin/sample-spring-chaosmonkey.git )。在克隆 git 代码仓库到本地工作副本后,使用 mvn clean install 命令进行示例项目的编译打包。先运行服务发现服务,然后给每个微服务启动两个实例,当然运行时需要通过 -Dserver.port 参数来指定服务端口,以下是运行服务的参考命令:
$ java -jar target/discovery-service-1.0-SNAPSHOT.jar
$ java -jar target/order-service-1.0-SNAPSHOT.jar --spring.profiles.active=chaos-monkey
$ java -jar -Dserver.port=9091 target/order-service-1.0-SNAPSHOT.jar --spring.profiles.active=chaos-monkey
$ java -jar target/product-service-1.0-SNAPSHOT.jar --spring.profiles.active=chaos-monkey
$ java -jar -Dserver.port=9092 target/product-service-1.0-SNAPSHOT.jar --spring.profiles.active=chaos-monkey
$ java -jar target/customer-service-1.0-SNAPSHOT.jar --spring.profiles.active=chaos-monkey
$ java -jar -Dserver.port=9093 target/customer-service-1.0-SNAPSHOT.jar --spring.profiles.active=chaos-monkey
3. Chaos Monkey 库配置
在 chaos-monkey-spring-boot 库的 2.0.0-SNAPSHOT 版本中,Chaos Monkey 在引入后是默认开启的,可以通过设置 chaos.monkey.enabled 属性来开启或关闭。默认的袭击方式是延迟,延迟袭击方式是在每个请求处理时添加随机的时延,其中随机时延取值于 chaos.monkey.assaults.latencyRangeStart 和 chaos.monkey.assaults.latencyRangeEnd 两个属性之间的区间。袭击的请求数量由属性 chaos.monkey.assaults.level 来设置,这个属性取值范围为 1-10,数值为 1 时意味着每个请求,数值为 10 时意味着每第 10 个请求。另外我们可以开启另外两种袭击方式:异常和 appKiller。在示例项目微服务中我们关于 Chaos Monkey 的配置如下:
chaos:
  monkey:
    assaults:
      level: 8
      latencyRangeStart: 1000
      latencyRangeEnd: 10000
      exceptionsActive: true
      killApplicationActive: true
    watcher:
      repository: true
      restController: true
在每个微服务的 application.yml 文件中设置如上内容,理论上,我们会开启 Chaos Monkey 三种袭击方式。但实际上,如果我们开启了延时和异常的袭击方式,appKiller 袭击方式就不会发生;并且,当我们同时开启了延时和异常的袭击方式,每个请求都会被攻击,将与我们设置的 chaos.monkey.assaults.level 属性无关。另外需要注意的是,我们将 restController watcher 开启了,默认情况下是关闭的。
4. 启用 Spring Boot Actuator 访问端口
在 Codecentric Chaos Monkey 库的 2.0 版本中有个新的特性:Spring Boot Actuator 访问端口,通过 management.endpoint.chaosmonkey.enabled 属性来设置是否开启,在应用启动后,就可以通过 HTTP 访问端口来访问了。
management:
  endpoint:
    chaosmonkey:
      enabled: true
  endpoints:
    web:
      exposure:
        include: health,info,chaosmonkey
示例项目 chaos-monkey-spring-boot 提供了几个访问端口进行配置查看和修改,通过 GET 请求访问 /chaosmonkey 可以获取 Chaos Monkey 库的所有配置,另外可以通过 POST 请求访问 /chaosmonkey/disable 来关闭 Chaos Monkey。完整的访问端口列表详见:https://codecentric.github.io/chaos-monkey-spring-boot/2.0.0-SNAPSHOT/#endpoints 。
5. 运行项目
示例项目中所有的微服务都将数据存储到了 MySQL,这里我们将使用 Docker 镜像来跑 MySQL 数据库,运行命令如下:
$ docker run -d --name mysql -e MYSQL_DATABASE=chaos -e MYSQL_USER=chaos -e MYSQL_PASSWORD=chaos123 -e MYSQL_ROOT_PASSWORD=123456 -p 33306:3306 mysql
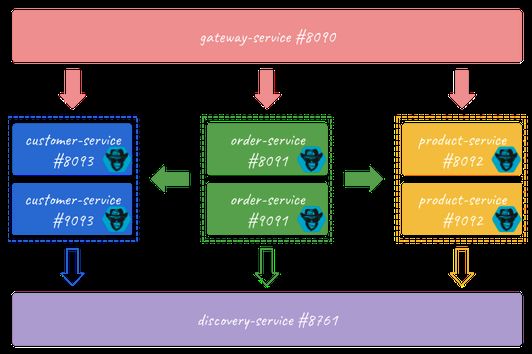
在示例项目中的应用都运行后(每个微服务运行两个实例),我们的运行环境架构应该跟下图一致:
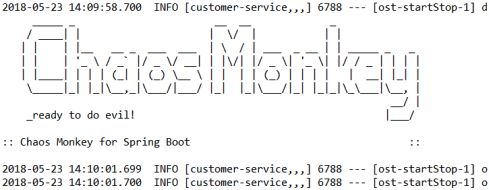
当应用启动时我们可以在日志中看到 Chaos Monkey 的启动信息,大致如下:
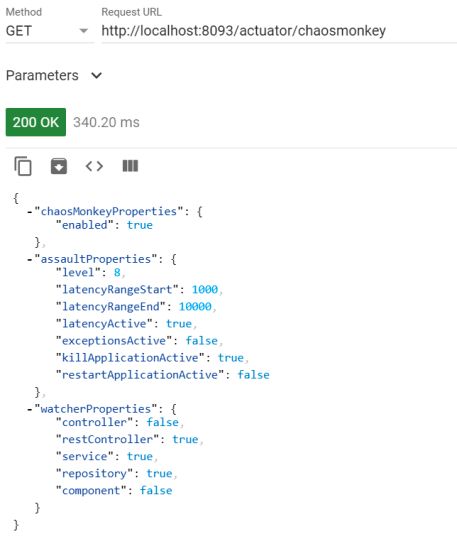
可以通过 actuator 的 HTTP 访问端口来查看每个运行中实例的 Chaos Monkey 配置。
6. 测试示例项目
我们这里使用性能测试库 Gatling 来进行测试,将创建 20 个并发线程,将通过 API 网关服务来调用 order-service,每个线程调用 500 次。
class ApiGatlingSimulationTest extends Simulation {

  val scn = scenario("AddAndFindOrders").repeat(500, "n") {
        exec(
          http("AddOrder-API")
            .post("http://localhost:8090/order-service/orders")
            .header("Content-Type", "application/json")
            .body(StringBody("""{"productId":""" + Random.nextInt(20) + ""","customerId":""" + Random.nextInt(20) + ""","productsCount":1,"price":1000,"status":"NEW"}"""))
            .check(status.is(200),  jsonPath("$.id").saveAs("orderId"))
        ).pause(Duration.apply(5, TimeUnit.MILLISECONDS))
        .
        exec(
          http("GetOrder-API")
            .get("http://localhost:8090/order-service/orders/${orderId}")
            .check(status.is(200))
        )
  }

  setUp(scn.inject(atOnceUsers(20))).maxDuration(FiniteDuration.apply(10, "minutes"))

}
测试的 POST 请求访问端口是 OrderController 的 add(...) 方法,这个方法将通过 OpenFeign 客户端来调用 customer-service 和 product-service。如果顾客用足够的资金并且相应商品有库存的情况下,就接受订单通过 PUT 方法对顾客和商品服务进行修改。下面是相应的方法实现:
@RestController
@RequestMapping("/orders")
public class OrderController {

    @Autowired
    OrderRepository repository;
    @Autowired
    CustomerClient customerClient;
    @Autowired
    ProductClient productClient;

    @PostMapping
    public Order add(@RequestBody Order order) {
        Product product = productClient.findById(order.getProductId());
        Customer customer = customerClient.findById(order.getCustomerId());
        int totalPrice = order.getProductsCount() * product.getPrice();
        if (customer != null && customer.getAvailableFunds() >= totalPrice && product.getCount() >= order.getProductsCount()) {
            order.setPrice(totalPrice);
            order.setStatus(OrderStatus.ACCEPTED);
            product.setCount(product.getCount() - order.getProductsCount());
            productClient.update(product);
            customer.setAvailableFunds(customer.getAvailableFunds() - totalPrice);
            customerClient.update(customer);
        } else {
            order.setStatus(OrderStatus.REJECTED);
        }
        return repository.save(order);
    }

    @GetMapping("/{id}")
    public Order findById(@PathVariable("id") Integer id) {
        Optional order = repository.findById(id);
        if (order.isPresent()) {
            Order o = order.get();
            Product product = productClient.findById(o.getProductId());
            o.setProductName(product.getName());
            Customer customer = customerClient.findById(o.getCustomerId());
            o.setCustomerName(customer.getName());
            return o;
        } else {
            return null;
        }
    }

    // ...

}
如前面第三步所示,我们将 Chaos Monkey 库设置了随机延时为 1000 到 10000 毫秒之间,因此我们要设置下 Feign 和 Ribbon 客户端的默认超时,这里我们设定读超时为 5000 毫秒,这样有些请求将会引起客户端超时。
feign:
  client:
    config:
      default:
        connectTimeout: 5000
        readTimeout: 5000
  hystrix:
    enabled: false
下面是访问 API 网关的 Ribbon 客户端超时设置,同时我们需要更改下 Hystrix 设置,将 zuul 的断路器给关闭。
ribbon:
  ConnectTimeout: 5000
  ReadTimeout: 5000

hystrix:
  command:
    default:
      execution:
        isolation:
          thread:
            timeoutInMilliseconds: 15000
      fallback:
        enabled: false
      circuitBreaker:
        enabled: false
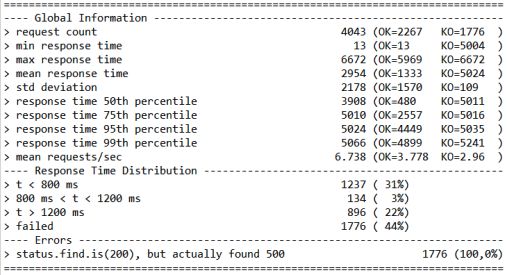
接下来我们将运行 Gatling 性能测试,到 performance-test 目录中运行 gradle loadTest 命令,测试结果跟 Chaos Monkey 袭击设置以及 Ribbon、Feign 客户端的超时设置都相关,下图是我们运行后的结果:
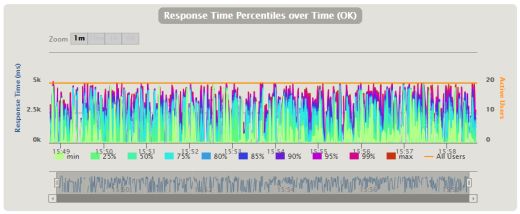
下面是 Gatling 绘制平均响应时间的图表,需要注意的是示例项目 order-service 的 add 方法将调用 product-service 和 customer-service。
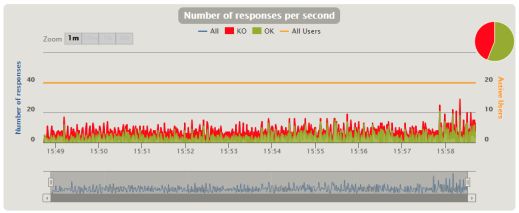
下面是 Gatling 绘制请求结果的图表,这里显示了成功和失败响应的情况。Gatling 生成 HTML 报告在目录 performance-test/build/gatling-results 。
译注:混沌工程扩展阅读
想了解更多关于混沌工程相关内容,以下资料会有帮助:
Slides-Chaos Engineering: Why Breaking Things Should Be Practiced.
PRINCIPLES OF CHAOS ENGINEERING
Codecentric's Chaos Monkey for Spring Boot
Twilio的混沌工程实践
Chaos Engineering的历史、原则以及实践

