这次帮助学妹彻底搞定Spring程序配置优先级!
通过配置文件application.properties,可实现Spring Boot应用程序的参数配置。但Spring程序配置是有优先级的,即当两个不同的配置源包含相同的配置项时,其中一个配置项很可能会被覆盖。
Spring Boot程序,一般我们会通过设置management.server.port参数,暴露独立的actuator管理端口。这样做更安全,也更方便监控系统统一监控程序是否健康。
management.server.port=45679
某程序重新发布后,监控系统显示程序离线。排查发现,程序是正常的,只是actuator管理端口的端口号被改了,不是配置文件中定义的45679。
后来发现,运维在服务器上定义了两个环境变量MANAGEMENT_SERVER_IP、MANAGEMENT_SERVER_PORT,目的是方便监控Agent把监控数据上报到统一的管理服务上:
MANAGEMENT_SERVER_IP=192.168.0.2
MANAGEMENT_SERVER_PORT=12345
问题就出在这里。MANAGEMENT_SERVER_PORT覆盖了配置文件中的management.server.port,修改了应用程序本身的端口。自然监控系统也就无法通过老的管理端口访问到应用的health端口。actuator的端口号变成了12345。
坑还没完,为了方便用户登录,需要在页面上显示默认的管理员用户名,于是开发同学在配置文件中定义了一个user.name属性,并设置为defaultadminname:
user.name=defaultadminname
但实际上,程序读的user.name不是配置文件中的defaultadminname,why?
不如写代码看看,从Spring中到底能读取到几个management.server.port、user.name配置项。
要想查询Spring中所有的配置,要以Environment接口起手,Spring通过Environment抽象出的Property和Profile:
- Property,抽象出各种PropertySource类代表配置源。一个环境下可能有多个配置源,每个配置源许多配置项。查询配置信息时,按配置源优先级进行查询
- Profile定义了场景。定义类似dev、test、stage和prod等环境作为不同Profile,用于按场景对Bean进行逻辑归属。
Profile和配置文件也有关系,每个环境都有独立的配置文件,但我们只会激活某一个环境来生效特定环境的配置文件

来看看Property的查询过程。
对于非Web应用,Spring对于Environment接口的实现是StandardEnvironment类。我们通过Spring注入StandardEnvironment后循环getPropertySources获得的PropertySource,来查询所有的PropertySource中key是user.name或management.server.port的属性值;然后遍历getPropertySources方法,获得所有配置源并打印出来:
@Autowired
private StandardEnvironment env;
@PostConstruct
public void init(){

    Arrays.asList("user.name", "management.server.port").forEach(key -> {

         env.getPropertySources().forEach(propertySource -> {

                    if (propertySource.containsProperty(key)) {

                        log.info("{} -> {} 实际取值:{}", propertySource, propertySource.getProperty(key), env.getProperty(key));
                    }
                });
    });

    System.out.println("配置优先级:");
    env.getPropertySources().stream().forEach(System.out::println);
}
查看日志:
- ConfigurationPropertySourcesPropertySource {
     name='configurationProperties'} -> apple 实际取值:apple
- PropertiesPropertySource {
     name='systemProperties'} -> apple 实际取值:apple
- OriginTrackedMapPropertySource {
     name='applicationConfig: [classpath:/application.properties]'} -> defaultadminname 实际取值:apple
- ConfigurationPropertySourcesPropertySource {
     name='configurationProperties'} -> 45679 实际取值:45679
- OriginTrackedMapPropertySource {
     name='applicationConfig: [classpath:/application.properties]'} -> 45679 实际取值:45679
配置优先级:
ConfigurationPropertySourcesPropertySource {
     name='configurationProperties'}
StubPropertySource {
     name='servletConfigInitParams'}
ServletContextPropertySource {
     name='servletContextInitParams'}
PropertiesPropertySource {
     name='systemProperties'}
OriginAwareSystemEnvironmentPropertySource {
     name='systemEnvironment'}
RandomValuePropertySource {
     name='random'}
OriginTrackedMapPropertySource {
     name='applicationConfig: [classpath:/application.properties]'}
MapPropertySource {
     name='springCloudClientHostInfo'}
MapPropertySource {
     name='defaultProperties'}
有三处定义了user.name:
- configurationProperties,值是apple
- systemProperties,代表系统配置,值是apple
- applicationConfig,即配置文件,值是配置文件中定义的defaultadminname。
同理三处定义了management.server.port:
- configurationProperties,值是30666
- systemEnvironment代表系统环境,值是30666
- applicationConfig,即配置文件,值是配置文件中定义的45679
Spring共有9个配置源,注意关注
- ConfigurationPropertySourcesPropertySource
- PropertiesPropertySource
- OriginAwareSystemEnvironmentPropertySource
- 我们的配置文件
Spring真的是按这个顺序查询配置吗?这就需要分析源码,整体流程图如下
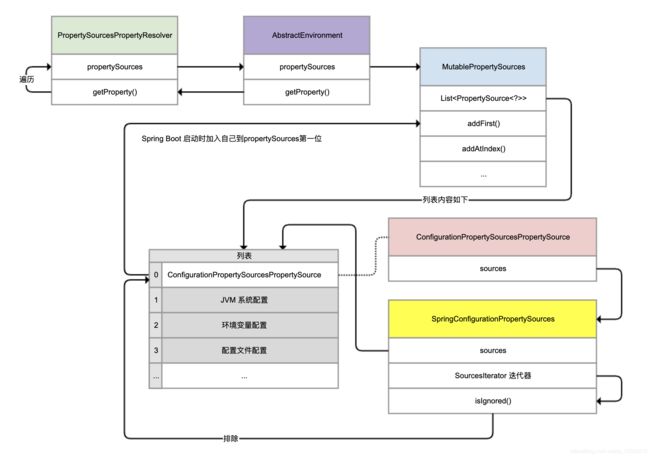
Demo中注入的StandardEnvironment,继承的是AbstractEnvironment(图中紫色类)。AbstractEnvironment的源码如下:
public abstract class AbstractEnvironment implements ConfigurableEnvironment {

	private final MutablePropertySources propertySources = new MutablePropertySources();
	private final ConfigurablePropertyResolver propertyResolver =
			new PropertySourcesPropertyResolver(this.propertySources);

	public String getProperty(String key) {

		return this.propertyResolver.getProperty(key);
	}
}
可见
- MutablePropertySources#propertySources,代表了所有配置源
- getProperty方法,通过PropertySourcesPropertyResolver类进行查询配置
- 实例化PropertySourcesPropertyResolver的时候,传入了当前的MutablePropertySources
然后,来看MutablePropertySources(蓝色类):
public class MutablePropertySources implements PropertySources {


	// 真正保存PropertySource的List
	private final List<PropertySource<?>> propertySourceList = new CopyOnWriteArrayList<>();

	public void addFirst(PropertySource<?> propertySource) {

		removeIfPresent(propertySource);
		this.propertySourceList.add(0, propertySource);
	}
	public void addLast(PropertySource<?> propertySource) {

		removeIfPresent(propertySource);
		this.propertySourceList.add(propertySource);
	}
	public void addBefore(String relativePropertySourceName, PropertySource<?> propertySource) {

		...
		int index = assertPresentAndGetIndex(relativePropertySourceName);
		addAtIndex(index, propertySource);
	}
    public void addAfter(String relativePropertySourceName, PropertySource<?> propertySource) {

       ...
       int index = assertPresentAndGetIndex(relativePropertySourceName);
       addAtIndex(index + 1, propertySource);
    }
    private void addAtIndex(int index, PropertySource<?> propertySource) {

       removeIfPresent(propertySource);
       this.propertySourceList.add(index, propertySource);
    }
}
PropertySourcesPropertyResolver(绿色类)
找到真正查询配置的方法getProperty。
遍历的propertySources是通过PropertySourcesPropertyResolver的构造器传入的
结合AbstractEnvironment,该propertySources就是AbstractEnvironment#MutablePropertySources对象。
遍历时,如果发现配置源中有对应的Key值,则使用这个值。
因此,MutablePropertySources中配置源的次序尤为重要。
public class PropertySourcesPropertyResolver extends AbstractPropertyResolver {


	private final PropertySources propertySources;

	public PropertySourcesPropertyResolver(@Nullable PropertySources propertySources) {

		this.propertySources = propertySources;
	}

	protected <T> T getProperty(String key, Class<T> targetValueType, boolean resolveNestedPlaceholders) {

		if (this.propertySources != null) {

			for (PropertySource<?> propertySource : this.propertySources) {

				Object value = propertySource.getProperty(key);
				if (value != null) {

					if (resolveNestedPlaceholders && value instanceof String) {

						value = resolveNestedPlaceholders((String) value);
					}
					logKeyFound(key, propertySource, value);
					return convertValueIfNecessary(value, targetValueType);
				}
			}
		}
	}
}
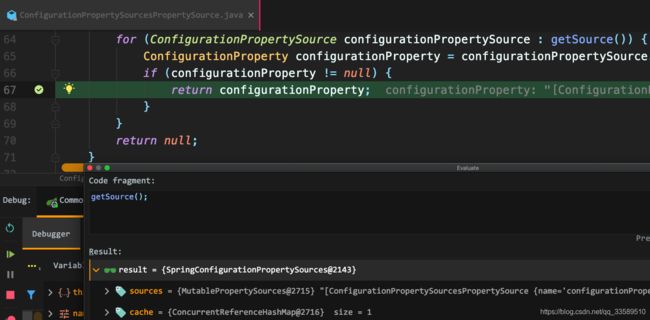
在查询所有配置源的时候,NO.1 ConfigurationPropertySourcesPropertySource,它不是一个实际存在的配置源,扮演的是一个代理角色。但调试会发现,我们获取的值竟然是由它提供并且返回的,且没有循环遍历后面的PropertySource:

ConfigurationPropertySourcesPropertySource(红色类)
getProperty方法最终还是是通过findConfigurationProperty方法查询配置
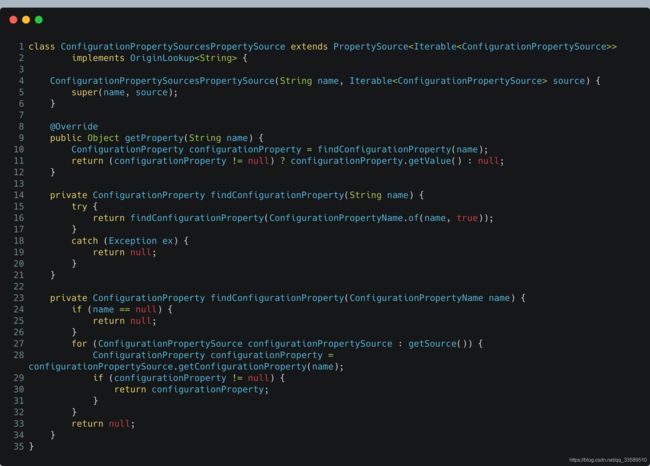
这个循环遍历(getSource()的结果)的配置源就是SpringConfigurationPropertySources(黄色类)
其中包含的配置源列表
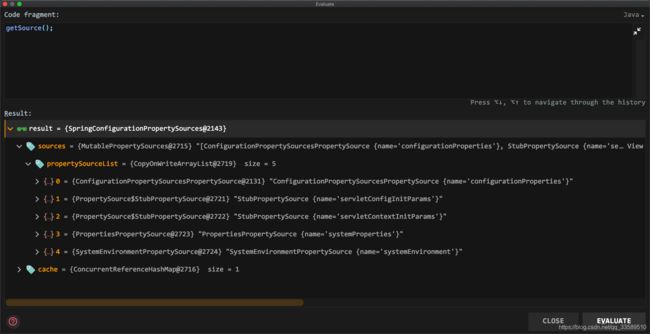
第一个就是ConfigurationPropertySourcesPropertySource,呀这不是会死循环吗,那它在遍历的时候怎么排除自己呢?
同时观察configurationProperty,这个ConfigurationProperty类似代理,实际配置是从系统属性获得的
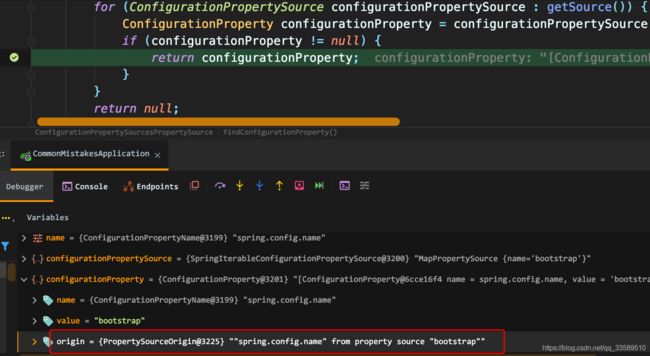
SpringConfigurationPropertySources
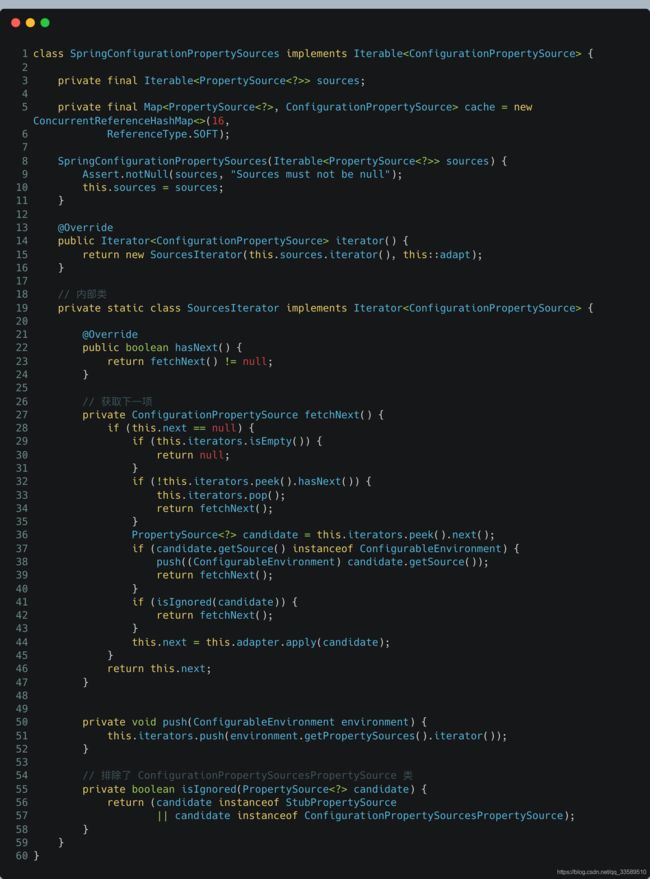
ConfigurationPropertySourcesPropertySource是所有配置源中的第一个,实现了对PropertySourcesPropertyResolver中遍历逻辑的“劫持”,并且知道了其遍历逻辑。
它怎么做到,让自己成为第一个配置源的?
实例化ConfigurationPropertySourcesPropertySource时
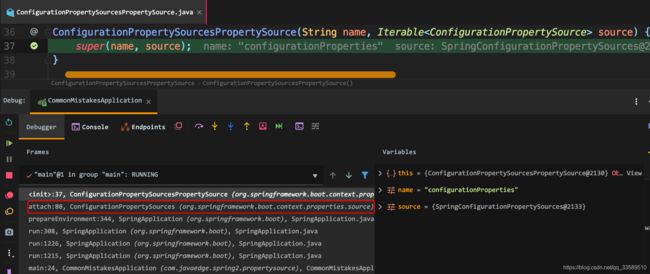 ConfigurationPropertySourcesPropertySource类由ConfigurationPropertySources#attach实例化而得。
从环境中获得最初的MutablePropertySources,把自己加入成为一个元素:
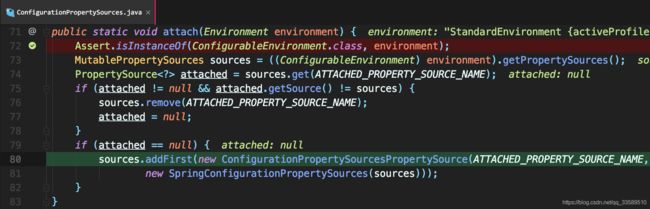
这个attach方法就是在Spring应用程序启动时准备环境的时候调用的。
