我们来实现这个简聊 App 介绍界面
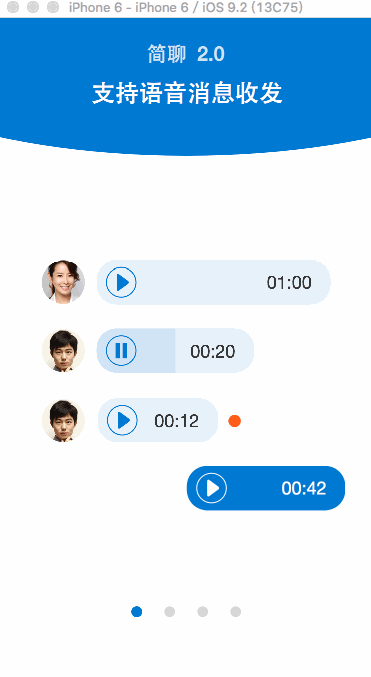
其中小圆点的变化动画非常舒服, 类似 Keynote 中的 Magic Move 神奇移动效果
实现小圆点 Magic Move
原理浅析:
每个页面都有一个小圆点
- 首先在每页的合适位置固定圆点
- 让第一页的圆点移动到第二页圆点的位置上
- 让第二页的圆点从第一页圆点的初始位置移动到第二页圆点应该在的固定位置上.这给人错觉好像是第一页的圆点移动到了第二页,实际上是两个圆点叠加在一起移动的.
- 同时淡出第一个圆点,淡入第二个圆点
- 这样实现了第一个圆点 Magic Move 到第二页,并淡入淡出过渡的效果
接下来我们一步一步实现这个效果.
开始
创建一个空工程或者空 VieController 继承自 UIViewCOntroller
引入头
#import
在. M 文件中添加
@interface TalkIntroDemo ()
@property (strong,nonatomic) UIScrollView *scrollView;
@property (strong,nonatomic) IFTTTAnimator *animator;
@property (strong,nonatomic) UIImageView *point1;
@property (strong,nonatomic) UIImageView *point2;
@property (strong,nonatomic) UIImageView *point3;
@end
scrollView 和 Animator 分别是交互的 View 和动画管理者
point 代表前3个页面的小圆点...
设置好 scrollView 的代理
-(void)scrollViewDidScroll:(UIScrollView *)scrollView{
    [self.animator animate:scrollView.contentOffset.x];
}
在 ViewDidLoad 中
- (void)viewDidLoad {
    [super viewDidLoad];
    [self setupView];  //设置 View 的位置
    [self setupAnimation]; //添加动画
}
布局 View
首先将3个圆点初始化,并设置他们的位置
-(void)setupView{
    self.scrollView=[[UIScrollView alloc]initWithFrame:self.view.bounds];
    self.scrollView.delegate=self;
    self.scrollView.backgroundColor=[UIColor whiteColor];
    self.scrollView.pagingEnabled=YES;
    self.scrollView.contentSize=CGSizeMake(self.view.boundWidth*NUMBER_OF_PAGES,0); //高度为0,不会上下滚动
    self.animator=[IFTTTAnimator new];
    //
    self.point1=[[UIImageView alloc]initWithImage:[UIImage imageNamed:@"RedPoint"]];
    self.point2=[[UIImageView alloc]initWithImage:[UIImage imageNamed:@"pdfIcon"]];
    self.point3=[[UIImageView alloc]initWithImage:[UIImage imageNamed:@"CategoryIcon"]];
    //
    self.point1.center=CGPointMake(PageWidth*0.5+80, PageHeight*0.5+80); //第一个点,放在第一页中间偏右下的位置
    self.point2.center=CGPointMake(PageWidth*1.5-80, PageHeight*0.5+80); //第二个点,放在第二页中间偏左的位置
    self.point3.center=CGPointMake(PageWidth*2.5, PageHeight*0.5-80); //第三个点,放在第三页偏上位置.
    //
    [self.view addSubview:self.scrollView];
    [self.scrollView addSubview:self.point1];
    [self.scrollView addSubview:self.point2];
    [self.scrollView addSubview:self.point3];
}
我定义了4个宏,来方便 Code
#define NUMBER_OF_PAGES 3

#define PageWidth self.view.boundWidth //每一页的宽度

#define PageHeight self.view.boundHeight

#define timeForPage(page) (NSInteger)(PageWidth * (page - 1)) //马上下面会说到
运行一下,效果如下
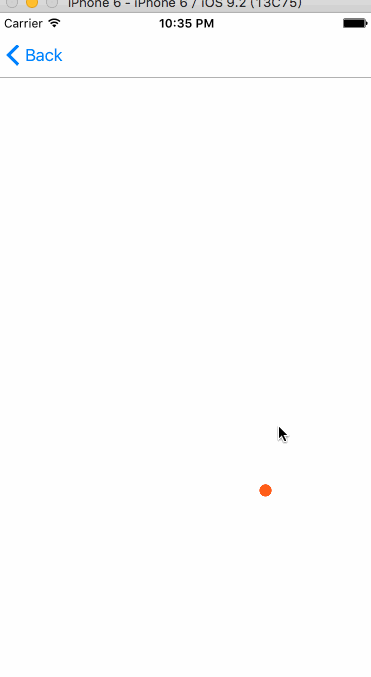
添加动画
3个圆点的位置已经确定好了,接下来实现动画,先添加 Point1的动画
-(void)setupAnimation{
    //Point1
    IFTTTFrameAnimation *point1Frame=[IFTTTFrameAnimation animationWithView:self.point1];
    [self.animator addAnimation:point1Frame];

    //添加2个帧动画,在 scrollView 从第一页滚动到第二页时,圆点1的位置从它的起始位置移动到圆点2的位置.
    [point1Frame addKeyframeForTime:timeForPage(1) frame:self.point1.frame];
    [point1Frame addKeyframeForTime:timeForPage(2) frame:self.point2.frame];

    //timeForPage 方便我们转换,页数 - 时间
}
我们做的就是添加2个关键帧
- 圆点1,在第一页时处于它原来的位置
- 圆点1,在第二页时处于圆点2的位置
- 当 scrollView 从第一页滑动到第二页时, JazzHands 会帮我们平滑的在这2个关键帧中过渡,实现平移效果
运行一下,效果如图

好像有点 Magic Move的感觉了
在 setupAnimation 方法中,在 Point1动画的下面,继续添加圆点2的动画
    //Point2 位移
    IFTTTFrameAnimation *point2Frame=[IFTTTFrameAnimation animationWithView:self.point2];
    [self.animator addAnimation:point2Frame];

    //让scrollView 从第一页滚动到第二页时
    //圆点2从圆点一个位置,移动到圆点原来的位置,这样2个圆点叠加起来移动,看起来好像是一个圆点渐变成了另一个圆点了,
    [point2Frame addKeyframeForTime:timeForPage(1) frame:self.point1.frame];
    [point2Frame addKeyframeForTime:timeForPage(2) frame:self.point2.frame];
运行一下,效果如图
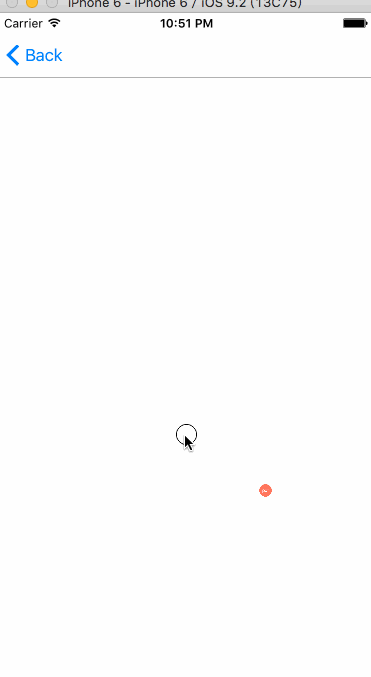
看起来只是一个圆点在移动缩放..没有 Magic 感
因为我们还没加入淡入淡出的动画
接着刚才的Point2动画,添加如下
    //Point1 透明度
    IFTTTAlphaAnimation *point1Alpha=[IFTTTAlphaAnimation animationWithView:self.point1];
    [self.animator addAnimation:point1Alpha];

    [point1Alpha addKeyframeForTime:timeForPage(1) alpha:1.0];
    [point1Alpha addKeyframeForTime:timeForPage(2) alpha:0.0];

    //Point2 透明度
    IFTTTAlphaAnimation *point2Alpha=[IFTTTAlphaAnimation animationWithView:self.point2];
    [self.animator addAnimation:point2Alpha];

    [point2Alpha addKeyframeForTime:timeForPage(1) alpha:0.0];
    [point2Alpha addKeyframeForTime:timeForPage(2) alpha:1.0];
在scrollView 从第一页滚动到第二页的过程中,我们让圆点1的透明度减小到0(淡出),让圆点2淡入.
运行一下,效果如图

我们可以看到,圆点 Magic Move 起来了.. Cool 接下来实现圆点3
继续添加如下
    //Point3 平移
    IFTTTFrameAnimation *point3Frame=[IFTTTFrameAnimation animationWithView:self.point3];
    [self.animator addAnimation:point3Frame];

    [point3Frame addKeyframeForTime:timeForPage(2) frame:self.point2.frame];
    [point3Frame addKeyframeForTime:timeForPage(3) frame:self.point3.frame];

    //Point3 透明度
    IFTTTAlphaAnimation *point3Alpha=[IFTTTAlphaAnimation animationWithView:self.point3];
    [self.animator addAnimation:point3Alpha];

    [point3Alpha addKeyframeForTime:timeForPage(2) alpha:0.0];
    [point3Alpha addKeyframeForTime:timeForPage(3) alpha:1.0];
很熟悉了..让圆点3从圆点2的位置移动到自身原来的位置,并淡入
再运行一下,效果如图

额..圆点2怎么和圆点3分开了..
我们还需添加一个帧,让圆点2平移并且淡出到圆点3的位置上
在添加圆点3动画的代码上面,加上
    //让圆点2跟随圆点3运动并淡出
    [point2Frame addKeyframeForTime:timeForPage(3) frame:self.point3.frame];

    [point2Alpha addKeyframeForTime:timeForPage(3) alpha:0.0];
再再运行一下,效果如图

Done
Magic Move 的效果完成了,一步一步的分析实现,也并不难.
Magic Move 同样也可以在 ViewController 的切换时实现,如果你感兴趣请搜索 ViewController 自定义转场
或者参考 这篇博文