Flutter学习日记之底部导航栏BottomNavigationBar组件的使用
本文地址:https://blog.csdn.net/qq_40785165/article/details/116953235,转载需附上此地址
大家好,我是小黑,一个还没秃头的程序员~~~
空袋子,难直立 。
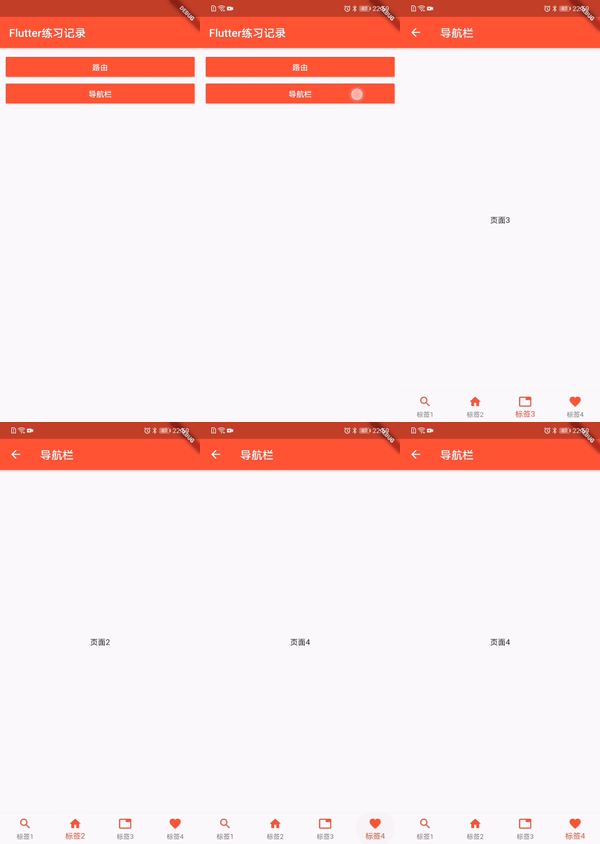
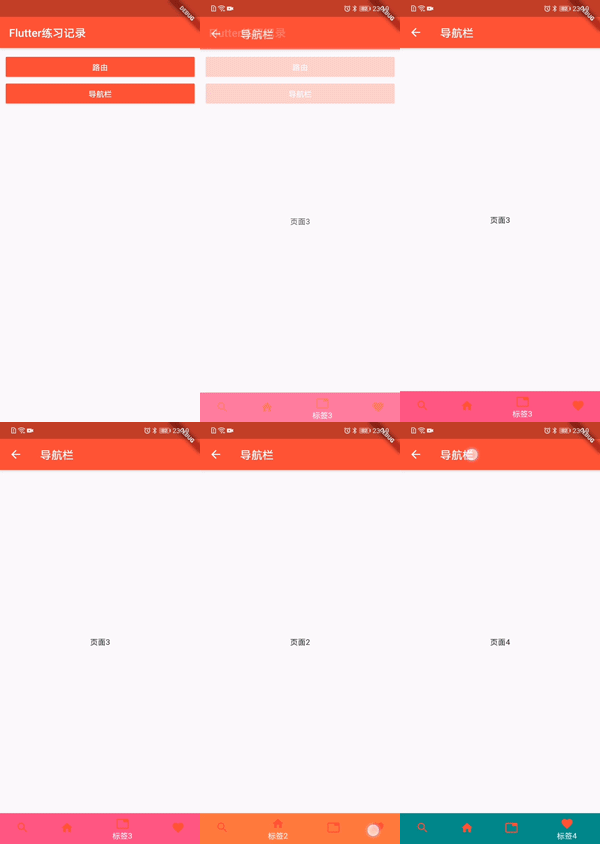
今天分享的内容是Flutter的BottomNavigationBar组件,用来定义底部导航栏,源码地址:https://gitee.com/fjjxxy/flutter-study.git,效果如下:
type=BottomNavigationBarType.fixed,当数量<=3时默认是这个类型的导航栏
type=BottomNavigationBarType.shifting,当数量>3时默认是这个类型的导航栏
BottomNavigationBar的参数:
| items | BottomNavigationBarItem集合,代表子项 |
| onTap | 子项点击事件监听,参数为子项索引index |
| currentIndex | 当前页面对应的子项索引 |
| type | 导航栏的类型-BottomNavigationBarType.fixed/BottomNavigationBarType.shifting |
BottomNavigationBarItem的参数:
| backgroundColor | 当选中这个子项时的背景颜色 |
| icon | 图标,Icon组件 |
| title | 子项的名称 |
以上是Demo中有用到的参数,其他的像选中时的文字颜色,文字大小也有相应的参数,大家可以下载源码自己试一下
好的,开始正文,BottomNavigationBar需要在Scaffold中使用,需要为Scaffold设置bottomNavigationBar参数,BottomNavigationBar的参数上面已列举,更多的参数大家可以自己尝试一下,代码如下:
List _pageList = [TabPage1(), TabPage2(), TabPage3(), TabPage4()]; return Scaffold(
appBar: AppBar(title: Text("导航栏"),),
body: this._pageList[_index],
bottomNavigationBar: BottomNavigationBar(
type: BottomNavigationBarType.fixed,
currentIndex: this._index,
onTap: (int index) {
print("点击位置===============$index");
setState(() {
_index = index;
});
},
items: [
BottomNavigationBarItem(
backgroundColor: Colors.deepPurpleAccent,
icon: Icon(
Icons.search,
color: Colors.red,
),
title: Text("标签1")),
BottomNavigationBarItem(
backgroundColor: Colors.deepOrangeAccent,
icon: Icon(Icons.home, color: Colors.red),
title: Text("标签2")),
BottomNavigationBarItem(
backgroundColor: Colors.pinkAccent,
icon: Icon(Icons.tab, color: Colors.red),
title: Text("标签3")),
BottomNavigationBarItem(
backgroundColor: Colors.teal,
icon: Icon(Icons.favorite, color: Colors.red),
title: Text("标签4")),
]));
从上面的代码中可以看出,items是BottomNavigationBarItem的集合,用来设置子项,点击事件中通过setState修改_index参数从而修改当前索引currentIndex,从而修改显示页,如果想要在跳转到导航页时指定显示的页面组件,可以使用命名路由跳转传参的方式,进行默认索引的修改,不了解路由的同学可以看我上一篇博客:Flutter学习日记之使用路由进行页面切换,代码如下:
class NavigationBarPage extends StatefulWidget {
  final arguments;

  NavigationBarPage({this.arguments});

  @override
  _NavigationBarPageState createState() =>
      _NavigationBarPageState(arguments:this.arguments);
}

class _NavigationBarPageState extends State {
  Map arguments;
  var _index;

  _NavigationBarPageState({this.arguments}) {
    this._index = arguments["index"];//_index到时候赋值给导航栏的当前索引参数
  }
}
RaisedButton(
onPressed: () {
Navigator.pushNamed(context, "/tabs", arguments: {
"index":2//传值给导航页表示默认显示第三个页面
});
}, //这个属性不能为空,不然背景颜色无效
child: Text(
"导航栏",
style: TextStyle(color: Colors.white),
),
color: Colors.red,
)
其中的标签显示页面都只是简单的带文字的组件,代码如下:
import 'package:flutter/material.dart';
class TabPage1 extends StatefulWidget {
  @override
  _TabPage1State createState() => _TabPage1State();
}

class _TabPage1State extends State {
  @override
  Widget build(BuildContext context) {
    return Center(
      child: Text("页面1"),
    );
  }
}
到这里为止,一个底部导航栏+页面切换就实现了,导航栏在App开发中还是经常出现的,相信大家可以在不断的练习与探索中变得越来越熟练,最后,希望喜欢我文章的朋友们可以帮忙点赞、收藏、评论,也可以关注一下,如果有问题可以在评论区提出,后面我会持续更新Flutter的学习记录,与大家分享,谢谢大家的支持与阅读!

