YOLO_V4 入手贴
YOLO_V4 入手贴
- 1. YOLO_V4模型可视化
-
- 1.1 CSPDarknet-53与Darknet53的区别
- 1.2关于[PAN](https://arxiv.org/pdf/1803.01534.pdf)
- 1.3 激活函数Mish
- 2.图像增强 Mosaic
- 3.关于build_targets
-
- 3.1 初始化下输入变量
- 3.2 子函数主体部分
- 3.3 代码运行实例
- 3.4 对比 ultralytics yolo与YOLO_V4作者的`build_targets`部分
-
- 3.4.1 获取mask
- 3.4.2 获取更新后的target:`t_match`
- 3.4.3 获取offsets
- 3.4.4 与target_box对应的anchor index
- 4. CBAM块
- 参考文献
此blog主要参考YOLO_v4作者Chien-Yao Wang的pytorch实现。
由于此GitHub是在ultralytics的YOLO代码基础上完成的,因此还是免不了要对其实现细致了解下。
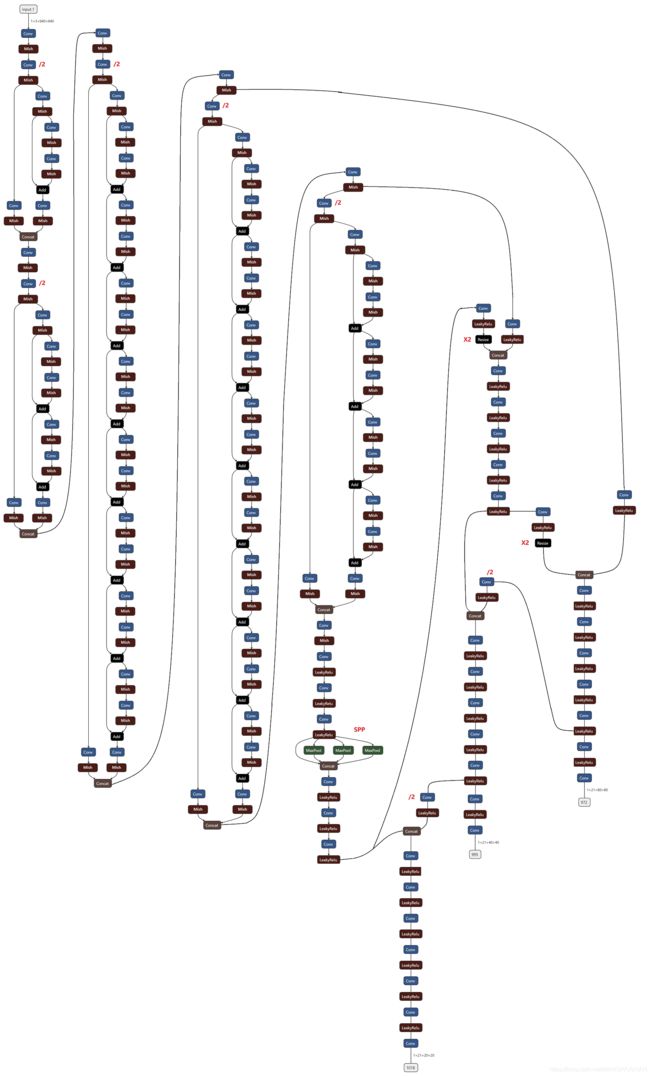
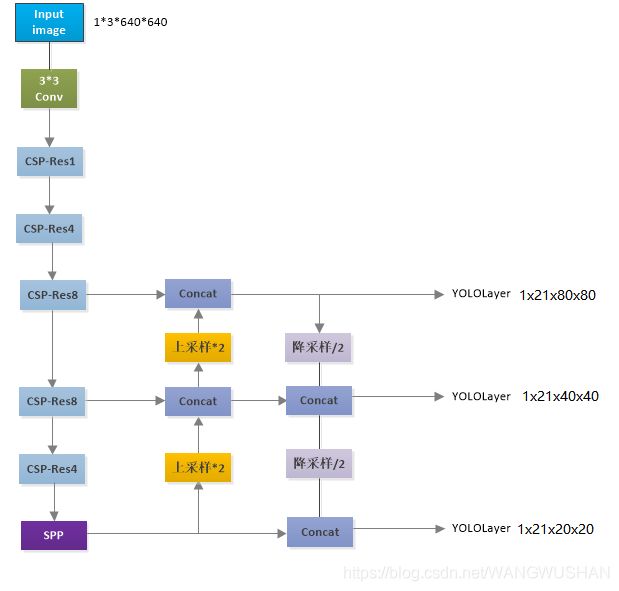
1. YOLO_V4模型可视化
详细图片可见本人csdn资源https://download.csdn.net/download/WANGWUSHAN/18473381。
这里,CSP-ResN(N=1,4,8,8,4) 表示当前CSP块中Resblock的个数。CSP块见1.1节图示。Resblock不再赘述。
1.1 CSPDarknet-53与Darknet53的区别
YOLO_V3采用Darknet53作为backbone,而YOLO_V4则采用了CSPDarknet53。
为了说明二者的异同,截取模型中input-下采样两倍这一段进行个简单的对比。
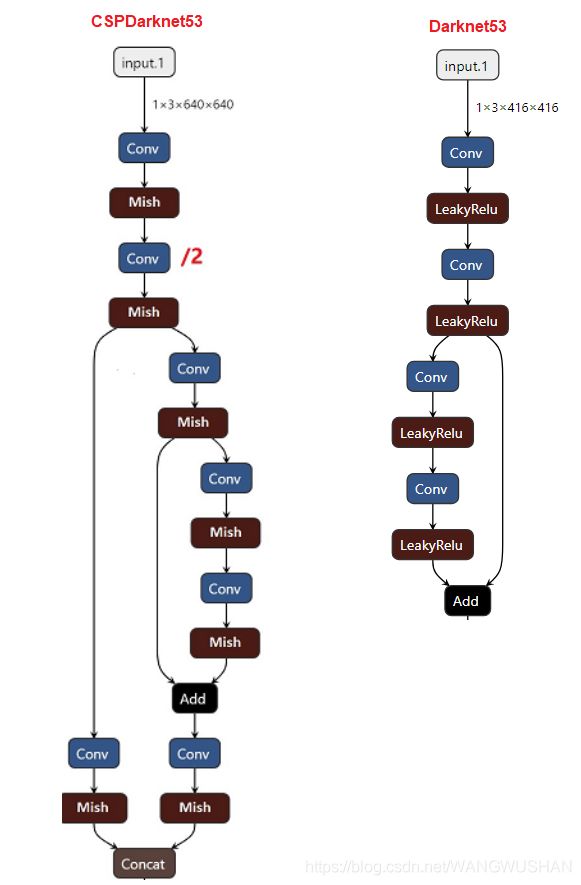
此结构来自YOLO_v4作者Chien-Yao Wang的pytorch实现,可见其只是在原先restnet block左侧增加1*1卷积进行concatenate,而并非像CSPNet1中介绍的那样,将feature maps split 成2部分。
当然也可以理解为通过使用1*1的卷积起到了split的作用。
1.2关于PAN
我觉得PAN2 确实是一个比较富有创造性的模型。
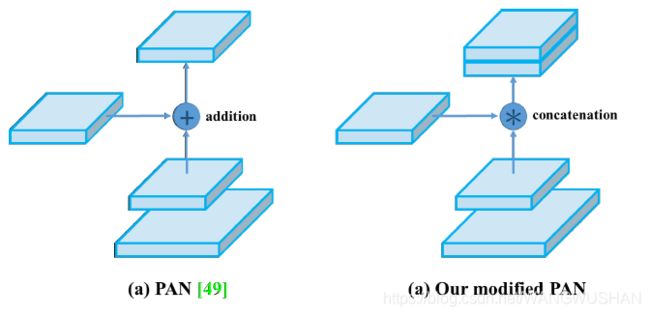
其主要特点是使用了bottom-up path augmentation,可以 “shorten information path and enhance feature
pyramid with accurate localization signals existing in low-levels”,见下图绿线。
下面这一句也是摘自原文,意思也是low level的特征对定位也很有用~
Our framework further enhances the localization capability of the entire feature hierarchy by propagating strong responses of low-level patterns based on the fact that high response to edges or instance parts is a strong indicator to accurately localize instances.
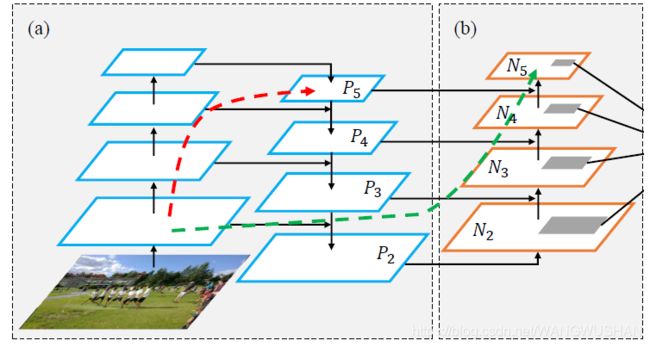
此图来自PANet,YOLO_V4基础版只有两次上采样,三个检测头。
另外一个重要区别,正如YOLO_V4论文中所述,特征融合改add为concatenate。在上面完整的模型可视化图中,这一点也看的很清楚。
1.3 激活函数Mish
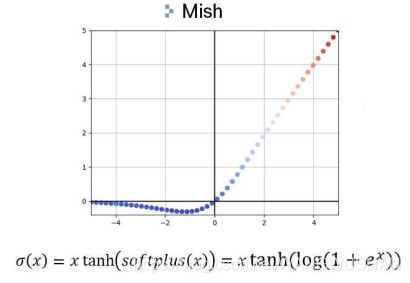
采用这个激活函数的原因,除了连续可微,论文中也只是实验了下CSPResNeXt-50 classifier采用Mish更优。
2.图像增强 Mosaic
Mosaic从实现效果来看比较轻松,就是将四张图片放到一张图上。但是ultralytics的代码实现看起来比较复杂。
因此这一段单独拎出来具体看下。
为了说明效果,抽出几张图片及其gt分别放在对应的文件,如下:


下面的代码进行了适当改编:
-
删除了代码中提到的cache功能。
这样Mosaic这段代码就非常容易理解了。通过
cv2.resize()已经将各分图最长的一边调整到需要合成的图一半的大小,那么接下来的工作就是向往盘子里放东西一样把图片放进去; 再把gt box做适当平移就可以了。 -
此段代码中加入了个小功能:新选择的其他三张图片与当前图片不同。
完整代码:
1)先准备好需要使用的变量;
import os
import random
import numpy as np
from PIL import Image
import cv2
img_size=640

img_path=r"D:\mosaic\images"
label_path=r"D:\mosaic\labels"

img_files=[os.path.join(img_path,p) for p in os.listdir(img_path)]

label_files=[os.path.join(label_path,p) for p in os.listdir(label_path)]

labels=[]
for label_txt in label_files:
    with open(label_txt,"r") as f:
        # label=[]
        # for line in f.readlines():
        #     label.append([float (item) for item in line.split()])
        label=np.array([x.split() for x in f.read().splitlines()], dtype=np.float32)
    labels.append(label)
2)两个子函数load_image及load_mosaic。
load_image实现读入单张图片,并将其最大边放缩到合成图一半尺寸。
load_mosaic实现将四张图片合成一张图片,并修改label。
def load_image(index):
    # loads 1 image from dataset, returns img, original hw, resized hw
    path = img_files[index]
    img = np.array(Image.open(path).convert('RGB'), dtype=np.uint8)

    assert img is not None, 'Image Not Found ' + path
    h0, w0 = img.shape[:2]  # orig hw
    r = img_size / max(h0, w0)  # resize image to img_size
    if r != 1:  # always resize down, only resize up if training with augmentation
        img = cv2.resize(img, (int(w0 * r), int(h0 * r)), interpolation=cv2.INTER_LINEAR)
    return img, (h0, w0), img.shape[:2]  # img, hw_original, hw_resized


def load_mosaic(index,labels):
    # loads images in a mosaic

    labels4 = []
    s = img_size
    yc, xc = s, s  # mosaic center x, y
    #indices = [index] + [random.randint(0, len(labels) - 1) for _ in range(3)]  # 3 additional image indices
    indices=[index]

    while len(indices)<4:
        ind=random.randint(0, len(labels) - 1)
        if  ind not in indices:
            indices.append(ind)

    for i, index in enumerate(indices):
        # Load image
        img, _, (h, w) = load_image(index)
        # place img in img4
        if i == 0:  # top left
            img4 = np.full((s * 2, s * 2, img.shape[2]), 114, dtype=np.uint8)  # base image with 4 tiles
            x1a, y1a, x2a, y2a = xc - w, yc - h, xc, yc  # 在合成图中的绝对坐标(x1,y,1,x2,y2)
        elif i == 1:  # top right
            x1a, y1a, x2a, y2a = xc, yc - h,xc + w, yc
        elif i == 2:  # bottom left
            x1a, y1a, x2a, y2a = xc - w, yc, xc,  yc + h
        elif i == 3:  # bottom right
            x1a, y1a, x2a, y2a = xc, yc, xc + w, yc + h

        img4[y1a:y2a, x1a:x2a] = img[:h, :w]  # img4[ymin:ymax, xmin:xmax]

        # Labels
        x = np.array(labels[index])
        label = x.copy()

        if len(x) > 0:  # Normalized xywh to pixel xyxy format
            label[:, 1] = w * (x[:, 1] - x[:, 3] / 2) + x1a
            label[:, 2] = h * (x[:, 2] - x[:, 4] / 2) + y1a
            label[:, 3] = w * (x[:, 1] + x[:, 3] / 2) + x1a
            label[:, 4] = h * (x[:, 2] + x[:, 4] / 2) + y1a
        labels4.append(label)

    # Concat/clip labels
    if len(labels4):
        labels4 = np.concatenate(labels4, 0)
        # np.clip(labels4[:, 1:], 0, 2 * s, out=labels4[:, 1:])  # use with random_affine
    return img4, labels4
3)实现mosaic,并使用imgaug.augmentables.bbs工具查看效果:
if __name__=="__main__":
    img4, labels4=load_mosaic(1,labels)

    import imgaug as ia
    from imgaug.augmentables.bbs import BoundingBox, BoundingBoxesOnImage
    img = img4
    boxes=labels4
    bboxes = BoundingBoxesOnImage(
                [BoundingBox(*box[1:], label=int(box[0])) for box in boxes],
                shape=img.shape)
    ia.imshow(bboxes.draw_on_image(img, size=2))
3.关于build_targets
可能是ultralytics的yolov_v3实现近期更新过的原因,YOLO_V4作者实现的build_targets与ultralytics的yolov_v3实现稍微有点差异。
另外,可以看出ultralytics的yolov_v3实现与其YOLO_V5实现在这一部分是一致的。
这一段代码有点晦涩,可读性不是很好。eriklindernoren实现的PyTorch-YOLOv3对应代码读起来还是相对容易的,只是eriklindernoren github 中已把这部分更新成和ultralytics一样了。
参考csdn yolov4&v5训练代码理解和csdn yolov5代码详解,自己又把代码通读了一遍,现分享如下:
3.1 初始化下输入变量
import torch
anchors = torch.tensor([12, 16, 19, 36, 40, 28, 36, 75, 76,
                        55, 72, 146, 142, 110, 192, 243, 459, 401]).reshape(3, -1, 2)

stride = torch.tensor([8, 16, 32])
anchor_vec = anchors/(stride.view(3, 1, 1).repeat(1, 3, 2))
3.2 子函数主体部分
def build_targets(p, targets):

    nt = targets.shape[0]  # number of anchors, targets
    tcls, tbox, indices, anchor_ls = [], [], [], []
    gain = torch.ones(7, device=targets.device)  # normalized to gridspace gain
    g = 0.5  # offset
    off = torch.tensor([[0, 0], [1, 0], [0, 1], [-1, 0], [0, -1]],
                       device=targets.device).float()*g  # overlap offsets

    for i in range(1):
        # get number of grid points and anchor vec for this yolo layer
        anchors = anchor_vec[i]
        anchors = anchors.to(targets.device)
        gain[2:6] = torch.tensor(p.shape)[[3, 2, 3, 2]]  # xyxy gain
        #  e.g. ([1, 3, 80, 80, 7])[[3, 2, 3, 2]]=tensor([80, 80, 80, 80])
        # Match targets to anchors

        if nt:
            na = anchors.shape[0]  # number of anchors
            # anchor tensor, same as .repeat_interleave(nt)
            at = torch.arange(na).view(na, 1).repeat(1, nt)
            # append anchor indices
            targets = torch.cat((targets.repeat(na, 1, 1), at[:, :, None]), 2)
            t, offsets = targets * gain, 0

            ratio = t[:, :, 4:6] / anchors[:, None]  # wh ratio
            filt = torch.max(
                ratio, 1. / ratio).max(2)[0] < 4   # filter
            # choose the apropriate anchor(within the ratio range) for the target box

            t_match = t[filt]

            # anchor_ind:the anchor index filtered after j
            # t_match:the target box corrspoding to the anchor_ind  filtered after  j
            # overlaps
            gxy = t_match[:, 2:4]  # grid xy

            j, k = ((gxy % 1. < g) & (gxy > 1.)).T
            l, m = ((gxy % 1. > (1 - g)) & (gxy < (gain[[2, 3]] - 1.))).T

            Inds = torch.stack((torch.ones_like(j), j, k, l, m))

            # gxy = t_match[:, 2:4]  # grid xy
            # gxi = gain[[2, 3]] - gxy  # inverse
            # j1, k1 = ((gxy % 1. < g) & (gxy > 1.)).T
            # l1, m1 = ((gxi % 1. < g) & (gxi > 1.)).T
            # Inds1 = torch.stack((torch.ones_like(j1), j1, k1, l1, m1))
            # print(Inds==Inds1)

            # t_match = torch.cat(
            #     (t_match, t_match[j], t_match[k], t_match[l], t_match[m]), 0)
            t_match = t_match.repeat((off.shape[0], 1, 1))[Inds]

            offsets = (torch.zeros_like(gxy)[None] + off[:, None])[Inds]
            # z = torch.zeros_like(gxy)
            # offsets= torch.cat(
            #     (z+ off[0], z[j] + off[1], z[k] + off[2], z[l] + off[3], z[m] + off[4]), 0)

        # Define
        # img_index in one batch, class
        img_ind, tbox_class = t_match[:, :2].long().T
        gxy, gwh = t_match[:, 2:4], t_match[:, 4:6]  # grid xy,grid wh

        gij = (gxy - offsets).long()
        gi, gj = gij.T  # grid xy indices

        # anchor_ind = at[filt]
        # anchor_ind = torch.cat(
        #     (anchor_ind, anchor_ind[j], anchor_ind[k], anchor_ind[l], anchor_ind[m]), 0)

        anchor_ind = t_match[:, 6].long()

        indices.append(
            (img_ind, anchor_ind, gj.clamp_(0, gain[3] - 1), gi.clamp_(0, gain[2] - 1)))
        tbox.append(torch.cat((gxy - gij, gwh), 1))  # box
        anchor_ls.append(anchors[anchor_ind])  # anchors
        tcls.append(tbox_class)  # class

    return tcls, tbox, indices, anchor_ls
3.3 代码运行实例
torch.manual_seed(12345)
pred = torch.randn((1, 3, 80, 80, 7))
targets = torch.randn((4, 6))
targets[:, 0] = torch.zeros((1, 4))
targets[:, 1] = torch.randint(0, 3, (1, 4))
tcls, tbox, indices, anchor_ls = build_targets(pred, targets)
targets第0维是该batch中image的index,第1维是类别,后面的4维是xywh。
3.4 对比 ultralytics yolo与YOLO_V4作者的build_targets部分
3.4.1 获取mask
YOLO_V4:
gxy = t_match[:, 2:4]  # grid xy
gxi = gain[[2, 3]] - gxy  # inverse
j, k = ((gxy % 1. < g) & (gxy > 1.)).T
l, m = ((gxi % 1. < g) & (gxi > 1.)).T
Inds = torch.stack((torch.ones_like(j), j, k, l, m))
ultralytics YOLO:
gxy = t_match[:, 2:4]  # grid xy
j, k = ((gxy % 1. < g) & (gxy > 1.)).T
l, m = ((gxy % 1. > (1 - g)) & (gxy < (gain[[2, 3]] - 1.))).T

Inds = torch.stack((torch.ones_like(j), j, k, l, m))
3.4.2 获取更新后的target:t_match
YOLO_V4:
t_match = torch.cat(
    (t_match, t_match[j], t_match[k], t_match[l], t_match[m]), 0)
ultralytics YOLO:
t_match = t_match.repeat((off.shape[0], 1, 1))[Inds]
3.4.3 获取offsets
YOLO_V4:
z = torch.zeros_like(gxy)
offsets= torch.cat(
    (z+ off[0], z[j] + off[1], z[k] + off[2], z[l] + off[3], z[m] + off[4]), 0)
ultralytics YOLO:
offsets = (torch.zeros_like(gxy)[None] + off[:, None])[Inds]
3.4.4 与target_box对应的anchor index
YOLO_V4:
at = torch.arange(na).view(na, 1).repeat(1, nt)
anchor_ind = at[filt]
anchor_ind = torch.cat(
    (anchor_ind, anchor_ind[j], anchor_ind[k], anchor_ind[l], anchor_ind[m]), 0)
ultralytics YOLO中通过torch.cat将anchor_index与targets合成一个变量,直接通过t_match[:, 6]使用。
at = torch.arange(na).view(na, 1).repeat(1, nt)
targets = torch.cat((targets.repeat(na, 1, 1), at[:, :, None]), 2)

#通过代码再由targets得到t_match t

anchor_ind = t_match[:, 6].long()
因此,整体来看ultralytics YOLO此部分代码更简洁。通读过程中也发现了此部分代码有几个地方采用了广播机制,如3.4.3。
此部分实现原理csdn yolov5代码详解中介绍的比较清楚了,这里再简单叙述下:
- 1.过滤掉target box与anchors对应长/宽(都对应于当前feature map尺寸,如13*13)的比值不在合理区别部分,代码中使用了(1/4,4);
- 2.获取target_box的x,y的offset:分别计算
x的余数部分小于g;
y的余数部分小于g;
x的余数部分大于1-g(或inverse后小于g);
y的余数部分大于1-g的Mask(g取0.5),并将这些Mask和通过1过滤后得到的所有target box,进行stack,即程序中的:
Inds = torch.stack((torch.ones_like(j), j, k, l, m))
- 3.获取offset信息,取整得到gij (grid坐标i,j)
用原x,y的值减去offset值,即:
x的余数部分小于g,x减去0.5;
y的余数部分小于g,y减去0.5;
x的余数部分大于1-g,x加上0.5;
y的余数部分大于1-g,y加上0.5.
然后取整。
offsets = (torch.zeros_like(gxy)[None] + off[:, None])[Inds]
gij = (gxy - offsets).long()
- 4.更新target_box信息
最后使用的target_box,即为原x,y坐标相对grid坐标i,j的偏移量。
tbox.append(torch.cat((gxy - gij, gwh), 1))
Github ultralytics/yolov5 issues中有个回复:the ground truth bbox would be matched with three grids (contains two neighbor grids)。
效果如下(图片来自网络),增加了两个gird:

参考8中解释这样可以增加正样本个数,来加快训练。
4. CBAM块
见本人blog CBAM简介及pytorch实现。
参考文献
- https://github.com/ultralytics/yolov3/blob/master/utils/datasets.py
- https://github.com/WongKinYiu/PyTorch_YOLOv4/
- CSPNet: A New Backbone that can Enhance Learning Capability of CNN
- http://kocw-n.xcache.kinxcdn.com/data/document/2020/edu1/cuk/leehongsub1113/9.pdf
- PANet
- csdn yolov4&v5训练代码理解
- yolov5代码详解-build_targets
- YOLOv5 深度可视化解析
CSPNet:Cross Stage Partial Network ↩︎
Path Aggregation Network ↩︎
