Nginx之web服务
目录
- 一、Nginx 服务简介
-
- 1、简介
- 2、优点
- 3、应用
-
- ⑴ 作为Web 服务软件
- ⑵ 反向代理或负载均衡
- ⑶ 前端业务数据缓存服务
- 二、Nginx Web应用
- 三、Nginx 编译安装
-
- 1、查看系统环境
- 2、安装依赖库
- 3、安装Nginx
-
- ❶ 创建软件原件目录
- ❷ 创建服务账户
- ❸ 源码包编译安装
- ❹创建软链接
- 4、安装检查
-
- ❶语法检查
- ❷启动服务
- ❸端口检查
- ❹进程检查
- ❺日志检查
- ❻拦截检查
- 5、主页检查
-
- ❶客户端
- ❷服务端
- 6、部署测试
-
- ❶主配置文件位置
- ❷查看默认设置
- ❸改默认主页
- ❹访问主页
- 四、Nginx 配置剖析
-
-
- ⑴ 模块说明
- ⑵ 目录结构
- ⑶ 配置文件
-
- ❶ 核心配置
- ❷ 其他配置
-
- 五、Nginx 虚拟主机
-
- ⑴ 虚拟主机
- ⑵ 配置步骤
-
- ❶ 配置子配置
- ❷ 子配置导入主配置
- ❸ 创建网站目录及首页
- ❹ 语法检查,服务重启,进程、端口检查
- ❺ host解析或DNS解析
- ❻ 测试访问
- ⑶ 基于域名的虚拟主机
- ⑷ 基于端口的虚拟主机
- ⑸ 基于IP 的虚拟主机
- ⑹ 检测策略
- 六、Nginx 功能配置
-
- 1、别名设置
-
- ⑴ 添加别名`test_nginx.org`
- ⑵ 语法检查,平滑重启,进程、端口检查。
- ⑶ hosts配置
- ⑷ 访问测试
- 2、状态信息
-
- ⑴ 模块
- ⑵ 检查
- ⑶ 配置
- ⑷ 说明
- 七、Nginx 日志文件
-
- 1、 错误日志
-
- ❶ 日志简介
- ❷ 参数说明
- ❸ 配置说明
- 2、 访问日志
-
- ⑴ 日志简介
- ⑵ 参数说明
-
- ❶ log_format
- ❷ access_log
- ⑶ 配置说明
- ⑷ 日志剖析
- ⑸ 轮询切割
- 八、Nginx location
-
- 1、 作用
- 2、 语法
- 3、 示例
- 九、Nginx rewrite
-
- 1、作用
- 2、语法
-
- ❶rewrite语法
- ❷正则表达式
- ❸结尾flag标记
- 3、示例
-
- ❶参数说明
- ❷配置
- 4、应用
-
- ❶代码段
- ❷参数说明
- ❸配置
- 十、Nginx 访问认证
-
- 1、作用
- 2、语法
-
- ❶ 配置格式
- ❷ 参数说明
- 3、示例
-
- ❶配置密码认证
- ❷安装认证模块
- ❸创建认证文件
- ❹语法检查,平滑重启
- ❺访问测试
- 参考
一、Nginx 服务简介

1、简介
- Nginx是一款轻量级、高性能的Web 服务器、反向代理服务器及电子邮件代理服务器(IMAP/POP3)。
2、优点
- 支持高并发:能支持几万并发连接(特别是静态小文件业务环境) 。
- 资源消耗少:在3 万并发连接下,开启10 个Nginx 线程消耗的内存不到200MB 。
- 可以做HTTP 反向代理及加速缓存, 即负载均衡功能, 内置对RS 节点服务器健康检查功能,这相当于专业的Haproxy 软件或LVS 的功能。
- 具备Squid 等专业缓存软件等的缓存功能。
- 支持异步网络I/O事件模型epoll (Linux 2.6+ ) 。
3、应用
⑴ 作为Web 服务软件
- 高性能、高并发、占用的资源少、效率更高
- Apache select 和Nginx epoll 的技术对比
| 指标 | Apache select | Nginx epoll |
|---|---|---|
| 性能 | 随着连接数的增加性能急剧下降。处理成千上万并发连接数时,性能很差 | 随着连接数的增加性能基本没有下降。处理成千上万并发连接时,性能很好 |
| 连接数 | 连接数有限制,处理的最大连接数不超过1024。如果要处理的连接数超过1024 个,则需要修改FD SETSIZE 宏,并重新编译 | 连接数无限制 |
| 内在处理机制 | 线性轮询 | 回调ca llback |
| 开发复杂性 | 低 | 中 |
⑵ 反向代理或负载均衡
- Nginx 可以作为Web 服务、PHP 等动态服务及Memcached 缓存的代理服务器,同时也是一个优秀的邮件代理服务软件 。
⑶ 前端业务数据缓存服务
- Nginx 可通过自身的proxy_cache 模块实现类Squid 等专业缓存软件的功能。
二、Nginx Web应用
- 使用Nginx 运行HTML 、JS 、CSS 、小图片等静态数据(此功能类似Lighttpd 软件) 。
- Nginx 结合FastCGI 运行PHP 等动态程序(例如使用fastcgi_pass 方式) 。
- Nginx 结合Tomcat/Resin 等支持Java 动态程序(常用proxy_pass 方式) 。
三、Nginx 编译安装
1、查看系统环境
[root@www ~]# cat /etc/redhat-release
CentOS release 6.6 (Final)
[root@www ~]# uname -r
2.6.32-504.el6.x86_64
2、安装依赖库
❶gcc-c++
- gcc-c++:编译库,用于源码编译
[root@www ~]# yum install gcc-c++
[root@www ~]# rpm -qa gcc-c++
gcc-c++-4.4.7-11.el6.x86_64
❷pcre pcre-devel
- pcre:perl 兼容正则表达式,用于Nginx的rewrite模块,实现URI重写
- pcre-devel:Nginx的依赖库
[root@www yum.repos.d]# yum install -y pcre
pcre-7.8-6.el6.x86_64
[root@www yum.repos.d]# yum install -y pcre-devel
pcre-devel-7.8-6.el6.x86_64
❸openssl openssl-devel
- openssl:HTTP服务支持
- openssl-devel:Nginx的依赖库
[root@www yum.repos.d]# yum install -y openssl
openssl.x86_64 0:1.0.1e-30.el6.11
[root@www yum.repos.d]# yum install -y openssl-devel
openssl-devel.x86_64 0:1.0.1e-30.el6.11
3、安装Nginx
❶ 创建软件原件目录
- 创建软件原件目录,便于管理软件
#创建目录用于存放安装软件
[root@www ~]# mkdir -p /home/centos/tools
[root@www ~]# cd /home/centos/tools
#下载安装包
[root@www tools]# wget -q http://nginx.org/download/nginx-1.6.3.tar.gz
[root@www tools]# ls -l nginx-1.6.3.tar.gz
-rw-r--r--. 1 root root 805253 4月   8 2015 nginx-1.6.3.tar.gz
❷ 创建服务账户
useradd nginx -s /sbin/nologin -M/sbin/nologin该用户无法登陆系统,提升系统安全性。
#创建账户
[root@www tools]# useradd nginx -s /sbin/nologin -M
useradd: cannot open /etc/shadow
#报错是因为安全优化时,锁定了关键系统文件,更改了指令名称songcha=chattr。
- 关键文件的锁定与解锁。
#以下为解决过程:
[root@www tools]# lsattr /etc/shadow
----i--------e- /etc/shadow
#解锁
[root@www tools]# songcha -i /etc/passwd /etc/shadow /etc/group /etc/gshadow /etc/inittab
#添加用户
[root@www tools]# useradd nginx -s /sbin/nologin -M
#再次锁定
[root@www tools]# songcha +i /etc/passwd /etc/shadow /etc/group /etc/gshadow /etc/inittab
❸ 源码包编译安装
- 源码包安装的几个步骤:编译环境
gcc-c++、下载源码包wget、编译./configure、生成二进制安装程序make、运行二进制安装程序make install、清理源码包临时文件make clean。 - 编译:
./configure --user=nginx --group=nginx --prefix=/application/nginx --with-http_stub_status_module --with-http_ssl_module - ./configure编译参数说明:
| 参数 | 说明 |
|---|---|
| –user=USER | 进程用户权限 |
| –group=GROUP | 进程用户组权限 |
| –prefix=PATH | 设置安装路径 |
| –with-http_stub_status_module | 激活状态信息 |
| –with-http_ssl_module | 激活ssl 功能 |
[root@www tools]# tar xf nginx-1.6.3.tar.gz
[root@www tools]# cd nginx-1.6.3
[root@www nginx-1.6.3]# ./configure --user=nginx --group=nginx --prefix=/application/nginx --with-http_stub_status_module --with-http_ssl_module
[root@www nginx-1.6.3]# make
[root@www nginx-1.6.3]# make install
❹创建软链接
ln -s /application/nginx-1.6.3 /application/nginx,便于版本维护
[root@www nginx-1.6.3]# ln -s /application/nginx-1.6.3 /application/nginx
[root@www nginx-1.6.3]# ls -l /application/nginx/
总用量 16
drwxr-xr-x. 2 root root 4096 5月  10 13:56 conf
drwxr-xr-x. 2 root root 4096 5月  10 13:56 html
drwxr-xr-x. 2 root root 4096 5月  10 13:56 logs
lrwxrwxrwx. 1 root root   24 5月  10 13:56 nginx-1.6.3 -> /application/nginx-1.6.3
drwxr-xr-x. 2 root root 4096 5月  10 13:56 sbin
[root@www nginx-1.6.3]#
安装方式参考
4、安装检查
❶语法检查
/application/nginx/sbin/nginx -t
[root@www nginx-1.6.3]# /application/nginx/sbin/nginx -t
nginx: the configuration file /application/nginx/conf/nginx.conf syntax is ok
nginx: configuration file /application/nginx/conf/nginx.conf test is successful
❷启动服务
/application/nginx/sbin/nginx
[root@www nginx-1.6.3]# /application/nginx/sbin/nginx
❸端口检查
lsof -i :80netstat -lnt | grep 80
[root@www nginx-1.6.3]# lsof -i :80
COMMAND   PID  USER   FD   TYPE DEVICE SIZE/OFF NODE NAME
nginx   10246  root    6u  IPv4  35980      0t0  TCP *:http (LISTEN)
nginx   10247 nginx    6u  IPv4  35980      0t0  TCP *:http (LISTEN)
[root@www nginx-1.6.3]# netstat -lnt | grep 80
tcp        0      0 0.0.0.0:80                  0.0.0.0:*                   LISTEN
❹进程检查
ps -ef | grep nginx
[root@www nginx-1.6.3]# ps -ef | grep nginx
root      10246      1  0 14:33 ?        00:00:00 nginx: master process /application/nginx/sbin/nginx
nginx     10247  10246  0 14:33 ?        00:00:00 nginx: worker process
root      10278    982  0 14:49 pts/0    00:00:00 grep nginx
❺日志检查
cat /application/nginx/logs/error.log
[root@www nginx-1.6.3]# cat /application/nginx/logs/error.log
2021/05/10 14:35:54 [error] 10247#0: *1 open() "/application/nginx/html/favicon.ico" failed (2: No such file or directory), client: 192.168.10.133, server: localhost, request: "GET /favicon.ico HTTP/1.1", host: "192.168.10.10", referrer: "http://192.168.10.10/"
❻拦截检查
setenforce 0/etc/init.d/iptales status
[root@www nginx-1.6.3]# setenforce 0
[root@www nginx-1.6.3]# /etc/init.d/iptales status
5、主页检查
❶客户端
-
win
-
显示页面
-
linux
#链路检查
ping 192.168.10.10
#端口检查
telnet 192.168.10.10 80
#访问检查
wget 192.168.10.10
curl -I 192.168.10.10
❷服务端
- linux
wget 192.168.10.10下载保存网页
[root@www nginx-1.6.3]# wget 192.168.10.10
--2021-05-10 14:36:40--  http://192.168.10.10/
正在连接 192.168.10.10:80... 已连接。
已发出 HTTP 请求,正在等待回应... 200 OK
长度:612 [text/html]
正在保存至: “index.html”

100%[=======================================>] 612         --.-K/s   in 0s

2021-05-10 14:36:40 (189 MB/s) - 已保存 “index.html” [612/612])
curl 192.168.10.10显示网页源码
[root@www nginx-1.6.3]# curl 192.168.10.10
<!DOCTYPE html>
<html>
<head>
<title>Welcome to nginx!</title>
略

6、部署测试
❶主配置文件位置
/application/nginx/conf/nginx.conf
❷查看默认设置
[root@www ~]# grep html /application/nginx/conf/nginx.conf
            root   html;
            index  index.html index.htm;
略
❸改默认主页
[root@www ~]# vim /application/nginx/html/index.html
<head>
<!DOCTYPE html>
<html>
<head>
<meta charset="utf-8">
<title>江雪</title>
<style>
    body {

        width: 35em;
        margin: 0 auto;
        font-family: tahoma, arial, 宋体, sans-serif;
    }
</style>
</head>
<body>
<h1>江雪</h1>
<p>作者:柳宗元</p>
<p>千山鸟飞绝,</p>
<p>万径人踪灭。</p>
<p>孤舟蓑笠翁,</p>
<p>独钓寒江雪。</p>
</body>
</html>
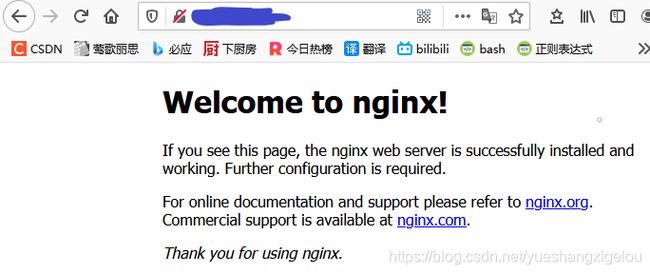
❹访问主页

四、Nginx 配置剖析
⑴ 模块说明
-
核心模块:Nginx 核心功能模块负责全局应用,主要对应主配置文件的Main区块和Events区块区域。
-
http功能模块
| Nginx http 功能模块 | 模块说明 |
|---|---|
| ngx_ http_core_module | 包括一些核心的http 参数配置,对应Nginx 的配置为HTTP 区块部分 |
| ngx http_ access_ module | 访问控制模块,用来控制网站用户对Nginx 的访问 |
| ngx_http_gzip_module | 压缩模块,对Nginx 返回的数据压缩,属于性能优化模块 |
| ngx_http_fastcgi_module | FastCGI 模块,和动态应用相关的模块,例如PHP |
| ngx_http_proxy_module | proxy 代理模块 |
| ngx_http_ upstream_module | 负载均衡模块,可以实现网站的负载均衡功能及节点的健康检查 |
| ngx_bttp_rewrite_module | URL 地址重写模块 |
| ngx_http_limit_conn_module | 限制用户并发连接数及请求数模块 |
| ngx_http_limit_req_ module | 根据定义的key 限制Nginx 请求过程的速率 |
| ngx_http_log_module | 访问日志模块,以指定的格式记录Nginx 客户访问日志等信息 |
| ngx http_ auth_basic_ module | Web 认证模块,设置Web 用户通过账号、密码访问Nginx |
| ngx_http_ssl_module | ssl 模块,用于加密的http 连接,如https |
| ngx_http_stub_status_module | 记录Nginx 基本访问状态信息等的模块 |
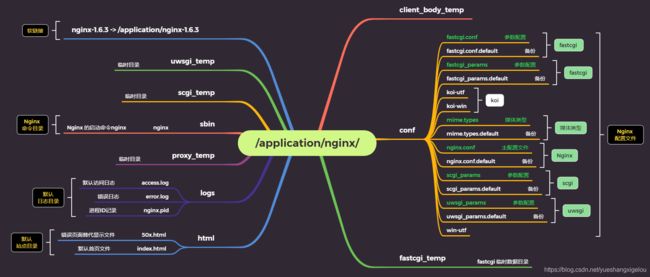
⑵ 目录结构
[root@www ~]# yum install -y tree
[root@www ~]# tree /application/nginx/
/application/nginx/
├── client_body_temp
├── conf
│   ├── fastcgi.conf
│   ├── fastcgi.conf.default
│   ├── fastcgi_params
│   ├── fastcgi_params.default
│   ├── koi-utf
│   ├── koi-win
│   ├── mime.types
│   ├── mime.types.default
│   ├── nginx.conf
│   ├── nginx.conf.default
│   ├── scgi_params
│   ├── scgi_params.default
│   ├── uwsgi_params
│   ├── uwsgi_params.default
│   └── win-utf
├── fastcgi_temp
├── html
│   ├── 50x.html
│   └── index.html
├── logs
│   ├── access.log
│   ├── error.log
│   └── nginx.pid
├── nginx-1.6.3 -> /application/nginx-1.6.3
├── proxy_temp
├── sbin
│   └── nginx
├── scgi_temp
└── uwsgi_temp

9 directories, 22 files
⑶ 配置文件
❶ 核心配置
- 核心配置
nginx.conf - 去除包含#的行和空行
egrep -v "#|^$" nginx.conf
#去除包含#的行和空行
[root@www conf]# egrep -v "#|^$" nginx.conf
worker_processes  1;
#worker进程数量

#事件区块
events {

    worker_connections  1024;
    #每个worker进程支持的最大连接数
}

#http区块
http {

    include       mime.types;
    #媒体类型库文件
    default_type  application/octet-stream;
    #默认媒体类型
    sendfile        on;
    #开启高效传输模式
    keepalive_timeout  65;
    #连接超时

    #服务区块
    server {

        listen       80;
        #监听80端口
        server_name  localhost;
        #域名主机名

        #location区块
        location / {

            root   html;
            #默认站点目录
            index  index.html index.htm;
            #默认首页
        }
        error_page   500 502 503 504  /50x.html;
        #状态码及回应文件

        location = /50x.html {

        #location匹配,访问50x.html
            root   html;
            #默认站点目录
        }
    }
}
❷ 其他配置
- 动态扩展主配置文件
fastcgi.conf - 动态扩展参数文件
fastcgi_params
五、Nginx 虚拟主机
⑴ 虚拟主机
虚拟主机:在Web 服务里就是一个独立的网站站点,这个站点对应独立的域名(也可能是IP 或端口),具有独立的程序及资源目录,可以独立地对外提供服务供用户访问。
| 服务 | 虚拟主机标签 |
|---|---|
| Apache | |
| Nginx | server{} |
⑵ 配置步骤
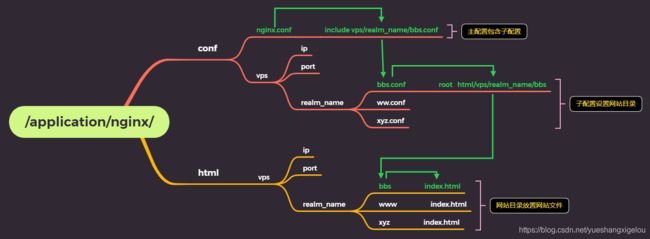
配置优化:配置文件分开存放,使主配置不会过于臃肿;同时便于配置管理。
方法:当虚拟主机数量过多时,配置按业务进行分类,子配置配置完成,再用include导入主配置。
❶ 配置子配置
- 增加一个完整的
server标签段。设置域名、root根目录、首页文件信息。
❷ 子配置导入主配置
- 在主配置末尾,用
include将子配置导入主配置文件。
❸ 创建网站目录及首页
- 创建
server_name域名对应网页的根目录,并且建立首页文件,如果没有index首页,访问会出现403 错误。
❹ 语法检查,服务重启,进程、端口检查
- Nginx 配置文件
语法检查,平滑重启Nginx 服务。
❺ host解析或DNS解析
- 在客户端对
server_name处配置的域名做host 解析或DNS 配置,并检查(ping域名看返回的IP是否正确) 。
❻ 测试访问
- 在Win浏览器中输入地址
访问;或者在Linux 客户端做hosts 解析,用wget或curl接地址访问。
⑶ 基于域名的虚拟主机
❶简介
说明:通过不同的域名区分不同的虚拟主机
应用:对外服务的网站
❷配置
- 创建子配置
[root@www conf]# mkdir -p vps/realm_name
[root@www conf]# cd /application/nginx/conf/vps/realm_name
[root@www realm_name]# vim www.conf
server {

        listen       80;
        server_name  www.test_nginx.org;

        location / {

            root   html/vps/realm_name/www;
            index  index.html index.htm;
        }
        error_page   500 502 503 504  /50x.html;

        location = /50x.html {

            root   html;
        }
    }
- 子配置导入主配置
[root@www realm_name]# vim  /application/nginx/conf/nginx.conf
worker_processes  1;
events {

    worker_connections  1024;
}
http {

    include       mime.types;
    default_type  application/octet-stream;
    sendfile        on;
    keepalive_timeout  65;
include vps/realm_name/www.conf;
}
- 创建网站目录及首页
[root@www realm_name]# mkdir -p /application/nginx/html/vps/realm_name/www
[root@www realm_name]# cd /application/nginx/html/vps/realm_name/www
[root@www www]# vim index.html
<!DOCTYPE html>
<html>
<head>
<meta charset="utf-8">
<title>江雪</title>
</head>
<body>
<h1>域名</h1>
<p>www</p>
<p>测试</p>
<p>www.text_nginx.org</p>
</body>
</html>
- 语法检查,服务重启,进程、端口检查
[root@www www]# /application/nginx/sbin/nginx -t
nginx: the configuration file /application/nginx/conf/nginx.conf syntax is ok
nginx: configuration file /application/nginx/conf/nginx.conf test is successful
[root@www www]# /application/nginx/sbin/nginx -s reload
[root@www www]# ps -ef | grep nginx
root      10246      1  0 14:33 ?        00:00:00 nginx: master process /application/nginx/sbin/nginx
nginx     10824  10246  0 18:47 ?        00:00:00 nginx: worker process
root      10826    982  0 18:47 pts/0    00:00:00 grep nginx
[root@www www]# netstat -lntp | grep 80
tcp        0      0 0.0.0.0:80                  0.0.0.0:*                   LISTEN      10246/nginx
-
host解析

-
测试访问

⑷ 基于端口的虚拟主机
❶简介
说明:通过不同的端口区分不同的虚拟主机
应用:公司内部网站,对外服务网站的后台
❷配置
- 端口子配置文件
[root@www conf]# cp -r ../conf/vps/realm_name ../conf/vps/port
[root@www port]# mv bbs.conf 80.conf | mv www.conf 81.conf | mv xyz.conf 82.conf
[root@www port]# tree
.
├── 80.conf
├── 81.conf
└── 82.conf

0 directories, 3 files
[root@www port]# vim 81.conf
server {

        listen       81;
        server_name  www.test_nginx.org;

        location / {

            root   html/vps/port/81;
            index  index.html index.htm;
        }
        error_page   500 502 503 504  /50x.html;

        location = /50x.html {

            root   html;
        }
    }
- 子配置导入主配置
[root@www ~]# vim /application/nginx/conf/nginx.conf
include vps/port/80.conf;
worker_processes  1;

events {

    worker_connections  1024;
}

http {

    include       mime.types;
    default_type  application/octet-stream;
    sendfile        on;
    keepalive_timeout  65;

include vps/realm_name/www.conf;
include vps/realm_name/bbs.conf;
include vps/realm_name/xyz.conf;

include vps/port/80.conf;
include vps/port/81.conf;
include vps/port/82.conf;
}
- 端口网站目录及首页文件
[root@www vps]# cp -r ../vps/realm_name ../vps/port
[root@www vps]# tree
[root@www vps]# cd ../vps/port
[root@www port]# mv ../port/bbs ../port/80 | mv ../port/www ../port/81 | mv ../port/xyz ../port/82
[root@www port]# tree
.
├── 80
│   └── index.html
├── 81
│   └── index.html
└── 82
    └── index.html

3 directories, 3 files
[root@www port]# vim ../port/82/index.html
<!DOCTYPE html>
<html>
<head>
<meta charset="utf-8">
<title>江雪</title>
</head>
<body>
<h1>端口</h1>
<p>82</p>
<p>测试</p>
<p>xyz.text_nginx.org:82</p>
</body>
</html>
- 语法检查,重启,进程、端口检查
- 警告:nginx: [warn] conflicting server name “bbs.test_nginx.org” on 0.0.0.0:80, ignored
[root@www ~]# /application/nginx/sbin/nginx -t
[root@www ~]# /application/nginx/sbin/nginx -s reload
nginx: [warn] conflicting server name "bbs.test_nginx.org" on 0.0.0.0:80, ignored
[root@www ~]# /application/nginx/sbin/nginx -s reload
[root@www ~]# ps -ef | grep 80
[root@www ~]# netstat -lnsp | grep 80
- host解析
192.168.10.10 bbs.test_nginx.org:80 www.test_nginx.org:81 xyz.test_nginx.org:82
- 访问测试

- 80为默认端口,省略。80端口解析与bbs域名解析用了同一端口(80),所以上面重启时警告,解析结果也一样。

⑸ 基于IP 的虚拟主机
❶简介
说明:通过不同的IP区分不同的虚拟主机
应用:VIP 绑定
❷配置
- 添加IP
[root@www ~]# ip addr add 192.168.10.20/24 dev eth0
[root@www ~]# ip add | grep 192.168.10
    inet 192.168.10.10/24 brd 192.168.10.255 scope global eth0
    inet 192.168.10.20/24 scope global secondary eth0
- 创建子配置
[root@www vps]# cp -r ../vps/port ../vps/ip
[root@www vps]# tree
[root@www vps]# cd ../vps/ip
[root@www ip]# rm -f 80.conf
[root@www ip]# mv 81.conf 192.168.10.10.conf
[root@www ip]# mv 82.conf 192.168.10.20.conf
[root@www ip]# tree
.
├── 192.168.10.10.conf
└── 192.168.10.20.conf
[root@www ip]# vim 192.168.10.10.conf
server {

        listen       192.168.10.10:81;
        server_name  www.test_nginx.org;

        location / {

            root   html/vps/ip/192_168_1_10;
            index  index.html index.htm;
        }
        error_page   500 502 503 504  /50x.html;

        location = /50x.html {

            root   html;
        }
    }
- 子配置导入主配置
[root@www ip]# cd ../../
[root@www conf]# vim nginx.conf
worker_processes  1;

events {

    worker_connections  1024;
}

http {

    include       mime.types;
    default_type  application/octet-stream;
    sendfile        on;
    keepalive_timeout  65;

include vps/realm_name/www.conf;
include vps/realm_name/bbs.conf;
include vps/realm_name/xyz.conf;

include vps/port/80.conf;
include vps/port/81.conf;
include vps/port/82.conf;

include vps/ip/192.168.10.10.conf;
include vps/ip/192.168.10.20.conf;
}
- 创建网站目录及首页文件
[root@www html]# cd ../html/vps
[root@www vps]# cp -r ../vps/port ../vps/ip
[root@www vps]# cd ../vps/ip
[root@www ip]# rm -r ../ip/80
[root@www ip]# mv ../ip/81 ../ip/192_168_1_10
[root@www ip]# mv ../ip/82 ../ip/192_168_1_20
[root@www ip]# tree
.
├── 192_168_1_10
│   └── index.html
└── 192_168_1_20
    └── index.html

2 directories, 2 files
[root@www ip]# vim ../ip/192_168_1_20/index.html
<!DOCTYPE html>
<html>
<head>
<meta charset="utf-8">
<title>江雪</title>
</head>
<body>
<h1>IP</h1>
<p>192.168.10.20</p>
<p>测试</p>
<p>192.168.10.20:82</p>
</body>
</html>
- 语法检查,平滑重启,进程、端口检查。
[root@www ip]# /application/nginx/sbin/nginx -t
nginx: [warn] conflicting server name "bbs.test_nginx.org" on 0.0.0.0:80, ignored
nginx: the configuration file /application/nginx/conf/nginx.conf syntax is ok
nginx: configuration file /application/nginx/conf/nginx.conf test is successful
[root@www ip]# /application/nginx/sbin/nginx -s reload
nginx: [warn] conflicting server name "bbs.test_nginx.org" on 0.0.0.0:80, ignored
[root@www ip]# ps -ef | grep nginx
root       1024      1  0 12:17 ?        00:00:00 nginx: master process /application/nginx/sbin/nginx
nginx      1294   1024  0 13:38 ?        00:00:00 nginx: worker process
root       1296    996  0 13:38 pts/0    00:00:00 grep nginx
[root@www ip]# netstat -lnsp | grep 81
    InBcastPkts: 81
- 访问测试

⑹ 检测策略
启动脚本检测策略:启动Nginx时,通过脚本获取header信息(如HTTPf1.1 200 OK)或模拟用户访问指定URL (wget 等方式)来自动检查Nginx 的启动是否正常,保证服务重启后迅速确定网站情况,而无须手工敲命令查看。
#!/bin/sh
#------function split------
#调用源函数库
. /etc/init.d/functions
#定义函数
function checkURL ()
{

	checkUrl = $1
	#被检查网址
	echo 'check url start ...'
	judge = ($(curl -I -s --connect-timeout 2 ${
      checkUrl} | head -1 | tr " " "\n"))
	#获得响应起始行,如HTTPf1.1 200 OK,空格替换为\n
	if [[ "${judge[1]}" == '200' && "${judge[2]}" == 'OK' ]]
	then
			action "${checkUrl}" /bin/true
			#/bin/true是linux系统自带的一个程序,它固定返回0,而0是bash语法中的真值。
			#相应的/bin/false返回的则是非零值。
	else
			action "${checkUrl}" /bin/false
			echo -n "retrying again... ";sleep 3;
			#3秒后重新检测
			judgeagain=($(curl -I -s --connect-timeout 2 ${
      checkUrl} | head -1 | tr"\r" "\n"))
			if [[ "${judgeagain[1]}" == '200' && "${judgeagain[2]}" == '0K' ]]
			then
				action "${checkUrl),retried again" /bin/true
			else
				action "${ch.eckUrl),retried again" /bin/false
			fi
	fi
	sleep 1;
}
#usage method
checkURL http://www.test_nginx.org
六、Nginx 功能配置
1、别名设置
虚拟主机别名:为虚拟主机设置除了主域名以外的一个或多个域名,实现多个域名访问同一个虚拟主机网站。
⑴ 添加别名test_nginx.org
[root@www nginx]# vim ../nginx/conf/vps/realm_name/www.conf
server {

        listen       80;
        server_name  www.test_nginx.org test_nginx.org;

        location / {

            root   html/vps/realm_name/www;
            index  index.html index.htm;
        }
        error_page   500 502 503 504  /50x.html;

        location = /50x.html {

            root   html;
        }
    }
⑵ 语法检查,平滑重启,进程、端口检查。
[root@www nginx]# /application/nginx/sbin/nginx -t
[root@www nginx]# /application/nginx/sbin/nginx -s reload
[root@www nginx]# ps -ef | grep nginx
root       1024      1  0 12:17 ?        00:00:00 nginx: master process /application/nginx/sbin/nginx
nginx      1432   1024  0 14:45 ?        00:00:00 nginx: worker process
root       1434    996  0 14:45 pts/0    00:00:00 grep nginx
[root@www nginx]# netstat -lntp | grep 80
tcp        0      0 0.0.0.0:80                  0.0.0.0:*                   LISTEN      1024/nginx
⑶ hosts配置
192.168.10.10 bbs.test_nginx.org www.test_nginx.org xyz.test_nginx.org test_nginx.org
⑷ 访问测试

2、状态信息
⑴ 模块
- ngx_http_ stub_ status_ module 模块:记录Nginx的基本访问状态信息
⑵ 检查
/application/nginx/sbin/nginx -Vconfigure arguments: --user=nginx --group=nginx --prefix=/application/nginx --with-http_stub_status_module --with-http_ssl_module
[root@www nginx]# /application/nginx/sbin/nginx -V
nginx version: nginx/1.6.3
built by gcc 4.4.7 20120313 (Red Hat 4.4.7-11) (GCC)
TLS SNI support enabled
configure arguments: --user=nginx --group=nginx --prefix=/application/nginx --with-http_stub_status_module --with-http_ssl_module
⑶ 配置
- 添加状态配置
status.conf - 出于安全考虑,状态信息防止外部用户查看
- 访问限制-允许
allow 192.168.2.0/24; - 访问限制-禁止
deny all;
[root@www vps]# vim status.conf
##status
server{

    listen 80;
    server_name status.test_nginx.org;
    location / {

        stub_status on;
        access_log off;
		allow 192.168.2.0/24;
        deny all;
    }
}
"status.conf" [新] 9L, 119C 已写入
- 子配置导入主配置
[root@www vps]# cd ../../
[root@www nginx]# vim ../nginx/conf/nginx.conf
略
include vps/status.conf;
略
}
- 语法检查,平滑重启
[root@www nginx]# /application/nginx/sbin/nginx -t
[root@www nginx]# /application/nginx/sbin/nginx -s reload
- hosts解析
192.168.10.10 test_nginx.org status.test_nginx.org
- 访问测试

⑷ 说明
Active connections: 2
server accepts handled requests
 13 13 21
Reading: 0 Writing: 1 Waiting: 1
| 状态 | 说明 |
|---|---|
| Active connections: 2 | 正在处理的连接数 |
| server 13 | 启动到现在处理了13个连接 |
| accepts13 | 启动到现在创建了13次握手 |
| 13-13=0 | 请求丢失数=握手数-连接数;0表示无丢失。 |
| handled requests 21 | 启动到现在处理了21次请求 |
| Reading: 0 | Nginx 读取到客户端的Header 信息数 |
| Writing: 1 | Nginx 返回到客户端的Header 信息数 |
| Waiting: 1 | Nginx 已经处理完正在等候下一次请求指令的驻留连接。在开启keep-alive的情况下,这个值等于active - (reading+ writing)。 |
七、Nginx 日志文件

1、 错误日志
❶ 日志简介
- 错误日志:Nginx 软件自身运行的故障信息。
- 错误日志属于核心功能模块(
ngx_core_module) 的参数,该参数名字为error_log。
❷ 参数说明
error_log的语法格式及参数语法说明如下:
| error_log | file | level |
|---|---|---|
| 关键字 | 日志文件 | 错误日志级别 |
- 常见的错误日志级别:debug、info、notice、warn、error、crit、alert、emerg。
- 常用的错误日志级别:
warn、error、crit。 - 低级别日志会带来巨大的I/O消耗,如info。
❸ 配置说明
- 日志文件的位置
[root@www nginx]# tree
略
├── logs
│   ├── access.log
│   ├── error.log
│   └── nginx.pid
略
25 directories, 40 files
- 配置错误日志文件
error_log默认值:error_log logs/error.log error;- 可放置标签段:
main, http, server, location
[root@www nginx]# vim ../nginx/conf/nginx.conf
worker_processes  1;
error_log logs/error.log;
events {

    worker_connections  1024;
}
略
2、 访问日志
⑴ 日志简介
- 访问日志:记录每个用户访问网站信息的日志文件,用于分析用户的浏览行为。
- 错误日志属于
ngx_http_ log_ module模块的参数,该参数名字为access_log。
⑵ 参数说明
access_log访问日志的参数:
| 参数 | 说明 |
|---|---|
| log_format | 用来定义记录日志的格式 |
| access_log | 用来指定日志文件的路径及使用何种日志格式记录日志 |
❶ log_format
- log_format默认配置
log_format main	'$remote_addr - $remote_user[$time_local] "$request" '
				'$status $body_bytes_sent "$http_referer" '
				'"$http_user_agent" "$http_x_forwarded_for" ';
- log_format变量说明
| 变量 | 说明 |
|---|---|
| $remote_ addr | 记录访问网站的客户端地址 |
| $http_ x forwarded for | 当前端有代理服务器时,设置Web 节点记录客户端地址的配置,此参数生效的前提是代理服务器上也进行了相关的x_forwarded_ for 设置 |
| $remote_ user | 远程客户端用户名称 |
| $time_local | 记录访问时间与时区 |
| $request | 用户的http 请求起始行信息 |
| $status | http 状态码,记录请求返回的状态,例如: 200 、404 、301 等 |
| $body_bytes_sents | 服务器发送给客户端的响应body 字节数 |
| $http_referer | 记录此次请求是从哪个链接访问过来的,可以根据referer 进行防盗链设笠 |
| $http_ user_ agent | 记录客户端访问信息,例如:浏览器、手机客户端等 |
- 一般使用默认配置即可。
❷ access_log
- access_log默认配置
access_log logs/access.log main;
- access_log格式
	access_log path [format [buffer=size [flush=time]] [if=condition]];
	access_log path format gzip[=level] [buffer=size] [flush=time] [if=condition];
	access_log syslog:server=address[,parameter=value] [format [if=condition]];
- access_log参数说明
| 参数 | 说明 |
|---|---|
| buffer-size | 存放访问日志的缓冲区大小 |
| flusb=time | 将缓冲区的日志刷到磁盘的时间 |
| gzip[=level] | 压缩级别 |
| [if=condition] | 其他条件 |
| access_ log off | off表示不记录访问日志 |
- 一般的场景中,这些参数都无须配置,极端优化时才可能会考虑这些参数。在记录日志参数中加上buffer 和flush 选项,在高并发场景下可以提升网站访问性能。
- access_log默认配置:
access_log logs/access.log main; - access_log放置标签:
http 、server 、location 、if in location 、limit_except。
⑶ 配置说明
- 在主配置
nginx.conf中配置访问日志格式log_format
[root@www nginx]# vim ../nginx/conf/nginx.conf
worker_processes  1;
error_log logs/error.log;
events {

    worker_connections  1024;
}

http {

    include       mime.types;
    default_type  application/octet-stream;
    log_format main '$remote_addr - $remote_user [$time_local] "$request" '
                    '$status $body_bytes_sent "$http_referer" '
                    '"$http_user_agent" "$http_x_forwarded_for" ';
    sendfile        on;
    keepalive_timeout  65;
略
- 在子配置
www.conf中配置访问日志access_log logs/access_www.log main;
[root@www nginx]# vim ../nginx/conf/vps/realm_name/www.conf
server {

        listen       80;
        server_name  www.test_nginx.org test_nginx.org;

        location / {

            root   html/vps/realm_name/www;
            index  index.html index.htm;
        }
        error_page   500 502 503 504  /50x.html;

        location = /50x.html {

            root   html;
        }
        access_log logs/access_www.log main;
    }
- 语法检查,平滑重启
[root@www nginx]# /application/nginx/sbin/nginx -t
[root@www nginx]# /application/nginx/sbin/nginx -s reload
- 日志目录树
[root@www nginx]# tree
略
├── logs
│   ├── access.log
│   ├── access_www.log
│   ├── error.log
│   └── nginx.pid
略
- 查看日志
[root@www nginx]# cat ../nginx/logs/access_www.log
192.168.10.256 - - [11/May/2021:18:46:51 +0800] "GET / HTTP/1.1" 304 0 "-" "Mozilla/5.0 (Windows NT 10.0; Win64; x64; rv:88.0) Gecko/20100101 Firefox/88.0" "-"
⑷ 日志剖析
192.168.10.256 - - [11/May/2021:18:46:51 +0800] "GET / HTTP/1.1" 304 0 "-" "Mozilla/5.0 (Windows NT 10.0; Win64; x64; rv:88.0) Gecko/20100101 Firefox/88.0" "-"
| 参数 | 剖析 | 实例 |
|---|---|---|
| $remote_addr | 客户端IP | 192.168.10.256 |
| - | 就是个杠 | - |
| $remote_user | 无远程用户 | - |
| [$time_local] | 时间 | [11/May/2021:18:46:51 +0800] |
| “$request” | 请求头 | “GET / HTTP/1.1” |
| $status | 状态码 | 304 |
| $body_bytes_sent | html的body大小为0字节 | 0 |
| “$http_referer” | referer引用页,直接打开的域名,referer无值 | “-” |
| “$http_user_agent” | 浏览器 | “Mozilla/5.0 (Windows NT 10.0; Win64; x64; rv:88.0) Gecko/20100101 Firefox/88.0” |
| “$http_x_forwarded_for” | Web 服务没有使用代理 | “-” |
⑸ 轮询切割
- 默认情况Nginx会把所有的访问日志生成到一个指定的访问日志文件access.log 里,时间长了就会导致日志个头很大,不利千日志的分析和处理,因此,有必要对Nginx 日志、按天或按小时进行切割,使其分成不同的文件保存。
cat /server/script/cut_nginx_log.sh- 切割脚本:将正在写入的Nginx 日志( access_www.log) 改名为带日期的格式文件(20150417_access_www.l og),然后平滑重新加载Nginx, 生成新的Nginx 日志(access_www.log) 。
#!/bin/sh
Dateformat= `date + %Y%m%d`
Basedir="/application/nginx"
Nginxlogdir="$Basedir/logs"
Logname="access_www"
#判断文件是否是目录
##如果是,切换到目录
##如果不是,正常退出程序,退出状态码为1
[ -d $Nginxlogdir ] && cd $Nginxlogdirl || exit 1
#判断文件是否是普通文件
##如果不是,正常退出程序,退出状态码为1
[ -f ${Logname}.log ] || exit 1
#重命名
/bin/mv ${Logname}.log ${Dateformat}_${Logname}.log
#平滑启动
$Basedir/sbin/nginx -s reload
- 定时任务:每天00 点整定时执行/server/script/cut_nginx _log.sh 切割日志
[root@www logs]# crontab -1
#time sync at 2021-2-1
*/5 * * * * /usr/sbin/ntpdate time.nist.gov >/dev/null 2>&1
#cut nginx access_log 2021-3-3
00 00 • • • /bin/sh /server/script/cut_nginx_log.sh >/dev/null 2>&1
- 结果
[root@www logs]# 11
-rw-r--r-- 1 root root 92456 	4 月 18 00:07 acceaa_www_20150418.log
-rw-r--r-- 1 root root 5648 	4 月 18 00:07 access_www_20150419. log
八、Nginx location
1、 作用
- location :根据用户请求的网站地址URI进行匹配,匹配成功即进行相关的操作。
2、 语法
- location 的语法为:
location [ = | ~ | ~* | ^~ ] uri {

	...
}
- location 的语法说明:
location |
[=|~|~*|^~] |
uri |
{ ... } |
|---|---|---|---|
| 指令标识 | 匹配标识 | 匹配的网站网址,可以是正则表达式 | 匹配uri后要执行的配置段 |
- 匹配标识说明
| 标识 | 说明 |
|---|---|
| = | 精准匹配 |
| ~ | 大小写敏感的匹配 |
| ~* | 不区分大小写的匹配 |
| ! | 匹配取反,即!~和!~* |
| ^~ | 进行常规匹配之后,不做正则表达式检查 |
3、 示例
[root@www nginx]# vim ../nginx/conf/vps/realm_name/www.conf
server {

        listen       80;
        server_name  www.test_nginx.org test_nginx.org;
        location / {

            root   html/vps/realm_name/www;
            index  index.html index.htm;
        }
        location = / {

            return 402;
        }
        location /documents/ {

            return 403;
        }
        location ^~ /images/ {

            return 404;
        }
        location ~* \.(gif|jpg|jpeg)$ {

            return 500;
        }
        error_page   500 502 503 504  /50x.html;
        location = /50x.html {

            root   html;
        }
        access_log logs/access_www.log main gzip buffer=32k flush=5s;
    }
| 访问 | 返回 | 说明 | 优先级 |
|---|---|---|---|
| http://test_nginx.org/ | 返回402 | location = / { 精确匹配,优先级最高 |
高 |
| http://test_nginx.org/images/1.gif | 返回404 | location ^~ /images/ { 常规匹配,^~忽略了正则匹配 |
↓ |
| http://test_nginx.org/documents/1.jpg | error_page 500.html | location ~* \.(gif|jpg|jpeg)$ { 正则匹配,匹配到路径,优先匹配正则。 |
↓ |
| http://test_nginx.org/documents/document.html | 返回403 | location /documents/ { 常规匹配,有正则,优先匹配正则。 |
↓ |
| http://test_nginx.org/index.html | 访问index.html | location / { 默认匹配。先匹配其他location,最后默认匹配。 |
低 |
九、Nginx rewrite
1、作用
- rewrite:URL地址重写。常用于动态地址转静态地址。需要
pcre库支持。
2、语法
❶rewrite语法
指令语法: rewrite regex replacement [flag];
指令语法: 指令标识 正则表达式 替换地址 标记
默认值: none
应用位置: server 、location 、if
❷正则表达式
测试:正则测试
参考:Python正则表达式
| 正则 | 说明 |
|---|---|
| . | 除换行符以外的所有字符。 |
| ^ | 字符串开头。 |
| $ | 字符串结尾。 |
| \d,\w,\s | 匹配数字、字符、空格。 |
| \D,\W,\S | 匹配非数字、非字符、非空格。 |
| [abc] | 匹配 a、b 或 c 中的一个字母。 |
| [a-z] | 匹配 a 到 z 中的一个字母。 |
| [^abc] | 匹配除了 a、b 或 c 中的其他字母。 |
| aa|bb | 匹配 aa 或 bb。 |
| ? | 0 次或 1 次匹配。 |
| * | 匹配 0 次或多次。 |
| + | 匹配 1 次或多次。 |
| {n} | 匹配 n次。 |
| {n,} | 匹配 n次以上。 |
| {m,n} | 最少 m 次,最多 n 次匹配。 |
| (expr) | 捕获 expr 子模式,以 \1 使用它。 |
| (?:expr) | 忽略捕获的子模式。 |
| (?=expr) | 正向预查模式 expr。 |
| (?!expr) | 负向预查模式 expr。 |
❸结尾flag标记
| 标记 | 说明 |
|---|---|
| last | 本条规则匹配完成后,继续向下匹配新的location URI规则 |
| break | 本条规则匹配完成即终止,不再匹配后面的任何规则 |
| redirect | 返回302临时重定向,浏览器地址栏会显示跳转后的URL地址 |
| permanent | 返回301永久重定向,浏览器地址栏会显示跳转后的URL地址 |
3、示例
❶参数说明
| 网址跳转 | test_nginx.org→www.test_nginx.org |
|---|---|
| 地址重写 | rewrite ^/(.*) http://www.test_nginx.org/$1 permanent; |
rewrite:关键字^/(.*):匹配/开头的所有http://www.test_nginx.org/$1跳转地址$1提取^/(.*)中的.*permanent永久跳转到跳转地址
❷配置
[root@www nginx]# vim ../nginx/conf/vps/realm_name/www.conf
server {

        listen       80;
        server_name  test_nginx.org;
        rewrite ^/(.*) http://www.test_nginx.org/$1 permanent;
}
server {

        listen       80;
        server_name  www.test_nginx.org;

        location / {

            root   html/vps/realm_name/www;
            index  index.html index.htm;
        }

        error_page   500 502 503 504  /50x.html;

        location = /50x.html {

            root   html;
        }
        access_log logs/access_www.log main gzip buffer=32k flush=5s;
    }
4、应用
- 调整URL
- 伪静态地址
- 旧域名跳转
- 按需求跳转
❶代码段
| 网址跳转 | bbs.test_nginx.org→www.test_nginx.org/bbs/index.html |
|---|---|
| 地址重写 | rewrite ^(.*) http://www.test_nginx.org/$domain/index.html break; |
if ( $http_host ~* "^(.*)\.test_nginx\.org$" ) {

	set $domain $1;
	rewrite ^(.*) http://www.test_nginx.org/$domain/index.html break;
}
❷参数说明
- C语言if语法格式:
if(条件) {

   /* 条件成立,执行语句 */
}
if (匹配成功) {执行语句}$http_host=server_name此处匹配bbs.test_nginx.org~*大小写不敏感^(.*)\.test_nginx\.org$匹配任意开头,.test_nginx.org结尾。$domain值为$1,$1值为^(.*)rewrite关键字^(.*)匹配所有http://www.test_nginx.org/$domain/index.html跳转地址break本条规则匹配完成即终止,不再匹配后面的任何规则
$host是core模块内部的一个变量
1、当请求头里不存在Host属性或者是个空值,$host则等于server_name。
2、若是请求头里有Host属性,那么$host等于Host属性除了端口号的部分,例如Host属性是www.example.com,那么$host就是www.example.com。
3、$http_host不是一个固定的变量,他实际上是$http_HEADER通配后的结果。4、$http_HEADER,注意,这里的HEADER是一个通配符,通配的是请求头里的header属性,例如$http_content_type表示请求头里content-type属性的值,同理,$http_host指的就是请求头里的host属性。
❸配置
bbs.test_nginx.org的配置bbs.conf
[root@www nginx]# vim ../nginx/conf/vps/realm_name/bbs.conf
server {

        listen       80;
        server_name  bbs.test_nginx.org;
        location / {

            root   html/vps/realm_name/www;
            index  index.html index.htm;
        }
		if ( $http_host ~* "^(.*)\.test_nginx\.org$" ) {

			set $domain $1;
			rewrite ^(.*) http://www.test_nginx.org/$domain/index.html break;
			}
        access_log logs/access_www.log main gzip buffer=32k flush=5s;
    }
www.test_nginx.org/bbs/index.html的配置www.conf
[root@www nginx]# vim ../nginx/conf/vps/realm_name/www.conf
server {

        listen       80;
        server_name  www.test_nginx.org;
        location / {

            root   html/vps/realm_name/www;
            index  index.html index.htm;
        }
        access_log logs/access_www.log main gzip buffer=32k flush=5s;
    }
十、Nginx 访问认证
1、作用
- 访问认证:访问网站时,账号和密码登录。
2、语法
❶ 配置格式
location / {

	auth_basic 				"closed site";
	auth_basic_user_file	conf/htpasswd;
}
❷ 参数说明
auth_ basic:string网站访问提示字符;off关闭此功能。
语法: auth_basic string | off;
默认值: auth_basic off;
使用位置: http、server、location、limit_except
auth_basic_user_file:认证;file认证文件位置。
语法: auth_basic_user_file file;
默认值:—
使用位置: http、server、location、limit_except
file
# comment
name1:password1
name2:password2:comment
name3:password3
3、示例
❶配置密码认证
[root@www nginx]# vim ./conf/vps/realm_name/bbs.conf
server {

        listen       80;
        server_name  bbs.test_nginx.org;

        location / {

            root   html/vps/realm_name/bbs;
            index  index.html index.htm;
            auth_basic              "密码认证";
            auth_basic_user_file    /application/nginx/conf/vps/realm_name/htpass
wd;
        }
        error_page   500 502 503 504  /50x.html;

        location = /50x.html {

            root   html;
        }
    }
❷安装认证模块
[root@www realm_name]# which htpasswd
/usr/bin/which: no htpasswd in (/usr/local/sbin:/usr/local/bin:/sbin:/bin:/usr/sbin:/usr/bin:/root/bin)
[root@www realm_name]# yum install httpd -y
[root@www realm_name]# which htpasswd
/usr/bin/htpasswd
❸创建认证文件
[root@www realm_name]# htpasswd -bc ./htpasswd test 123
Adding password for user test
[root@www realm_name]# chmod 400 ./htpasswd
[root@www realm_name]# chown nginx ./htpasswd
[root@www realm_name]# cat htpasswd
test:frpCu7Ni/clas
❹语法检查,平滑重启
[root@www realm_name]# /application/nginx/sbin/nginx -t
[root@www realm_name]# /application/nginx/sbin/nginx -s reload
❺访问测试
- 乱码是"密码认证",见bbs子配置。

参考
跟老男孩学Linux运维:Web集群实战