React+Electron桌面应用开发文章索引
继续前面的文章,这篇文章介绍基于MaterialUI的响应式布局方法。所谓响应式布局就是指在不同屏幕设备(如手机、平板、PC)上显示不同的布局格式,主要是根据屏幕宽度调整不同来匹配不同的布局,高度自动拉长或缩短。(一般主要是排列方式的改变,而内容并没有太大变化)
MaterialUI官方说明
MaterialDesign官方解说
断点BreakPoints
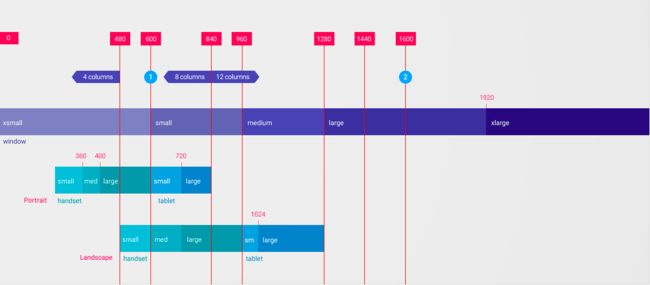
当页面宽度超过或低于某个像素数字的时候,我们就切换到新的布局,这个数字叫做断点BreakPoint.
MaterialUI默认的断点是:
- xs, extra-small: 0px or larger
- sm, small: 600px or larger
- md, medium: 960px or larger
- lg, large: 1280px or larger
- xl, xlarge: 1920px or larger
12栏布局
Material design默认把屏幕竖向分隔为12栏,使用柔性盒技术Flex box来实现。
来自网络的flexbox 布局教程
我们把网格单元Grid分为两类进行布局:Container容器和Item填充项目。
Item用百分比设定宽度,也就是它总是占父层的百分之多少,跟着父层一起放缩。Item之间有间隔,由父层Container的空隙spacing决定。
为了去除页面最外面的空隙,我们把body的边缘都去掉,打开index.html修改
自动排列内容
下面是新的HomePage.js的代码,请注意render()里面:
- 我们先创建12个items,每个item里面放一个卡片Card。
- 最后创建一个Grid容器container,把12个item放进去。
- 注意item设定xs=12,表示在极小屏幕(也就是宽度小于600像素)的时候,它占12栏充满父层;随着屏幕变大,超过600但小于960的时候,sm=6表示占父层的一半;以此类推。
import {
    Component
} from 'react'
import h from 'react-hyperscript'

import Button from 'material-ui/Button'
import Grid from 'material-ui/Grid'
import Card, {
    CardActions,
    CardContent
} from 'material-ui/Card';
import Typography from 'material-ui/Typography';

const styles = {
    container: {
        padding: 16,
    },
    item: {
        background: '#EEE'
    }
}

class Page extends Component {
    constructor(props) {
        super(props)
        this.state = {}
    }

    render() {
        let that = this

        let items = []
        for (let i = 0; i < 12; i++) {
            items.push(h(Grid, {
                item: true,
                xs: 12,
                sm: 6,
                md: 4,
                lg: 3,
                style: styles.item,
            }, [
                    h(Card, [
                        h(CardContent, 'Hello Card!')
                    ]),
                ]))
        }

        return h(Grid, {
            container: true,
            spacing: 16,
            style: styles.container,
        }, items)
    }
}

export default Page
得到效果如下图,手工拉宽浏览器观察不同效果(注意由于截图的原因,看起来卡片变小了,但实际并没有变小):
自动宽度
我们希望添加左侧导航栏,它固定200像素宽度,右侧内容区自适应充满画面宽度。
为了让整个页面居中,我们修改index.html中的body:
我们彻底修改一下HomePage的代码:
- 使用withStyles标准的样式编写格式
- Style的page设置了最大1000,inline-block让它居中
- Style的left设置了width:200,
- render()中的left和right都使用了两层Grid,外层item内层Container
- return的div使用css.page样式,锁定最大宽度1000像素
- div内还嵌套了一个Grid容器container,包含了left和right两个Grid(item)
import {
    Component
} from 'react'
import h from 'react-hyperscript'
import PropTypes from 'prop-types';
import {
    withStyles
} from 'material-ui/styles';

import Button from 'material-ui/Button'
import Grid from 'material-ui/Grid'
import Card, {
    CardActions,
    CardContent
} from 'material-ui/Card';
import Typography from 'material-ui/Typography';


const Style = (theme) => ({
    page: {
        maxWidth: 1000,
        width: '100%',
        display: 'inline-block'
    },
    left: {
        background: '#EEE',
        width: 200,
    },
    right: {
        background: '#CCC',
    },
    lfetBtn: {
        width: '100%',
        height: 56
    },
    rightBtn: {
        width: '100%',
        height: 56
    }
})

class Page extends Component {
    constructor(props) {
        super(props)
        this.state = {}
    }

    render() {
        let that = this
        const css = this.props.classes

        let rightItems = []
        for (let i = 0; i < 12; i++) {
            rightItems.push(h(Grid, {
                item: true,
                xs: 12,
                sm: 6,
                md: 4,
                lg: 3,
            }, [
                h(Button, {
                    className: css.rightBtn,
                }, 'hello!'),
            ]))
        }

        let leftItems = []
        for (let i = 0; i < 4; i++) {
            leftItems.push(h(Grid, {
                item: true,
                xs: 12,
            }, [
                h(Button, {
                    className: css.lfetBtn,
                }, 'Nav!'),
            ]))
        }

        let right = h(Grid, {
            item: true,
            xs: 12,
            sm: 8,
            className: css.right,
        }, h(Grid, {
            container: true,
        }, rightItems))


        let left = h(Grid, {
            item: true,
            className: css.left,
        }, h(Grid, {
            container: true,
        }, leftItems))

        return h('div', {
            className: css.page,
        }, [
            h(Grid, {
                container: true,
                justify: 'center',
            }, [
                left,
                right,
            ])
        ])
    }
}

Page.propTypes = {
    classes: PropTypes.object.isRequired,
}
export default withStyles(Style)(Page)
显示效果如下图,无论如何改变窗口宽度,左侧被锁定为200像素不变,右侧自动盛满。
响应式显示和隐藏
对于上面的布局,当窗口超小xs的时候,left和right会变为竖向排列,看起来很糟糕。
我们可以让left在xs的时候自动隐藏,然后让一个同样功能的菜单自动出现。
首先我们需要导入Hidden元素。
import Hidden from 'material-ui/Hidden';
然后再把最后的left罩一层Hidden,设定only='xs',就是在极小窗口隐藏。
同样,我们创建一个top,它也是一个container嵌套item的grid结构,外层设定了justify: 'flex-end',alignItems: 'center'这是右对齐上下居中,我们设定了右侧的Button元素所在grid宽度100锁定,左侧div所在grid自动调整。
修改后的全部代码如下,重点注意底部render()方法:
import {
    Component
} from 'react'
import h from 'react-hyperscript'
import PropTypes from 'prop-types'
import {
    withStyles
} from 'material-ui/styles'

import Button from 'material-ui/Button'
import Grid from 'material-ui/Grid'
import Card, {
    CardActions,
    CardContent
} from 'material-ui/Card';
import Typography from 'material-ui/Typography';
import Hidden from 'material-ui/Hidden';

import Icon from 'material-ui/Icon';
import IconButton from 'material-ui/IconButton';
import MenuIcon from '@material-ui/icons/Menu';


const Style = (theme) => ({
    page: {
        maxWidth: 1000,
        width: '100%',
        display: 'inline-block'
    },
    left: {
        background: '#EEE',
        width: 200,
    },
    right: {
        background: '#CCC',
    },
    menuBtn: {
        width: '100%',
        height: 56
    },
    lfetBtn: {
        width: '100%',
        height: 56
    },
    rightBtn: {
        width: '100%',
        height: 56
    }
})

class Page extends Component {
    constructor(props) {
        super(props)
        this.state = {}
    }

    render() {
        let that = this
        const css = this.props.classes

        let rightItems = []
        for (let i = 0; i < 12; i++) {
            rightItems.push(h(Grid, {
                item: true,
                xs: 12,
                sm: 6,
                md: 4,
                lg: 3,
            }, [
                h(Button, {
                    className: css.rightBtn,
                }, 'hello!'),
            ]))
        }

        let leftItems = []
        for (let i = 0; i < 4; i++) {
            leftItems.push(h(Grid, {
                item: true,
                xs: 12,
            }, [
                h(Button, {
                    className: css.lfetBtn,
                }, 'Nav!'),
            ]))
        }

        let right = h(Grid, {
            item: true,
            xs: 12,
            sm: 8,
            className: css.right,
        }, h(Grid, {
            container: true,
        }, rightItems))


        let left = h(Grid, {
            item: true,
            className: css.left,
        }, h(Grid, {
            container: true,
        }, leftItems))

        let top = h(Grid, {
            container: true,
            justify: 'flex-end',
            alignItems: 'center'
        }, [
            h(Grid, {
                item: true,
                xs: 8,
            }, h('div', '')),
            h(Grid, {
                item: true,
                style: {
                    width: 100
                }
            }, h(Button, {
                className: css.menuBtn,
            }, h(MenuIcon)))
        ])

        return h('div', {
            className: css.page,
        }, [
            h(Grid, {
                container: true,
                justify: 'center',
            }, [
                h(Hidden, {
                    only: ['sm', 'md', 'lg', 'xl']
                }, top),
                h(Hidden, {
                    only: ['xs']
                }, left),

                right,
            ])
        ])
    }
}

Page.propTypes = {
    classes: PropTypes.object.isRequired,
}
export default withStyles(Style)(Page)
实际效果是当窗口宽度达到xs的时候,顶部按钮就会自动显示出来。
此外,还有一些其他解决方案实现隐藏和显示,参考官方的Grid案例。
菜单按钮可以点击,但还不能弹出内容,可以参照这里的官方文档创建
致力于让一切变得简单
如果您发现文章错误,请不吝留言指正;
如果您觉得有用,请点喜欢;
如果您觉得很有用,欢迎转载~
END


