前言
之前花费了一些精力阅读技术书籍,及逛技术论坛看技术博文。但渐渐地感觉似乎方向不太对,花了很多精力看了绘图,并发等后,因为这些在我目前的项目中用得很少,学习过后不得实践,过段时间又忘掉了,过段时间后又要温习。因此,我感觉到应该把方向转换为向当前所做的项目学习,着眼当下,像公司前辈学习。从公司项目中挖掘出一个个的干货,然后串联整理,融会贯通。熟悉项目脉络,触及细枝末节。
我的意思并不是全面转向,放弃阅读技术文,而是要两者兼顾。面对任务的重要程度,难易程度,合理地分配精力和时间。
程序启动原理
main.m是整个程序的入口,它里面是这样的:
#import
#import "AppDelegate.h"

int main(int argc, char * argv[]) {
   @autoreleasepool {
       return UIApplicationMain(argc, argv, nil, NSStringFromClass([AppDelegate class]));
   }
}
启动步骤:
1.执行main函数;
2.执行UIApplicationMain函数;
创建代表整个应用程序的对象UIApplication,并设置整个应用程序的代理类AppDelegate为其代理属性值。
既然UIApplication代表整个应用程序,那必然是单例的,而且我们可通过它实现一些全局操作。(比如设置状态栏样式,打开URL等,具体可以找API查看详情)。
AppDelegate类实现了UIApplicationDelegate协议。系统把应用的几乎一切事物交给代理类AppDelegate来处理。
3.在代理类AppDelegate.m的application:didFinishLaunchingWithOptions:中创建UIWindow,并设置rootViewController。此时程序启动完毕。
项目里的AppDelegate.m中一般都写了什么?
AppDelegate中的application:didFinishLaunchingWithOptions:方法执行是在程序刚刚启动时,所以,它里面需要对针对程序启动而做些准备工作。另外AppDelegate是全局的,且在程序的任何地方都可以获得,我们在此可以处理一些全局的事物。
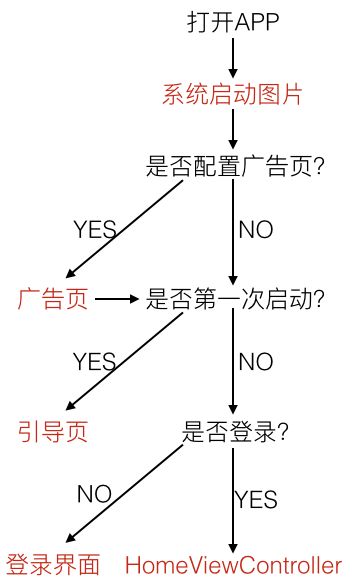
打开APP时进入页面的逻辑处理:
:
- (void)openAPPHandle
{
    // 1 ------------------是否配置广告页面?
    LaunchModel *launchModel = [self isSettingLaunch];
    if(launchModel.launchImage)// 1-YES: 若配置了广告页,则进入广告页
    {
        [self enterLaunchView:launchModel];
    }
    else // 1-NO:  若没配置广告页,则判断是否是第一次启动
    {
        // 2 ------------------是否第一次启动?
        if(![PubicClassMethod appFirstUserd]) // 2-YES: 第一次启动,则进入引导页
        {
            [self enterGuideView];
        }
        else // 2-NO:不是第一次启动,则判断是否登录?
        {
            // 3 ------------------是否登录?
            BOOL isLogin = [[NSUserDefaults standardUserDefaults] boolForKey:kUserLoginStatus];
            if(isLogin) // 3-YES:若是登录状态,则进入主界面
            {
                [self enterHomeView];
            }
            else
            {
                // 3-NO:若是未登陆了状态,则进入登录界面
                [self enterLoginView];
            }
        }


    }
}

// 是否设置广告页面
- (LaunchModel *)isSettingLaunch
{
    NSData *launchData = (NSData *)[[NSUserDefaults standardUserDefaults] objectForKey:@"launchImg"];
    LaunchModel *launch = (LaunchModel *)[NSKeyedUnarchiver unarchiveObjectWithData:launchData];

    return launch;
}


// 进入广告页
- (void)enterLaunchView:(LaunchModel *)launchModel
{
    LaunchViewController *launchVC = [LaunchViewController new];
    launchVC.launchModel = launchModel;
    UINavigationController *launchNavC = [[UINavigationController alloc] initWithRootViewController:launchVC];
    launchNavC.navigationBarHidden = YES;
    self.window.rootViewController = launchNavC;
}

// 进入引导页
- (void)enterGuideView
{
    [PubicClassMethod saveAppFirstUserd:YES];
    ZJNewcomerGuidViewController *guidVC = [[ZJNewcomerGuidViewController alloc]init];
    self.window.rootViewController = guidVC;
}


// 进入主界面
- (void)enterHomeView
{
    HomeViewController *homeVC = [[HomeViewController alloc] init];
    self.homeController = homeVC;
    UINavigationController *homeNavC = [[UINavigationController alloc] initWithRootViewController:homeVC];
    homeNavC.navigationBarHidden = YES;
    self.window.rootViewController = homeNavC;
    self.window.backgroundColor = [UIColor whiteColor];
    [self.window makeKeyAndVisible];
}


// 进入登录界面
- (void)enterLoginView
{
    LoginViewController *loginVC = [[LoginViewController alloc] init];
    UINavigationController *loginNavC = [[UINavigationController alloc] initWithRootViewController:loginVC];
    loginNavC.navigationBarHidden = YES;
    self.window.rootViewController = loginNavC;
    [self.window makeKeyAndVisible];
}


// 是否登录:进入主界面还是登录界面?
- (void)enterHomeOrLoginView
{
    RUNDUG(@"%s",__func__);
    AppDelegate *appDelegate = (AppDelegate *) [[UIApplication sharedApplication]delegate];
    BOOL isLogin = [[NSUserDefaults standardUserDefaults] boolForKey:kUserLoginStatus];
    if (isLogin) // 若已登录,则进入主界面
    {
        [appDelegate enterHomeView];
    }
    else // 若未登录,则进入登录界面
    {
        [appDelegate enterLoginView];
    }
}


// 是否第一次启动:进入引导页或者其他
- (void)enterGuideOrOther
{
    if(![PubicClassMethod appFirstUserd])
    {
        [self enterGuideView];
    }
    else
    {
        [self enterHomeOrLoginView];
    }
}
||更新(2016.10.27)||
之前只说了先判断本APP是否有广告页?即在本地有无存储广告页的数据。但是之前忘了说明这些数据是怎么存储在本地的了。其实整个逻辑是这样的:程序启动后再didFinishLaunchingWithOptions:方法里一边做着该进入哪个界面的逻辑处理,一边也去请求广告页的网络接口。
    if(interface == RequestStartPageInfo)
    {
        if(result.status == 200)
        {
            // 启动页图片缓存
            _launchModel = [LaunchModel ParseTipsPageDic:result.resultInfo LaunchModelType:start_Page];
            [_launchModel loadImageUrl];
        }
    }
把接口返回的关于广告页的数据以LaunchModel形式存入本地。
需要注意的是,我们不单存入了图片的url,更是先生成该url对应的UIImage,然后将UIImage对象存入了本地。这是必须的,因为缓存在本地的目的就是为了避免因为要再次从网络下载而消耗时间。光缓存url是没用的,下次照样还得加载出该url对应的图片。
- (void)loadImageUrl;
{

    NSString *urlStr=@"";
    if(PDHeight_mainScreen<=480&&self.imgUrl.length>0){
        urlStr=self.imgUrl;
    }else if (PDHeight_mainScreen>480&&self.imgUrlIos.length>0){
        urlStr=self.imgUrlIos;
    }

    if (urlStr.length>0)
    {
        if (!self.launchImgView) {
            self.launchImgView =[[UIImageView alloc]init];
        }

        __weak typeof(self) weakSelf = self;
        [self.launchImgView  setImageWithURL:[NSURL URLWithString:urlStr] placeholderImage:nil options:SDWebImageContinueInBackground  completed:^(UIImage *image, NSError *error, SDImageCacheType cacheType) {
            weakSelf.launchImage = image;
            NSData *data = [NSKeyedArchiver archivedDataWithRootObject:weakSelf];
            [[NSUserDefaults standardUserDefaults]setObject:data forKey:@"launchImg"];
            [[NSUserDefaults standardUserDefaults] synchronize];
        }] ;
    }
    else{
        [[NSUserDefaults standardUserDefaults]setObject:nil forKey:@"launchImg"];
        [[NSUserDefaults standardUserDefaults] synchronize];
    }
}
注册键盘通知:
这个我在前段时间的这篇笔记中关于键盘遮挡问题已经写过了:
UITextField一箩筐——输入长度限制、自定义placeholder、键盘遮挡问题
注册各种第三方库等(环信、个推、百度地图等):
(略)

