vue 编程不良人 学习笔记
时长 19小时
https://www.bilibili.com/video/BV1Lo4y1R7hc?p=1
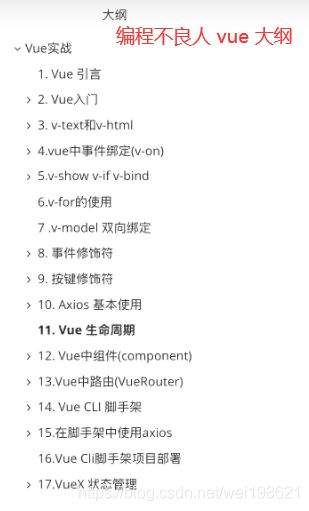
P01.vue的简介                                      17:41
P02.vue的第一个程序和v-text、v-html的使用             54:59
P03.v-on事件绑定                                    46:33
P04.v-if、v-show、v-bind使用                        47:28
P05.v-for、v-model的使用                            28:27
P06.备忘录案例实现                                 37:06
P07.购物车案例实现                                 21:55
P08.methods、computed计算属性和事件修饰符            37:19
P09.按键修饰符                                     11:44
P10.axios的基本使用                                56:07
P11.vue中生命周期                                   1:01:04
P12.用户列表页面开发&作业                             19:18
P13.用户列表页面开发&作业讲解(一)                      55:16
P14.用户列表页面开发&作业讲解(二)                      51:04
P15.es6的新特性                                      28:18
P16.组件的简介和基本使用                               54:23
P17.组件中定义data、methods、computed 以及生命周期函数       30:44
P18.vue中组件回顾                                       16:21
P19.vue中父子组件数据传递prop                            33:26
P20.vue中父子组件事件传递、slot插槽的使用                  40:40
P21.vue中路由的使用                                      43:37
P22.vue中默认路由、router-link                           45:13
P23.vue中嵌套路由、以及嵌套路由使用                         29:37
P24.vue阶段性复习                                         1:08:30
P25.vue cli脚手架简介、以及第一个项目开发                     1:08:46
P26.webstorm开发vue cli项目(一)                            46:21
P27.webstorm开发vue cli项目(二)                            28:01
P28.vuex简介、安装和使用                                    44:46
P01.vue的简介 17:41
P02.vue的第一个程序和v-text、v-html的使用 54:59
20210509
P03.v-on事件绑定 46:33
P04.v-if、v-show、v-bind使用 47:28
P05.v-for、v-model的使用 28:27
P06.备忘录案例实现 37:06
P07.购物车案例实现 21:55
P08.methods、computed计算属性和事件修饰符 37:19
        事件修饰符: 作用: 用来和事件连用,用来决定事件触发条件和决定事件触发机制
        .stop     停止事件冒泡
        .prevent  阻止默认行为
        .self     只触发自身行为
        .once     一次事件
        注意: 事件修饰符可以多个连续使用
P09.按键修饰符 11:44
<!DOCTYPE html>
<html lang="en">
<head>
    <meta charset="UTF-8">
    <title>vue系列课程</title>

</head>
<body>
    <div id="app">

        <h1>{
     {
     msg}}</h1>
        <!--

            按键修饰符:  作用:用来键盘上事件(keyup keydown ....)进行连用,用来修饰键盘上特定的按键来触发对应的事件
            .enter
            .tab
            .delete (捕获“删除”和“退格”键)
            .esc
            .space
            .up
            .down
            .left
            .right
        -->

        <!--.enter 回车键修饰符-->
        <input type="text" v-model="msg" @keyup.enter.delete.up.down.left.right="test">

    </div>
</body>
</html>
<!--引入vue的js文件-->
<script src="js/vue.js"></script>
<script>
    var app = new Vue({

        el:"#app",//代表vue实例作用范围
        data:{
         //在vue实例中定义一些列数据
            msg:"按键修饰符",
        },
        methods:{
      //在vue实例中定义相关函数
            test(){

                console.log("test");
            }
        },
        computed:{
      //用来书写计算相关方法  计算属性
        }
    });
</script>
P10.axios的基本使用 56:07
P11.vue中生命周期 1:01:04
P12.用户列表页面开发&作业 19:18
P13.用户列表页面开发&作业讲解(一) 55:16
P14.用户列表页面开发&作业讲解(二) 51:04
P15.es6的新特性 28:18
P16.组件的简介和基本使用 54:23
P17.组件中定义data、methods、computed 以及生命周期函数 30:44
P18.vue中组件回顾 16:21
P19.vue中父子组件数据传递prop 33:26
父组件向子组件传递值一(静态值传递 props)
<!DOCTYPE html>
<html lang="en">
<head>
<meta charset="UTF-8">
<title>vue系列课程</title>
</head>
<body>
<div id="app">
<h1>{
{
msg}}</h1>
<!--使用login组件 传递静态数据:在组件上传递写死数据-->
<login title="欢迎访问我们系统!!!" count="11" age="23"></login>
</div>
</body>
</html>
<script src="js/vue.js"></script>
<script src="js/axios.min.js"></script>
<script>
//定义组件配置对象
const login = {
template:"登录界面- {
{ title }}-{
{ count }}-{
{ age }}-{
{ loginTitle }}
",
data(){
// 注意: 在props中定义数据,不能再data中重复定义,如果重复定义优先使用props中数据为主
return {
//title:"我是登录页面,请在这里登录"
loginTitle: this.title,
};
},
props:['title','count','age'],//用来接收组件传递数据
};
//如何实现父组件向子组件内部传递数据,并将数据在子组件中进行展示?注意: 在vue中父组件向子组件传递数据可以使用 prop 属性完成数据传递
const app = new Vue({
el:"#app",
data:{
msg: "Vue 中组件开发",
name: "小陈",
},
methods:{
},
computed:{
},
components:{
login,//注册组件
}
});
</script>
父组件向子组件传递值二(动态值传递)
<!DOCTYPE html>
<html lang="en">
<head>
<meta charset="UTF-8">
<title>vue系列课程</title>
</head>
<body>
<div id="app">
<h1>{
{
msg}}</h1>
<input type="text" v-model="name">
<input type="text" v-model="age">
<br>
<!--使用局部组件 如何动态向组件传递数据-->
<login :title="name" :age="age" :user="user"></login>
</div>
</body>
</html>
<script src="js/vue.js"></script>
<script src="js/axios.min.js"></script>
<script>
//如何实现父组件向子组件内部传递数据,并将数据在子组件中进行展示?注意: 在vue中父组件向子组件传递数据可以使用 prop 属性完成数据传递
/**
* 注意: prop单向数据流
* 1.所有的 prop 都使得其父子 prop 之间形成了一个单向下行绑定:父级 prop 的更新会向下流动到子组件中,但是反过来则不行。这样会防止从子组件意外变更父级组件的状态,从而导致你的应用的数据流向难以理解。
2.额外的,每次父级组件发生变更时,子组件中所有的 prop 都将会刷新为最新的值。这意味着你不应该在一个子组件内部改变 prop。如果你这样做了,Vue 会在浏览器的控制台中发出警告。
*/
//定义一个登录组件
const login = {
template:"登录界面 - {
{ title }} - {
{ age }} - {
{ user.id }} - {
{ user.name }} -{
{ user.age }}
",
data(){
return {
};
},
props:['title','age','user'],
methods:{
changeAge(){
this.age++;
}
}
};
const app = new Vue({
el:"#app",
data:{
msg: "Vue 中组件开发",
name: "小陈",
age:23,
user:{
id:1,name:"小张",age:22}
},
methods:{
},
computed:{
},
components:{
login,
}
});
</script>
P20.vue中父子组件事件传递、slot插槽的使用 40:40
子组件向父组件传递值(通过$emit方法参数传递)
<!DOCTYPE html>
<html lang="en">
<head>
<meta charset="UTF-8">
<title>vue系列课程</title>
</head>
<body>
<div id="app">
<h1>信息: {
{
msg}} 年龄:{
{
age}} 用户信息:{
{
user}}</h1>
<!--使用局部组件 传递一个父组件中事件 @别名: 代表想组件中传递一个事件事件名为aa value="findAll" 代表将父组件中指定事件传递给子组件中-->
<login @aa="findAll" @test="test"></login>
</div>
</body>
</html>
<script src="js/vue.js"></script>
<script src="js/axios.min.js"></script>
<script>
//如何将父组件中事件传递给子组件中 1.在使用事件时使用@别名="传递事件名" 2.在组件中调用传递的事件时 this.$emit('别名')
//定义一个登录组件配置对象
const login = {
template:"用户登录-{
{msg}}
",
data(){
return {
msg:"我是子组件的信息",
age:34,
user:{
id:2,name:"王五",age:12,bir:"2012-12-12"}
};
},
methods:{
test(){
alert('子组件中定义的事件....');
//调用父组件中findAll事件 aa 事件别名:
//this.$emit('aa');//$emit用来调用父组件中相关事件
this.$emit('test',this.msg,this.age,this.user);//$emit用来调用父组件中传递的事件 并传递参数
}
}
};
const app = new Vue({
el:"#app",
data:{
msg: "Vue 中组件开发",
name: "小陈",
age:23,
user:{
id:1,name:"小张",age:22}
},
methods:{
findAll(){
alert('父组件中定义的事件...');
},
test(msg,age,user){
//alert('父组件中定义test的事件....'+msg+age);
console.log("msg: ",msg);
console.log("age: ",age);
console.log("user: ",user);
this.age = age;
this.msg = msg;
this.user = user;
}
},
computed:{
},
components:{
login,
}
});
</script>
P21.vue中路由的使用 43:37
<!DOCTYPE html>
<html lang="en">
<head>
<meta charset="UTF-8">
<title>vue 系列课程</title>
</head>
<body>
<div id="app">
<h1>{
{
msg}}</h1>
<!--指定路由组件在哪里展示 router-view 标签 作用:就是用来展示路由对应组件显示的位置 -->
<router-view></router-view>
<!--
vue中router路由使用:
1.引入vue router 核心js文件
2.创建路由对象并自定义路由规则
3.将路由对象注册到vue实例
4.在vue实例作用范围内使用router-view指定路由组件显示位置
-->
<a href="#/users">用户管理</a>
<a href="#/emps">员工管理</a>
</div>
</body>
</html>
<script src="js/vue.js"></script>
<script src="js/vue-router.js"></script>
<script src="js/axios.min.js"></script>
<script>
//创建组件配置对象
const users = {
template:"用户管理
编号 姓名 年龄 生日 操作 1 张三 23 2012-12-12 删除
",
data(){
return {
};
},
methods:{
},
computed:{
},
created(){
}
};
const emps = {
template:"员工管理
编号 姓名 年龄 生日 操作
"
};
//创建路由对象并定义路由规则
const router = new VueRouter({
routes:[
{
path:'/users',component:users}, //用来定义具体的某个组件路由规则 path: 用来指定对应请求路径 component:指定路径对应的组件
{
path:'/emps',component:emps}
] //用来定义一些列规则
});
const app = new Vue({
el:"#app",
data:{
msg:" vue 中router(路由)的使用"
},
methods:{
},
computed:{
},
components:{
},//注册局部,
router:router,//用来注册路由配置
});
</script>
P22.vue中默认路由、router-link 45:13
vue中路由router-link标签以及默认路由使用
<!DOCTYPE html>
<html lang="en">
<head>
<meta charset="UTF-8">
<title>vue 系列课程</title>
</head>
<body>
<div id="app">
<h1>{
{
msg}}</h1>
<!--通过a标签进行路由切换-->
<a href="#/users">用户管理</a>
<a href="#/emps">员工管理</a>
<!--router-link 标签 作用:用来替换a标签 实现路由切换 好处:书写路径时不需要显示加入# to: 用来指定路由路径 tag: 默认为a标签 用来指定router-link底层渲染标签 -->
<router-link to="/users" tag="a">用户管理(link)</router-link>
<router-link to="/emps" tag="a">员工管理(link)</router-link>
<!--router-view 路由组件展示位置-->
<router-view></router-view>
</div>
</body>
</html>
<script src="js/vue.js"></script>
<script src="js/vue-router.js"></script>
<script src="js/axios.min.js"></script>
<script>
//创建路由配置对象
const users = {
template:"用户管理
"
};
const emps = {
template: "员工管理
"
};
//创建路由对象
const router = new VueRouter({
routes:[
{
path:'/',redirect:'/users'},//默认路由规则 redirect:(路由路径重定向)
{
path:'/users',component:users},//用户组件路由规则
{
path:'/emps',component:emps},//员工组件路由规则
]
});
const app = new Vue({
el:"#app",
data:{
msg:" vue 中router(路由) router-link标签的使用"
},
methods:{
},
computed:{
},
router,//注册路由
});
</script>
vue中路由切换两种方式 标签方式 代码方式
<!DOCTYPE html>
<html lang="en">
<head>
<meta charset="UTF-8">
<title>vue 系列课程</title>
</head>
<body>
<div id="app">
<h1>{
{
msg}}</h1>
<!--1.通过使用标签方式直接切换路由菜单-->
<router-link to="/users">用户管理(link)</router-link>
<router-link to="/emps">员工管理(link)</router-link>
<a href="#/users">用户管理(a)</a>
<a href="#/emps">员工管理(a)</a>
<!--2.通过js代码的方式动态切换路由 this.$router.push("切换的路由路径")-->
<button @click="test">测试切换路由</button>
<!--router-view显示路由组件-->
<router-view></router-view>
</div>
</body>
</html>
<script src="js/vue.js"></script>
<script src="js/vue-router.js"></script>
<script src="js/axios.min.js"></script>
<script>
//创建路由配置对象
const users = {
template:"用户管理
"
};
const emps = {
template: "员工管理
"
};
//创建路由对象
const router = new VueRouter({
routes:[
{
path:'/',redirect:'/users'},//默认路由规则 redirect:(路由路径重定向)
{
path:'/users',name:"users",component:users},//用户组件路由规则 name:路由名称
{
path:'/emps',name:"emps",component:emps},//员工组件路由规则 name:路由名称 必须唯一
]
});
const app = new Vue({
el:"#app",
data:{
msg:" vue 中router(路由) router-link标签的使用"
},
methods:{
test(){
console.log("test");
console.log(this);
//this.$router.push("/emps");// 代表切换路由路径
//this.$router.push({path:'/users'});//路径方式切换路由
this.$router.push({
name:"emps"});//名称方式切换路由 [推荐]
}
},
computed:{
},
router,//注册路由
});
</script>
vue路由中参数传递
<!DOCTYPE html>
<html lang="en">
<head>
<meta charset="UTF-8">
<title>vue 系列课程</title>
</head>
<body>
<div id="app">
<h1>{
{
msg}}</h1>
<!--切换路由-->
<!--1.获取?后传递参数 this.$route.query.?后面参数key -->
<router-link to="/users?deptid=21&name=张三">用户管理</router-link>
<!--2.后去路由路径中参数 rest 方式参数获取 this.$route.param.路径中别名 -->
<router-link to="/emps/11/李四">员工管理</router-link>
<!--router-view显示路由组件-->
<router-view></router-view>
</div>
</body>
</html>
<script src="js/vue.js"></script>
<script src="js/vue-router.js"></script>
<script src="js/axios.min.js"></script>
<script>
//创建路由配置对象
const users = {
template:"用户管理
",
data(){
return {
};
},
methods:{
},
created(){
//获取路由路径中参数 1.获取queryString(url?deptid=21)中传递参数
//this.$route 当前路由对象
//this.$router 路由管理器对象
console.log("deptid: ",this.$route.query.deptid);
console.log("name: ",this.$route.query.name);
//debugger
console.log("用户管理this :"+this);
}
};
const emps = {
template: "员工管理
",
data(){
return {
};
},
methods:{
},
created(){
console.log("id: ",this.$route.params.id);//获取路径中参数
console.log("name: ",this.$route.params.name);//获取路径中参数 console.log("00000");
console.log("员工管理 this:"+ this);
}
};
//创建路由对象
const router = new VueRouter({
routes:[
{
path:'/',redirect:'/users'},//默认路由规则 redirect:(路由路径重定向)
{
path:'/users',name:"users",component:users},//用户组件路由规则 name:路由名称
{
path:'/emps/:id/:name',name:"emps",component:emps},//员工组件路由规则 name:路由名称 必须唯一
]
});
const app = new Vue({
el:"#app",
data:{
msg:" vue 中router(路由) router-link标签的使用"
},
methods:{
},
computed:{
},
router,//注册路由
});
</script>
P23.vue中嵌套路由、以及嵌套路由使用 29:37
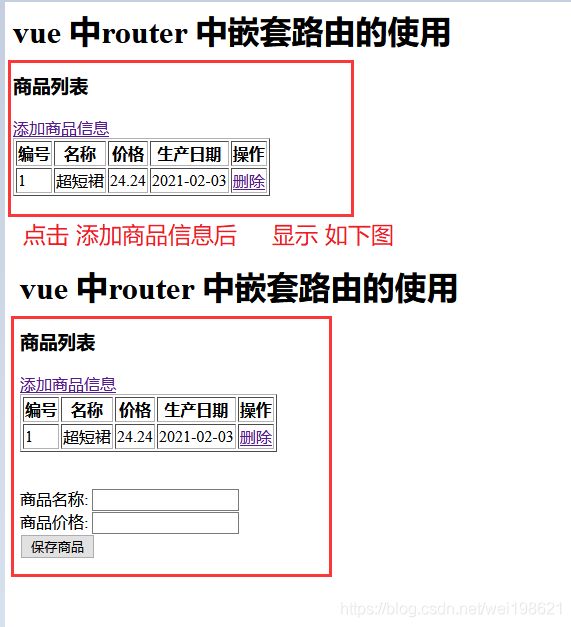
第一步 只有主页路由,无其他
此时点击添加商品信息, 由于router 无法找到内容,会调到空页面 #/products/add
需要在 const router 中添加子路由

<!DOCTYPE html>
<html lang="en">
<head>
    <meta charset="UTF-8">
    <title>vue 系列课程</title>
</head>
<body>

<div id="app">
    <h1>{
     {
     msg}}</h1>

    <!--显示路由组件-->
    <router-view></router-view>

</div>
<script src="js/vue.js"></script>
<script src="js/vue-router.js"></script>
<script src="js/axios.min.js"></script>
</body>
</html>


<template id="productsTemplate">
    <div>
        <h3>商品列表</h3>
        <a href="#/products/add">添加商品信息</a>
        <table border="1">
            <tr>
                <th>编号</th>
                <th>名称</th>
                <th>价格</th>
                <th>生产日期</th>
                <th>操作</th>
            </tr>
            <tr>
                <td>1</td>
                <td>超短裙</td>
                <td>24.24</td>
                <td>2021-02-03</td>
                <!--<td><a href="">删除</a>  <a href="#products/edit" >修改</a></td>-->
                <td><a href="">删除</a>  </td>
            </tr>
        </table>

    </div>
</template>


<script>
    //spring springmvc redis es springboot
    //创建组件配置对象
    const products = {

        template:"#productsTemplate",
        data(){

            return {
     };
        },
        methods:{


        }
    };


    //创建路由对象
    const router = new VueRouter({

        routes:[
            {
     path:'/',redirect:'/products'},//默认路由
            {

                path: '/products',
                name: 'products',
                component: products,

            },
        ]
    });


    const app = new Vue({

        el:"#app",
        data:{

            msg:" vue 中router 中嵌套路由的使用"
        },
        methods:{

        },
        computed:{
     },
        router,//注册路由
    });


</script>
添加子组件 添加商品信息的 template router-view
<!DOCTYPE html>
<html lang="en">
<head>
    <meta charset="UTF-8">
    <title>vue 系列课程</title>
</head>
<body>

<div id="app">
    <h1>{
     {
     msg}}</h1>

    <!--显示路由组件-->
    <router-view></router-view>

</div>
<script src="js/vue.js"></script>
<script src="js/vue-router.js"></script>
<script src="js/axios.min.js"></script>
</body>
</html>


<template id="productsTemplate">
    <div>
        <h3>商品列表</h3>
        <a href="#/products/add">添加商品信息</a>
        <table border="1">
            <tr>
                <th>编号</th>
                <th>名称</th>
                <th>价格</th>
                <th>生产日期</th>
                <th>操作</th>
            </tr>
            <tr>
                <td>1</td>
                <td>超短裙</td>
                <td>24.24</td>
                <td>2021-02-03</td>
                <!--<td><a href="">删除</a>  <a href="#products/edit" >修改</a></td>-->
                <td><a href="">删除</a>  </td>
            </tr>
        </table>

        <!--router-view 用来展示子组件路由-->
        <router-view></router-view>

    </div>
</template>


<script>
    //spring springmvc redis es springboot
    //创建组件配置对象
    const products = {

        template:"#productsTemplate",
        data(){

            return {
     };
        },
        methods:{


        }
    };


    //创建添加商品信息子组件
    const add = {

            template: `
<div>
<form action=''>
<br>
<br>
商品名称: <input type='text'><br>
商品价格: <input type='text'><br>
<input type='button' value='保存商品'>
</form>
</div>`
    };

    //创建路由对象
    const router = new VueRouter({

        routes:[
            {
     path:'/',redirect:'/products'},//默认路由
            {

                path: '/products',
                name: 'products',
                component: products,
                children:[ //定义子路由 注意:子路由的path属性不能使用"/"开头
                    {
     path: "add", component: add},
                ]

            },
        ]
    });


    const app = new Vue({

        el:"#app",
        data:{

            msg:" vue 中router 中嵌套路由的使用"
        },
        methods:{

        },
        computed:{
     },
        router,//注册路由
    });


</script>
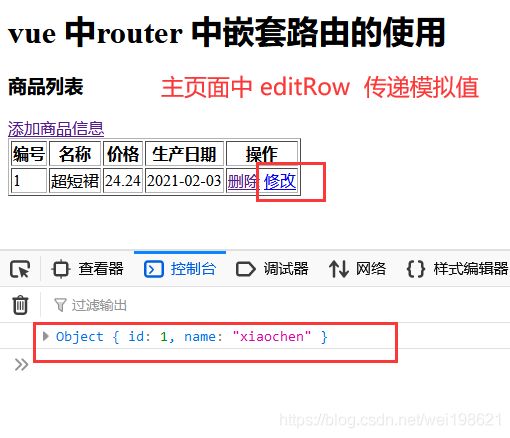
editRow 传递值
<!DOCTYPE html>
<html lang="en">
<head>
    <meta charset="UTF-8">
    <title>vue 系列课程</title>
</head>
<body>

<div id="app">
    <h1>{
     {
     msg}}</h1>

    <!--显示路由组件-->
    <router-view></router-view>

</div>
<script src="js/vue.js"></script>
<script src="js/vue-router.js"></script>
<script src="js/axios.min.js"></script>
</body>
</html>


<template id="productsTemplate">
    <div>
        <h3>商品列表</h3>
        <a href="#/products/add">添加商品信息</a>
        <table border="1">
            <tr>
                <th>编号</th>
                <th>名称</th>
                <th>价格</th>
                <th>生产日期</th>
                <th>操作</th>
            </tr>
            <tr>
                <td>1</td>
                <td>超短裙</td>
                <td>24.24</td>
                <td>2021-02-03</td>
                <!--<td><a href="">删除</a>  <a href="#products/edit" >修改</a></td>-->
                <td><a href="">删除</a>  <a href="javascript:;" @click.prevent="editRow({id:1,name:'xiaochen'})">修改</a></td>
            </tr>
        </table>

        <!--router-view 用来展示子组件路由-->
        <router-view></router-view>

    </div>
</template>


<script>
    //spring springmvc redis es springboot
    //创建组件配置对象
    const products = {

        template:"#productsTemplate",
        data(){

            return {
     };
        },
        methods:{

            editRow(user){

                console.log(user);
                //代码方式切换路由
               // this.$router.push({path:'/products/edit',query:user}); //切换路路径 通过query (?)方式传递数据
            }
        }
    };

    //创建添加商品信息子组件
    const add = {

            template: `
<div>
<form action=''>
<br>
<br>
商品名称: <input type='text'><br>
商品价格: <input type='text'><br>
<input type='button' value='保存商品'>
</form>
</div>`
    };


    const edit = {

        template: `
<div>
<form action=''>商品id: <input type='text' v-model='user.id'><br>
商品名称: <input type='text' v-model='user.name'><br>
<input type='button' value='确认修改'>
</form>
</div>`,
        data(){

            return {

                user:{
     },
            };
        },
        methods:{
     },
        created(){

            console.log("edit: ",this.$route.query); //获取对应参数
            this.user = this.$route.query;
        }
    };

    //创建路由对象
    const router = new VueRouter({

        routes:[
            {
     path:'/',redirect:'/products'},//默认路由
            {

                path: '/products',
                name: 'products',
                component: products,
                children:[ //定义子路由 注意:子路由的path属性不能使用"/"开头
                    {
     path: "add", component: add},
                    {
     path: "edit", component: edit}
                ]

            },
        ]
    });


    const app = new Vue({

        el:"#app",
        data:{

            msg:" vue 中router 中嵌套路由的使用"
        },
        methods:{

        },
        computed:{
     },
        router,//注册路由
    });


</script>
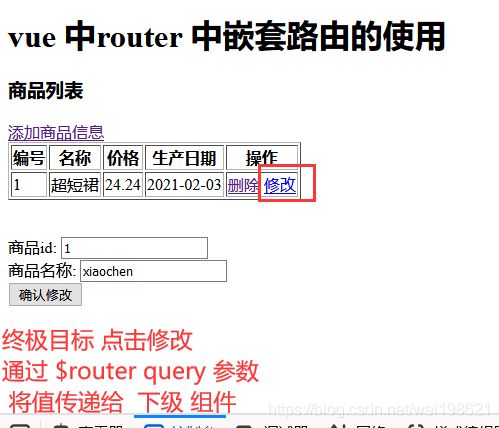
终极效果
<!DOCTYPE html>
<html lang="en">
<head>
    <meta charset="UTF-8">
    <title>vue 系列课程</title>
</head>
<body>

<div id="app">
    <h1>{
     {
     msg}}</h1>

    <!--显示路由组件-->
    <router-view></router-view>

</div>
<script src="js/vue.js"></script>
<script src="js/vue-router.js"></script>
<script src="js/axios.min.js"></script>
</body>
</html>


<template id="productsTemplate">
    <div>
        <h3>商品列表</h3>
        <a href="#/products/add">添加商品信息</a>
        <table border="1">
            <tr>
                <th>编号</th>
                <th>名称</th>
                <th>价格</th>
                <th>生产日期</th>
                <th>操作</th>
            </tr>
            <tr>
                <td>1</td>
                <td>超短裙</td>
                <td>24.24</td>
                <td>2021-02-03</td>
                <!--<td><a href="">删除</a>  <a href="#products/edit" >修改</a></td>-->
                <td><a href="">删除</a>  <a href="javascript:;" @click.prevent="editRow({id:1,name:'xiaochen'})">修改</a></td>
            </tr>
        </table>

        <!--router-view 用来展示子组件路由-->
        <router-view></router-view>

    </div>
</template>


<script>
    //spring springmvc redis es springboot
    //创建组件配置对象
    const products = {

        template:"#productsTemplate",
        data(){

            return {
     };
        },
        methods:{

            editRow(user){

                console.log(user);
                //代码方式切换路由
                this.$router.push({
     path:'/products/edit',query:user}); //切换路路径 通过query (?)方式传递数据
            }
        }
    };

    //创建添加商品信息子组件
    const add = {

            template: `
<div>
<form action=''>
<br>
<br>
商品名称: <input type='text'><br>
商品价格: <input type='text'><br>
<input type='button' value='保存商品'>
</form>
</div>`
    };


    const edit = {

        template: `
<div>
<br>
<br>
<form action=''>商品id: <input type='text' v-model='user.id'><br>
商品名称: <input type='text' v-model='user.name'><br>
<input type='button' value='确认修改'>
</form>
</div>`,
        data(){

            return {

                user:{
     },
            };
        },
        methods:{
     },
        created(){

            console.log("edit: ",this.$route.query); //获取对应参数
            this.user = this.$route.query;
        }
    };

    //创建路由对象
    const router = new VueRouter({

        routes:[
            {
     path:'/',redirect:'/products'},//默认路由
            {

                path: '/products',
                name: 'products',
                component: products,
                children:[ //定义子路由 注意:子路由的path属性不能使用"/"开头
                    {
     path: "add", component: add},
                    {
     path: "edit", component: edit}
                ]

            },
        ]
    });


    const app = new Vue({

        el:"#app",
        data:{

            msg:" vue 中router 中嵌套路由的使用"
        },
        methods:{

        },
        computed:{
     },
        router,//注册路由
    });


</script>


