springboot多模块项目(微服务项目)正确打包(jar)方式
大致步骤
-
新建一个springboot项目名称为父亲
-
添加父快捷方式。新建子模块,子模块同时插入新建springboot的项目,依次创建enty和web模块(关键是并配置好pom文件)
-
web模块依赖于entiy模块中的实体类,创建测试控制器,先测试项目没问题再开始打包(jar)
-
开始打包
-
测试jar是否有用
创建项目
注意点 :子模块需要保留xx.iml,xx.mvn文件,父模块保留.idea,.mvn文件 。如果删除了这些可能会报发现主类的错误
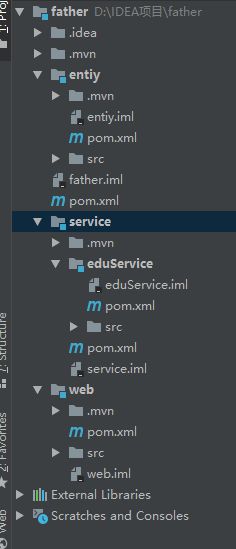
要打包项目大致的目录结构如下 :
第一级别:father
第二级别:service、web、entiy
第三级别:eduService
其中web、eduService是web项目可以独立运行,且依赖entiy( 学会了这个,以后所有的多模块项目都能学会打包(jar))

配置父亲的pom文件
配置父模块注意点一: 修改打包为pom(一般父级的打包方式为pom,所以father、service的打包方式为pom)。
<packaging>pompackaging>
配置父模块注意点二: 记得指定该父模块下面有哪些子模块
 <modules>
        <module>entiymodule>
        <module>webmodule>
        <module>servicemodule>
    modules>
配置父模块注意点三: 记得指定java的版本号
  <properties>
        <java.version>1.8java.version>
    properties>
配置父模块注意点四: 只需在father配置apache的maven打包插件,service的其他父模块不需要配置这个
<build>
        <plugins>
            <plugin>
                <groupId>org.apache.maven.pluginsgroupId>
                <artifactId>maven-compiler-pluginartifactId>
                <version>3.1version>
                <configuration>
                    <source>${java.version}source>
                    <target>${java.version}target>
                configuration>
            plugin>
            <plugin>
                <groupId>org.apache.maven.pluginsgroupId>
                <artifactId>maven-surefire-pluginartifactId>
                <version>2.19.1version>
                <configuration>
                    <skipTests>trueskipTests>
                configuration>
            plugin>
        plugins>
    build>
完整father的pom文件如下:
<project xmlns="http://maven.apache.org/POM/4.0.0" xmlns:xsi="http://www.w3.org/2001/XMLSchema-instance"
         xsi:schemaLocation="http://maven.apache.org/POM/4.0.0 https://maven.apache.org/xsd/maven-4.0.0.xsd">
    <modelVersion>4.0.0modelVersion>
    <parent>
        <groupId>org.springframework.bootgroupId>
        <artifactId>spring-boot-starter-parentartifactId>
        <version>2.4.0version>
    parent>
    <modules>
        <module>entiymodule>
        <module>webmodule>
        <module>servicemodule>
    modules>
    <groupId>com.zzhgroupId>
    <artifactId>fatherartifactId>
    <version>0.0.1-SNAPSHOTversion>
    <packaging>pompackaging>
    <name>fathername>

    <properties>
        <java.version>1.8java.version>
    properties>

    <dependencies>
        <dependency>
            <groupId>org.springframework.bootgroupId>
            <artifactId>spring-boot-starterartifactId>
        dependency>

        <dependency>
            <groupId>org.springframework.bootgroupId>
            <artifactId>spring-boot-starter-testartifactId>
            <scope>testscope>
        dependency>
    dependencies>

    <build>
        <plugins>
            <plugin>
                <groupId>org.apache.maven.pluginsgroupId>
                <artifactId>maven-compiler-pluginartifactId>
                <version>3.1version>
                <configuration>
                    <source>${java.version}source>
                    <target>${java.version}target>
                configuration>
            plugin>
            <plugin>
                <groupId>org.apache.maven.pluginsgroupId>
                <artifactId>maven-surefire-pluginartifactId>
                <version>2.19.1version>
                <configuration>
                    <skipTests>trueskipTests>
                configuration>
            plugin>
        plugins>
    build>

project>
配置子模块的pom文件
配置子模块注意点一 : 在parent节点下面加上relativePath,作用是指明依赖哪个父模块pom文件(如果是依赖直接父级就是…/规则和写html那种引用绝对路径一样)。
<relativePath>../pom.xmlrelativePath>
配置子模块注意点二 : 修改打包方式为jar
<packaging>jarpackaging>
配置子模块注意点三 : 加上springBoot的maven打包插件,并且指定运行的主入口类(springboot的maven插件,用这个插件打包的Jar包可以直接运行,但是不可依赖!),如果此子模块需要被依赖,那么还需加上这句代码(不加会报找不到类的错误)。(entiy模块需要加,其他子模块不要加)
感谢大佬的文章
<classifier>execclassifier>
<build>
        <plugins>
            <plugin>
                <groupId>org.springframework.bootgroupId>
                <artifactId>spring-boot-maven-pluginartifactId>
                <configuration>
                     <classifier>execclassifier>

                    <mainClass>com.zzh.demo.EntiyApplicationmainClass>
                    <layout>ZIPlayout>
                configuration>
                <executions>
                    <execution>
                        <goals>
                            <goal>repackagegoal>
                        goals>
                    execution>
                executions>
            plugin>
        plugins>
    build>
配置子模块注意点四 : 指定以下bulid的编码规则
 <properties>
        <project.build.sourceEncoding>UTF-8project.build.sourceEncoding>
        <project.reporting.outputEncoding>UTF-8project.reporting.outputEncoding>
        <java.version>1.8java.version>
    properties>
完整的web模块pom文件
<project xmlns="http://maven.apache.org/POM/4.0.0" xmlns:xsi="http://www.w3.org/2001/XMLSchema-instance"
         xsi:schemaLocation="http://maven.apache.org/POM/4.0.0 https://maven.apache.org/xsd/maven-4.0.0.xsd">
    <modelVersion>4.0.0modelVersion>
    <parent>
        <groupId>org.springframework.bootgroupId>
        <artifactId>spring-boot-starter-parentartifactId>
        <version>2.4.0version>
        <relativePath>../pom.xmlrelativePath>
    parent>
    <groupId>com.zzhgroupId>
    <artifactId>webartifactId>
    <version>0.0.1-SNAPSHOTversion>
    <name>webname>
    <packaging>jarpackaging>
    <properties>
        <project.build.sourceEncoding>UTF-8project.build.sourceEncoding>
        <project.reporting.outputEncoding>UTF-8project.reporting.outputEncoding>
        <java.version>1.8java.version>
    properties>

    <dependencies>
        <dependency>
            <groupId>com.zzhgroupId>
            <artifactId>entiyartifactId>
            <version>0.0.1-SNAPSHOTversion>
        dependency>
        <dependency>
            <groupId>org.springframework.bootgroupId>
            <artifactId>spring-boot-starter-webartifactId>
        dependency>
        <dependency>
            <groupId>org.springframework.bootgroupId>
            <artifactId>spring-boot-starter-testartifactId>
            <scope>testscope>
        dependency>

    dependencies>
    <build>
        <plugins>
            <plugin>
                <groupId>org.springframework.bootgroupId>
                <artifactId>spring-boot-maven-pluginartifactId>
                <configuration>

                    <mainClass>com.zzh.demo.WebApplicationmainClass>
                    <layout>ZIPlayout>
                configuration>
                <executions>
                    <execution>
                        <goals>
                            <goal>repackagegoal>
                        goals>
                    execution>
                executions>
            plugin>
        plugins>
    build>
project>
完整的eduService模块pom文件(由于service中配置了springboot的打包插件,由于可以依赖传递,这里可以不用配置打包插件)
<project xmlns="http://maven.apache.org/POM/4.0.0" xmlns:xsi="http://www.w3.org/2001/XMLSchema-instance"
         xsi:schemaLocation="http://maven.apache.org/POM/4.0.0 http://maven.apache.org/xsd/maven-4.0.0.xsd">
    <parent>
        <artifactId>serviceartifactId>
        <groupId>com.zzhgroupId>
        <version>0.0.1-SNAPSHOTversion>
        <relativePath>../pom.xmlrelativePath>
    parent>
    <modelVersion>4.0.0modelVersion>
    <artifactId>eduServiceartifactId>
    <packaging>jarpackaging>
    <name>eduServicename>
    <properties>
        <project.build.sourceEncoding>UTF-8project.build.sourceEncoding>
        <project.reporting.outputEncoding>UTF-8project.reporting.outputEncoding>
        <java.version>1.8java.version>
    properties>
project>
编写测试代码
entiy模块
编写entiyTest类,并且自己调用自己的entiyTest
public class entiyTest {

    public void showEntiyTest() {

        System.out.println("调用showEntiyTest成功!!");
    }
}
@RestController
@RequestMapping("/entiy")
public class entiyController {

    @RequestMapping("/test")
    public String testEntiy() {

        System.out.println("entiySucess");
        return "entiySucess";
    }
}
web模块(前提:我们引入了entiy模块的)
@RestController
@RequestMapping("/web")
public class controller {

    @RequestMapping("/test")
    public String testWeb() {

        entiyTest entiyTest = new entiyTest();
        entiyTest.showEntiyTest();
        return "webSucess";
    }
}
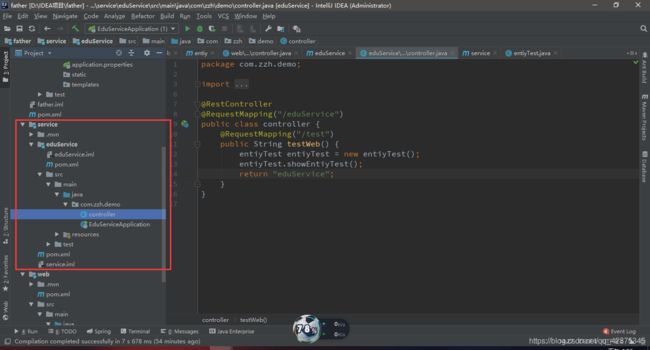
eduService模块(前提:我们引入了entiy模块的)
@RestController
@RequestMapping("/eduService")
public class controller {

    @RequestMapping("/test")
    public String testWeb() {

        entiyTest entiyTest = new entiyTest();
        entiyTest.showEntiyTest();
        return "eduService";
    }
}
终极打包了
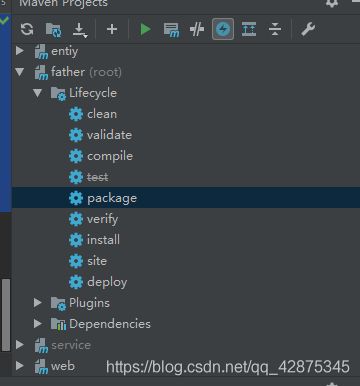
直接点clean接着点package或者install一键打包就ok了?

然后你会发现你会报这个错哈哈哈哈哈哈

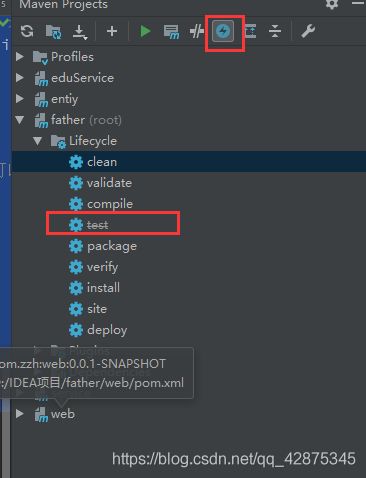
解决办法,点一下这个在clean、package(maven的编译打包检查:关闭点一下就可以了,忽略检查测试文件)
可以参考这个文章

这下就真的打包成功啦开心吧哈哈哈。输入java -jar 然后按tab键就可以切换jar包名字

全部启动okk了,注意启动entiy模块的这个jar包,这个才是可执行的jar包另外一个是可依赖的jar包
在需要对外提供依赖的项目的pom里设置(如本项目的xxx-a、xxx-b),这样设置会让项目生成两个jar:一个可执行jar,一个可依赖的jar;
<build>
    <plugins>
        <plugin>
            <groupId>org.springframework.bootgroupId>
            <artifactId>spring-boot-maven-pluginartifactId>
            <configuration>


                <classifier>execclassifier>
            configuration>
        plugin>
    plugins>
build>


