Ext2.0的选择需要冒很大的风险,确实Ext在界面上能够有很大的提升,但是客户端机器的性能和网络方面的制约,再加上Ext本身没有很好的实现工具支持。从编码角度来说,可能需要花费更多的时间,这相对于直接的Web开发。如果项目中缺少美工,又对访问性能或并发量不是特别的要求的Web开发,可以考虑使用,譬如说安全设备的控制界面。当然项目组成员必须忍受大量javascript编码。
一般来说,Ext使用如下:
Ext 作为前台,Spring-Hibernate-Stucts作为整体的控制层,json-lib作为两者的交互。
当然后台是什么无所谓了,主要就是json字符串的拼凑
流程稍微记录了一下,后面有些不想写了,所以逻辑有些混乱。
1. Json-Lib
导入依赖库
commons-beanutils.jar
commons-collections-3.1.jar
commons-lang-2.1.jar
commons-logging.jar
ezmorph-1.0.4.jar
json-lib-2.2-jdk15.jar
测试Bean类

 public
class
TestBean
...
{
 String date1 = "111";
 int date2 = 10;

 public String getDate1() ...{
 return date1;
 }
}

 public void setDate1(String date1) ...{
 this.date1 = date1;
 }
}

 public int getDate2() ...{
 return date2;
 }
}

 public void setDate2(int date2) ...{
 this.date2 = date2;
 }
}

 }
}

测试代码
 JSONObject jsonBean
=
JSONObject.fromObject(
new
TestBean());
 System.out.println(jsonBean);

 List list
=
new
ArrayList();
 list.add(
new
TestBean());
 list.add(
new
TestBean());

 JSONArray jsonList
=
JSONArray.fromObject(list);
 System.out.println(jsonList);

输出:
{"date1":"111","date2":10}
[{"date1":"111","date2":10},{"date1":"111","date2":10}]
正式使用再做一下字符串处理
2. Ext使用
将整个Ext2.0的目录导入到MyEclipse中去
Docs可以全部删去,example 也可删去部分
只保留examples根目录下的内容
在examples\examples.js中的开头修改成
Ext.BLANK_IMAGE_URL = 'ext-2.0/resources/images/default/s.gif';
将指向Ext网站的s.gif文件指向本地
添加 ext-fix.js 修正radio等Form控件从json数据获取信息时,工作不正常的问题

 Ext.form.BasicForm.prototype.setValues
=
function
(values)
...
{

 if(values instanceof Array)...{

 for(var i = 0, len = values.length; i < len; i++)...{
 var v = values[i];
 var f = this.findField(v.id);

 if(f)...{

 if ( f.getEl().dom.type == 'radio' ) ...{
 var group = this.el.dom.elements[f.getName()];

 for (var i=0; i < group.length; i++ ) ...{

 if(group[i].__ext_field) ...{
 group[i].__ext_field.setValue(group[i].value == v);

 if(this.trackResetOnLoad)...{
 group[i].__ext_field.originalValue = group[i].__ext_field.getValue();
 }
}
 }
}
 }
}
 }
}
 else
else

 ...{
...{
 f.setValue(v.value);

 if(this.trackResetOnLoad)...{
 f.originalValue = f.getValue();
 }
}
 }
}
 }
}
 }
}

 }else...{
 var field, id;

 for(id in values)...{

 if(typeof values[id] != 'function' && (field = this.findField(id)))...{

 if( field.getEl().dom.type == 'radio' ) ...{
 var group = this.el.dom.elements[field.getName()];

 for (var i=0; i < group.length; i++ ) ...{

 if(group[i].__ext_field) ...{
 group[i].__ext_field.setValue(group[i].value == values[id]);

 if(this.trackResetOnLoad)...{
 group[i].__ext_field.originalValue = group[i].__ext_field.getValue();
 }
}
 }
}
 }
}
 }
}
 else
else

 ...{
...{
 field.setValue(values[id]);

 if(this.trackResetOnLoad)...{
 field.originalValue = field.getValue();
 }
}
 }
}
 }
}
 }
}
 }
}
 return this;
 }
}


 Ext.form.Radio.prototype.onRender
=
function
(ct, position)
...
{
 Ext.form.Radio.superclass.onRender.call(this, ct, position);
 this.el.dom.__ext_field = this;
 }
}


 Ext.form.Radio.prototype.setValue
=
function
(v)
...
{

 if(v === true || v === 'true' || v == '1' || v === false || v === 'false' || v == '0') ...{

 // Select all radios of this group
 var radios = this.el.up('form').select('input[type=radio]');

 // Uncheck all other values

 for(var i = 0; i < radios.elements.length; i++) ...{
 if(radios.elements[i].__ext_field && radios.elements[i].__ext_field != this && radios.elements[i].name == this.el.dom.name)

 ...{
...{
 radios.elements[i].__ext_field.checked = false;

 // DOM checked is set by the browser

 radios.elements[i].__ext_field.fireEvent("check", this, this.checked);
 }
}
 }
}

 this.checked = (v === true || v === 'true' || v == '1');

 if(this.el && this.el.dom) ...{
 this.el.dom.checked = this.checked;
 }
}
 this.fireEvent("check", this, this.checked);
 }
}
 }
}

在使用Ext项目中将所有的文件的编码调到UTF-8,这包括js文件和页面文件。因为Ext核心使用UTF-8编码,在表单提交和Grid时表现得比较明显。
使用Ext时,在页面文件的<head></head>中加入下面内容
 <
meta
http-equiv
="Content-Type"
content
="text/html; charset=UTF-8"
>
 <
title
>
Forms
</
title
>
<
title
>
Forms
</
title
>
 <
link
rel
="stylesheet"
type
="text/css"
href
="ext-2.0/resources/css/ext-all.css"
/>

 <!--
GC
-->
 <!--
LIBS
-->

 <
script
type
="text/javascript"
src
="ext-2.0/adapter/ext/ext-base.js"
></
script
>
 <!--
ENDLIBS
-->

 <
script
type
="text/javascript"
src
="ext-2.0/ext-all.js"
></
script
>
 <
script
type
="text/javascript"
src
="ext-2.0/build/locale/ext-lang-zh_CN.js"
></
script
>
 <
script
type
="text/javascript"
src
="ext-2.0/ext-fix.js"
></
script
>
 <!--
Common Styles for the examples
-->
 <
link
rel
="stylesheet"
type
="text/css"
href
="ext-2.0/examples/examples.css"
/>
 <
script
type
="text/javascript"
src
="ext-2.0/examples/examples.js"
></
script
>

这一部分可以制作页面模板
每个独立的页面 再加入自己独特的js逻辑,以dynamic.js为例
 <
script
type
="text/javascript"
src
="dynamic.js"
></
script
>
如果页面需要div的话,就加入即可。
3. Form
表单制作包括提交和数据内容的填充
制作Ext Form表单, 可以使用Ext form builder来简化一些操作。
Ext Form Builder同样使用Ext开发
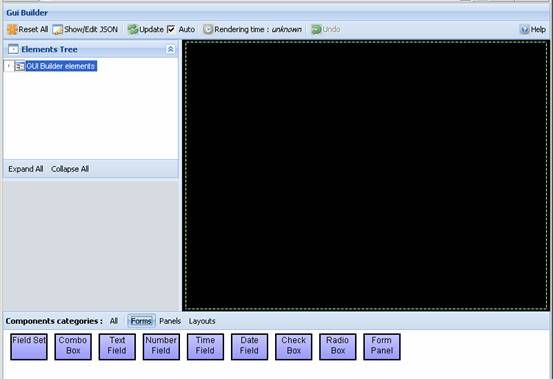
首先添加一个Form Panel
然后将所需要的Form控件拖到Form Panel上即可
选择Show/Edit JSON就可以看到生成表单所需要的javascript语句
1) 表单提交

制作上面的这个表单
两个Edit,一个Combo和一个Radio,代码中有些布局信息也可以使用Form Builder来制作,但是Form Builder不支持%的布局方式,可以手工改写生成界面的json来达到效果。
表单提交时,使用各个控件name值作为请求参数
这里的控件都有些布局信息,可以忽略
l Edit控件

 ...
{
...
{
 columnWidth : .5,
 layout : 'form',
 border : false,

 items : [...{
 xtype : 'textfield',
 fieldLabel : '姓名',
 name : 'name',
 anchor : '90%'
 }]
}]
 }
}
如果需要填写默认值的话,加入value参数即可
提交时也是使用最新的value值来提交的
l Radio控件

 ...
{
...
{

 columnWidth : .25,
 layout : 'form',
 border : false,

 items : [...{
 style : 'margin-top:5px',
 xtype : 'radio',
 fieldLabel : '性别',
 boxLabel : '男',
 name : 'sex',
 checked : true,
 inputValue : 'M',
 anchor : '95%'
 }]
}]

 }
, ...
{
 columnWidth : .25,
 layout : 'form',
 labelWidth : 0,
 labelSeparator : '',
 hideLabels : true,
 border : false,

 items : [...{
 style : 'margin-top:5px',
 xtype : 'radio',
 fieldLabel : '',
 boxLabel : '女',
 name : 'sex',
 inputValue : 'F',
 anchor : '95%'
 }]
}]
 }
}

Radio使用inputValue来作为提交值,接收时也使用这个值
l Combo控件
Combo控件获取信息的Json字符串格式

 ...{totalProperty:100,root:[...{retrunValue:1, displayText:'中文1'},...{retrunValue:2, displayText:'中文2'},...{retrunValue:3, displayText:'中文3'},...{retrunValue:4, displayText:'中文4'},...{retrunValue:5, displayText:'中文5'},...{retrunValue:6, displayText:'中文6'}]}
这里使用combo.jsp来返回这些信息
 <%@ page language="java" contentType="text/html; charset=UTF-8"
 pageEncoding
="UTF-8"%>
 <%
<%

 response.setCharacterEncoding(
"UTF-8"
);

 String json = "{totalProperty:100,root:["
;

 json += "{retrunValue:1, displayText:'中文1'},"
 +"{retrunValue:2, displayText:'中文2'},"
 +"{retrunValue:3, displayText:'中文3'},"
 +"{retrunValue:4, displayText:'中文4'},"
 +"{retrunValue:5, displayText:'中文5'},"
 +"{retrunValue:6, displayText:'中文6'}]}"
;

 response.getWriter().write(json);

 %>
%>
获取的数据源

 var ds = new Ext.data.Store(...
{

 proxy: new Ext.data.HttpProxy(...{url:'combo.jsp'}),

 reader: new Ext.data.JsonReader(...{
 totalProperty: 'totalProperty',
 root: 'root'
 }, [
}, [

 ...{name: 'retrunValue', type: 'int'},

 ...{name: 'displayText'}
 ])
])

 }
);
}
);

'totalProperty' json中记录的总数量
'root' json中数据开头的标示
'retrunValue' 和'displayText' 为数据对象的字段名称, 其中'retrunValue'为int类型
从combo.jsp中获取json数据将组装成定义数据源类型
Combo使用这个数据源

 ...
{
...
{
 xtype:'combo',
 store: ds,
 valueField :"retrunValue",
 displayField: "displayText",
 mode: 'local',
 forceSelection: true,
 blankText:'请选择学历',
 emptyText:'选择学历',
 hiddenName:'education',
 editable: false,
 triggerAction: 'all',
 allowBlank:false,
 fieldLabel: '学历',
 name: 'education',
 anchor:'90%'
 }
}


Combo的值为"retrunValue",显示使用"displayText"
当然最后不要忘记将ds进行load
l 保存按钮将表单信息进行提交

 buttons : [
...
{
 text : '保存',

 handler : function() ...{

 if (simpleForm.form.isValid()) ...{
 this.disabled = true;

 simpleForm.form.doAction('submit', ...{
 url : 'test.jsp',
 method : 'post',
 params : '',

 success : function(form, action) ...{
 Ext.Msg.alert('成功', action.result.data);
 this.disabled = false;
 //document.location.href = 'hello.html';
 },
},

 failure : function() ...{
 Ext.Msg.alert('失败', '抱歉');
 this.disabled = false;
 }
}
 });
});
 }
}
 }
}
 }
,
}
,


保存按钮将表单信息提交给test.jsp,我们将所有的请求参数打印出来,并返回结果信息
 <%
<%

 request.setCharacterEncoding(
"UTF-8"
);


 try...
{
 String name;
 java.util.Enumeration pNames=request.getParameterNames();

 while(pNames.hasMoreElements())...{
 name=(String)pNames.nextElement();
 System.out.println(name+"="+request.getParameter(name));
 }
}

 }
catch(Exception e)...
{
 System.out.print(e.toString());
 }
}

 out.print(
"{success:true, data:age=567}"
);
 %>
%>

打印处来的例子
age=dfgg
name=ddfgdfg
sex=M
education=3
返回参数也必须是json字符串,success表示操作成功,或失败
action.result.data会取=后的值
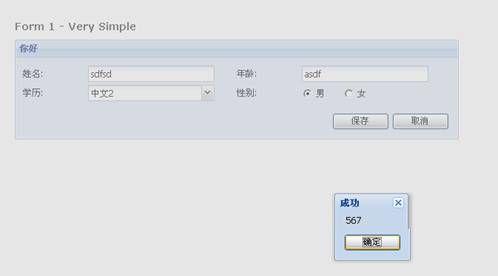
2) 表单接收信息
只需要返回和表单相符的JSON字符串
{success:true,data:{"name":'你好',"age":'131',education:3,sex:'F'}}
formget.jsp文件内容
 <%
@ page language
=
"
java
"
contentType
=
"
text/html; charset=UTF-8
"
 pageEncoding
=
"
UTF-8
"
%>
 <%
<%

 out.print(
"
{success:true,data:{"name":'你好',"age":'131',education:3,sex:'F'}}
"
);

 %>
%>


取消按钮从formget.jsp中获取这个字符串信息,来填充表单
 buttons : [
 ...
...

 ...
{
...
{
 text : '取消',

 handler : function() ...{


 simpleForm.form.load( ...{
 url : 'formget.jsp',
 method : 'get',
 params : ''

 });
});

 }
}

当然也可以在开始时,就调用来导入数据
4. Grid
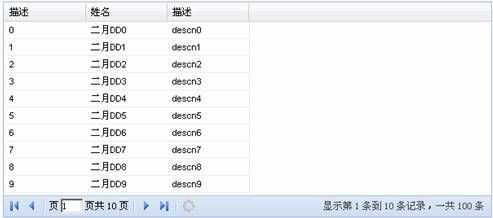
Grid所需要的json字符串
{totalProperty:100,root:[{id:1,name:'二月DD1',descn:'descn1'},{id:2,name:'二月DD2',descn:'descn2'},{id:3,name:'二月DD3',descn:'descn3'},{id:4,name:'二月DD4',descn:'descn4'},{id:5,name:'二月DD5',descn:'descn5'},{id:6,name:'二月DD6',descn:'descn6'},{id:7,name:'二月DD7',descn:'descn7'},{id:8,name:'二月DD8',descn:'descn8'},{id:9,name:'二月DD9',descn:'descn9'},{id:10,name:'二月DD10',descn:'descn10'}]}
Grid.jsp 根据起始值和限制数量决定返回json字符串
 <%
@ page language
=
"
java
"
contentType
=
"
text/html; charset=UTF-8
"
 pageEncoding
=
"
UTF-8
"
%>
 <%
<%
 //
response.setCharacterEncoding("UTF-8");
 String start
=
request.getParameter(
"
start
"
);
 String limit
=
request.getParameter(
"
limit
"
);

 try
...
{
 int index = Integer.parseInt(start);
 int pageSize = Integer.parseInt(limit);

 //String json = "{totalProperty:100,root:[";
 String json = "{totalProperty:100,root:[";

 for (int i = index; i < pageSize + index; i++) ...{
 json += "{id:" + i + ",name:'二月DD" + i + "',descn:'descn" + i + "'}";

 if (i != pageSize + index - 1) ...{
 json += ",";
 }
}
 }
}
 json += "]}";
 response.getWriter().write(json);
 //out.print(json);

 }
catch
(Exception ex)
...
{
 }
}
 %>
%>

获取数据时,如此访问grid.jsp文件
grid.jsp?start=1&limit=10
Grid使用
Grid中字段定制
 var
cm
=
new
Ext.grid.ColumnModel([

 ...
{header:'描述',dataIndex:'id'}
,

 ...
{header:'姓名',width:100, sortable:true,dataIndex:'name'}
,

 ...
{header:'描述',dataIndex:'descn'}
 ]);
]);

Header 显示名称
dataIndex 从ds查找字段
width 字段宽度
sortable 是否允许排序
Grid中使用数据源的定义,从grid.jsp中获取数据

 var
ds
=
new
Ext.data.Store(
...
{

 proxy: new Ext.data.HttpProxy(...{url:'grid.jsp'}),

 reader: new Ext.data.JsonReader(...{
 totalProperty: 'totalProperty',
 root: 'root'
 }, [
}, [

 ...{name: 'id'},

 ...{name: 'name'},

 ...{name: 'descn'}
 ])
])

 }
);
}
);

定义GridPanel创建Grid

 var
grid
=
new
Ext.grid.GridPanel(
...
{
 el: 'grid',
 width:600,
 ds: ds,
 cm: cm,


 bbar: new Ext.PagingToolbar(...{
 pageSize: 10,
 store: ds,
 displayInfo: true,
 displayMsg: '显示第 {0} 条到 {1} 条记录,一共 {2} 条',
 emptyMsg: "你好"
 })
})

 }
);
}
);

 grid.render();

el为grid.html中id为grid的div块
ds 数据源
cm grid显示列定义
bbar bottom toolbal下面的工具栏
这里使用分页控件
最后ds导入时候,使用参数进行过滤
ds.load({params:{start:0,limit:10}});
扩展一下,将上面的Form放入到grid中来
在Grid上添加一个工具栏,通过单击工具栏中Add Something按钮,弹出上面的Form信息
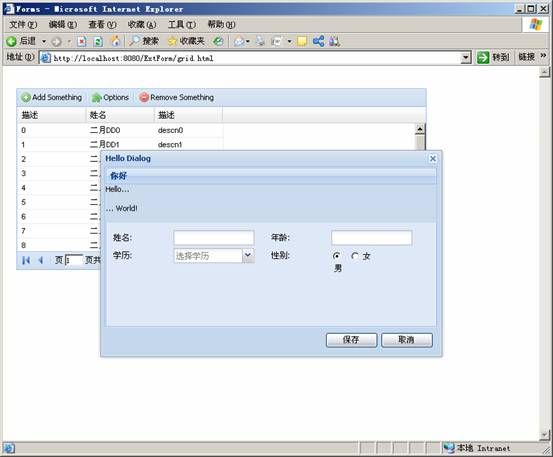
修改如下:

 var
grid
=
new
Ext.grid.GridPanel(
...
{
 el: 'grid',
 width:600,
 ds: ds,
 cm: cm,

 tbar:[...{
 text:'Add Something',
 tooltip:'Add a new row',
 iconCls:'add',
 handler : onItemClick

 }, '-', ...{
 text:'Options',
 tooltip:'Blah blah blah blaht',
 iconCls:'option'

 },'-',...{
 text:'Remove Something',
 tooltip:'Remove the selected item',
 iconCls:'remove'
 }],
}],

 bbar: new Ext.PagingToolbar(...{
 pageSize: 10,
 store: ds,
 displayInfo: true,
 displayMsg: '显示第 {0} 条到 {1} 条记录,一共 {2} 条',
 emptyMsg: "你好"
 })
})

 }
);
}
);

在GridPanel添加在Grid上的Toolbar,Toolbar上添加三个按钮,并为Add Something添加单击事件onItemClick。
单击事件
 var
win;

 function
onItemClick(item)
...
{
 //alert(item.text);


 if (!win) ...{


 var ds = new Ext.data.Store(...{

 proxy: new Ext.data.HttpProxy(...{url:'combo.jsp'}),

 reader: new Ext.data.JsonReader(...{
 totalProperty: 'totalProperty',
 root: 'root'
 }, [
}, [

 ...{name: 'retrunValue', type: 'int'},

 ...{name: 'displayText'}
 ])
])
 });
});


 var simpleForm = new Ext.FormPanel( ...{
 el : 'hello-tabs',
 labelAlign : 'left',
 title : '你好',
 buttonAlign : 'right',
 bodyStyle : 'padding:5px',
 width : 600,
 frame : true,
 labelWidth : 80,

 items : [...{
 xtype : "textfield",
 fieldLabel : "Text",
 name : "textvalue"
 }],
}],

 items : [...{
 layout : 'column',
 border : false,
 labelSeparator : ':',

 items : [ ...{
 columnWidth : .5,
 layout : 'form',
 border : false,

 items : [...{
 xtype : 'textfield',
 fieldLabel : '姓名',
 name : 'name',
 anchor : '90%'
 }]
}]

 }, ...{
 columnWidth : .5,
 layout : 'form',
 border : false,

 items : [...{
 xtype : 'textfield',
 fieldLabel : '年龄',
 name : 'age',
 anchor : '90%'
 }]
}]

 }, ...{
 columnWidth : .5,
 layout : 'form',
 border : false,

 items : [...{
 xtype : 'combo',
 store : ds,
 valueField : "retrunValue",
 displayField : "displayText",
 mode : 'local',
 forceSelection : true,
 blankText : '请选择学历',
 emptyText : '选择学历',
 hiddenName : 'education',
 editable : false,
 triggerAction : 'all',
 allowBlank : false,
 fieldLabel : '学历',
 name : 'education',
 anchor : '90%'
 }]
}]
 },
},


 ...{
...{

 columnWidth : .25,
 layout : 'form',
 border : false,

 items : [...{
 style : 'margin-top:5px',
 xtype : 'radio',
 fieldLabel : '性别',
 boxLabel : '男',
 name : 'sex',
 checked : true,
 inputValue : 'M',
 anchor : '95%'
 }]
}]

 }, ...{
 columnWidth : .25,
 layout : 'form',
 labelWidth : 0,
 labelSeparator : '',
 hideLabels : true,
 border : false,

 items : [...{
 style : 'margin-top:5px',
 xtype : 'radio',
 fieldLabel : '',
 boxLabel : '女',
 name : 'sex',
 inputValue : 'F',
 anchor : '95%'
 }]
}]
 }
}

 ]
]
 }]
}]
 });
});


 win = new Ext.Window( ...{
 el : 'hello-win',
 layout : 'fit',
 width : 500,
 height : 300,
 closeAction : 'hide',
 plain : true,

 items :
 simpleForm,


 buttons : [ ...{
 text : '保存',

 handler : function() ...{

 if (simpleForm.form.isValid()) ...{
 this.disabled = true;

 simpleForm.form.doAction('submit', ...{
 url : 'test.jsp',
 method : 'post',
 params : '',

 success : function(form, action) ...{
 Ext.Msg.alert('成功', action.result.data);
 this.disabled = false;
 //document.location.href = 'hello.html';
 },
},

 failure : function() ...{
 Ext.Msg.alert('失败', '抱歉');
 this.disabled = false;
 }
}
 });
});
 }
}
 }
}

 }, ...{
 text : '取消',

 handler : function() ...{


 simpleForm.form.load( ...{
 url : 'formget.jsp',
 method : 'get',
 params : ''

 });
});

 }
}
 }]
}]

 });
});


 ds.load();
 }
}
 win.show(this);
 }
}

唯一需要注意的是保存和取消按钮需要加入Ext.Window做控制,并且要注意FormPanel和Ext.Windows所要渲染的div块,并且这些块必须在grid.html中进行定义
 <
div id
=
"
hello-win
"
class
=
"
x-hidden
"
>
 <
div class
=
"
x-window-header
"
>
Hello Dialog
</
div
>
<
div class
=
"
x-window-header
"
>
Hello Dialog
</
div
>
 <
div id
=
"
hello-tabs
"
>
 <!--
Auto create tab
1
-->
 <
div class
=
"
x-tab
"
title
=
"
Hello World 1
"
>
 <
p
>
Hello...
</
p
>
<
p
>
Hello...
</
p
>
 </
div
>
 <!--
Auto create tab
2
-->
 <
div class
=
"
x-tab
"
title
=
"
Hello World 2
"
>
 <
p
>
... World
!</
p
>
 </
div
>
 </
div
>
 </
div
>

5. Tree
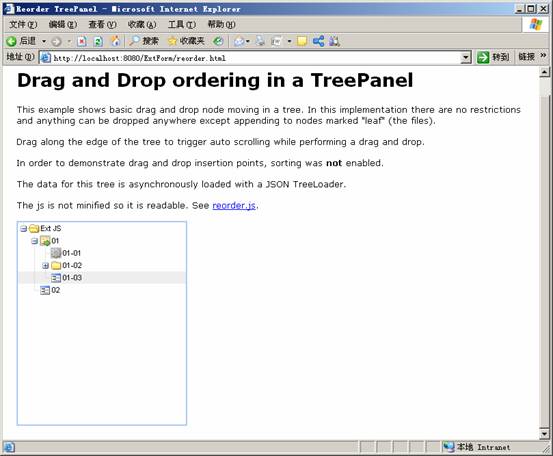
直接使用Ext例子
Tree所需要的json字符串
[{id:300,text:'01',cls:'task-folder',children:[{id:'2',text:'01-01',leaf:true, cls:'task'},{id:'3',text:'01-02',children:[{id:'4',text:'01-02-01',leaf:true},{id:'5',text:'01-02-02',leaf:true}]},{id:'6',text:'01-03',leaf:true}]},{id:'7',text:'02',leaf:true}]
text"-->显示的文本
"id"-->id值 ,单击事件时可以使用
"leaf"-->Boolean值,如果"叶子"是真的话,则不能包含子节点Children nodes
"cls"-->选用的样式,通常在这里选定图标
"href"-->指定的url,还有一个"hrefTarget"的属性
children -〉表示子节点信息
在Record.css中自定了两个定义的css,task和task-folder
.task .x-tree-node-icon {
background-image:url(icons/cog.png) ;
}
.task-folder .x-tree-node-icon{
background-image:url(icons/folder_go.png) !important;
}
Json字符串中就使用了这个值
Tree使用如下,相对比较简单
 var
Tree
=
Ext.tree;


 var
tree
=
new
Tree.TreePanel(
...
{
 el:'tree-div',
 autoScroll:true,
 animate:true,
 enableDD:true,
 containerScroll: true,

 loader: new Tree.TreeLoader(...{
 dataUrl:'record.jsp'
 })
})
 }
);
}
);

 //
set the root node

 var
root
=
new
Tree.AsyncTreeNode(
...
{
 text: 'Ext JS',
 draggable:false,
 id:'source'
 }
);
}
);
 tree.setRootNode(root);

 //
render the tree
 tree.render();
 root.expand();

6. Layout
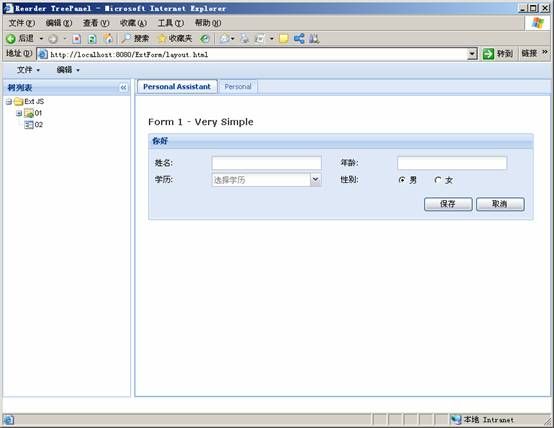
左边为树型控件,右边为TabPanel,显示的页面
当左边树型控件被点击后,右边的所有的Tab进行变化,访问与树型列表id相对应的页面内容
l 布局使用
布局一般使用Viewport
var viewport = new Ext.Viewport({
只要注意region和el即可
region:'north',
el:'north-div',
el和contentEl的区别
el是第一层div, contentEl一般指向更内部的div
l Tab使用
普通的Tab访问未有无法显示js的问题
{
title: 'Ajax Tab 1',
autoLoad:{url:'grid.html',scripts:true}
}
所以就使用了Ext论坛中提供的一个Iframe的扩展 Ext.ux.ManagedIFrame
使用时将miframe.js文件导入即可

 var
tabs2
=
new
Ext.TabPanel(
...
{
 // renderTo: document.body,
 region : 'center',
 el : 'center-center', // 大的
 //contentEl : 'center-center', // 小的
 activeTab : 0,
 width : 600,
 height : 250,
 plain : true,

 defaults : ...{
 autoScroll : true
 },
},
 items : [


 ...{
...{
 xtype : "panel",
 title : "Personal Assistant",

 body : new Ext.ux.ManagedIFrame( ...{

 autoCreate : ...{
 id:'person', // 设置访问的名称
 src : 'dynamic.html',
 frameBorder : 0,
 cls : 'x-panel-body',
 width : '100%',
 height : '100%'
 }
}
 })
})
 },
},

 ...{
...{
 xtype : "panel",
 title : "Personal",

 body : new Ext.ux.ManagedIFrame( ...{

 autoCreate : ...{
 id:'person2', // 设置访问的名称
 src : 'grid.html',
 frameBorder : 0,
 cls : 'x-panel-body',
 width : '100%',
 height : '100%'
 }
}
 })
})
 }
}
 ]
]
 }
);
}
);

l 树型控件
要给树型控件添加单击事件

 tree.on(
'
click
'
,
function
(node)
...
{
 // do something
 alert(node.id + ' was activated.');
 Ext.get('person').dom.src = 'grid.html?selectedid='+node.id;
 }
);
}
);

单击后,通过查找ManagedIFrame形成的Tab页的id,并且将其属性src改变来达到Tab页内容改变的效果
 Ext.get(
'
person
'
).dom.src
=
'
grid.html?selectedid=
'
+
node.id;
参考:
Ext2_0 form使用实例 - 天晓得的专栏 - CSDNBlog
Ext 2_0布局实例
[2_0][SOLVED] Best practices for getting - saving form data - Ext JS Forums
[EXT Develop Log]--comboBoxradioFix it! - kkbear - JavaEye技术网站
ext学习-tree组件-在线阅读-新书城
对《Ext2_0 form使用实例》的一点补充 - 天晓得的专栏 - CSDNBlog
用Ext 2_0 combobox 做的省份和城市联动选择框 - 天晓得的专栏 - CSDNBlog
关于ext和struts的交互 - Allen_CD_China - JavaEye技术网站
从Java 类产生json(json-lib) - windfree - BlogJava
学习EXT第XX天
流氓临远, 没人性土豆's ext tutorial
And Others, I can't remember


