Spring Boot学习笔记23——缓存管理
缓存是分布式系统的重要组件,主要解决数据库数据的高并发访问问题,对于用户访问量大的网站,缓存对于提高服务器访问性能,减少数据库压力和提高用户体验十分重要。spring boot对缓存提供了很好的支持,下面我们将对spring boot的缓存进行介绍和对spring boot与redis缓存中间件进心整合
1. Spring Boot默认缓存管理
spring框架支持透明的向应用程序添加缓存并对缓存进行管理,其管理缓存的核心是将缓存应用于操作数据据的方法中,从而减少操作数据的次数,同时不对程序本身造成干扰。spring boot继承了spring的缓存管理功能,通过
@EnableCaching注解开启基于注解的缓存支持,springboot可以启动缓存管理的自动化配置。下面我们对springboot支持的默认缓存管理进行讨论
1.1 继承环境搭建
- 准备数据
直接使用前面用到的springbootdata数据库,里面有两个表格t_article和t_comment,然后我们预先插入几条测试数据 - 创建项目
 编写实体类domain.Comment,对应t_comment,并使用JPA注解配置映射关系
@Entity(name="t_comment")//设置ORM实体类,并指定映射表名
public class Comment {

    @Id//表明映射对应的主键id
    @GeneratedValue(strategy = GenerationType.IDENTITY)//设置主键自增策略
    private Integer id;
    private String content;
    private String author;
    @Column(name = "a_id")//指定映射的表字段名
    private Integer aId;

    //省略get-set和toString方法

}
编写数据库操作的repository.Repository接口文件,用于操作Comment实体
public interface Repository extends JpaRepository<Comment,Integer> {


    @Transactional
    @Modifying
    @Query("UPDATE t_comment c SET c.author= ?1 WHERE c.id = ?2")
    public int updateComment(String author,Integer id);//根据评论id修改评论作者author
}
编写业务操作类service.CommentService,包括查询,更新和删除功能
@Service
public class CommentService {

    @Autowired
    private CommentRepository commentRepository;
    public Comment findById(int comment_id){

        Optional<Comment> optional = commentRepository.findById(comment_id);
        if(optional.isPresent()){

            return optional.get();
        }
        return null;
    }

    public Comment updateComment(Comment comment){

        commentRepository.updateComment(comment.getAuthor(),comment.getaId());
        return comment;
    }

    public void deleteComment(int comment_id){

        commentRepository.deleteById(comment_id);
    }
}
编写web访问层controller.CommentController
@RestController
public class CommentController {

    @Autowired
    private CommentService commentService;
    @GetMapping("/get/{id}")
    public Comment findById(@PathVariable("id") int comment_id){

        Comment comment = commentService.findById(comment_id);
        return comment;
    }
    @GetMapping("update/{id}/{author}")
    public Comment updateComment(@PathVariable("id")int comment_id,
                             @PathVariable("author")String author){

        Comment comment = commentService.findById(comment_id);
        comment.setAuthor(author);
        Comment updateComment = commentService.updateComment(comment);
        return updateComment;
    }
    @GetMapping("/delete/{id}")
    public void deleteComment(@PathVariable("id")int comment_id){

        commentService.deleteComment(comment_id);
    }
}
- 编写配置文件application.properties
# mysql数据库连接配置
spring.datasource.url=jdbc:mysql://localhost:3306/springbootdata?serverTimezone=UTC
spring.datasource.username=
spring.datasource.password=

# 显示使用JPA进行数据库查询的sql语句
spring.jpa.show-sql=true
- 项目测试
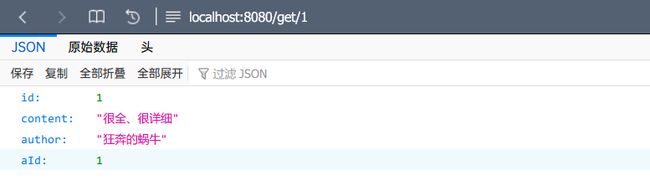
启动项目并访问http://localhost:8080/get/1,会返回一条数据,同时可以发现控制台也会输出一条sql语句,如果多刷新几次页面,控制台的sql语句也会相应增加

之所以会出现这种情况,是因为没有开启缓存,这样数据表中的数据虽没有变化,但每执行一次查询操作(本质是执行sql语句),都会访问一次数据库,随着时间和访问量的增加,数据规模会越来越大,这样会影响用户体验,为此我们要使用缓存来解决问题
1.2 spring boot默认缓存体验
- 在项目启动类上使用
@EnableCaching注解开启缓存支持
@EnableCaching   //开启缓存支持
@SpringBootApplication
public class CacheApplication {

    public static void main(String[] args) {

        SpringApplication.run(CacheApplication.class, args);
    }
}
2.在Service类的查询方法上使用@Cacheable注解对数据操作方法进行缓存管理
@Cacheable(cacheNames = "comment")
    public Comment findById(int comment_id){

        Optional<Comment> optional = commentRepository.findById(comment_id);
        if(optional.isPresent()){

            return optional.get();
        }
        return null;
    }
该@Cacheable注解的作用是将查询结果Comment存放在spring boot默认缓存中名称为comment的名称空间(namespace)中,对应缓存的唯一标识(即缓存数据对应的主键key)默认为方法参数comment_id的值
3. 效果测试(略)
测试中我们可以发现,多次刷新页面,控制台也只是显示同一条sql语句,说明执行查询操作时,只执行了一次sql语句,缓存开启成功
2. Spring Boot缓存注解介绍
上一小节介绍了@EnableCaching和@Cacheable实现了spring boot基于注解的缓存管理,下面我们进一步讨论关于缓存管理的其他注解
@EnableCaching
该注解一般配置在启动类上,用于开启基于注解的缓存支持@Cacheable
可以作用于类或方法(一般为查询方法),用于对方法的查询结果进行缓存存储。@Cacheable的执行顺序时,先进行缓存查询,如果为空则进行方法查询,并将结果缓存;如果缓存中有数据,则不进行方法查询,直接使用缓存数据
@Cacheabl提供了多个属性,用于对缓存存储进行相关配置,具体说明如下
| 属性名 | 说明 |
|---|---|
| value/cacheNames | 指定缓存空间的名称,必配属性。这两个属性二选一使用 |
| key | 指定缓存数据的key,默认使用方法参数值,可以使用SpEL表达式 |
| keyGenerator | 指定缓存数据的key生成器,于key属性二选一 |
| cacheManager | 指定缓存管理器 |
| cacheResolver | 指定缓存解析器,与cacheManager属性二选一 |
| condition | 指定在符合某条件下,进行数据缓存 |
| unless | 指定在符合某条件下,不进行数据缓存 |
| sync | 指定是否使用异步缓存,默认false |
- value/cacheNames:可以同时指定多个名称空间(如
@Cacheable(cacheNames = {"c1","c2"}))。如果@Cacheable只配置value(或cacheNames)的一个属性,那这两个属性名可以省略,如@Cacheable("c1")指定了缓存的名称空间为c1 - key:缓存数据的本质时map类型数据,key用于指定唯一的标识,用于指定缓存的数据
如果缓存数据时,没有指定key属性,springboot默认提供的配置类SimpleKeyGenerator会通过generateKey(Object...params)方法参数生成key值。默认下,generateKey()只有一个参数,参数值就是key属性的值,如果generateKey()没有参数,那key属性是一个空参的SimpleKey[]对象,如果有多个参数,那key属性是一个带参的SimpleKey[p1,[p2…]]对象
除了使用默认key属性值外,还可以手动指定key属性值,或使用spring提供的SqEL表达式
| 名称 | 位置 | 描述 | 示例 |
|---|---|---|---|
| methodName | root对象 | 当前被调用的方法名 | #root.methodName |
| method | root对象 | 当前被调用的方法 | #root.method.name |
| target | root对象 | 当前被调用的目标对象示例 | #root.target |
| targetClass | root对象 | 当前被调用的目标对象的类 | #root.targetClass |
| args | root对象 | 当前被调用的方法的参数列表 | #root.args [0] |
| caches | root对象 | 当前被调用的方法的缓存列表 | #root.caches [0].name |
| ArgumentName | 执行上下文 | 当前被调用的方法参数,可以用#参数名或者#a0、#p0的形式标识(0标识参数索引,从0开始) | #comment_id、#a0、#p0 |
| result | 执行上下文 | 当前方法执行后的返回结果 | #result |
- keyGenerator:指定key值生成器规则,由其中指定的生成器生成具体的key。使用时,keyGenerator属性和key属性要二选一
- cacheManager/cacheResolver:默认下无需配置,如果存在多个缓存管理器(如redis、ehcache等),可以使用这两个属性分别指定
- condition:只有指定条件为true才会对查询结果进行缓存,可以值用SqEL表达式指定属性值,如
@Cacheable(cacheNames="comment",condition="#comment_id>10")表示方法参数comment_id的值大于10才会对结果进行缓存 - unless:只有指定条件为true,方法返回值不会进行缓存,以值用SqEL表达式指定属性值,如
@Cacheable(cacheNames="comment",unless="#result==null")表示只有查询结果不为空才会对结果进行缓存 - sync:见上
@CachePut注解:可以作用于类或方法(一般为数据更新方法上),作用是更新缓存数据。执行顺序:先进行方法调用,然后将方法结果更新到缓存。@CachePut也有多个属性,这些属性和Cacheable注解的属性完全相同@CacheEvict注解:可以作用于类或方法(一般为数据删除方法上),作用是删除缓存数据。执行顺序:先进行方法调用,然后清除缓存。@CacheEvict也有多个属性,这些属性和Cacheable注解的属性基本相同,需额外注意另外两个特殊属性allEntries和beforeInvocation,说明如下
- allEntries:表示是否清楚指定缓存空间中所有缓存数据,默认false(即默认只删除指定key对应的缓存数据),如
@CacheEvict(cacheNames = "comment",allEntries = true)表示删除缓存空间comment中所有数据 - beforeInvocation:表示是否在方法执行前进行缓存清除,默认false(即默认在方法执行后再进行缓存清楚),
@CacheEvict(cacheNames = "comment",beforeInvocation= true)表示在方法执行前进行缓存清除;需要注意的是,该设置为true时有弊端,如再进行数据删除的方法中发生了异常,会导致实际数据没有被删除,但是缓存数据被提前删除了
@Caching注解:如果处理复杂规则的数据缓存可以使用@Caching注解,该注解作用于类或方法,@Caching注解包括cacheable、put、和evict三个属性,它们的作用等同于@Cacheable、@CachePut和@CacheEvict,示例代码如下:
@Caching(cacheable={
     @Cacheable(cacheNames="comment",key="#id")},put={
     @CachePut(cacheNames="comment",key="#result.author")})
public Comment getComment(int comment_id){

	return commentRepository.findById(comment_id).get();
}
@Caching作用于根据id执行查询操作并将查询到的Comment对象进行缓存管理的getComment()上,在@Caching中使用了cacheable和put两个属性,并且这两个属性嵌套引入@Cacheable和@CachePut两个注解,在两个注解中分别使用#id和#result.author缓存key的值
CacheConfig注解:作用于类,作用是统筹管理类中所有使用@Cacheable、@CachePut和@CacheEvict注解标注的方法中的公共属性,这些公共属性包括cacheNames、keyGenerator、cacheManager和cacheResolver,示例代码如下:
@CacheConfig(cacheNames = "comment")
@Service
public class CommentService{

	@Autowired
	private CommentRepository commentRepository;
	@Cacheable
	public Comment findById(int comment_id){

		Comment comment = commentRepository.findById(comment_id).get();
		return comment;
	}
	...
}
上述代码中,使用
@CacheConfig在CommentService上标注并用cacheNames属性将缓存空间统一设置为comment,这样该类的所有方法上使用缓存注解时可以省略相应的cacheNames属性;需要注意的时如果在类上标注了@CacheConfig注解定义了某个属性(如cacheNames),同时又在该类方法中使用缓存注解定义了相同属性,那么该属性值就会使用“就近原则”,以方法上注解中的属性值为准
3. SpringBoot整合Redis缓存实现
3.1 spring boot支持的缓存组件
spring boot中,数据的管理存储依赖于spring框架中cache相关的org.springframework.cache.Cache和org.springframework.cache.CacheManager缓存管理器接口。如果程序中没有定义类型为cacheManager的Bean组件或是名为cacheResolver的cacheResolver缓存解析器,spring boot将尝试选择并启用一下缓存组件(按照指定的顺序加载)
Generic>JCache>EhCache>Hazelcast>Infinispan>Couchbase>Redis>Caffeine>Simple
添加某个缓存组件后,spring boot会选择并启动对应的缓存管理器。如果同时添加了多个缓存组件且没有指定缓存管理器或缓存解析器(cacheManager&cacheResolver),则优先启动指定的缓存组件并进行缓存管理。
在前面的默认缓存笔记中,我们没有添加任何缓存管理组件却能进行缓存管理,这是因为开启缓存管理后,spring boot将按照上面的顺序查找有效的缓存组件进行缓存管理,如果没有任何缓存组件,默认使用最后一个Simple;Simple时spring boot默认的缓存管理组件,默认使用内存中的ConcurrentHashMap进行缓存存储。
3.2 基于注解的Redis缓存实现
我们在前面笔记的默认缓存管理基础上引入redis缓存组件
- 添加redis依赖
<dependency>
       <groupId>org.springframework.bootgroupId>
       <artifactId>spring-boot-starter-data-redisartifactId>
dependency>
- redis服务连接配置
使用类似redis第三方缓存组件需要预先搭建类似redis服务的数据仓库进行缓存存储,而不是像默认缓存直接存储在内存中,所以需要安装并开启redis(这个大家自行学习,获取后面我继续发学习笔记),然后在配置文件中添加相关配置
# redis服务地址
spring.redis.host=127.0.0.1
# redis服务连接端口
spring.redis.port=6379
# redis服务器连接密码(默认为空)
spring.redis.password=
- 使用缓存注解定制缓存管理
@Service
public class CommentService {

    @Autowired
    private CommentRepository commentRepository;
    @Cacheable(cacheNames = "comment",unless = "#result==null")
    public Comment findById(int comment_id){

        Optional<Comment> optional = commentRepository.findById(comment_id);
        if(optional.isPresent()){

            return optional.get();
        }
        return null;
    }
    @CachePut(cacheNames = "comment",key = "#result.id")
    public Comment updateComment(Comment comment){

        commentRepository.updateComment(comment.getAuthor(),comment.getaId());
        return comment;
    }
    @CacheEvict(cacheNames = "comment")
    public void deleteComment(int comment_id){

        commentRepository.deleteById(comment_id);
    }
}
- 缓存测试
启动项目,访问http://localhost:8080/get/1(记得开启redis服务),发现浏览器数据相应错误,通知台报异常
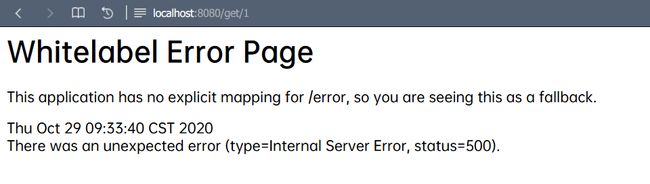
 可以看到执行了sql语句,但是出现非法参数异常,提示信息要求对应Comment实体类必须实现序列化
-
缓存对象序列化
我们对进行缓存的Comment进行改进,实现JDK自带的序列化接口Serializable

-
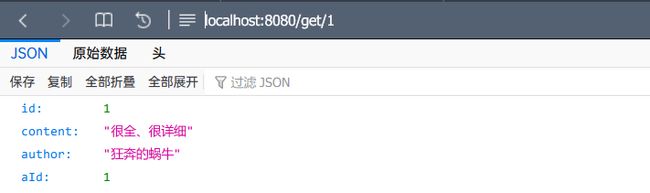
真·缓存测试
再次访问http://localhost:8080/get/1,并重复刷新。分别查看浏览器返回结果,控制台和redis管理器


-
缓存更新测试


-
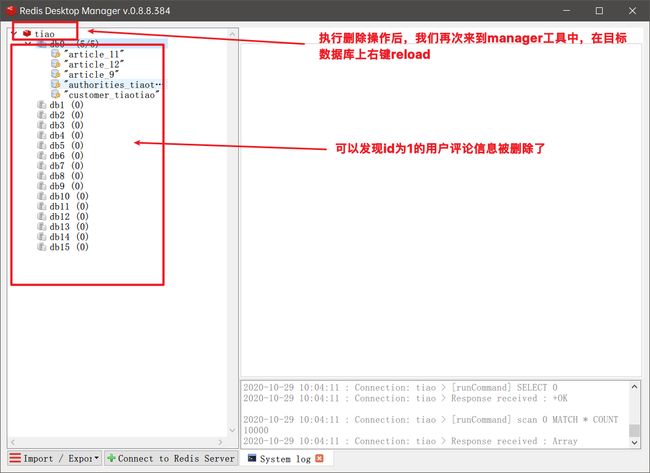
缓存删除测试

我们 剋在配置文件中添加属性统一配置redis数据的有效期(单位为毫秒),但这种方法不够灵活,并且对下面要讨论的基于API的redis缓存实现没有效果
# 对基于注解的redis缓存数据统一设置有效期为1min,单位毫秒
spring.cache.redis.time-to-live=60000
3.3 基于API的redis缓存实现
spring boot除了基于注解形式实现redis缓存外,还有基于API的redis缓存实现,下面就来实现一下吧
- 使用Redis API进行业务数据缓存管理,编写service.ApiCommentService
@Service
public class ApiCommentService {

    @Autowired
    private CommentRepository commentRepository;
    @Autowired
    private RedisTemplate redisTemplate;
    public Comment findBuId(int comment_id){

        //先从redis缓存中查询数据,注意本部分特意把前缀设置为comment_,加以区分
        Object object = redisTemplate.opsForValue().get("comment_"+comment_id);
        if(object != null){

            return (Comment) object;
        }else {

            //缓存中没有,就进入数据库查看
            Optional<Comment> optional = commentRepository.findById(comment_id);
            if(optional.isPresent()){

                Comment comment = optional.get();
                //将查询结果缓存,设置有效期1天
                redisTemplate.opsForValue().set("comment_"+comment_id,comment, 1,TimeUnit.DAYS);
                return comment;
            }else {

                return null;
            }
        }
    }

    public Comment updateComment(Comment comment){

        commentRepository.updateComment(comment.getAuthor(),comment.getaId());
        //更新数据并缓存
        redisTemplate.opsForValue().set("comment_"+comment.getId(),comment);
        return comment;
    }

    public void deleteComment(int comment_id){

        commentRepository.deleteById(comment_id);
        //删除数据后进行缓存删除
        redisTemplate.delete("comment_"+comment_id);
    }
}
RedisTemplate有如下特点
- 可以直接进行redis操作的JavaAPI,可以直接注入使用
- 可以操作
- 提供了多种进行数据缓存操作的方法,可以进行数据缓存的查询、更新、修改、删除以及设置有效期
- 上述代码中,设置缓存数据时,将缓存有效期设置为1填(倒数第一个参数还可以设置其他时间单位,如天、小时、分钟、秒等);当然,也可以先设置有效期再设置缓存数据,如下
redisTemplate.opsValue().set("comment_"+comment_id,comment);
redisTemplate.expire("comment_)"+comment_id,90,TimeUnit,SECONDS);
- 编写controller.ApiCpmmentController
@RestController
@RequestMapping("/api")//窄化请求路径
public class ApiCpmmentController {

    @Autowired
    private ApiCommentService apiCommentService;
    @GetMapping("/get/{id}")
    public Comment findById(@PathVariable("id")int comment_id){

        Comment comment = apiCommentService.findById(comment_id);
        return comment;
    }
    @GetMapping("/update/{id}/{author}")
    public Comment updateComment(@PathVariable("id") int comment_id,
                                 @PathVariable("author") String author){

        Comment comment = apiCommentService.findById(comment_id);
        comment.setAuthor(author);
        Comment updateComment = apiCommentService.updateComment(comment);
        return comment;
    }
    @GetMapping("/delete/{id}")
    public void deleteComment(@PathVariable("id") int comment_id){

        apiCommentService.deleteComment(comment_id);
    }
}
-
设置相关配置
基于PAI的redis缓存不需要@EnableCaching来开启缓存支持,所以把之前加的@EnableCaching去掉(当然,不删也没啥关系);然后我们还需要引入redis依赖,并在配置文件中配置redis服务连接,勇士为进行数据存储的Comment实体类实现序列化接口,这些我们在基于注解的redis实现已经做了,那就当我说废话吧 -
效果测试(略)
这里的效果和基于注解的redis缓存实现一毛一样,大家自己康康
相对于基于注解的方式,基于PAI的方式会更灵活,如手机验证码进行验证时,可以在缓存中设置验证的等待时间,但是代码量可能会更多
4. 自定义Reids缓存序列化机制
在上面的缓存管理中的实体类数据使用的时JDK序列化机制,这样很不便于可视化管理工具的查看和管理,接下来我们就来看看分别基于注解和PAI的数据序列化机制进行讨论,并自定义JSON格式的数据序列化机制进行数据缓存管理
4.1 自定义RedisTemplate
下面我们针对基于注解的Redis缓存机制和自定义序列化方式的实现进行讨论
- Redis API默认序列化机制
基于API的redis缓存时使用RedisTemplate模板进行数据缓存的,我们打开RedisTemplate类查看源码
public class RedisTemplate<K, V> extends RedisAccessor implements RedisOperations<K, V>, BeanClassLoaderAware {


	...
	//声明了key、value的各种序列化方式,初始值=null
	@SuppressWarnings("rawtypes") private @Nullable RedisSerializer keySerializer = null;
	@SuppressWarnings("rawtypes") private @Nullable RedisSerializer valueSerializer = null;
	@SuppressWarnings("rawtypes") private @Nullable RedisSerializer hashKeySerializer = null;
	@SuppressWarnings("rawtypes") private @Nullable RedisSerializer hashValueSerializer = null;

	...

	public RedisTemplate() {
     }
	@Override
	public void afterPropertiesSet() {
     //进行默认序列化方式设置,设置为JDK序列化方式
		super.afterPropertiesSet();
		boolean defaultUsed = false;
		if (defaultSerializer == null) {
     //如果defaultSerializer为null,则数据序列化方式为JDK
			defaultSerializer = new JdkSerializationRedisSerializer(
					classLoader != null ? classLoader : this.getClass().getClassLoader());
		}

		...
由此我们可以知道
- 使用RedisTemplate对redis数据进行缓存时,内部使用
JdkSerializationRedisSerializer系列化方式要求被序列化的实体类继承Serializer接口 - 使用RedisTemplate时,如果没有特殊设置,key和value都是使用
defaultSerializer = new JdkSerializationRedisSerializer()进行序列化的 - 在RedisTemplate源码中,看到的key和value的各种序列化类型都是RedisSerializer,进入RedisSerializer源码查看RedisSerializer支持的序列化方式(进入类后,按ctrl+alt+左键单击类名)

可以看到RedisSerializer是一个Reids序列化接口,默认有6个类,代表6种不同的序列化方式,默认是JdkSerializtionRedisSerializer(JDK自带),也是ReidsTemplate内部默认的序列化方式,我们可以根据需求选择其他支持的序列化方式,如JSON
- 自定义API默认序列化机制
我们引入Redis依赖后,spring boot的RedisAutoConfiguration自动配置生效,我们进入RedisAutoConfiguration类查看有关ReidsTemplate的定义部分
...

public class RedisAutoConfiguration {

	@Bean
	@ConditionalOnMissingBean(name = "redisTemplate")//当某个类不存在时生效
	//(接上)如果我们自己开发一个名为redisTemplate的Bean则RedisTemplate会使用这个自定义的Bean
	public RedisTemplate<Object, Object> redisTemplate(RedisConnectionFactory redisConnectionFactory)
			throws UnknownHostException {

		RedisTemplate<Object, Object> template = new RedisTemplate<>();
		template.setConnectionFactory(redisConnectionFactory);
		return template;
	}
...
接下来我们创建一个redis自定义配置类config.RedisConfig
@Configuration//定义一个配置类
public class RedisConfig {

    @Bean
    public RedisTemplate<Object,Object> redisTemplate(RedisConnectionFactory redisConnectionFactory){

        RedisTemplate<Object,Object> template = new RedisTemplate();
        template.setConnectionFactory(redisConnectionFactory);
        //使用JSON格式序列化对象,对缓存数据key和value进行转换
        Jackson2JsonRedisSerializer jacksonSeial = new Jackson2JsonRedisSerializer(Object.class);
        //解决查询缓存转换异常的问题
        ObjectMapper om = new ObjectMapper();
        om.setVisibility(PropertyAccessor.ALL, JsonAutoDetect.Visibility.ANY);
        //om.enableDefaultTyping(ObjectMapper.DefaultTyping.NON_FINAL);
        jacksonSeial.setObjectMapper(om);
        //设置RedisTemplate模板PAI的序列化方式为JSON
        template.setDefaultSerializer(jacksonSeial);
        return template;
    }
}
- 效果测试(略)
启动项目,访问localhost:8080/api/get/3,并刷新几次页面,可以看到页面结果,同时从控制台看到数据库只执行一次sql
4.2 自定义RedisCacheManager
- Redis注解默认序列化机制
打开RedisCacheConfiguration(org.springframework.boot.autoconfigure.cache)源码信息(部分)
class RedisCacheConfiguration {

	@Bean
	RedisCacheManager cacheManager(CacheProperties cacheProperties, CacheManagerCustomizers cacheManagerCustomizers,
			//通过redis连接工厂redisConnectionFactory定义了缓存管理器
			RedisConnectionFactory redisConnectionFactory, ResourceLoader resourceLoader) {

		RedisCacheManagerBuilder builder = RedisCacheManager.builder(redisConnectionFactory).cacheDefaults(
				determineConfiguration(cacheProperties, redisCacheConfiguration, resourceLoader.getClassLoader()));
		List<String> cacheNames = cacheProperties.getCacheNames();
		if (!cacheNames.isEmpty()) {

			builder.initialCacheNames(new LinkedHashSet<>(cacheNames));
		}

		...

	private org.springframework.data.redis.cache.RedisCacheConfiguration createConfiguration(
			CacheProperties cacheProperties, ClassLoader classLoader) {

		Redis redisProperties = cacheProperties.getRedis();
		org.springframework.data.redis.cache.RedisCacheConfiguration config = org.springframework.data.redis.cache.RedisCacheConfiguration
				.defaultCacheConfig();
		//使用默认的JdkSerializationRedisSerializer
		config = config.serializeValuesWith(
				SerializationPair.fromSerializer(new JdkSerializationRedisSerializer(classLoader)));

		...

		return config;
	}

}
我们要自定义的话,可以参考上面源码,创建一个名为cacheManager的Bean组件并设置相关序列化即可;在spring boot2.x中RedisCacheManager是单独构建的(1.x则是在RedisTemplate基础上构建),即对RedisTemplate进行自定义序列化机制构建后,既然无法对RedisTemplate内部默认序列化机制进行覆盖(这也是为什么基于注解的redis缓存依旧使用jdk默认序列化机制),因此我们需要自定义RedisCacheManager
- 自定义RedisCacheManager
在RedisConfig中创建cacheManager的Bean组件
@Bean
    public RedisCacheManager cacheManager(RedisConnectionFactory redisConnectionFactory){

        //分别创建String和JSON格式序列化对象,对缓存数据key和value进行转换
        RedisSerializer<String> strSerializer = new StringRedisSerializer();
        Jackson2JsonRedisSerializer jacksonSeial = new Jackson2JsonRedisSerializer(Object.class);
        //解决查询缓存转换异常问题
        ObjectMapper om = new ObjectMapper();
        om.setVisibility(PropertyAccessor.ALL,JsonAutoDetect.Visibility.ANY);
        om.enableDefaultTyping(ObjectMapper.DefaultTyping.NON_FINAL);
        jacksonSeial.setObjectMapper(om);
        //定制缓存数据序列化方式及时效,将缓存数据有效期设置为1天
        RedisCacheConfiguration config = RedisCacheConfiguration.defaultCacheConfig()
                .entryTtl(Duration.ofDays(1))
                .serializeKeysWith(RedisSerializationContext.SerializationPair.fromSerializer(strSerializer))
                .serializeValuesWith(RedisSerializationContext.SerializationPair.fromSerializer(jacksonSeial))
                .disableCachingNullValues();
        RedisCacheManager cacheManager = RedisCacheManager.builder(redisConnectionFactory)
                .cacheDefaults(config).build();

        return cacheManager;
    }
- 效果测试(和前面效果一致,略)
该SpringBoot学习笔记学习自黑马程序员出版的《Spring Boot企业级开发教程》,是对知识点的整理和自我认识的梳理,如有不当之处,欢迎指出