Unity 法线贴图、高光贴图、Cube Map shader
Unity 相关纹理贴图
写unity shader有些时候了,出于寂寞,拿出来晒晒吧!!!!
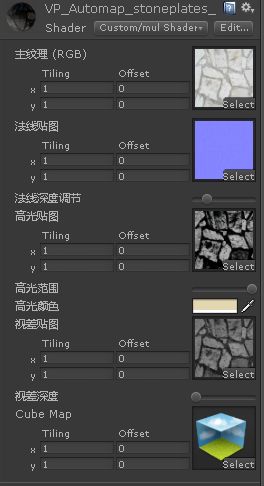
先看一下Unity 法线贴图、高光贴图、Cube Map shader最终效果:
说老实话,我不怎么喜欢看教程,我喜欢自己捉摸捉摸,要知道自己捉摸出来的东西那个高兴劲儿,恨不得全城人都跟我一起hi一把。这个多纹理shader写了有几个月了,当然还有其他一同出炉的shader。
- 什么是漫反射光照
先看一下Unity中Lighting.cginc文件,

哦,对!!这就是漫反射,不过我不喜欢这么就用在vert fragment shader中,而且unity他自己喜欢他的surface shader。 说白了漫反射的数学就是光线与法线的关系,
用用cos(光线,法线)来算出它在不同地方的强度当然根据量子力学,光线与物体表面做了能量交换,光这种电磁波频率受到影响,所以这个cos要乘以rgb,也可以理解为物体表面颜色强度变化。
法线贴图、高光贴图、Cube Map ##
我就不那么多说了,我以下只会贴出关键实现代码,因为其他博客都有过,我想我的博客因该基于它们做深层次实现,当然一切都是原创,不过还是要看理论的东西和一些语法,其他都好说。
法线贴图代码

先解算法线贴图的数值,用用UnpackNormal就行了,他其实就是把(0,1)的颜色值算到(-1,1)中,当然要注意法线是保存在AG通道中的,AG=法线的xy,z可以用勾股定理算出,当然可以用其他值来代替,比如我用法线深度值来代替,方便了美工的调节;最后在算到模型的切线空间做光照。高光贴图代码

这这这,就相当的简单了,当你看到高光贴图时,我是第一想到的算法是白色的地方就是光线可以反射的地方。于是就这么直接算算纹理和高光。CubeMap代码

这儿先对应他的颜色。。。

cubmap 就是反射周围的颜色,所以借助高光纹理的通道乘以cube颜色,就表示光泽的地方才反射。
cube/2 是降低反射颜色的亮度,不然我不喜欢这么亮,当然交给美工也可以哟!!!- 注意理论
按照量子理论的思想来说,多种光照的影响下它们在物体表面有各自的状态,所以这儿代码为:

所以在数学上的表示为各种光照相加。。。。。
一切代码原型
Shader "Custom/mul Shader" {
    Properties {
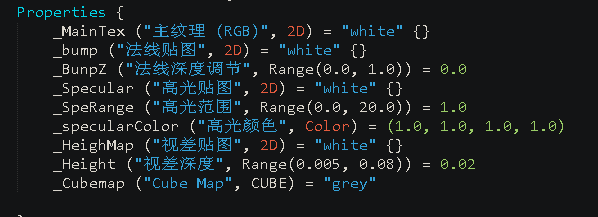
        _MainTex ("主纹理 (RGB)", 2D) = "white" {}
        _bump ("法线贴图", 2D) = "white" {}
        _BunpZ ("法线深度调节", Range(0.0, 1.0)) = 0.0
        _Specular ("高光贴图", 2D) = "white" {}
        _SpeRange ("高光范围", Range(0.0, 20.0)) = 1.0
        _specularColor ("高光颜色", Color) = (1.0, 1.0, 1.0, 1.0)
        _HeighMap ("视差贴图", 2D) = "white" {}
        _Height ("视差深度", Range(0.005, 0.08)) = 0.02
        _Cubemap ("Cube Map", CUBE) = "grey"

    }
    SubShader {
        Tags { "RenderType"="Opaque" "LightMode"="ForwardBase" "Queue"="Overlay"}
        LOD 200

        Pass{
            Zwrite Off
            CGPROGRAM
            #pragma target 3.0
            #pragma vertex vert
            #pragma fragment frag
            #include "UnityCG.cginc"

            sampler2D _MainTex;
            float4 _MainTex_ST;
            sampler2D _bump;
            fixed _BunpZ;
            sampler2D _Specular;
            half _SpeRange;
            fixed4 _specularColor;
            sampler2D _HeighMap;
            fixed _Height;
            samplerCUBE _Cubemap;
            fixed3 _LightColor0;

            struct vertIN{
                float4 vertex : POSITION;
                fixed2 tex : TEXCOORD0;
                fixed3 normal : NORMAL;
                fixed3 tangent : TANGENT;
            };

            struct vertOUT{
                float4 pos : SV_POSITION;
                half2 uv : TEXCOORD0;
                fixed3 nDir : NORMAL;
                fixed3 tDir : TANGENT;
                fixed3 bDir : BINORMAL;
                fixed3 LDir : TEXCOORD1;
                fixed3 rDir : TEXCOORD2;
                fixed3 vDir : TEXCOORD3;
                fixed3 reflectDir : TEXCOORD4;
                //float3 view : TEXCOORD4;
            };

            vertOUT vert(vertIN i){
                vertOUT o;
                o.pos = mul(UNITY_MATRIX_MVP,i.vertex);
                o.uv = TRANSFORM_TEX(i.tex,_MainTex);
                o.nDir = normalize(mul(float4(i.normal,0),_World2Object).xyz);
                o.tDir = normalize(mul(_Object2World,float4(i.tangent,0)).xyz);
                o.bDir = normalize(cross(o.nDir,o.tDir));
                o.LDir = normalize(_WorldSpaceLightPos0);
                o.rDir = normalize(reflect(-o.LDir,o.nDir));
                o.vDir = normalize(WorldSpaceViewDir(i.vertex));
                o.reflectDir = normalize(reflect(-o.vDir,o.nDir));

                //o.view = WorldSpaceViewDir(i.vertex);
                return o;
            }

            fixed4 frag(vertOUT ou):COLOR{
                //half h = tex2D(_HeighMap,ou.uv).w;
                //float2 offset = ParallaxOffset(h,_Height,ou.vDir);

                half2 uv = ou.uv; //+ offset;
                fixed4 c = tex2D(_MainTex,uv);
                fixed Diff = saturate(dot(ou.nDir,ou.LDir));

                fixed3 bump = UnpackNormal(tex2D(_bump,uv));
                    bump.z = _BunpZ;
                fixed3x3 TangentSpace = fixed3x3(
                    ou.tDir,
                    ou.bDir,
                    ou.nDir
                );
                fixed3 bumpDir = normalize(mul(TangentSpace,bump));
                fixed bumpDiff = max(0,dot(ou.LDir,bumpDir));

                fixed3 specular = tex2D(_Specular,uv);
                fixed specularDiff = bumpDiff*pow(dot(ou.rDir,ou.vDir),_SpeRange);

                fixed3 cube = texCUBE(_Cubemap,ou.reflectDir)/2;

                c.rgb *=(bumpDiff*_LightColor0 + specularDiff*specular*_specularColor + cube*specular.g);
                return c;
            }
            ENDCG
        }
    }
    //FallBack "Diffuse"
}
呵呵,一不小心贴出来罗,我觉得你能懂这些光照原理,在多的代码算什么。
换一种角度去思考,不然看http://www.shadertoy.com 的代码时,你就知道了。。。以后我会叙述我移植其中的一个代码。我觉得移植它们的神代码是件不道德事,因为我还不如自己写写学习。


