IOS开发学习笔记021-练习2
只是简单练习一下,主要是学习里面的思想,处理问题的方法。
不过还有一个问题没想到解决方法。
那就是动态生成的按钮如何绑定按钮事件,请哪位大神指点一下啊。(知道怎么办了,原来是方法addTarget)
segmentControll 控件和imageView 控件
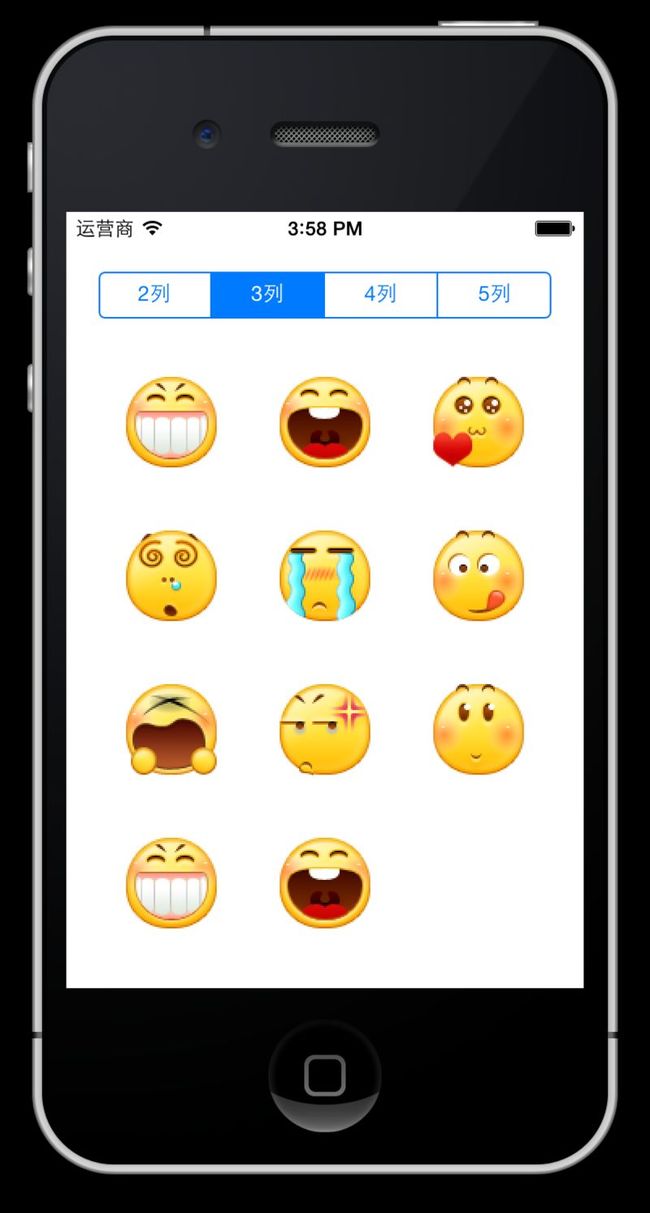
总体效果如下,点击3列,表情按照3列显示,点击4列表情按照4列显示。
界面也很简单,只有一个segmentedControll控件,表情是通过代码生成的,自动排序。
一、先将界面做好,将表情资源添加到工程里,具体方法可以看上一篇。
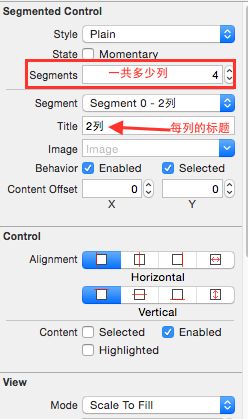
1、segmentControll 控件只需设置几个列显示就行,然后绑定事件
2、绑定valueChanged事件
1 - (IBAction)segmentValue:(UISegmentedControl *)sender; // 值改变后相应事件
2
3
4
5
6 - (IBAction)segmentValue:(UISegmentedControl *)sender // 值改变后相应事件
7 {
8 }
可以在方法中测试是否正常, 可以使用属性selectedSegmentIndex
1 - (IBAction)segmentValue:(UISegmentedControl *)sender
2 {
3     NSLog(@"%d",sender.selectedSegmentIndex); // 获取改变的值
4 }
二、加载表情资源到视图中
1、首先将加载表情资源的过程封装到一个 方法中。其中WIDTH_HIGHT是一个宏表示表情的宽度和高度
#define WIDTH_HIGHT 60
参数是表情的名称和位置。
1 - (void)addImageWithName:(NSString *)name x:(CGFloat)x y:(CGFloat)y
2 {
3     // 通过代码加载图片
4     UIImageView *ima = [[UIImageView alloc] init]; // 初始化图片对象
5     ima.image = [UIImage imageNamed:name]; // 获取名称
6     ima.frame = CGRectMake(x, y, WIDTH_HIGHT, WIDTH_HIGHT); // 设置位置和尺寸
7     [self.view addSubview:ima]; // 添加到view
8 }
2、其次才是添加事件,将过程封装到另一个函数中。默认显示的是2列
COUNT是另一个宏,表示默认表情的数量
#define COUNT 10
参数是要设置的列数
 1 - (void)adjustImagePosWithColumns:(int)col //add:(BOOL)add
 2 {
 3
 4     // 是否是第一次添加图片,第一次只有一个子控件
 5     int first = self.view.subviews.count;
 6    //NSLog(@"%ld",self.view.subviews.count);
 7     int columns = col; // 列数
 8     // 间距 = (view宽度 - 列数 * 表情宽度) / (列数 + 1)
 9     CGFloat margin = (self.view.frame.size.width - columns *WIDTH_HIGHT)/(columns + 1);
10     // 第一个表情位置
11     CGFloat oneY = 100;
12     CGFloat oneX = margin;
13     // for循环,遍历所有的子控件
14     for (int i = 0 ; i < COUNT ; i ++)
15     {
16         int col = i % columns;
17         int row = i / columns;
18         // 计算xy,列数决定x,行数决定y
19         CGFloat x = oneX + col * (WIDTH_HIGHT + margin);
20         CGFloat y = oneY + row * (WIDTH_HIGHT + margin);
21         // 判断是重新排序还是添加图片,如果子控件个数为1则进行添加,否则进行重新排序
22         if (1 == first) // 添加图片
23         {
24             int no = i % 9; // 保证图片显示在制定 内
25             NSString *name = [NSString stringWithFormat:@"01%d.png",no];
26             [self addImageWithName:name x:x y:y]; // 添加控件到view
27             if( (++no) == 9)
28             {
29                 // 在末尾添加一个按钮,这里不知道怎么给按钮添加响应事件
30                 _btnAdd = [[UIButton alloc] init];
31                 [_btnAdd setBackgroundImage:[UIImage imageNamed:@"019.png"] forState:UIControlStateNormal];
32                 _btnAdd.frame = CGRectMake(x,y, WIDTH_HIGHT, WIDTH_HIGHT);
33                 [self.view addSubview:_btnAdd];
34             }
35         }
36         else // 进行重新排序,要忽略segmented的位置
37         {
38             // 取出i+1位置对应的表情,设置x、y值
39             UIView *child = self.view.subviews[i + 1]; // +1是为了跳过segmentControll控件
40             // 获取子控件的frame
41             CGRect rect = child.frame;
42             // 设置起始坐标位置
43             rect.origin = CGPointMake(x, y);
44             // 重新赋值
45             child.frame = rect;
46
47         } // end of if
48
49     } // end of for
50
51 }
3、然后在viewDidLoad加载表情
1 - (void)viewDidLoad
2 {
3     [super viewDidLoad];
4     // Do any additional setup after loading the view, typically from a nib.
5
6     // 调用方法,添加表情到视图
7     [self adjustImagePosWithColumns:2];
8 }
4、在valueChanged事件中相应改变
 1 - (IBAction)segmentValue:(UISegmentedControl *)sender
 2 {
 3     // NSLog(@"%d",sender.selectedSegmentIndex);
 4     // 开始动画
 5     [UIView beginAnimations:nil context:nil];
 6     // 设置动画事件
 7     [UIView setAnimationDuration:0.5];
 8     int columns = sender.selectedSegmentIndex + 2; // 要显示的列数从2列开始
 9     [self adjustImagePosWithColumns:columns]; // 调用方法
10     // 执行动画
11     [UIView commitAnimations];
12 }
所有代码如下
SLQViewController.h 文件
 1 //
 2 //  SLQViewController.h
 3
 4 //  Created by Christian on 15/4/27.
 5 //  Copyright (c) 2015年 itcast. All rights reserved.
 6 //
 7
 8 #import <UIKit/UIKit.h>
 9
10 @interface SLQViewController : UIViewController
11
12
13 // 函数名:segmentValue:
14 // 返回值: void
15 // 参数: (UISegmentedControl *)sender
16 // 描述: segmentedControll控件的值改变响应事件
17 - (IBAction)segmentValue:(UISegmentedControl *)sender;
18
19
20 @end
SLQViewController.m 文件
  1 //
  2 //  SLQViewController.m
  3 //  练习01_1
  4 //
  5 //  Created by Christian on 15/4/27.
  6 //  Copyright (c) 2015年 itcast. All rights reserved.
  7 //
  8
  9 #import "SLQViewController.h"
 10 #define WIDTH_HIGHT 60 // 表情默认宽度和高度
 11 #define COUNT 10    // 默认子控件数量
 12
 13 @implementation SLQViewController
 14
 15 {
 16     UIButton *_btnAdd;  // 添加表情按钮
 17 }
 18
 19 - (void)viewDidLoad
 20 {
 21     [super viewDidLoad];
 22     // Do any additional setup after loading the view, typically from a nib.
 23
 24     // 调用方法,添加表情到视图
 25     [self adjustImagePosWithColumns:2];
 26 }
 27 // 函数名:addImageWithName: x: y:
 28 // 返回值: void
 29 // 参数: (NSString *)name (CGFloat)x (CGFloat)y
 30 // 描述: 添加图片到视图
 31 - (void)addImageWithName:(NSString *)name x:(CGFloat)x y:(CGFloat)y
 32 {
 33     // 通过代码加载图片
 34     UIImageView *ima = [[UIImageView alloc] init]; // 初始化图片对象
 35     ima.image = [UIImage imageNamed:name]; // 获取名称
 36     ima.frame = CGRectMake(x, y, WIDTH_HIGHT, WIDTH_HIGHT); // 设置位置和尺寸
 37     [self.view addSubview:ima]; // 添加到view
 38 }
 39
 40 - (void)didReceiveMemoryWarning
 41 {
 42     [super didReceiveMemoryWarning];
 43     // Dispose of any resources that can be recreated.
 44 }
 45 // 函数名:segmentValue:
 46 // 返回值: void
 47 // 参数: (UISegmentedControl *)sender
 48 // 描述: segmentedControll控件的值改变响应事件
 49 - (IBAction)segmentValue:(UISegmentedControl *)sender
 50 {
 51     // NSLog(@"%d",sender.selectedSegmentIndex);
 52     // 开始动画
 53     [UIView beginAnimations:nil context:nil];
 54     // 设置动画事件
 55     [UIView setAnimationDuration:0.5];
 56     int columns = sender.selectedSegmentIndex + 2; // 列数从2开始
 57     [self adjustImagePosWithColumns:columns]; // 调用方法
 58     // 执行动画
 59     [UIView commitAnimations];
 60 }
 61 // 函数名:adjustImagePosWithColumns:
 62 // 返回值: void
 63 // 参数: (int)col
 64 // 描述: 根据列数添加或者排序表情
 65 - (void)adjustImagePosWithColumns:(int)col //add:(BOOL)add
 66 {
 67
 68     // 是否是第一次添加图片,第一次只有一个子控件
 69     int first = self.view.subviews.count;
 70    //NSLog(@"%ld",self.view.subviews.count);
 71     int columns = col; // 列数
 72     // 间距 = (view宽度 - 列数 * 表情宽度) / (列数 + 1)
 73     CGFloat margin = (self.view.frame.size.width - columns *WIDTH_HIGHT)/(columns + 1);
 74     // 第一个表情位置
 75     CGFloat oneY = 100;
 76     CGFloat oneX = margin;
 77     // for循环,遍历所有的子控件
 78     for (int i = 0 ; i < COUNT ; i ++)
 79     {
 80         int col = i % columns;
 81         int row = i / columns;
 82         // 计算xy,列数决定x
 83         CGFloat x = oneX + col * (WIDTH_HIGHT + margin);
 84         CGFloat y = oneY + row * (WIDTH_HIGHT + margin);
 85         // 判断是重新排序还是添加图片,如果子控件个数为1则进行添加,否则进行重新排序
 86         if (1 == first) // 添加图片
 87         {
 88             int no = i % 9; // 保证图片显示在指定范围内
 89             NSString *name = [NSString stringWithFormat:@"01%d.png",no];
 90             [self addImageWithName:name x:x y:y]; // 添加控件到view
 91             if( (++no) == 9)
 92             {
 93                 // 在末尾添加一个按钮,这里不知道怎么给按钮添加响应事件
 94                 _btnAdd = [[UIButton alloc] init];
 95                 [_btnAdd setBackgroundImage:[UIImage imageNamed:@"019.png"] forState:UIControlStateNormal];
 96                 _btnAdd.frame = CGRectMake(x,y, WIDTH_HIGHT, WIDTH_HIGHT);
 97                 [self.view addSubview:_btnAdd];
 98             }
 99         }
100         else // 进行重新排序,要忽略segmented的位置
101         {
102             // 取出i+1位置对应的表情,设置x、y值
103             UIView *child = self.view.subviews[i + 1]; // +1是为了跳过segmentControll控件
104             // 获取子控件的frame
105             CGRect rect = child.frame;
106             // 设置起始坐标位置
107             rect.origin = CGPointMake(x, y);
108             // 重新赋值
109             child.frame = rect;
110
111         } // end of if
112
113     } // end of for
114
115 }
116
117
118 @end
效果如下:按钮已经添加上了,但是如何响应事件呢?


