Unity零基础到入门 ☀️| 轻松学会 Unity 的 UGUI基础控件的使用(包括一个简易血条、蓝条设计)
- 博客主页:https://blog.csdn.net/zhangay1998
- 欢迎点赞 收藏 ⭐留言 如有错误敬请指正!
- 本文由 God Y.原创,首发于 CSDN
- 未来很长,值得我们全力奔赴更美好美好的生活✨
-
-
-
- 前言
-
- ❤️UGUI的分类
- UI简单实用小技能
- 搭建UI小技巧
- UGUI常用控件的实例使用
-
-
- Text(文本组件)
- Image(图片)
- RawImage
- Button(按钮)
- Slider(滑动条)
- Scrollbar(滚动条)
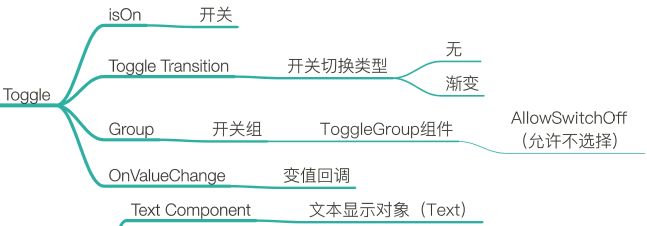
- Toggle(开关按钮)
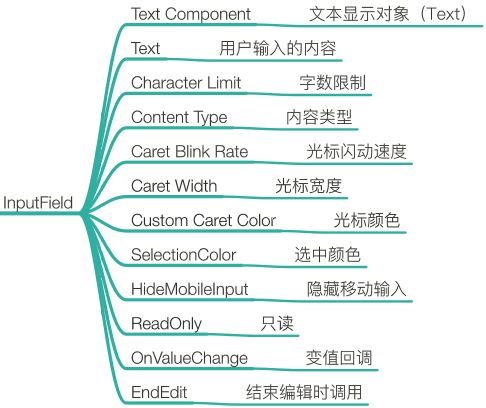
- InputField(输入框)
- Dropdown(下拉菜单)
-
- 血条、蓝条小测试
-
- 总结
前言
- 之前发了篇博客是简单介绍了下Unity的几种UI系统,并且做了简单介绍
- ❤️ Unity零基础到入门 ☀️| 认识Unity引擎中几种最常用 UI系统,这一篇文章就够用了
- 那本篇博客来挑几种Unity中最常用的UI控件如何使用和使用技巧吧
❤️UGUI的分类
UGUI 是Unity 官方推出的最新UI系统。它从 Unity 4.6 开始,被集成到 Unity 的编辑器中。相较于旧的 UI 系统,它绝对属于一个巨大的飞跃!
UGUI中的组件可简单的分为两类
- 基础UI:Text、Image、RawImage
- 可交互UI:Button、Toggle、Slider、Scrollbar、DropDown、Input Field、Scroll View 等
UI简单实用小技能
- 使用键盘上的数字2,可将Unity中的Sence视图切换成2D模式,再按一次或者按3就可回复3D
- 使用快捷键T,可以更方便的调节UI的大小和位置
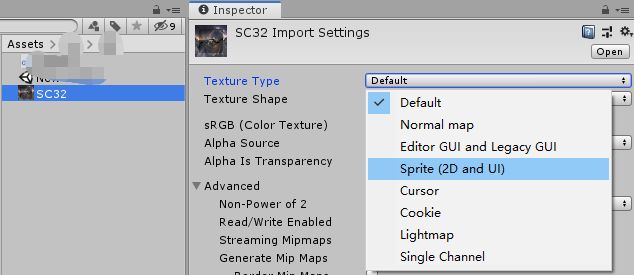
- 将导入的Tex图片变为Sprit精灵图片,才能给Image使用
搭建UI小技巧
- 首先注意层级,前面一篇文章也说过了,是由UI在层级⾯板上的顺序决定的
- 搭建顺序——从底层到上层
- UI的名字要⻅名知意,不要乱起名字
- 搭建UI时要⾮常注意⽗⼦关系
这里有个简单小技巧大家可以记一下,在Hierarchy面板上,越是在层级面板的下面,图片就越靠上层
比如下图,图片就是5-4-3-2-1,5在最上面。这下懂了吧

UGUI常用控件的实例使用
上篇文章介绍了各种UGUI控件以及面板属性,那这里就来介绍下各个UI组件的实际使用案例
那这里先说一下使用脚本代码控制组件的思路
- 首先要找到这个组件,只要是能找到与这个组件有关系的都可以,比如它的父物体,子物体,他身上的其他组件
只要能找个与这个组件相关联的,我们都可以借助各种方法拿到这个物体 - 然后才是调用代码改变这个组件的属性或者状态
Text(文本组件)
官方介绍:
The Text control displays a non-interactive piece of text to the user. This can be used to provide captions or labels for other GUI controls or to display instructions or other text.译文:
文本控件向用户显示非交互的文本。这可用于为其他GUI控件提供标题或标签,或显示说明或其他文本。
文本组件,用于在工程中显示文字的地方(常用),只要能看到字的情况下,一般都是用的这个组件
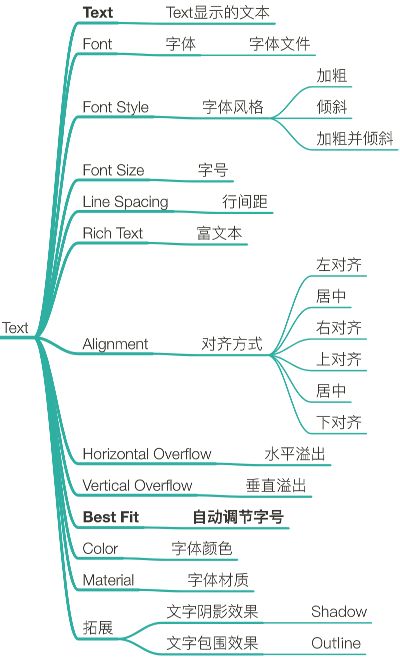
直接上代码
首先定义一个Text组件,以下UI组件都是这样定义的
using UnityEngine;
using UnityEngine.UI;

public class hpTest : MonoBehaviour
{

    //文本组件Text-public
    public Text text1;
    //文本组件Text-private
    private Text text2;
    //Image图片组件
    public Image image;
    //Button按钮组件
    public Button button;

    private void Awake()
    {

        text2 = transform.Find("Text2").GetComponent<Text>();
        text2 = GameObject.Find("Text2").GetComponent<Text>();
    }
}
这里注意,打开脚本后,如果要使用UI组件,需要加命名空间,就是这个
using UnityEngine.UI;
上述代码中,我使用了两种寻找组件的Find方法
一种是通过Transform,一种是GameObject
Transform只能找到挂在当前物体上的所有子物体(激活不激活都能找到),GameObject能找到Hirearchy面板上所有激活的物体
Tips:如下图,勾上就是激活状态,未勾上就是非激活状态
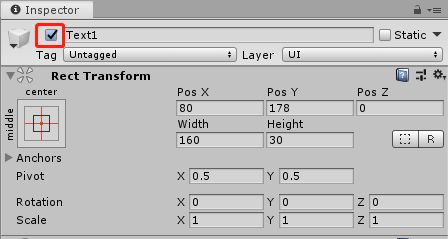
这里大家可能注意到了可以使用public,也可以使用private。
这两种是有区别的,
- 使用public可以直接在Unity面板上将组件拖上去
- 使用private就需要使用代码找到这个组件,然后才能改变它的属性
这两种方法都是上面说的 使用脚本代码控制组件的思路 的第一步,找到组件
然后就是用代码改变属性了,比如下简单实例
    private void Demo()
    {

        text1.text = "使用代码改变text1的值啦";
        text2.text = "使用代码改变text2的值啦";
    }

这就是一个简单的使用示例啦,就是利用代码改变Text文本中的值
还有很多属性可以改,大家可以参考下API尽情改变
Image(图片)
官方介绍:
The Image control displays a non-interactive image to the user. You can use this for purposes such as decorations or icons, and you can change the image from a script to reflect changes in other controls.
The control is similar to the Raw Image control, but offers more options for animating the image and accurately filling the control rectangle. However, the Image control requires its Texture to be a Sprite, while the Raw Image can accept any Texture.译文:
图像控件会向用户显示一个非交互式的图像。可以将此用于装饰或图标,也可以更改脚本中的图像以反映其他控件中的更改。该控件类似于原始图像控件,但提供了更多的图像动画和准确填充控件矩形。但是,图像控件要求其纹理是雪碧,而原始图像可以接受任何纹理。
Image是Unity中用于显示图片的地方,我们拿到他的属性值就可以改变图片的大小、位置透明度等等了

下面看实例来加深印象
代码:
    private void Demo()
    {

        text1.text = "使用代码改变text1的值啦";
        text2.text = "使用代码改变text2的值啦";

        //动态加载贴图赋值给Image
        m_testImage.GetComponent<Image>().sprite = Resources.Load<Sprite>("图片的名字");
        //这里将图片变成黑色而且改变透明度为50%
        image.color = new Color(0, 0, 0, 0.5f);
        //修改图片位置
        image.GetComponent<RectTransform>().anchoredPosition = new Vector2(100.0f, 100.0f);
        //修改图片旋转
        image.GetComponent<RectTransform>().localRotation = Quaternion.Euler(new Vector3(0f, 180f, 0f));
        //修改缩放
        image.GetComponent<RectTransform>().localScale = new Vector3(1.2f, 1.2f, 1.2f);
        //修改大小
        image.GetComponent<RectTransform>().sizeDelta = new Vector2(200.0f, 200.0f);
    }
RawImage
RawImage与Image用法差别不是很大,下面就简单介绍一下属性吧

Button(按钮)
官方介绍:
The Button control responds to a click from the user and is used to initiate or confirm an action. Familiar examples include the Submit and Cancel buttons used on web forms
译文:
按钮控件响应用户的单击,用于启动或确认操作。熟悉的示例包括web表单上使用的“提交”和“取消”按钮
Button也算是Unity中最常用的组件了,就是监听点击事件,当用户点击这个Button按钮,就触发这个监听,然后执行我们写的方法
关于Button的面板属性就不多做介绍了,上篇文章也有介绍。Unity零基础到入门 ☀️| 认识Unity引擎中几种最常用 UI系统,这一篇文章就够用了!
值得一提的是Button属于可交互组件,上面的Text、Image、RawImage都是不可交互组件

上代码示例展示:
    private void Awake()
    {

        //第二种方法
        button.onClick.AddListener(ButtonDemo);
        //第一种方法
        button.onClick.AddListener(() =>
        {

            Debug.Log("第一种方法,点击Button按钮了!");
        });
    }
     private void ButtonDemo()
    {

        Debug.Log("第二种方法,点击Button按钮了!");
    }
点击按钮后,控制台打印效果,由于第二种在上面先执行的,所以执行第二种方法

还有第三种方法就是在unity面板将挂载此脚本的物体拖到Button组件上
然后选择对应的监听事件就可以了,如下图。效果与前两种一样
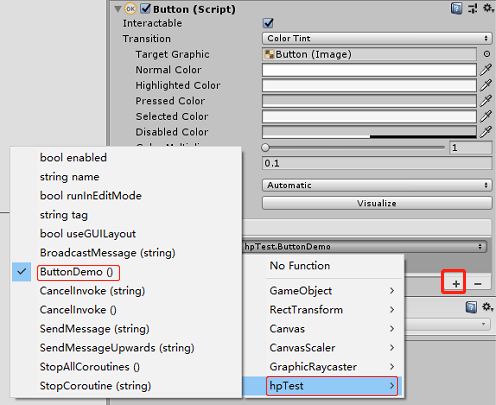
Slider(滑动条)
官方介绍:
The Slider control allows the user to select a numeric value from a predetermined range by dragging the mouse. Note that the similar ScrollBar control is used for scrolling rather than selecting numeric values. Familiar examples include difficulty settings in games and brightness settings in image editors.
译文:
滑块控制件允许用户通过拖动鼠标从预定范围内选择数值。请注意,类似的滚动条控件用于滚动,而不是选择数值。熟悉的例子包括游戏中的难度设置和图像编辑器中的亮度设置。
Slider滑动条在Unity中一般用于血条等需要类似进度条的时候才用得到,下面用简单示例演示下吧
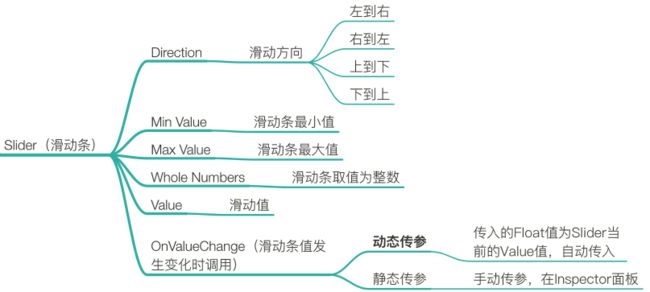
下列代码简单写了一个当Slider的Value值发生改变时调用的方法,和一个通过按键盘来改变Slider的值的示例
public class hpTest : MonoBehaviour
{

    public Slider slider;
    public Scrollbar scrollbar;

    private void Awake()
    {

        //Sleder的Value值发生改变时调用
        slider.onValueChanged.AddListener(delegate{
      SliderDemo1();} );
    }
    void Update()
    {

        SliderDemo();
    }
    void SliderDemo()
    {

        if (Input.GetKey(KeyCode.W))
        {

            slider.value += 2;
            scrollbar.value += 0.01f;
        }
        else if (Input.GetKey(KeyCode.S))
        {

            slider.value -= 2;
            scrollbar.value -= 0.01f;
        }
    }
    void SliderDemo1()
    {

        Debug.Log("Slider的值改变了!");
    }
}
按键效果如下,上面的是Slider,下面的是Scrollbar,两者用法差不多,在这就一块演示了。

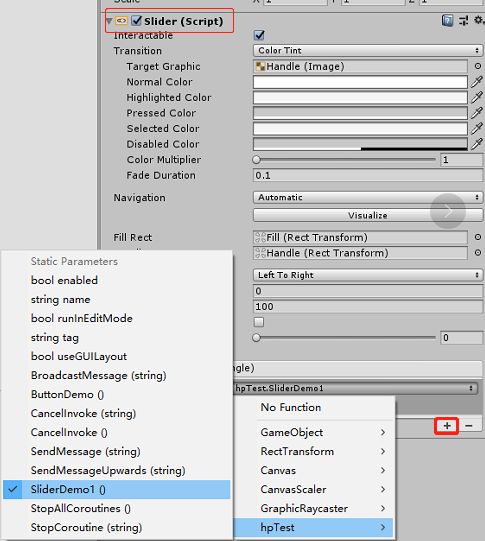
当然也可以像Button一样在Unity面板绑定,如下图
Scrollbar(滚动条)
官方介绍:
The Scrollbar control allows the user to scroll an image or other view that is too large to see completely. Note that the similar Slider control is used for selecting numeric values rather than scrolling. Familiar examples include the vertical Scrollbar at the side of a text editor and the vertical and horizontal pair of bars for viewing a section of a large image or map.
译文:
滚动条控件允许用户滚动一个太大而无法完全看到的图像或其他视图。请注意,类似的滑块控件用于选择数值,而不是滚动。熟悉的示例包括文本编辑器一侧的垂直滚动条,以及用于查看大型图像或地图部分的垂直和水平条对。
Scrollbar与上面的Slider用法差不多,这里就不多做介绍了,看下属性吧

Toggle(开关按钮)
官网介绍:
The Toggle control is a checkbox that allows the user to switch an option on or off.
译文:
切换控件是一个允许用户打开或关闭选项的复选框。
使用Toggle组件一般是用作某件事的开关使用,下面简单实例介绍如何根据开关的不同,处理不同的事情
代码:
    private void Awake()
    {

        toggle.onValueChanged.AddListener((bool value)=> ToggleDemo(value));
    }
    public void ToggleDemo(bool value)
    {

        if (value)
        {

            Debug.Log("true");
        }
        else
        {

            Debug.Log("false");
        }
    }
InputField(输入框)
官网介绍:
An Input Field is a way to make the text of a Text Control editable. Like the other interaction controls, it’s not a visible UI element in itself and must be combined with one or more visual UI elements in order to be visible.
译文:
输入字段是使文本控件的文本可编辑的一种方法。与其他交互控件一样,它本身并不是一个可见的UI元素,它必须与一个或多个可视化的UI元素组合起来才能可见。
介绍两种InputFiled的方法使用实例
onValueChanged是每当输入框的值改变时调用;
onEndEdit是当你输入完成后(焦点不再是InputFiled),才调用的方法
    private void Awake()
    {

        inputField.onValueChanged.AddListener((string msg) => {
      Debug.Log("输入框的值为:" + msg); });
        inputField.onEndEdit.AddListener((string msg)=> {
      Debug.Log("输入完成后的值为:"+msg); });
    }
Dropdown(下拉菜单)
官网介绍:
The Dropdown can be used to let the user choose a single option from a list of options.
The control shows the currently chosen option. Once clicked, it opens up the list of options so a new option can be chosen. Upon choosing a new option, the list of closed again, and the control shows the new selected option. The list is also closed if the user clicks on the control itself, or anywhere else inside the Canvas.
译文:
下拉菜单可用于让用户从选项列表中选择单个选项。
该控件显示当前选择的选项。单击后,它将打开选项列表,以便选择一个新选项。选择新选项后,再次关闭列表,控件显示新的所选选项。如果用户单击控件本身或画布中的其他任何地方,该列表也会关闭。
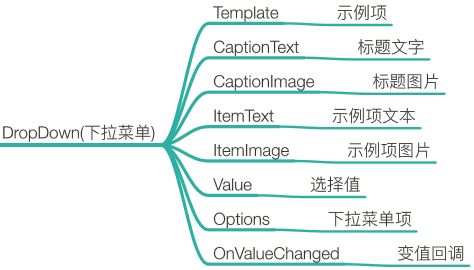
使用实例简单介绍一下怎样根据选择不同的下拉框做不同的事情
代码:
    private void Awake()
    {

        toggle.onValueChanged.AddListener((bool value)=> ToggleDemo(value));
    }
    public void Dropdown(int value)
    {

        switch (value)
        {

            case 0:
                Debug.Log("你选择了第一条");
                break;
            case 1:
                Debug.Log("你选择了第二条");
                break;
            case 2:
                Debug.Log("你选择了第三条");
                break;
            default:
                Debug.Log("默认情况");
                break;
        }
    }
血条、蓝条小测试
好了,介绍到这里就算是吧UGUI的常用UI组件都介绍完了,都做了简单地实例介绍
那就来简单做的小测试吧!

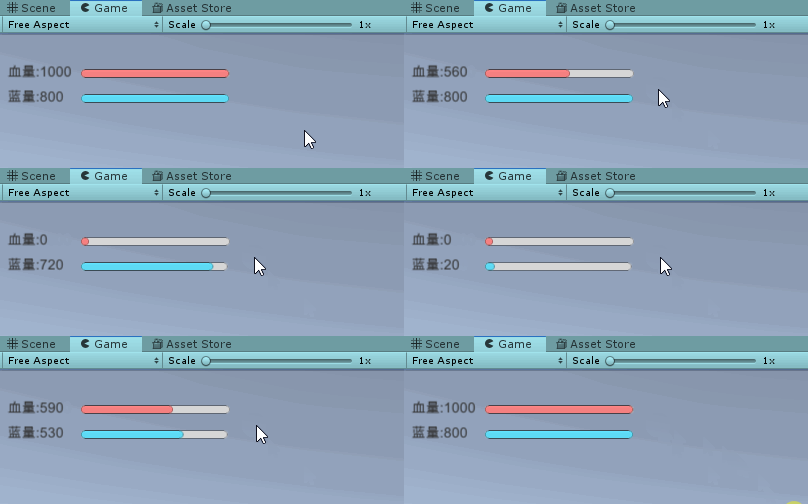
- 制作⾎条、蓝条
- 需求:可以通过左右键,添加或减少⾎量, 可以通过上下键,增加或减少蓝量
- ⾎量和蓝量要在⼀定范围内,0-1000,0-800
大家看完这个题目,脑子里有没有想法呢~
- 既然是做血条,那就是跟进度条差不多,所以那我们就用Slider来做一个简单的实例吧,当然也可以使用其他的组件也能做
- 通过键盘上的按键执行血量的加减,那就用到了Slider的Value值,与键盘按键建立交互事件就好啦
- 然后使用Text组件,获取Slide组件的Value的值赋给Text显示就好啦~
废话不多说,上代码~
using UnityEngine;
using UnityEngine.UI;

public class hpTest : MonoBehaviour
{

    public Slider hp;
    public Slider sp;
    public Text hptex;
    public Text sptex;

    void Update()
    {

      HPDemo();
    }
    public void HPDemo()
    {

        hptex.text = "血量:"+hp.value.ToString();
        sptex.text = "蓝量:"+sp.value.ToString();

        if (Input.GetKey(KeyCode.W))
        {

            hp.value += 10;
        }
        else if (Input.GetKey(KeyCode.S))
        {

            hp.value -= 10;
        }

        if (Input.GetKey(KeyCode.D))
        {

            sp.value += 10;
        }
        else if (Input.GetKey(KeyCode.A))
        {

            sp.value -= 10;
        }
    }
}
总结
好了,文章到这里就结束了。
本文介绍了Unity中UGUI的常用组件的简单使用方法和制作UI时候的一些小技巧
如果你仔细看过前面几篇介绍Unity的各种组件的文章和脚本介绍的文章,那么恭喜你Unity已经算正式入门了
如果能把UGUI吃透,做一些剧情类的小游戏已经是没啥问题了
这里给大家介绍一个做对话小游戏常用的插件—fungus ,非常好用的!做文字对话游戏必备插件,有空会写篇文章单独介绍
fungus官方下载链接,fungus——csdn下载链接
