本文在首发,如有转载,请注明出处
https://www.jianshu.com/p/010dc147cfaa
前言
上一节写了一个登录的Demo,用来阐释fish_redux的使用方法。想看的同学可以点击下方的连接
https://www.jianshu.com/p/591088f3bc73
这篇博客,将会再深入点讲解fish_redux的使用方式,通过实战的方式,让大家了解到fish_redux的adapter和component的概念和用法。
代码依旧使用上一篇博客的代码,新增页面,使用adapter和component
代码地址:https://github.com/wjbd/fish_redux_demo
component的概念
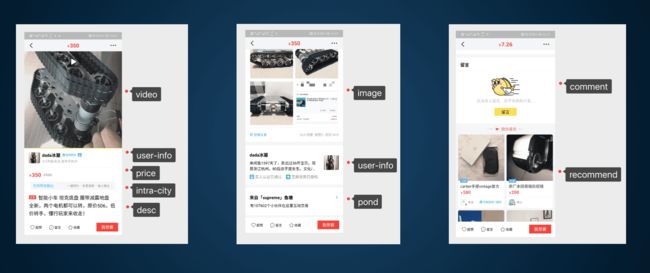
component意为组件的意思,组件是对局部的展示和功能的封装。组件是对视图的分治,也是对数据的分治。通过逐层分治,我们将复杂的页面和数据切分为相互独立的小模块。这将利于团队内的协作开发。
下面盗两张阿里公开闲鱼fish_redux的案例demo,让大家可以更清晰的组件在flutter页面中的形式。
adapter的概念
在Android开发当中所有人都得写过适配器,所有对这个概念应该相当熟悉,但是在fish_redux当中,adapter不仅仅充当了适配器的概念,更是超前了一步。
官方定义的adapter:面向 ListView 场景的分治设计 Adapter。
一个ListView一个adpter,这看上去非常像Android的设计,但是fish_redux的adapter概念比Android的adapter走的更远。
一个 Adapter 是可以由多个 Component 和 Adapter 组合而成
adapter的容器在fish_redux当中有两种,下面还是使用官方的图来简单说明一下:
-
StaicFlowAdapter
-
DynamicFlowAdapter
作者这里还是用DynamicFlowAdapter,因为更符合原生Android开发的思想。
撸码开始
通过实战让大家更清楚的了解adapter和comoponent,不然纸上谈兵,还是不了解这些代码的实际应用。
本次的demo是在上节demo基础上改造的,增加了listview功能,旨在使用fish_redux当中的adapter和component,同时还增加了使用fish_redux使用dialog的例子。
先看看代码结构图
在HomePage下面有WeatherComponent,WeatherAdapter两个组件,同时WeatherComponent下面还有一个DialogComponent组件。
本博客中只展示HomePage页面的详细代码,其他的请参考代码地址:
代码地址:https://github.com/wjbd/fish_redux_demo
page
class HomePage extends Page> {
  HomePage()
      : super(
          initState: initState,
          effect: buildEffect(),
          view: buildView,
          dependencies: Dependencies(
            adapter: NoneConn() + WeatherAdapter(),
          ),
        );
}
action
enum HomeAction { refresh }

class HomeActionCreator {
  static Action onRefresh() {
    return const Action(HomeAction.refresh);
  }

}
effect
Effect buildEffect() {
  return combineEffects(>{
    Lifecycle.initState: _init,
    HomeAction.refresh: _onRefresh,
  });
}

void _init(Action action, Context ctx) {
  ctx.dispatch(HomeActionCreator.onRefresh());
}

void _onRefresh(Action action, Context ctx) async {
  Map params = {
    'city': '北京',
  };
  Response response = await Dio().post(
    "https://www.apiopen.top/weatherApi",
    queryParameters: params,
  );
  int code = response.data['code'];
  String msg = response.data['message'];
  Map data = response.data['data'];
  List list = data['forecast'];
  List weatherList = list.map((m) {
    return new Weather.fromJson(m);
  }).toList();
  if (code == 200) {
    ctx.state.refreshController.refreshCompleted();
    ctx.dispatch(WeatherActionCreator.onSetNewData(weatherList));
    Fluttertoast.showToast(msg: '获取天气信息成功');
  } else {
    ctx.state.refreshController.refreshFailed();
    Fluttertoast.showToast(msg: "获取天气信息失败:$msg");
  }
}
state
class HomeState implements Cloneable {
  RefreshController refreshController;
  List list;
  @override
  HomeState clone() {
    return HomeState()
      ..list = list
      ..refreshController = refreshController;
  }
}

HomeState initState(Map args) {
  HomeState state = new HomeState();
  state.refreshController = new RefreshController(initialRefresh: false);
  state.list = new List();
  return state;
}
view
Widget buildView(HomeState state, Dispatch dispatch, ViewService viewService) {
  final ListAdapter adapter = viewService.buildAdapter();
  return Scaffold(
    appBar: PreferredSize(
      preferredSize: Size.fromHeight(50.0),
      child: AppBar(
        automaticallyImplyLeading: false,
        centerTitle: true,
        elevation: 0,
        title: Text('首页'),
      ),
    ),
    body: Container(
      child: SmartRefresher(
        header: ClassicHeader(),
        controller: state.refreshController,
        onRefresh: () {
          dispatch(HomeActionCreator.onRefresh());
        },
        child: ListView.builder(
          itemCount: adapter.itemCount,
          itemBuilder: adapter.itemBuilder,
        ),
      ),
    ),
  );
}
在fish_redux中dialog的使用方法
WeatherComponent的Effect
Effect buildEffect() {
  return combineEffects(>{
    WeatherAction.showDialog: _onShowDialog,
  });
}

void _onShowDialog(Action action, Context ctx) {
  showDialog(
    context: ctx.context,
    builder: (BuildContext context) {
      return ctx.buildComponent('dialog');
    },
  );
}
总结
- 本次demo代码量比较大,在博客展示显示太累赘,大家可以去github上查看详细代码,仔细阅读。
- adapter和component属于fish_redux的核心功能,对于代码的扩展分治起到了非常好的功能,堪称划分模块神器,让代码的划分更细,找错误更方便,模块划分也更好,容易分任务下去。
- 学习成本真的大,想要把这块代码搞清楚,如果不手动去敲一下,大部分的人应该很难理解Component和Adapter,这里也是借着简单的Demo,简化fish_redux的学习过程。


