TypeScript-系统入门到项目实战
我的代码地址:https://gitee.com/mus-z/ts_learn
原课地址:https://coding.imooc.com/class/evaluation/412.html?page=9
项目的话小demo基本上按照目录对应来看源码
项目我基本上只有最终版本,nodemodules搞起来太慢了所以就是直接在原有改了小节的内容
文章目录
-
- 一、环境配置
- 二、ts学习
-
- 1.静态类型的深度理解
- 2.基础类型和对象类型
- 3.类型推断和类型注解
- 4.函数相关类型
- 5.Interface接口
- 6.类的定义与继承
- 7.类中的访问类型和构造器
- 8.静态属性,setter和getter,单例模式
- 9.抽象类、接口
- 三、爬虫功能
-
- 1.初始化
- 2.获取html
- 3.提取信息
- 4.整理代码和存储过程
- 5.使用组合设计模式优化代码
- 6.单例模式改写
- 7.项目进一步理解
- 四、Typescript语法进阶
-
- 0.ts中的配置文件
- 1.联合类型和类型保护
- 2.Enum枚举
- 3.函数泛型
- 4.类中的泛型以及泛型类型
- 5.namespce命名空间(上
- 6.namespce命名空间(下
- 7.import对应的模块化
- 8.使用parcel打包
- 9.描述文件中的全局类型
- 10.通过.d.ts进行模块声明
- 11.keyof关键词和泛型
- 五、使用Express开发数据爬取和展示接口
-
- 1.项目初始化
- 2.解决express登录检验问题
- 3.解决express的类型定义问题
- 4.登录功能完善
- 5.代码优化
- 六、Typescript高级语法
-
- 1.类的装饰器初步
- 2.类的装饰器使用
- 3.类的方法装饰器
- 4.类的访问器装饰器
- 5.类的属性装饰器
- 6.类的参数装饰器
- 7.装饰器小例子(方法装饰器、工厂模式)
- 8.reflect-metadata
- 9.装饰器执行顺序
- 七、爬虫Express项目代码改良
-
- 1.创建控制器和装饰器
- 2.通过装饰器实现路由功能
- 3.工厂模式生成请求装饰器
- 4.中间件的装饰器+优化项目结构
- 5.使用多个中间件
- 八、前端React展示爬虫数据
-
- 1.初始化react项目
- 2.登录表单
- 3.类型及路由的使用
- 4.前后端联调实现登录验证及跳转功能
- 5.登录和退出功能
- 6.爬取和展示功能
- 7.折线图展示
- 8.接口数据类型的冗余定义问题
- 9.解决前后端接口一样
- 九、小结给的学习网站
一、环境配置
下载node,去官网下载安装包安装即可
npm包管理工具是node自带的,下面是我的node版本号
然后通过npm安装ts
npm install typescript -g
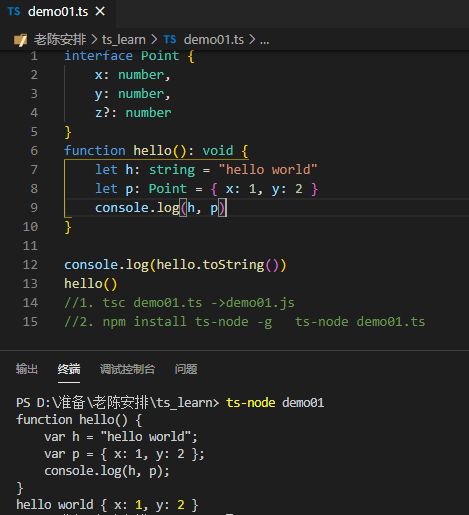
通过命令tsc demo.ts可以在同目录下编译出demo.js
为了省去编译,直接运行,使用ts-node工具进行全局安装
然后直接ts-node demo.ts就可以运行了
二、ts学习
1.静态类型的深度理解
对于变量的静态类型是固定的不可变的,变量受限于静态类型
可以帮助我们判断变量的类型、属性
2.基础类型和对象类型
//基础类型number string null undefined symbol boolean void等
const count: number = -123;
const n: string = "123"
//对象类型
const t: {

    name: string,
    age: number
} = {

    name: 'name1',
    age: 0
}
//对象的数组
const numbers: (number | undefined)[] = [1, 2, 3, , 4]
//对象的类
class Person {

    constructor(prop: {
      name: string, age: number }) {

        let {
      name, age } = prop
        this.name = name
        this.age = age
    }
    name: string
    age: number
}
const d: Person = new Person(t)
const s: Person = {

    name: 'name1',
    age: 0
}
console.log(t, d, s)
//对象的函数
const getTotal:
    (x: number, y: number) => number
    = function (x, y) {

        return x + y
    }
console.log(getTotal(1, 2))
3.类型推断和类型注解
inference and annotation
namespace demo03 {

    //类型注解,把count注解成数字
    let count: number;
    count = 123;

    //类型推断,自动分析变量类型
    let countInference = 123;
    console.log(typeof countInference)//number
    //但是即便有推断,也要习惯用注解

    function getTotal(x:number,y:number)
    //:number //这个推断了
    {

        return x+y
    }
    const t=getTotal(1,5)
    console.log(t,typeof t)

}
上面用命名空间解决命名冲突
4.函数相关类型
namespace demo04 {

    // function hello(){}
    // const hello1=function(){}
    // const hello2=()=>{}
    function add({
      f, s }: {
      f: number, s: number } = {
      f: 1, s: 0 })//给参数解构并注释并给初始值
        : number {
     //函数返回值的注解
        return f + s
    }
    const total: number = add({
      f: 1, s: 2 })*add()//接受结果的注解
    console.log(total)

    function say(): void {

        console.log('hello')
        //return null;//void不能有返回值
    }

    function error(): never {

        //never表示永远不能跑完的函数
        if (1) throw new Error("1")
        else while (true) {
      }
    }
}
5.Interface接口
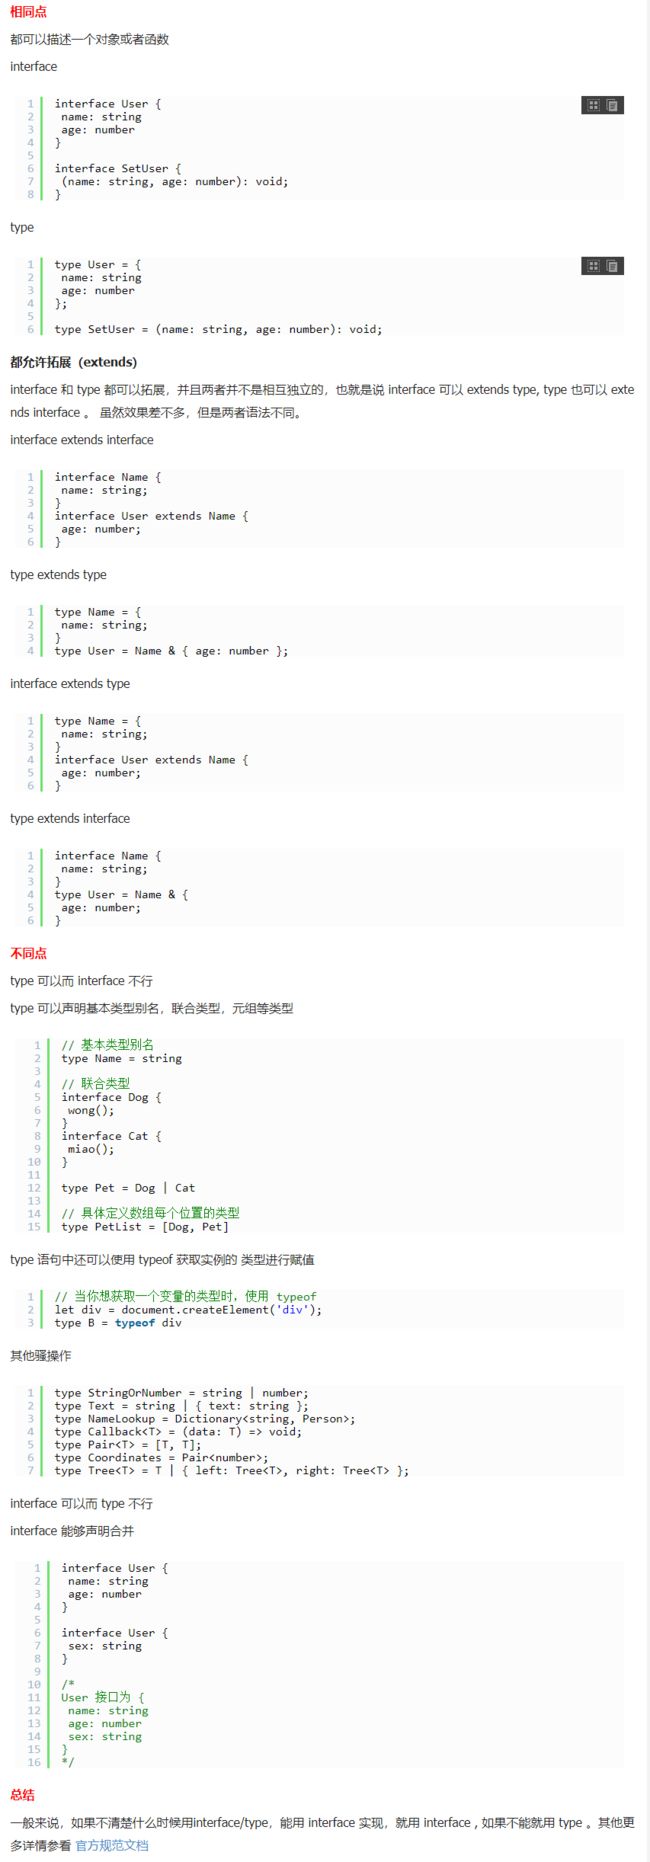
interface和type的区别:https://www.jb51.net/article/163299.htm
官方文档
interface Person{

        name:string;
    }
    //通用interface接口去表述对象,而不是type类型别名
    type Person_={

        readonly name:string;//只读readonly
    }
    interface Person{
     //合并声明Person接口,创建可选的age
        age?:number;

        //可以加入一个模型,需要包括所有已有情况,对象也可以写name、age之外的属性
        //[propName:string]:string|number|undefined;

        say():void;//接口加入方法
    }

    const getP=(person:Person):void=>{


        console.log(person.name)
    }
    const setP=(person:Person,name:string):void=>{

        person.name=name
        console.log(person)
    }
    const person={
     name:'dell',age:10,say(){
     }}
    getP(person)
    setP(person,'flank')

    //下面是一个校验特性,需要理解
    //getP({name:'sn',sex:'0',say(){}})//接口不使用模型,字面量会报错,不匹配sex属性
    const p2={
     name:'sn',sex:'0',age:10,say(){
     }}
    getP(p2)//缓存变量不会报错,只需要包含函数所需属性即可
另外可以结合类class应用接口来看
//类的继承接口
    class User implements Person{

        constructor(name:string,age?:number){

            this.name=name
            if(age)this.age=age
        }
        name: string
        age?: number | undefined
        say(): void {

            throw new Error("Method not implemented.")
        }

    }
    const u:User={

        name:'uuu',
        say:()=>{
     },
    }
    console.log(new User('user',8),u)
以及其他功能
 	//接口继承接口
    interface Teacher extends Person{

        teach():string
    }
    const t:Teacher={

        name:'tea',
        say:()=>{
     },
        teach:()=>'t',
    }

    //接口定义函数
    interface sayHi {

        (word:string):string,
        //接受string返回string
    }
    const say:sayHi=(x)=>{
     return x+'x'}
6.类的定义与继承
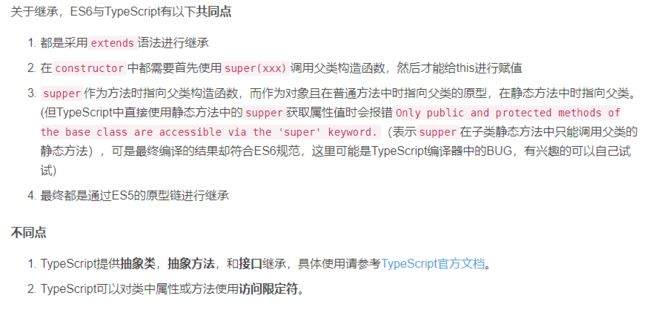
ts的类和es6的类很类似,但是又不一样
namespace demo05{

    class Person{

        protected name:string='dell';
        getName():string{

            return this.name
        }
        getp=()=>{
     return 'Person'}
    }
    const person=new Person()
    console.log(person,person.getName(),person.getp())
    //console.log(person.name)//会报错,因为给name属性加了private

    //类的继承,子类Teacher继承父类Person
    class Teacher extends Person{

        name='tt'
        getTeacherName(){

            return 'teacher'
        }
        //重写覆盖了getp方法
        getp=()=>{
     return 'Teacher'}
        getName(){

            //想拿到父类就用super
            return super.getName()+'_t'
        }
    }
    const teacher=new Teacher()
    //下面给的都是子类实例里的属性
    console.log(teacher.getName(),teacher.getTeacherName(),teacher.getp())
    console.log((teacher as Person).getName())
}
7.类中的访问类型和构造器
private、protected、public三种访问修饰符以及不写修饰符的形式默认为public
- public: 公有,在类里面、子类、类外部都可以访问
- protected: 保护类型,在类里面子类里面可以访问,在类外部没法访问
- private: 私有,在类里面可以访问,在子类、类外部都没法访问
namespace demo07 {

    class Person {

        name: string = 'dell';//默认情况下是public
        //public name:string='dell'

        private test = 'test'
        testF() {
      return this.test }

        protected pro: number = 123
    }
    const p = new Person()
    p.name = 'dell2'
    console.log(p.name)
    //p.test//报错
    //p.test='test_X'//报错
    console.log(p.testF())//可以

    class Teacher extends Person {

        // c
        // constructor(c: number) {

        //     //构造器用于new实例的情况,初始化属性
        //     super()//派生类必须使用
        //     this.c = c
        // }
        constructor(public c: number) {
     //这里加public等效于上边的声明,直接创建了c属性
            //构造器用于new实例的情况,初始化属性
            super()//派生类必须使用
        }
        say() {

            console.log(super.testF())//可以输出
            //console.log(super.test,super.pro)//不可以
            console.log(this.pro)//不修改值的话可以访问到123
        }
        //test='test_t'//test是private的不能使用
        protected pro = 0 //protected的可以修改和访问父类的pro,注意子类的权限
    }
    const t = new Teacher(10)
    t.say()
    //t.pro//外部不能访问
    console.log(t)
}
8.静态属性,setter和getter,单例模式
namespace demo08{

    class Person{

        constructor(private _name:string){
     }
        get name(){

            //某些操作解码_name
            return this._name
        }
        set name(n:string){

            //某些操作过滤n
            this._name=n
        }
        //其实getter和setter可以用类方法代替的,不过这样方便对外暴露公共属性以及增加过滤
    }
    const person =new Person('dell')
    console.log(person.name)
    person.name='dx'
    console.log(person)

    //单例模式,只有一个实例
    class Demo{

        private static instance:Demo;//缓存实例,私有静态变量
        private constructor(){
     }
        static getInstance(){

            if(!this.instance)this.instance=new Demo()
            return this.instance
        }
        static cal(){
     console.log(this)}//类中,static方法中的this指向类本身
    }
    const d0=Demo.getInstance()
    const d1=Demo.getInstance()
    console.log(d0===d1)
    Demo.cal()
}
9.抽象类、接口
namespace demo09 {


    //抽象类被继承
    abstract class Geom {

        abstract getArea(): number;//抽象方法
        say() {
     //非抽象方法
            console.log(this)
        }
    }
    class Circle extends Geom {

        getArea(): number {

            return 3.14
        }
    }
    class Square extends Geom {

        getArea(): number {

            return 4
        }
    }
    let c = new Circle()
    c.say()
    console.log(c, c.getArea())
    let s = new Square()
    s.say()
    console.log(s, s.getArea())


    //接口被实现继承
    interface Person{

        name:string
    }
    interface Teacher extends Person{

        teachAge:number
    }
    interface Student extends Person{

        age: number,
    }
    const t :Teacher= {

        name: 'dell',
        teachAge:5,
    }
    const st :Student= {

        name: 'lee',
        age: 18
    }
    const getUserInfo = (user: Person) => {

        console.log(user.name)
    }
    getUserInfo(t)
    getUserInfo(st)
}
https://blog.csdn.net/weixin_44036436/article/details/103816884
三、爬虫功能
1.初始化
npm init -y
tsc -init
npm install typescript -D
npm install ts-node -D
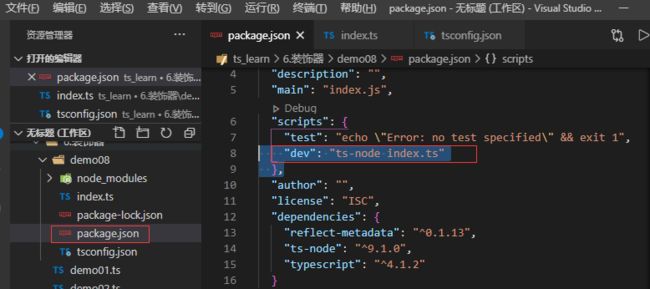
加入scripts命令之后
安装工具superagent
npm install superagent --save
但是这时候发现,会报错,ts并不能直接引入js的工具,需要@types/superagent
npm install @types/superagent --save
2.获取html
url:http://www.dell-lee.com/
打算拿到五个文章的标题以及图片的名称
//ts -> .d.ts ->js
//superagent是js的,ts不会分析
//需要@types
import superAgent from 'superagent'
class Crowller{

    private url='http://www.dell-lee.com/'
    private rawHtml=''
    async getRawHtml(){

        const res=await superAgent.get(this.url)
        this.rawHtml=res.text
        //res.text是正文内容
    }
    constructor(){

        //console.log('crowller!')
        this.getRawHtml()
    }
}
const crowller=new Crowller()
![]()
3.提取信息
使用cheerio库
npm install cheerio -D
npm install @types/cheerio -D
类似用jquery的方式使用cheerio库,本人jq基本上没咋学就是看输出结果和视频做的
//ts -> .d.ts ->js
//superagent是js的,ts不会分析
//需要@types
import superAgent from 'superagent'
import cheerio from 'cheerio'
interface course{

        title:string,
        pannel:string|undefined,
        index:number,
}
class Crowller{

    private url='http://www.dell-lee.com/'
    private rawHtml=''
    private $:cheerio.Root|null=null;

    getJsonInof(html:string){

        const courseInfos:course[]=[]
        this.$=cheerio.load(html)//解析成类似jq的方式
        const {
     $}=this
        const items=$('.course-item')
        //console.log(items)
        items.map((index,ele)=>{

            const descs=$(ele).find('.course-desc')
            const title=descs.eq(0).text()
            const src=$(ele).find('.course-img').attr('src')
            const pannel=src?.split(/[\/\.]/)[2]
            // console.log(pannel)
            // console.log(title)
            courseInfos.push({

                title,pannel,index
            })
        })
        return courseInfos
    }
    async getRawHtml(){

        const res=await superAgent.get(this.url)
        this.rawHtml=res.text
        //res.text是正文内容
        //console.log(this.rawHtml)
        const jsonInfo=this.getJsonInof(this.rawHtml)
        const result={

            time:new Date().valueOf(),
            data:jsonInfo
        }
        return result
    }
    constructor(){

        //console.log('crowller!')
        this.getRawHtml().then(res=>{

            console.log(res)
        })
    }
}
const crowller=new Crowller()
4.整理代码和存储过程
降低耦合性,用一个主函数来运行爬取html、整理对象、储存数据的过程
//ts -> .d.ts ->js
//superagent是js的,ts不会分析
//需要@types
import superAgent from 'superagent'
import cheerio from 'cheerio'
import fs from 'fs'
import path from 'path'
interface course {
     //课的数据结构
    title: string,
    pannel: string | undefined,
    index: number,
}
interface CourseResult {
     //整理的数据结构
    time: number,
    data: course[],
}
interface Content {
     //储存的数据结构
    [propName: number]: course[],
}
class Crowller {

    private url = 'http://www.dell-lee.com/'
    private $: cheerio.Root | null = null;
    async getRawHtml() {
     //拿到html
        const res = await superAgent.get(this.url)
        return res.text
        //res.text是正文内容
    }
    getJsonInof(html: string) {
     //把html字符串解析出变成所需对象
        const courseInfos: course[] = []
        this.$ = cheerio.load(html)//解析成类似jq的方式
        const {
      $ } = this
        const items = $('.course-item')
        //console.log(items)
        items.map((index, ele) => {

            const descs = $(ele).find('.course-desc')
            const title = descs.eq(0).text()
            const src = $(ele).find('.course-img').attr('src')
            const pannel = src?.split(/[\/\.]/)[2]
            // console.log(pannel)
            // console.log(title)
            courseInfos.push({

                title, pannel, index
            })
        })
        return courseInfos
    }
    saveContent(result: CourseResult) {
     //储存文件的操作
        //存到根目录的data下面
        const filePath = path.resolve(__dirname, '../data/course.json')
        let fileContent: Content = {
     }
        if (fs.existsSync(filePath)) {

            fileContent = JSON.parse(fs.readFileSync(filePath, 'utf-8'))
        }
        fileContent[result.time] = result.data
        fs.writeFileSync(filePath, JSON.stringify(fileContent))
    }
    async initSpiderProcess() {
     //主过程,降低耦合
        const html = await this.getRawHtml()//拿到html
        const jsonInfo = this.getJsonInof(html)//提取html数据
        const result = {
     //封装对象
            time: new Date().valueOf(),
            data: jsonInfo
        }
        this.saveContent(result)//储存对象到data/course中
        return result
    }
    run() {
     //启动爬虫
        //console.log('crowller!')
        this.initSpiderProcess().then(res => {

            console.log(res)
        })
    }
}
const crowller = new Crowller()//实例化爬虫
crowller.run()
5.使用组合设计模式优化代码
Crowller只负责主进程和初始化
新建一个Analyzer作为解析、定义接口、处理存储的类
//crowlle.ts
import superAgent from 'superagent'
import path from 'path'
import MyAnalyzer from './myanalyzer'
import HtmlAnalyzer from './htmlanalyzer'
export interface AnalyzerInterface {
     //通用的analyzer接口
    analyze:(html:string,filePath:string)=>string;
}
class Crowller {

    async getRawHtml() {
     //拿到html
        const res = await superAgent.get(this.url)
        return res.text
    }

    async initSpiderProcess(analyzer:AnalyzerInterface) {
     //主过程,降低耦合
        const html = await this.getRawHtml()//拿到html
        const result=analyzer.analyze(html,this.filePath)
        return result
    }
    constructor(private url:string,private filePath:string){
     }
    run(analyzer:AnalyzerInterface) {
     //启动爬虫
        this.initSpiderProcess(analyzer).then(res=>console.log(res))
    }
}
const url='http://www.dell-lee.com/'
const pathName=path.resolve(__dirname, '../data/course.json')
const crowller = new Crowller(url,pathName)//实例化爬虫
const analyzer=new MyAnalyzer()//分析器
crowller.run(myanalyzer)
crowller.run(new HtmlAnalyzer())
下面是整理好的分析器MyAnalyzer
import cheerio from 'cheerio'
import fs from 'fs'
import {
     AnalyzerInterface} from './crowlle'
interface course {
     //课的数据结构
    title: string,
    pannel: string | undefined,
    index: number,
}
interface CourseResult {
     //整理的数据结构
    time: number,
    data: course[],
}
interface Content {
     //储存的数据结构
    [propName: number]: course[],
}
export default class MyAnalyzer implements AnalyzerInterface{

    private getJsonInof(html: string) {
     //把html字符串解析出变成所需对象
        const courseInfos: course[] = []
        const $ = cheerio.load(html)//解析成类似jq的方式
        const items = $('.course-item')
        //console.log(items)
        items.map((index, ele) => {

            const descs = $(ele).find('.course-desc')
            const title = descs.eq(0).text()
            const src = $(ele).find('.course-img').attr('src')
            const pannel = src?.split(/[\/\.]/)[2]
            // console.log(pannel)
            // console.log(title)
            courseInfos.push({

                title, pannel, index
            })
        })
        return courseInfos
    }
    saveContent(result: CourseResult,filePath:string) {
     //储存文件的操作
        //存到根目录的data下面
        let fileContent: Content = {
     }
        if (fs.existsSync(filePath)) {

            fileContent = JSON.parse(fs.readFileSync(filePath, 'utf-8'))
        }
        fileContent[result.time] = result.data
        fs.writeFileSync(filePath, JSON.stringify(fileContent))
        return JSON.stringify(fileContent)
    }
    analyze(html:string,filePath:string){

        const jsonInfo = this.getJsonInof(html)//提取html数据
        const result = {
     //封装对象
            time: new Date().valueOf(),
            data: jsonInfo
        }
        return this.saveContent(result,filePath)
    }
}
如果我打算更换页面和整理方式,只需要再写一个有analyze方法的Analyzer就可以了
比如这样一个模板,是符合要求的(HtmlAnalyzer)
import {
     AnalyzerInterface} from './crowlle'
export default class HtmlAnalyzer implements AnalyzerInterface{

    analyze(html:string){

        return html
    }
}
原视频是把储存作为主操作,但是身为一个爬虫不一定直接就会储存,这样的功能可以包含在Analyzer中,而且可以保证Crowller的单纯性,只有初始化拉取某网站的html以及运行分析器Analyzer的程序,只把储存作为可选功能放到分析器中当然也可以像视频中的老师一样,把返回的result用fs.write写出去,但是我考虑到的是本身我的Analyzer中就有文件读写的复杂逻辑,再那边一起处理清楚,result做成状态码的形式也挺好
6.单例模式改写
主要是Analyzer的变动
import {
     AnalyzerInterface} from './crowlle'
export default class HtmlAnalyzer implements AnalyzerInterface{

/
    private constructor(){
     }
    private static instance:HtmlAnalyzer;
    public static getInstance(){

        if(!this.instance){

            this.instance=new HtmlAnalyzer()
        }
        return this.instance
    }
//
    analyze(html:string){

        console.log(html)
        return html
    }
}
7.项目进一步理解
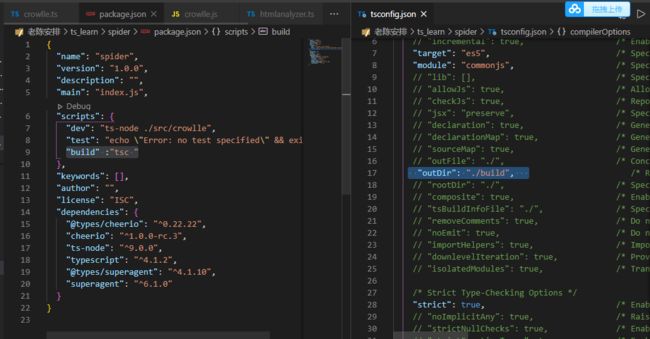
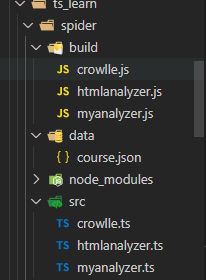
第一步 搞个build,即编译好js的命令
再package.json中增加script命令,然后在tsconfig.json中修改配置项outDir
还可以使用tsc -w自动检测改变
还可以使用nodemon检测自动运行
npm install nodemon -D
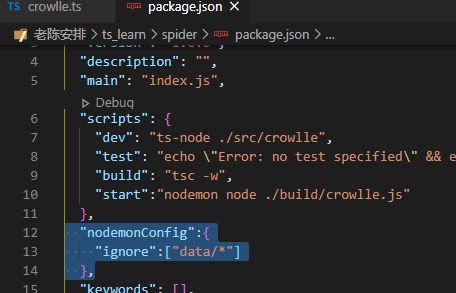
这时候发现会死循环刷新,所以要忽略data下面的变化
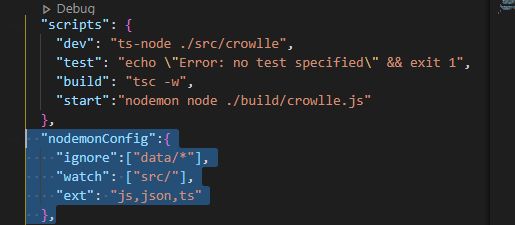
但是这时候只会检测js,所以还是要查一下nodemon的配置文件
然后在运行npm run start 就可以啦
不过这时候由于build检测ts,然后start再检测变动比较麻烦,想试试两句话用一个命令,用一个工具
npm install concurrently -D
之后就大功告成了
整理一下可以写成这样子
  "scripts": {

    "dev": "ts-node ./src/crowlle",
    "test": "echo \"Error: no test specified\" && exit 1",
    "d:build": "tsc ",
    "d:start":"nodemon node ./build/crowlle.js",
    "d":"concurrently npm:d:*"
  },
运行npm run d就行了
四、Typescript语法进阶
0.ts中的配置文件
https://www.typescriptlang.org/docs/handbook/tsconfig-json.html
首先我把自己的文件目录修改了,方便区分
安排好tsc-init
得到tsconfig.json即ts项目相关的配置项文件
只有当我们执行tsc命令的时候,ts的编译会通过该配置文件
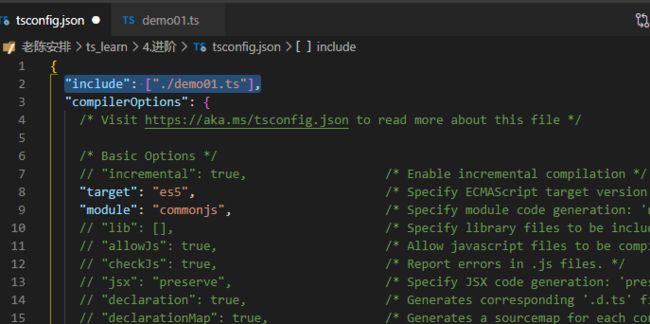
和我们之前tsc后面指定文件的用法不同,当我们只用tsc命令的时候,会去tsconfig找,默认会把目录下的所有ts文件都编译
如果想指定编译,像这样
https://typescript.bootcss.com/compiler-options.html
下面我跟着看了一下每个配置项的大概意思
{

  // "include": ["./**/*"],/*指定编译目录*/
  // "exclude": ["node_modules", "**/*.spec.ts"],/*排除的编译目录*/
  // "files":["demo01.ts"],/*指定编译文件*/
  //"extends": "",   // extends可以通过指定一个其他的tsconfig.json文件路径,来继承这个配置文件里的配置
  "compilerOptions": {

    /* Visit https://aka.ms/tsconfig.json to read more about this file */

    /* Basic Options */
    // "incremental": true,                   /* Enable incremental compilation 增量编译,只编译新增的内容*/
    "target": "es5",                          /* Specify ECMAScript target version: 'ES3' (default), 'ES5', 'ES2015', 'ES2016', 'ES2017', 'ES2018', 'ES2019', 'ES2020', or 'ESNEXT'. 用于指定编译后的版本目标*/
    "module": "commonjs",                     /* Specify module code generation: 'none', 'commonjs', 'amd', 'system', 'umd', 'es2015', 'es2020', or 'ESNext'. 指定编译使用的模块标准*/
    // "lib": [],                             /* Specify library files to be included in the compilation. 指定要包含在编译中的库文件*/
    // "allowJs": true,                       /* Allow javascript files to be compiled. 是否编译js文件*/
    // "checkJs": true,                       /* Report errors in .js files. 是否检查js的报错*/
    // "jsx": "preserve",                     /* Specify JSX code generation: 'preserve', 'react-native', or 'react'. 指定jsx的开发环境*/
    // "declaration": true,                   /* Generates corresponding '.d.ts' file. 是否编译时生成声明文件,不难和allowJs同时true*/
    // "declarationMap": true,                /* Generates a sourcemap for each corresponding '.d.ts' file. 是否为声明文件生成map文件*/
    // "sourceMap": true,                     /* Generates corresponding '.map' file. 编译时是否生成.map文件*/
    // "outFile": "./",                       /* Concatenate and emit output to single file. 输出文件,但想合并文件需要使用amd或system模块*/
    // "outDir": "./",                        /* Redirect output structure to the directory. 指定输出目录*/
    // "rootDir": "./",                       /* Specify the root directory of input files. Use to control the output directory structure with --outDir. 指定编译文件的入口目录*/
    // "composite": true,                     /* Enable project compilation 是否编译构建引用项目*/
    // "tsBuildInfoFile": "./",               /* Specify file to store incremental compilation information 增量编译文件的存储位置*/
    // "removeComments": true,                /* Do not emit comments to output. 是否去掉注释*/
    // "noEmit": true,                        /* Do not emit outputs. 不生成编译文件*/
    // "importHelpers": true,                 /* Import emit helpers from 'tslib'. 是否引入tslib的辅助工具*/
    // "downlevelIteration": true,            /* Provide full support for iterables in 'for-of', spread, and destructuring when targeting 'ES5' or 'ES3'. 降级遍历器的实现(es3/5)*/
    // "isolatedModules": true,               /* Transpile each file as a separate module (similar to 'ts.transpileModule'). 是否将每个文件作为单独模块,不可以和declaration同时设定*/

    /* Strict Type-Checking Options */
    "strict": true,                           /* Enable all strict type-checking options. 是否启动strict检查,开启等于下面几个都开启*/
    // "noImplicitAny": true,                 /* Raise error on expressions and declarations with an implied 'any' type. 是否需要显式声明any,默认false*/
    // "strictNullChecks": true,              /* Enable strict null checks. 是否对null和undefined进行检查*/
    // "strictFunctionTypes": true,           /* Enable strict checking of function types. 是否使用函数参数双向协变检查*/
    // "strictBindCallApply": true,           /* Enable strict 'bind', 'call', and 'apply' methods on functions. 是否对call、apply、bind绑定的方法参数严格检查*/
    // "strictPropertyInitialization": true,  /* Enable strict checking of property initialization in classes. 是否检查类的非undefined属性是否初始化*/
    // "noImplicitThis": true,                /* Raise error on 'this' expressions with an implied 'any' type. 当this表达式值为any类型,生成一个错误*/
    // "alwaysStrict": true,                  /* Parse in strict mode and emit "use strict" for each source file. 始终养个检查每个模块,设定"use strict"*/

    /* Additional Checks */
    // "noUnusedLocals": true,                /* Report errors on unused locals. 检查是否有定义未使用的变量*/
    // "noUnusedParameters": true,            /* Report errors on unused parameters. 检查是否有再函数体中未使用的参数*/
    // "noImplicitReturns": true,             /* Report error when not all code paths in function return a value. 检查函数是否有返回值,若无则提示*/
    // "noFallthroughCasesInSwitch": true,    /* Report errors for fallthrough cases in switch statement. 检查switch是否有case没有使用break跳出*/

    /* Module Resolution Options */
    // "moduleResolution": "node",            /* Specify module resolution strategy: 'node' (Node.js) or 'classic' (TypeScript pre-1.6). 模块解析策略,有'node'和'classic'两种类型*/
    // "baseUrl": "./",                       /* Base directory to resolve non-absolute module names. 解析非相对模块名称的基本目录,相对模块不会受baseUrl影响*/
    // "paths": {},                           /* A series of entries which re-map imports to lookup locations relative to the 'baseUrl'. 设置模块名称到基于baseUrl的路径映射*/
    // "rootDirs": [],                        /* List of root folders whose combined content represents the structure of the project at runtime. 指定路径列表,构建时编译器把该列表中的路径内容放到一个文件夹中*/
    // "typeRoots": [],                       /* List of folders to include type definitions from. 声明文件或文件夹的路径列表*/
    // "types": [],                           /* Type declaration files to be included in compilation. 指定需要包含的模块*/
    // "allowSyntheticDefaultImports": true,  /* Allow default imports from modules with no default export. This does not affect code emit, just typechecking. 允许从没有默认到处的模块中默认导入*/
    "esModuleInterop": true,                  /* Enables emit interoperability between CommonJS and ES Modules via creation of namespace objects for all imports. Implies 'allowSyntheticDefaultImports'. 通过为导入内容创建命名空间,实现CommonJs和ES模块之间的互操作性*/
    // "preserveSymlinks": true,              /* Do not resolve the real path of symlinks. 不把符号链接解析为其真实路径*/
    // "allowUmdGlobalAccess": true,          /* Allow accessing UMD globals from modules. 允许在模块中全局变量的方式访问umd模块*/

    /* Source Map Options */
    // "sourceRoot": "",                      /* Specify the location where debugger should locate TypeScript files instead of source locations. 指定调试器应该找到的ts文件而不是源文件位置,值会被写进.map中*/
    // "mapRoot": "",                         /* Specify the location where debugger should locate map files instead of generated locations. 用于指定调试器找到映射文件而非生成文件的位置,影响.map的sources属性*/
    // "inlineSourceMap": true,               /* Emit a single file with source maps instead of having a separate file. 指定是否将map文件的内容和js文件编译在同一个js文件中,如果设为true,则map的内容会以//# sourceMappingURL=然后拼接base64字符串的形式插入在js文件底部 */
    // "inlineSources": true,                 /* Emit the source alongside the sourcemaps within a single file; requires '--inlineSourceMap' or '--sourceMap' to be set. 用于指定是否进一步将.ts文件的内容也包含到输入文件中*/

    /* Experimental Options */
    // "experimentalDecorators": true,        /* Enables experimental support for ES7 decorators. 用于指定是否启用实验性的装饰器特性*/
    // "emitDecoratorMetadata": true,         /* Enables experimental support for emitting type metadata for decorators. 用于指定是否为装饰器提供元数据支持,关于元数据,也是ES6的新标准,可以通过Reflect提供的静态方法获取元数据,如果需要使用Reflect的一些方法,需要引入ES2015.Reflect这个库*/

    /* Advanced Options */
    "skipLibCheck": true,                     /* Skip type checking of declaration files. 对库定义文件跳过类型检查*/
    "forceConsistentCasingInFileNames": true  /* Disallow inconsistently-cased references to the same file. 禁止对同一个文件的不一致的引用*/
  }
}
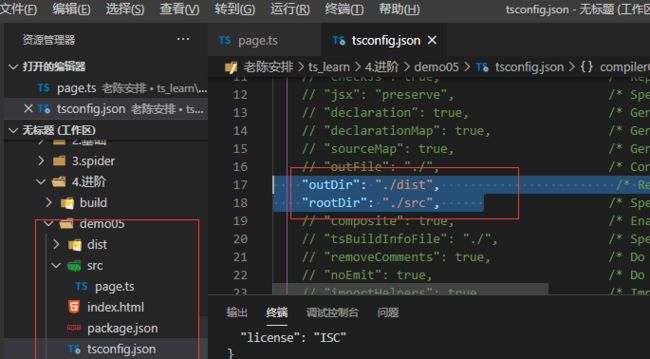
实现src和build的拆分
如果想编译js文件打开这两项
1.联合类型和类型保护
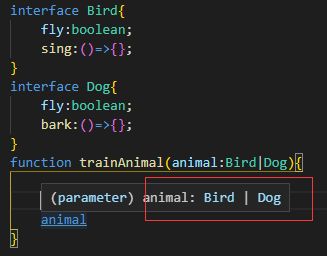
这里的animal使用了联合类型
但是由于联合类型的各类型不同,我们需要类型保护,来避免调用失误
//类型断言
interface Bird {

    fly: boolean;
    sing: () => {
     };
}
interface Dog {

    fly: boolean;
    bark: () => {
     };
}
function trainAnimal(animal: Bird | Dog) {

    if (animal.fly) {

        (animal as Bird).sing()
        //这里使用as断言,用自己的逻辑来梳理类型
    }
    (animal as Dog).bark()
}

//in语法
function trainAnimal2(animal: Bird | Dog) {

    if ('sing' in animal) {
     //这里使用in检索
        animal.sing()

    } else {
     //这里自动检测成除了Bird的情况
        animal.bark()
    }
}

//typeof语法
function add(first: string | number, second: string | number) {

    if (typeof first === "number" && typeof second === "number")
        return first + second
    else {

        return first + '' + second
    }
}
console.log(add(1,'23'))

//用instanceof来做类型保护,
//需要用class而不是interface
class NumberObj {

    constructor(public count: number) {
     }
}
function add2(first: object | NumberObj, second: object | NumberObj) {


    if (first instanceof NumberObj && second instanceof NumberObj) {

        return first.count + second.count
    }
    return 0
}
let f:NumberObj={
     count:1}
let s:NumberObj=new NumberObj(2)
console.log(add2(f,s))//这样f不行,0
console.log(add2(new NumberObj(1),s))//这样可以,3,instanceof基于obj的原型链
2.Enum枚举
namespace demo02 {

    const Status = {

        OFF: 0,
        ON: 1,
        ERR: 2,
    }
    //上面是js通常用法,可以用enum枚举代替
    //枚举通常从0开始赋值,但是也可以自定义数字,比如OFF=1,就会1,2,3这样枚举
    //也可以ON=2,会变成0,2,3
    enum StatusEnum {

        OFF, ON, ERR
    }
    function getResult(status: number) {

        if (status === StatusEnum.OFF) {

            return 'off'
        } else if (status === StatusEnum.ON) {

            return 'on'
        }
        return 'err'
    }
    console.log(getResult(2), getResult(Status.ON), getResult(StatusEnum.OFF))
    console.log(StatusEnum)//{ '0': 'OFF', '1': 'ON', '2': 'ERR', OFF: 0, ON: 1, ERR: 2 }
}
3.函数泛型
namespace demo03 {

    // function join(first:string|number,second:string|number){

    //     return `${first}${second}`
    // }
    //如果我想保证两个参数同类型但不一定是什么类型,就要用泛型
    function join<T>(first: T, second: T) {

        return `${
       first}${
       second}`
    }
    //join(1,'1')//报错
    //join(1,1)//报错
    console.log(join(1, 1), join<string>('1', '1'))//这样是可以的,不写泛型也会自动推断

    function map<M>(params:M[],_:Array<M>){
     //指M数组,M[]和Array差不多
        return params.concat(_)
    }
    console.log(map<string>(['123'],['0']))
}
4.类中的泛型以及泛型类型
namespace demo04 {

    class DataManager<T>{

        constructor(private data: T[]) {
      }
        getItem(index: number) {

            return this.data[index]
        }
    }
    const data = new DataManager(['1', '2', '3'])//类自动进行了推断
    console.log(data.getItem(1))
    const numbers = new DataManager<number>([1, 2, 3])
    console.log(numbers)

    //让泛型继承接口,会限制格式
    interface Obj {

        name: string
    }
    class DataManager1<T extends Obj>{

        constructor(private data: T[]) {
      }
        getItem(index: number) {

            return this.data[index].name
        }
    }
    const data1 = new DataManager1<Obj>([{
      name: 'dell' }])
    console.log(data.getItem(0))

    class DataManager2<T extends number | string>{
     //让T只能是某些类型
        constructor(private data: T[]) {
      }
        getItem(index: number): T {

            return this.data[index]
        }
    }
    interface Test {

        name: string
    }
    const data2 = new DataManager2<string>([''])

    //泛型和函数
    const fun: <T>(a: T) => string
        = <T>(a: T) => '123'
    console.log(fun<number>(0))
}
5.namespce命名空间(上
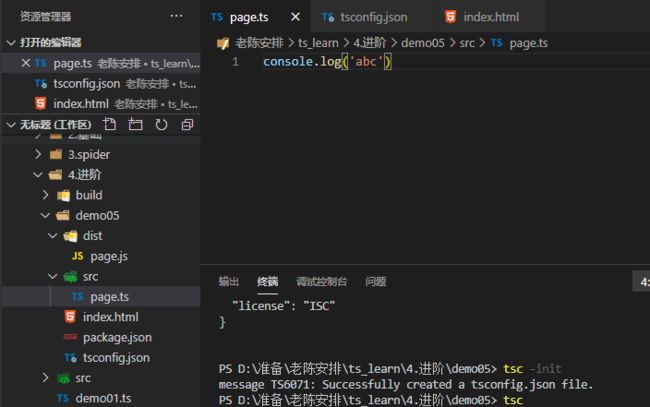
这个弄个项目目录
然后tscinit
搞定目录
然后编写测试输出,并在html中引入
之后是对于namespace的尝试
首先对于page.ts
class Header{

    constructor(){

        const elem=document.createElement('div')
        elem.innerText='Header'
        elem.setAttribute('style','background-color:red')
        document.body.appendChild(elem)
    }
}
class Content{

    constructor(){

        const elem=document.createElement('div')
        elem.innerText='Content'
        elem.setAttribute('style','background-color:red')
        document.body.appendChild(elem)
    }
}
class Footer{

    constructor(){

        const elem=document.createElement('div')
        elem.innerText='Footer'
        elem.setAttribute('style','background-color:red')
        document.body.appendChild(elem)
    }
}
class Page{

    constructor(){

        new Header()
        new Content()
        new Footer()
    }
}
然后tsc编译代码
会发现可以运行
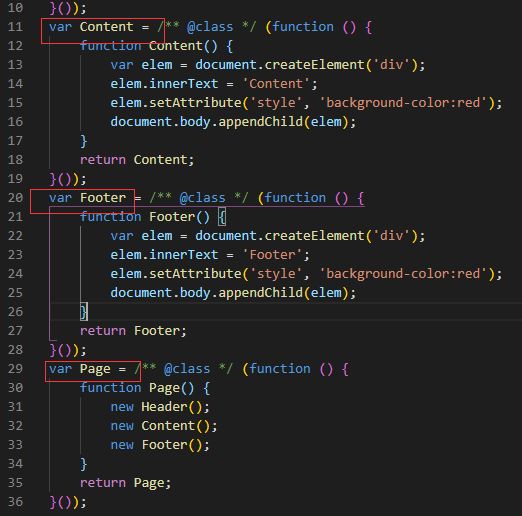
但是这时候我们可以看一下js代码
Header、Content、Footer、Page都是全局变量,这个是一个不好的现象,导致不可维护,全局变量都可以被访问到,其实我们只需要Page的暴露,别的都不想暴露
这时候我们也知道,ts是没有类似java的类中类这样的形式的
所以就需要namespace形成模块
namespace Demo{

    class Header{

        constructor(){

            const elem=document.createElement('div')
            elem.innerText='Header'
            elem.setAttribute('style','background-color:red')
            document.body.appendChild(elem)
        }
    }
    class Content{

        constructor(){

            const elem=document.createElement('div')
            elem.innerText='Content'
            elem.setAttribute('style','background-color:red')
            document.body.appendChild(elem)
        }
    }
    class Footer{

        constructor(){

            const elem=document.createElement('div')
            elem.innerText='Footer'
            elem.setAttribute('style','background-color:red')
            document.body.appendChild(elem)
        }
    }
    export class Page{
     //暴露加export
        constructor(){

            new Header()
            new Content()
            new Footer()
        }
    }
}
这时候的js代码是
"use strict";
var Demo;
(function (Demo) {

    var Header = /** @class */ (function () {

        function Header() {

            var elem = document.createElement('div');
            elem.innerText = 'Header';
            elem.setAttribute('style', 'background-color:red');
            document.body.appendChild(elem);
        }
        return Header;
    }());
    var Content = /** @class */ (function () {

        function Content() {

            var elem = document.createElement('div');
            elem.innerText = 'Content';
            elem.setAttribute('style', 'background-color:red');
            document.body.appendChild(elem);
        }
        return Content;
    }());
    var Footer = /** @class */ (function () {

        function Footer() {

            var elem = document.createElement('div');
            elem.innerText = 'Footer';
            elem.setAttribute('style', 'background-color:red');
            document.body.appendChild(elem);
        }
        return Footer;
    }());
    var Page = /** @class */ (function () {

        function Page() {

            new Header();
            new Content();
            new Footer();
        }
        return Page;
    }());
    Demo.Page = Page;
})(Demo || (Demo = {
     }));
发现可以暴露出Demo.page
这样就可以执行了,并且不会造成全局暴露过多,相当于把很多变量合并成一个可以隐藏内部类的变量,想暴露什么内容只需要手动export就可以
6.namespce命名空间(下
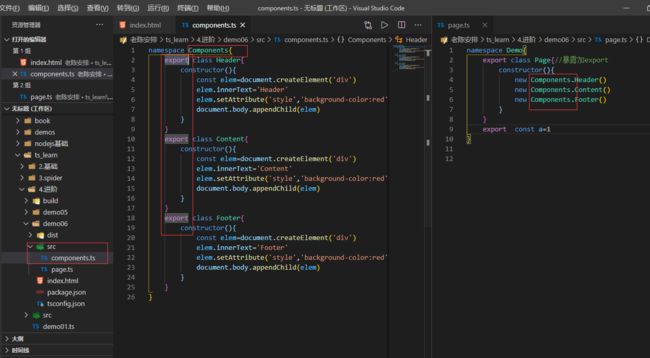
拆分组件逻辑
copy一份demo05为demo06
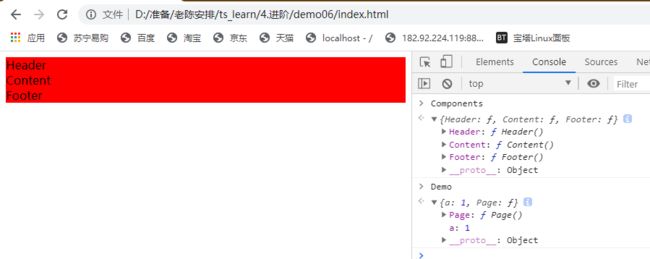
把组件通过export导出后,通过命名空间的全局变量就可以在ts内直接引用
但是入口还是只有引入文件的全局变量
这时候只需要修改html
就可以正常运行了
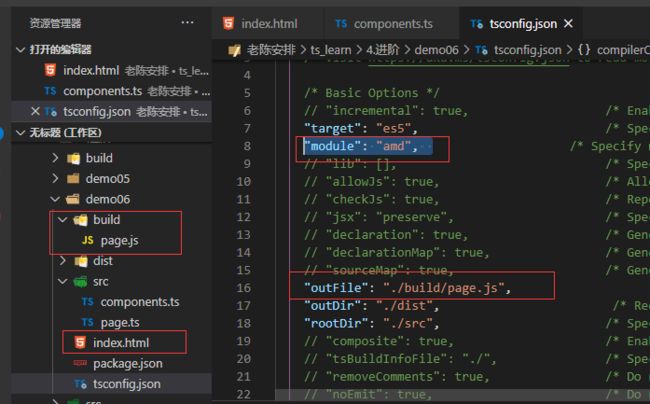
但是这样还是有点麻烦,希望变成单出口
需要修改tsconfig的配置项
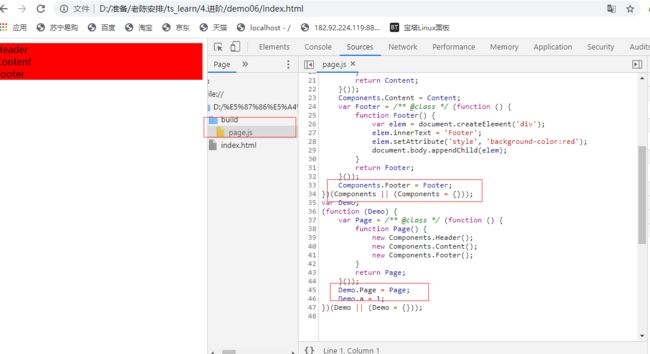
outFile设定为出口文件、module只支持amd或system,这时候就可以了
另外命名空间还可以嵌套或者export各种各样的变量或接口
namespace Components{

    export namespace SubComponents{

        export interface User{

            name:string
        }
    }
    export class Header{

        constructor(){

            const elem=document.createElement('div')
            elem.innerText='Header'
            elem.setAttribute('style','background-color:red')
            document.body.appendChild(elem)
        }
    }
    export class Content{

        constructor(){

            const elem=document.createElement('div')
            elem.innerText='Content'
            elem.setAttribute('style','background-color:red')
            document.body.appendChild(elem)
        }
    }
    export class Footer{

        constructor(){

            const elem=document.createElement('div')
            elem.innerText='Footer'
            elem.setAttribute('style','background-color:red')
            document.body.appendChild(elem)
        }
    }
}
///7.import对应的模块化
对于es6使用了之后 我们更习惯import进行模块化
我copy一份demo06的代码
删减修改之后
export class Header {

    constructor() {

        const elem = document.createElement('div')
        elem.innerText = 'Header'
        elem.setAttribute('style', 'background-color:red')
        document.body.appendChild(elem)
    }
}
export class Content {

    constructor() {

        const elem = document.createElement('div')
        elem.innerText = 'Content'
        elem.setAttribute('style', 'background-color:red')
        document.body.appendChild(elem)
    }
}
export class Footer {

    constructor() {

        const elem = document.createElement('div')
        elem.innerText = 'Footer'
        elem.setAttribute('style', 'background-color:red')
        document.body.appendChild(elem)
    }
}
import {
     Header,Content,Footer} from './components'
export class Page {
     //暴露加export
    constructor() {

        new Header()
        new Content()
        new Footer()
    }
}
不能直接运行amd模块化
需要使用require.js的cdn作为插件
<script src="https://cdn.bootcdn.net/ajax/libs/require.js/2.3.6/require.min.js">script>
然后导入采用amd的形式
<html lang="en">
<head>
    <meta charset="UTF-8">
    <title>demo07title>
    <script src="https://cdn.bootcdn.net/ajax/libs/require.js/2.3.6/require.min.js">script>
    <script src="./build/page.js">script>
head>
<body>
    <script>
        //使用amd的引用方式
        require(['page'],function(module){

            module.Page()
        })
    script>
body>
html>
当然真正做项目会搭配webpack编写js的出口文件使它适配es5
8.使用parcel打包
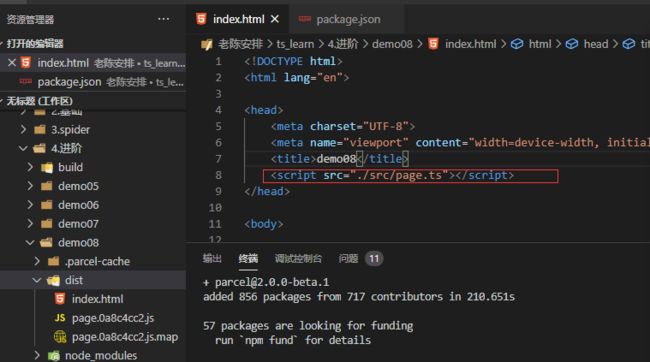
首先新建demo08文件夹,然后进行初始化
npm init -y
tsc --init
mkdir src
初始目录和配置代码如上
截下来下载parcel打包工具
npm install parcel@next -D
编译后的index.html和js文件自动打包到dist中并启动一个默认的localhost服务器
甚至可以直接识别打包ts文件去运行
9.描述文件中的全局类型
.d.ts这样的定义文件可以描述js文件并引入到ts中使用
现在拷贝一下demo08的代码
然后在html引入jquery的cdn
虽然可以使用但是$符号是报错的,需要我们有定义文件
定义一个jquery.d.ts文件来代替我们经常使用的@types类型定义包
$是一个参数为void函数的void函数
发现ts那边正常了
//page.ts
$(function(){

    $('body').html('hello')//这里和外面的使用方式不一样有返回值了
    new $.fn.init()//通过.运算符取对象和类构造器
})
//jquery.d.ts
interface JqueryInstance {

    html: (html: string) => JqueryInstance
}
// declare var $: (param: () => void) => void;//定义全局变量

declare function $(readyFunc: () => void): void;//定义全局函数
declare function $(selector: string): JqueryInstance;//函数重载声明


// //里面是多种实现方法,相当于上边两次分别声明,实现函数重载定义
// interface Jquery{

//     (readyFunc: () => void): void;
//     (selector: string): JqueryInstance;
// }
// declare var $:Jquery

//对对象进行类型定义
declare namespace ${

    namespace fn{

        class init {
     }
    }
}
这里注意interface的重载方法不能和namespace一起用,但是namespace方法可以和function单独重载一起用
10.通过.d.ts进行模块声明
复制一份demo09
安装一份jquery
npm install jquery --save
删掉html中的cdn引入
//jquery.d.ts
//es6模块化
declare module 'jquery' {

    interface JqueryInstance {

        html: (html: string) => JqueryInstance
    }
    //$是一个混合类型
    function $(readyFunc: () => void): void;//定义全局函数
    function $(selector: string): JqueryInstance;//函数重载声明
    //对对象进行类型定义
    namespace $ {

        namespace fn {

            class init {
      }
        }
    }
    export default $ //模块的导出
}
//page.ts
import $ from 'jquery'
$(function(){

    $('body').html('hello')//这里和外面的使用方式不一样有返回值了
    new $.fn.init()
})
11.keyof关键词和泛型
keyof someOne产生的类型是someOne的属性名称字符串字面量类型构成的联合类型
namespace demo11{

    interface Person {

        name: string;
        age: number;
        gender?: string;
    }
    class Teacher {

        constructor(private info: Person) {
      }
        getInfo<T extends keyof Person>(key: T) {

            //type T='name'|'age'|'gender'
            //keyof 通过遍历Person上的属性保证了T类型属于Person的属性的类型
            return this.info[key]
        }
    }
    const teacher = new Teacher({

        name: 'teacher',
        age: 30,
        gender: 'male'
    })
    const name = teacher.getInfo('name')
    const age = teacher.getInfo('age')
    const gender = teacher.getInfo('gender')
    console.log(name,age,gender)
}
五、使用Express开发数据爬取和展示接口
1.项目初始化
拷贝一份第三章的代码
要把这部分代码改成通过express搭建的数据接口
"d":"tsc && concurrently npm:d:*"
上边修改script命令以防同步任务报错
npm install express --save
npm install @types/express --save
//index.ts
import express, {
      Express } from 'express'
import router from './router'
const app: Express = express()
app.use(router)
app.listen(7001, () => {

    console.log('http://localhost:7001')
})
//router.ts
import {
      Router, Request, Response } from 'express'
import Crowller from './crowlle'
import MyAnalyzer from './myanalyzer'
import path from 'path'
const router = Router()
router.get('/', (req: Request, res: Response) => {

    res.send('hello')
})
router.get('/getdata', async(req: Request, res: Response) => {

    const url = 'http://www.dell-lee.com/'
    const pathName = path.resolve(__dirname, '../data/course.json')
    const crowller = new Crowller(url, pathName)
    const myanalyzer = MyAnalyzer.getInstance()
    const data=await crowller.run(myanalyzer)
    res.send(data)
})
export default router
我回去对爬虫进行了修改,让他可以返回值,并且使用async的方式异步等待
2.解决express登录检验问题
实现安全校验避免被刷爆服务器
npm install body-parser -D
body-parser用于解析post的body
//router.ts
import {
Router, Request, Response } from 'express'
import Crowller from './crowlle'
import MyAnalyzer from './myanalyzer'
import path from 'path'
const router = Router()
const _password='123'
router.get('/', (req: Request, res: Response) => {
res.send(`
`)
})
router.post('/getdata', async (req: Request, res: Response) => {
const password=req?.body?.password
if(password!==_password){
//console.log(password)
res.send('error')
}
const url = 'http://www.dell-lee.com/'
const pathName = path.resolve(__dirname, '../data/course.json')
const crowller = new Crowller(url, pathName)
const myanalyzer = MyAnalyzer.getInstance()
const data = await crowller.run(myanalyzer)
res.send(data)
})
export default router
//index.ts
import express, {
      Express } from 'express'
import router from './router'
import bodyParser from 'body-parser'
const app: Express = express()
//parse application/x-www-form-urlencoded
app.use(bodyParser.urlencoded({
     extended:false}))//在router前使用中间件解析body
//parse application/json
app.use(bodyParser.json())//顺便加上json的解释
app.use(router)
app.listen(7001, () => {

    console.log('http://localhost:7001')
})
其中视频中说到了两个问题
express 的@types中类型定义不准确,有滥用的any的问题
使用中间件的时候对req或res做了修改,实际上类型并不能改变
3.解决express的类型定义问题
第一个问题,我可以在本地定义接口让他继承原接口
import {
Router, Request, Response } from 'express'
import Crowller from './crowlle'
import MyAnalyzer from './myanalyzer'
import path from 'path'
const router = Router()
const _password = '123'
interface RequestWithBody extends Request {
//靠interface覆盖修饰类型
body: {
[key: string]: string | undefined
password?: string
}
}
router.get('/', (req: Request, res: Response) => {
res.send(`
`)
})
router.post('/getdata', async (req: RequestWithBody, res: Response) => {
const password = req.body.password
if (password !== _password) {
//console.log(password)
res.send('error:'+req.test)
return
} else {
const url = 'http://www.dell-lee.com/'
const pathName = path.resolve(__dirname, '../data/course.json')
const crowller = new Crowller(url, pathName)
const myanalyzer = MyAnalyzer.getInstance()
const data = await crowller.run(myanalyzer)
res.send(data)
}
})
export default router
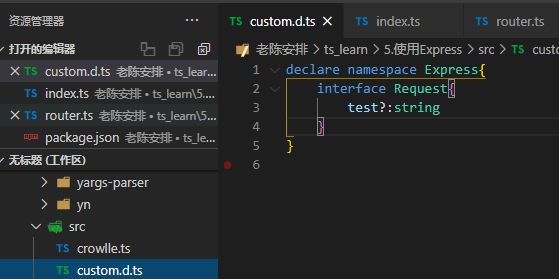
第二个问题可以在本地定义全局声明文件的接口让他与原声明文件融合
import express, {
      Express, Request } from 'express'
import router from './router'
import bodyParser from 'body-parser'
const app: Express = express()
//parse application/x-www-form-urlencoded
app.use(bodyParser.urlencoded({
      extended: false }))//在router前使用中间件解析body
//parse application/json
app.use(bodyParser.json())//顺便加上json的解释
//自定义中间件
app.use((req:Request, res, next) => {

    req.test = 'test'//直接加会因为没有该属性而报错,使用custom.d.ts进行类型融合
    next()
})
app.use(router)
app.listen(7001, () => {

    console.log('http://localhost:7001')
})
4.登录功能完善
npm install cookie-session --save
npm install @types/cookie-session --save
未登录可以登录可以看已经爬取的内容
已经登陆可以登出也可以爬取和查看
通过session可以缓存登录情况
//router.ts
import {
Router, Request, Response } from 'express'
import Crowller from './crowlle'
import MyAnalyzer from './myanalyzer'
import path from 'path'
import fs from 'fs'
const router = Router()
const _password = '123'
interface RequestWithBody extends Request {
//靠interface覆盖修饰类型
body: {
[key: string]: string | undefined
password?: string
}
}
router.get('/', (req: Request, res: Response) => {
//首页
const isLogin = req.session ? req.session.login : false
if (isLogin) {
res.send(`
logout
spider
show
`)
} else {
res.send(`
`)
}
})
router.get('/logout', (req: Request, res: Response) => {
//登出
if (req.session) req.session.login = false
res.redirect('/')
})
router.post('/login', async (req: RequestWithBody, res: Response) => {
//登录
const password = req.body.password
const isLogin = req.session ? req.session.login : false
if (isLogin) {
res.send('successed ever')
} else {
if (password !== _password) {
//密码错误
res.send('fail')
} else {
//密码正确
if (req.session) {
req.session.login = true;
res.send('success')
}
}
}
})
router.get('/getdata', async (req: RequestWithBody, res: Response) => {
//登录后可以爬
const isLogin = req.session ? req.session.login : false
if (!isLogin) {
//console.log(password)
res.send('error:' + req.test)
return
} else {
const url = 'http://www.dell-lee.com/'
const pathName = path.resolve(__dirname, '../data/course.json')
const crowller = new Crowller(url, pathName)
const myanalyzer = MyAnalyzer.getInstance()
const data = await crowller.run(myanalyzer)
res.send(data)
}
})
router.get('/showdata', async (req: Request, res: Response) => {
//只展示不爬
try {
const pathName = path.resolve(__dirname, '../data/course.json')
const data = await fs.readFileSync(pathName, 'utf-8')
res.json(data)
}catch(e){
res.send('err:'+e)
}
})
export default router
//index.ts
import express, {
      Express, Request } from 'express'
import router from './router'
import bodyParser from 'body-parser'
import cookieSession from 'cookie-session'
const app: Express = express()
//parse application/x-www-form-urlencoded
app.use(bodyParser.urlencoded({
      extended: false }))//在router前使用中间件解析body
//parse application/json
app.use(bodyParser.json())//顺便加上json的解释
//自定义中间件
app.use((req: Request, res, next) => {

    req.test = 'test'//直接加会因为没有该属性而报错,使用custom.d.ts进行类型融合
    next()
})
app.use(cookieSession({

    name: 'session',
    keys: ['tset'],
    maxAge: 24 * 60 * 60 * 1000,//24小时
}))
app.use(router)
app.listen(7001, () => {

    console.log('http://localhost:7001')
})
5.代码优化
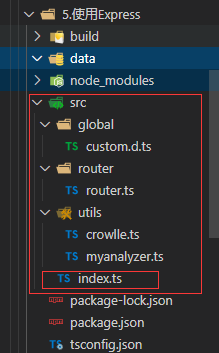
首先优化一下目录和路径
之后通过修改res.json实现接口化的json返回数据
新建一个工具utils/util.ts
//util.ts
interface Result {

    success: boolean;
    errMsg?: string;
    data: any;
    time:number;
}
export const getResponseData = (data: any, errMsg?: string): Result => {

    const time=new Date().valueOf()
    if (errMsg) {

        return {

            success: false,
            errMsg,
            data,
            time
        }
    } else {

        return {

            success: true,
            data,
            time
        }
    }
}
针对router里的请求做修改
import {
Router, Request, Response, NextFunction } from 'express'
import Crowller from '../utils/crowlle'
import MyAnalyzer from '../utils/myanalyzer'
import path from 'path'
import fs from 'fs'
import {
getResponseData } from '../utils/util'
const router = Router()
const _password = '123'
const pathName = path.resolve(__dirname, '../../data/course.json')
interface RequestWithBody extends Request {
//靠interface覆盖修饰类型
body: {
[key: string]: string | undefined
password?: string
}
}
const checkLogin = (req: RequestWithBody, res: Response, next: NextFunction) => {
//自定义中间件,代替业务中的通用判断作为接口保护
const isLogin = req.session ? req.session.login : false
if (isLogin) {
next() } else {
res.json(getResponseData(null, '请先登录'))
}
}
router.get('/', (req: Request, res: Response) => {
//首页
const isLogin = req.session ? req.session.login : false
if (isLogin) {
res.send(`
logout
spider
show
`)
} else {
res.send(`
`)
}
})
router.get('/logout', checkLogin, (req: Request, res: Response) => {
//登出
if (req.session) req.session.login = false
res.json(getResponseData('登出成功'))
})
router.post('/login', async (req: RequestWithBody, res: Response) => {
//登录
const password = req.body.password
const isLogin = req.session ? req.session.login : false
if (isLogin) {
res.json(getResponseData(null,'登陆过,请刷新首页'))
} else {
if (password !== _password) {
//密码错误
res.json(getResponseData(null,'密码错误'))
} else {
//密码正确
if (req.session) {
req.session.login = true;
res.json(getResponseData('登陆成功'))
}
}
}
})
router.get('/getdata', checkLogin, async (req: RequestWithBody, res: Response) => {
//登录后可以爬
const url = 'http://www.dell-lee.com/'
const crowller = new Crowller(url, pathName)
const myanalyzer = MyAnalyzer.getInstance()
const data = await crowller.run(myanalyzer)
res.json(getResponseData(JSON.parse(data)))
})
router.get('/showdata', async (req: Request, res: Response) => {
//只展示不爬
try {
const data = await fs.readFileSync(pathName, 'utf-8')
res.json(getResponseData(JSON.parse(data)))
} catch (e) {
res.json(getResponseData(null,e))
}
})
export default router
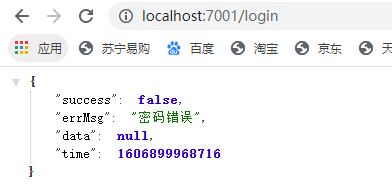
把所有的数据都改成接口方式返回类似这样(UI用了谷歌浏览器的JSON-formatter插件美化了)
六、Typescript高级语法
1.类的装饰器初步
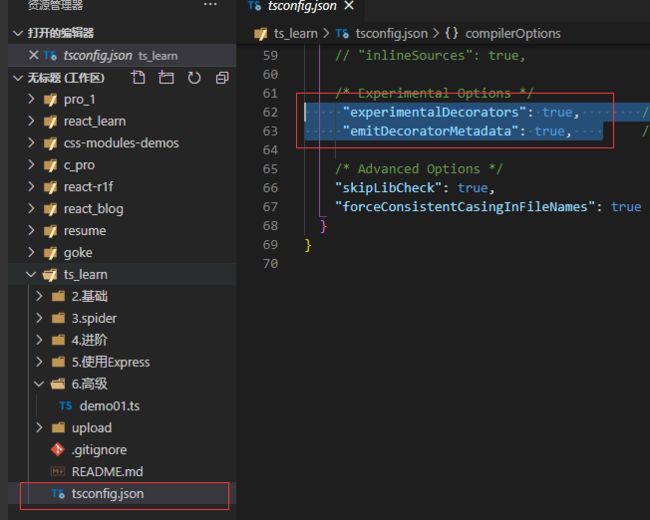
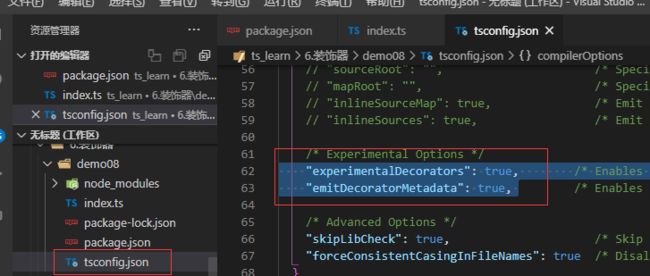
先在目录下tsconfig.json,打开装饰器的开关
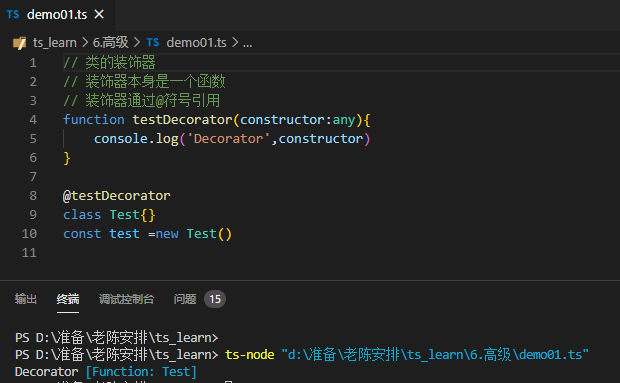
尝试运行一下
decorator在class类创建好之后,立即执行。因为装饰器是对类进行附加修饰
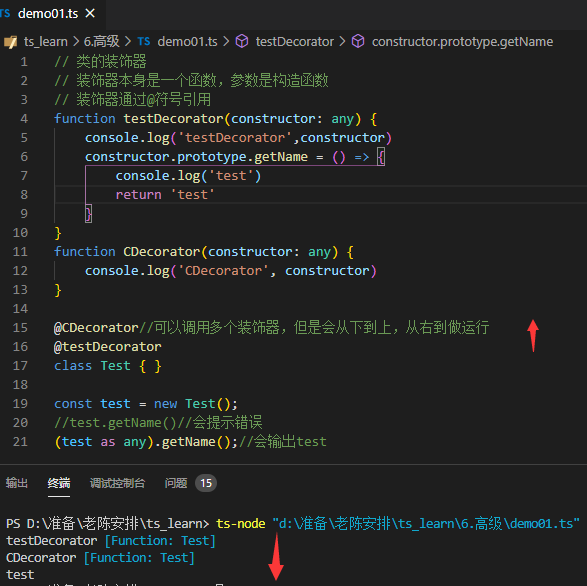
装饰器也有调用顺序
装饰器是函数,也可以使用封装好装饰器
namespace demo01{

// 类的装饰器
// 装饰器本身是一个函数,参数是构造函数
// 装饰器通过@符号引用
function testDecorator(constructor: any) {

    console.log('testDecorator', constructor)
    constructor.prototype.getName = () => {

        console.log('test')
        return 'test'
    }
}

function CDecorator(constructor: any) {

    console.log('CDecorator', constructor)
}

function FDecorator(flag:boolean) {

    if(flag){

        return function (constructor: any) {

            console.log('FDecorator', constructor)
        }
    }else{

        return function (constructor: any) {
     }//空的装饰器
    }

}

@FDecorator(true)//可以使用函数返回值封装装饰器,或者进行中间操作,参数判断
@CDecorator//可以调用多个装饰器,但是会从下到上,从右到做运行
@testDecorator
class Test {
      }

const test = new Test();
//test.getName()//会提示错误
(test as any).getName();//会输出test
}
2.类的装饰器使用
{}>
这个泛型是指一个接受多个任意参数的构造函数,返回值是一个any类型的类型,基本上就是我们的class
然后T继承上面这个类型
然后使用下面的装饰器使用方法,就可以支持ts的类型提示了
namespace demo02 {

    function testDecorator
        <T extends new (...args: any[]) => any>//为传参使用构造函数类型
        (constructor: T) {

        return class extends constructor {

            //name = 'lee'//扩展constructor的传参
            getName = () => {
     //扩展一个函数,但是ts不会自动识别到函数
                console.log(this.name)
            }
        }
    }

    const Test = testDecorator(
        class {
     //原始匿名类
            name: string
            constructor(name: string) {

                this.name = name
            }
        }
    )
    //这次的Test是装饰之后的class所以会有语法提示

    // class Test {

    //     name: string
    //     constructor(name: string) {

    //         this.name = name
    //     }
    // }
    const test = new Test('dell');
    console.log(test)
    test.getName()
}
如果还想封装就在外面包裹函数,像视频里那样,这里使用的是简单的版本,解决ts的提示和类型报错即可
3.类的方法装饰器
找到descriptor的描述
https://developer.mozilla.org/zh-CN/docs/Web/JavaScript/Reference/Global_Objects/Object/defineProperty
-
configurable当且仅当该属性的
configurable键值为true时,该属性的描述符才能够被改变,同时该属性也能从对应的对象上被删除。 默认为false。 -
enumerable当且仅当该属性的
enumerable键值为true时,该属性才会出现在对象的枚举属性中。 默认为false。
数据描述符还具有以下可选键值:
-
value该属性对应的值。可以是任何有效的 JavaScript 值(数值,对象,函数等)。 默认为
undefined。 -
writable当且仅当该属性的
writable键值为true时,属性的值,也就是上面的value,才能被赋值运算符改变。 默认为false。
存取描述符还具有以下可选键值:
-
get属性的 getter 函数,如果没有 getter,则为
undefined。当访问该属性时,会调用此函数。执行时不传入任何参数,但是会传入this对象(由于继承关系,这里的this并不一定是定义该属性的对象)。该函数的返回值会被用作属性的值。 默认为undefined。 -
set属性的 setter 函数,如果没有 setter,则为
undefined。当属性值被修改时,会调用此函数。该方法接受一个参数(也就是被赋予的新值),会传入赋值时的this对象。 默认为undefined。
namespace demo03 {

    //类的方法的装饰器
    function getNameDecorator(target: any, key: string, descriptor: PropertyDescriptor) {
     //类创建好立即装饰
        //普通方法,target对应的是类的prototype,key是对应的方法名,descriptor是函数的自定义形式
        //静态方法,target对应的是类的构造函数
        //console.log(target,key,descriptor,target[key])
        // value: [Function] 值
        // writable: true 可修改
        // enumerable: true 可枚举
        // configurable: true 可配置
        descriptor.writable = false//把可修改关掉
        descriptor.value = function () {

            console.log('descriptor')
        }
    }
    class Test {

        name: string
        constructor(name: string) {

            this.name = name
        }
        @getNameDecorator
        getName() {

            console.log('getName')
            return this.name
        }
        // @getNameDecorator
        // static say(){

        //     console.log('say')
        // }
    }
    const test = new Test('dell');
    console.log(test)
    // test.getName=()=>{

    //     //Cannot assign to read only property 'getName' of object '#'
    //     return '123'
    // }//运行错误
    test.getName()
}
4.类的访问器装饰器
注意 TypeScript 不允许同时装饰一个成员的 get 和 set 访问器。取而代之的是,一个成员的所有装饰的必须应用在文档顺序的第一个访问器上。这是因为,在装饰器应用于一个属性描述符时,它联合了 get 和 set 访问器,而不是分开声明的。
namespace demo04 {

    function visitDecorator(target: any, key: string, descriptor: PropertyDescriptor) {

        //访问器和方法的装饰器形同
        //descriptor.writable=false//组织修改值
    }
    class Test {

        private _name: string
        constructor(name: string) {

            this._name = name
        }
        // getName() {

        //     console.log('getName')
        //     return this.name
        // }
        get name() {

            return this._name
        }
        @visitDecorator
        set name(name: string) {

            this._name = name
        }
        //访问器不能同时加修饰器
    }
    const test = new Test('dell');
    test.name = 'test'
    console.log(test.name)
}
5.类的属性装饰器
修改于原型中
namespace demo05 {

    function nameWritableDecorator(target: any, key: string): any {

        //console.log(target, key)
        //新建descriptor替换掉原本的,需要返回类型为any
        const descriptor: PropertyDescriptor = {

            writable:true
        }
        return descriptor
    }
    class Test {

        @nameWritableDecorator
        name: string
        constructor(name: string) {

            this.name = name
        }
    }
    const test = new Test('dell');
    console.log(test.name)
}
6.类的参数装饰器
namespace demo05 {

    function paramDecorator(target: any, key: string, paramIndex: number) {

        //原型,方法名,参数序号
        console.log(target, key, paramIndex)
    }
    class Test {

        constructor() {
      }
        getInfo( name: string,@paramDecorator age: number) {

            console.log(name, age)
        }
    }
    const test = new Test();
    test.getInfo('dell', 30)

}
7.装饰器小例子(方法装饰器、工厂模式)
namespace demo07 {

    const userInfo: any = undefined
    function catchError(msg: string) {

        return function (target: any, key: string, descriptor: PropertyDescriptor) {

            const fn = descriptor.value
            descriptor.value = function () {

                try {

                    fn()
                } catch (e) {

                    console.log('error:', msg)
                }
            }
        }
    }

    class Test {

        @catchError('userInfo.name不存在')
        getName() {

            return userInfo.name
        }
        getAge() {

            try {

                return userInfo.age
            }
            catch (e) {

                console.log('userInfo.age不存在')
            }
        }
        @catchError('userInfo.gender不存在')
        getGender(){

            return userInfo.gender
        }
    }
    //原始版本为getAge,优化装饰器使用getName,实现了代码复用
    const test = new Test()
    test.getName()
    test.getAge()
    test.getGender()
}
8.reflect-metadata
Reflect是es6中的内容,作用就是可以实现对变量操作的函数化
Relfect Metadata,简单来说,你可以通过装饰器来给类添加一些自定义的信息。然后通过反射将这些信息提取出来。当然你也可以通过反射来添加这些信息
新建文件夹demo08
npm init
tsc --init
npm install typescript --save
npm install reflect-metadata --save
npm install ts-node --save
因为用的symbol,需要改一下es版本
import 'reflect-metadata'
function Decorator(key: symbol, value: string) {

    return function (target: any, name?: string | undefined, des?: PropertyDescriptor) {

        //console.log(arguments)
        if (typeof name === 'string') {

            //console.log(key, value, target, name)
            Reflect.defineMetadata(key, value, target, name)
        } else {

            Reflect.defineMetadata(key, value, target)//key,value,target
        }
    }
}
const key: symbol = Symbol.for('key')
@Decorator(key, 'value')
@Reflect.metadata('name', 'A')//key,value
class A {

    @Reflect.metadata('hello', 'world')
    @Decorator(key, 'value')
    public hello(): string {

        return 'hello world'
    }
}

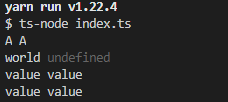
console.log(Reflect.getMetadata('name', A),// 'A'~key,target
    Reflect.getOwnMetadata('name', A)) // 'A'~key,target
console.log(Reflect.getMetadata('hello', new A(), 'hello'),// 'world'~key,target,name
    Reflect.getOwnMetadata('hello', new A(), 'hello')) // undefined~key,target,name~因为是实例不是原型
console.log(Reflect.getMetadata(Symbol.for('key'), A),//value~key,target
    Reflect.getOwnMetadata(Symbol.for('key'), A))//value~key,target
console.log(Reflect.getMetadata(Symbol.for('key'), A.prototype, 'hello'),//value~key,target,name
    Reflect.getOwnMetadata(Symbol.for('key'), A.prototype, 'hello'))//value~key,target,name
- 为什么类的方法的reflect要使用实例或prototype,而类的reflect直接用类?
都是定义在类这个对象上面的,而所有的对类的属性或者方法的修饰,都是定义在类的原型上面的,并且以属性或者方法的 key 作为 property - getOwnMetadata相比getMetadata多了一层作用,即访问到target本身的元数据而非继承到实例中的
上图中左侧是get右侧是getOwn
9.装饰器执行顺序
属性->方法->方法参数->类
同样的装饰器,倒序执行
namespace demo09 {

    const logClass1 = (params?: string) => (target: any) => {
      console.log('类装饰器1') }
    const logClass2 = (params?: string) => (target: any) => {
      console.log('类装饰器2') }
    const logAttribute1 = (params?: string) => (target: any, attrName: any) => {
      console.log('属性装饰器1') }
    const logAttribute2 = (params?: string) => (target: any, attrName: any) => {
      console.log('属性装饰器2') }
    const logMethod1 = (params?: string) => (target: any, attrName: any, desc: any) => {
      console.log('方法装饰器1') }
    const logMethod2 = (params?: string) => (target: any, attrName: any, desc: any) => {
      console.log('方法装饰器2') }
    const logParams1 = (params?: string) => (target: any, attrName: any, desc: any) => {
      console.log('方法参数装饰器1') }
    const logParams2 = (params?: string) => (target: any, attrName: any, desc: any) => {
      console.log('方法参数装饰器2') }
    @logClass1()
    @logClass2()
    class C {

        @logAttribute1()
        @logAttribute2()
        public a: string | undefined;

        constructor() {

        }

        @logMethod1()
        @logMethod2()
        getData() {

            return true;
        }

        setData(@logParams1() attr1: any, @logParams2() attr2: any,) {

        }
    }
    var c: any = new C();
}
七、爬虫Express项目代码改良
1.创建控制器和装饰器
首先拷贝一份第五章的代码出来
打开tsconfig的装饰器
npm install reflect-metadata -D
把router中的首页当作例子,初步搭建一下函数结构
//loginController.ts
import {
Request, Response } from 'express'
import 'reflect-metadata'
import {
Controller,get} from './decorators'
export interface RequestWithBody extends Request {
//靠interface覆盖修饰类型
body: {
[key: string]: string | undefined
password?: string
}
}
@Controller
class LoginController {
// @get('/login')
// login() {
// }
@get('/')
home(req: RequestWithBody, res: Response) {
const isLogin = req.session ? req.session.login : false
if (isLogin) {
res.send(`
logout
spider
show
`)
} else {
res.send(`
`)
}
}
}
//decorators.ts
export function Controller(target: any) {

    //方法的元数据都在原型中,可以获取元数据
    for (let key in target.prototype) {

        console.log(Reflect.getMetadata('path', target.prototype, key))
    }
}
export function get(path: string) {

    //为每个方法设定路径到元数据中
    return function (target: any, key: string, desc: PropertyDescriptor) {

        Reflect.defineMetadata('path', path, target, key)
    }
}
2.通过装饰器实现路由功能
之前能够在控制器中打印了
之后针对功能我们可以从Controller装饰器的函数中提取到
target.prototype[key]就是我需要的执行函数
import {
     Router} from 'express'

export const router=Router()

export function Controller(target: any) {

    //方法的元数据都在原型中,可以获取元数据
    for (let key in target.prototype) {

        const path=Reflect.getMetadata('path', target.prototype, key)
        const handler=target.prototype[key]
        if(path){
     //如果能取到path,说明@Controller修饰的对象的原型链中该属性是我们规定的路由
            router.get(path,handler)
        }
        //console.log(Reflect.getMetadata('path', target.prototype, key))
    }
}
export function get(path: string) {

    //为每个方法设定路径到元数据中
    return function (target: any, key: string, desc: PropertyDescriptor) {

        Reflect.defineMetadata('path', path, target, key)
    }
}
随后把生成的router暴露出去
之后修改index.ts之中的引用路由和conroller部分的代码
现在可以解决get方法请求的非中间件的方法的了
//loginController.ts
import {
Request, Response } from 'express'
import 'reflect-metadata'
import {
Controller, get } from './decorators'
import {
getResponseData } from '../utils/util'
export interface RequestWithBody extends Request {
//靠interface覆盖修饰类型
body: {
[key: string]: string | undefined
password?: string
}
}
@Controller
class LoginController {
@get('/logout')
logout(req: RequestWithBody, res: Response) {
if (req.session) req.session.login = false
res.json(getResponseData('登出成功'))
}
@get('/')
home(req: RequestWithBody, res: Response) {
const isLogin = req.session ? req.session.login : false
if (isLogin) {
res.send(`
logout
spider
show
`)
} else {
res.send(`
`)
}
}
}
//decorators.ts
import {
      Router } from 'express'

export const router = Router()

export function Controller(target: any) {

    //方法的元数据都在原型中,可以获取元数据
    for (let key in target.prototype) {

        const path = Reflect.getMetadata('path', target.prototype, key)
        const handler = target.prototype[key]
        if (path) {
     //如果能取到path,说明@Controller修饰的对象的原型链中该属性是我们规定的路由
            router.get(path, handler)
        }
        //console.log(Reflect.getMetadata('path', target.prototype, key))
    }
}
export function get(path: string) {

    //为每个方法设定路径到元数据中
    return function (target: any, key: string, desc: PropertyDescriptor) {

        Reflect.defineMetadata('path', path, target, key)
    }
}
//index.ts
import express, {
      Express, Request } from 'express'
//import router from './router/router'//原路由设定
import bodyParser from 'body-parser'
import cookieSession from 'cookie-session'
//新的路由设定
import './controller/loginController'//引入代码
import {
      router } from './controller/decorators'

const app: Express = express()
//parse application/x-www-form-urlencoded
app.use(bodyParser.urlencoded({
      extended: false }))//在router前使用中间件解析body
//parse application/json
app.use(bodyParser.json())//顺便加上json的解释
//自定义中间件
app.use((req: Request, res, next) => {

    req.test = 'test'//直接加会因为没有该属性而报错,使用custom.d.ts进行类型融合
    next()
})
app.use(cookieSession({

    name: 'session',
    keys: ['tset'],
    maxAge: 24 * 60 * 60 * 1000,//24小时
}))
app.use(router)
app.listen(7001, () => {

    console.log('http://localhost:7001')
})
至于这里为什么要引入loginController,是因为我们在使用装饰器的时候首先是对类的使用,类的定义代码要执行,否则是不会运行装饰器的也就不会得到运行好的router
3.工厂模式生成请求装饰器
这里采用工厂模式返回装饰器
import {
      Router } from 'express'

export const router = Router()
//const GET='get'
//const POST='post'
enum Method {
     //不使用这个枚举,下面的router[method]不认
    GET = 'get',
    POST = 'post',
    PUT='put',
    DELETE='delete',
}
export function Controller(target: any) {

    //方法的元数据都在原型中,可以获取元数据
    for (let key in target.prototype) {

        const path = Reflect.getMetadata('path', target.prototype, key)
        const method: Method = Reflect.getMetadata('method', target.prototype, key)
        const handler = target.prototype[key]
        if (path && method && handler) {
     //如果能取到path,说明@Controller修饰的对象的原型链中该属性是我们规定的路由
            router[method](path, handler)//这里使用string会报错,使用了枚举类型就可以调用method
        }
        //console.log(Reflect.getMetadata('path', target.prototype, key))
    }
}
function getRequestDecorator(type: string) {
     //工厂模式生成请求方法的装饰器
    return function (path: string) {

        //为每个方法设定路径到元数据中
        return function (target: any, key: string, desc: PropertyDescriptor) {

            Reflect.defineMetadata('path', path, target, key)
            Reflect.defineMetadata('method', type, target, key)
        }
    }
}
export const get=getRequestDecorator(Method.GET)
export const post=getRequestDecorator(Method.POST)
export const put=getRequestDecorator(Method.PUT)
export const del=getRequestDecorator(Method.DELETE)
// export function get(path: string) {

//     //为每个方法设定路径到元数据中
//     return function (target: any, key: string, desc: PropertyDescriptor) {

//         Reflect.defineMetadata('path', path, target, key)
//         Reflect.defineMetadata('method', Method.GET, target, key)
//     }
// }
之后的装饰器配置就简单多了
4.中间件的装饰器+优化项目结构
这里把使用中间件的部分做个单独的处理,新建一个crowllerController.ts
//crowllerController.ts
import {
      Request, Response, NextFunction } from 'express'
import 'reflect-metadata'
import {
      Controller, get, post, use } from './decorators'
import {
      getResponseData } from '../utils/util'
import Crowller from '../utils/crowlle'
import MyAnalyzer from '../utils/myanalyzer'
import path from 'path'
import fs from 'fs'

const _password = '123'
const pathName = path.resolve(__dirname, '../../data/course.json')
export interface RequestWithBody extends Request {

    //靠interface覆盖修饰类型
    body: {

        [key: string]: string | undefined
        password?: string
    }
}

const checkLogin = (req: RequestWithBody, res: Response, next: NextFunction) => {

    //自定义中间件,代替业务中的通用判断作为接口保护
    const isLogin = req.session ? req.session.login : false
    if (isLogin) {
      next() } else {

        res.json(getResponseData(null, '请先登录'))
    }
}
@Controller
class CrollerController {

    @get('/getData')
    @use(checkLogin)
    async getData(req: RequestWithBody, res: Response) {

        const url = 'http://www.dell-lee.com/'
        const crowller = new Crowller(url, pathName)
        const myanalyzer = MyAnalyzer.getInstance()
        const data = await crowller.run(myanalyzer)
        res.json(getResponseData(JSON.parse(data)))
    }
    @get('/showData')
    @use(checkLogin)
    async showData(req: RequestWithBody, res: Response) {

        try {

            const data = await fs.readFileSync(pathName, 'utf-8')
            res.json(getResponseData(JSON.parse(data)))
        } catch (e) {

            res.json(getResponseData(null, e))
        }
    }
}
发现使用了新的中间件@use,其实现是这样的
//decorator.ts
import {
      Router, RequestHandler } from 'express'

export const router = Router()
//const GET='get'
//const POST='post'
enum Method {
     //不使用这个枚举,下面的router[method]不认
    GET = 'get',
    POST = 'post',
    PUT = 'put',
    DELETE = 'delete',
}
export function Controller(target: any) {

    //方法的元数据都在原型中,可以获取元数据
    for (let key in target.prototype) {

        const path: string = Reflect.getMetadata('path', target.prototype, key)
        const method: Method = Reflect.getMetadata('method', target.prototype, key)
        const handler: () => void = target.prototype[key]
        const middleware: RequestHandler = Reflect.getMetadata('middleware', target.prototype, key)
        if (path && method && handler) {
     //如果能取到path,说明@Controller修饰的对象的原型链中该属性是我们规定的路由
            if (middleware) {

                router[method](path, middleware, handler)//这里使用string会报错,使用了枚举类型就可以调用method
            } else {

                router[method](path, handler)//这里使用string会报错,使用了枚举类型就可以调用method
            }

        }
        //console.log(Reflect.getMetadata('path', target.prototype, key))
    }
}
function getRequestDecorator(type: string) {
     //工厂模式生成请求方法的装饰器
    return function (path: string) {

        //为每个方法设定路径到元数据中
        return function (target: any, key: string, desc: PropertyDescriptor) {

            Reflect.defineMetadata('path', path, target, key)
            Reflect.defineMetadata('method', type, target, key)
        }
    }
}
export const get = getRequestDecorator(Method.GET)
export const post = getRequestDecorator(Method.POST)
export const put = getRequestDecorator(Method.PUT)
export const del = getRequestDecorator(Method.DELETE)
// export function get(path: string) {

//     //为每个方法设定路径到元数据中
//     return function (target: any, key: string, desc: PropertyDescriptor) {

//         Reflect.defineMetadata('path', path, target, key)
//         Reflect.defineMetadata('method', Method.GET, target, key)
//     }
// }
export function use(middleware: RequestHandler) {

    return function (target: any, key: string, desc: PropertyDescriptor) {

        Reflect.defineMetadata('middleware', middleware, target, key)//注册中间件
    }
}
使用的时候同样在index.ts中引入Controller就行了
到这里,我们就把之前的接口全部迁移完毕了
到这时候把router/router.ts代码删掉也没事了
之后整理了下把middleware和interface整理出去,减小代码重复,也方便之后的拆分
然后把之前的router改写成一个导出router的操作
再把decorator.ts中当时设定的router替换掉即可
之后我通过拆解的方法优化了目录,把相关的ts转化成文件夹通过index导出的形式,这样目录层次更清晰
尝试优化了Controller的装饰器,让他可以加根目录
//decorators/controller.ts
import {
      Methods } from '../interfaces'
import {
      RequestHandler } from 'express'
import router from '../router/router'
export const Controller = (root: string) =>
    function (target: new (...args: any[]) => {
     }) {

        //方法的元数据都在原型中,可以获取元数据
        for (let key in target.prototype) {

            const path: string = Reflect.getMetadata('path', target.prototype, key)
            const method: Methods = Reflect.getMetadata('method', target.prototype, key)
            const handler: () => void = target.prototype[key]
            const middleware: RequestHandler = Reflect.getMetadata('middleware', target.prototype, key)
            if (path && method) {
     //如果能取到path,说明@Controller修饰的对象的原型链中该属性是我们规定的路由
                const fullPath = `${
       root}${
       path}`
                console.log(fullPath)
                if (middleware) {

                    router[method](fullPath, middleware, handler)//这里使用string会报错,使用了枚举类型就可以调用method
                } else {

                    router[method](fullPath, handler)//这里使用string会报错,使用了枚举类型就可以调用method
                }

            }
            //console.log(Reflect.getMetadata('path', target.prototype, key))
        }
    }
5.使用多个中间件
现在想把decorator中的中间件功能扩展成,使用多个中间件
比如设计一个log的中间件
import {
      RequestWithBody } from '../interfaces'
import {
      Request, Response, NextFunction } from 'express'
export const log = (router:string) => async (req: RequestWithBody, res: Response, next: NextFunction) => {

    await console.log(`${
       router}-log:` + new Date().valueOf())
    next()
}
把他使用到controller的装饰中
这时候的思路就是把Reflect.matedata改成一个都是中间件函数的数组
//decorators/use.ts
import {
      RequestHandler } from 'express'
import {
      ControllerBase } from '../interfaces'
export function use(middleware: RequestHandler) {

    return function (target: ControllerBase, key: string, desc: PropertyDescriptor) {


        const middlewares = Reflect.getMetadata('middlewares', target, key)||[]
        middlewares.push(middleware)
        Reflect.defineMetadata('middlewares', middlewares, target, key)//注册中间件
    }
}
然后改写一下controller的解析过程
//deccorators/controller.ts
import {
      Methods } from '../interfaces'
import {
      RequestHandler } from 'express'
import router from '../router/router'
export const Controller = (root: string) =>
    function (target: new (...args: any[]) => {
     }) {

        //方法的元数据都在原型中,可以获取元数据
        for (let key in target.prototype) {

            const path: string = Reflect.getMetadata('path', target.prototype, key)
            const method: Methods = Reflect.getMetadata('method', target.prototype, key)
            const handler: () => void = target.prototype[key]
            const middlewares: RequestHandler[] = Reflect.getMetadata('middlewares', target.prototype, key)
            if (path && method) {
     //如果能取到path,说明@Controller修饰的对象的原型链中该属性是我们规定的路由
                const fullPath = `${
       root}${
       path}`
                //console.log(fullPath)
                if (middlewares && middlewares.length) {

                    router[method](fullPath, ...middlewares, handler)//这里使用string会报错,使用了枚举类型就可以调用method
                } else {

                    router[method](fullPath, handler)//这里使用string会报错,使用了枚举类型就可以调用method
                }

            }
            //console.log(Reflect.getMetadata('path', target.prototype, key))
        }
    }
现在可以使用多个中间件来修饰路由了
![]()
八、前端React展示爬虫数据
1.初始化react项目
npm uninstall creat-react-app -g
删除掉本地全局缓存的老版本creat-react-app,然后安装creact-react-app脚手架的的ts版本,项目名叫react_show
npx create-react-app react_show --template typescript --use-npm
耐心等待……了好久
  "dependencies": {

    "@testing-library/jest-dom": "^5.11.6",
    "@testing-library/react": "^11.2.2",
    "@testing-library/user-event": "^12.5.0",
    "@types/jest": "^26.0.18",
    "@types/node": "^12.19.8",
    "@types/react": "^16.14.2",
    "@types/react-dom": "^16.9.10",
    "react": "^17.0.1",
    "react-dom": "^17.0.1",
    "react-scripts": "4.0.1",
    "typescript": "^4.1.2",
    "web-vitals": "^0.2.4"
  },
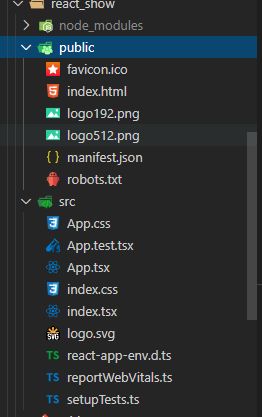
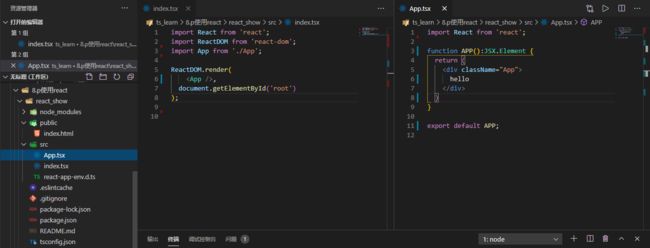
之后对脚手架进行一些删减
之后发现react17的版本脚手架ts还没跟上。。然后想办法降级
就修改了package,重新下载了依赖
{

  "name": "react_show",
  "version": "0.1.0",
  "private": true,
  "dependencies": {

    "@testing-library/jest-dom": "^5.11.6",
    "@testing-library/react": "^11.2.2",
    "@testing-library/user-event": "^12.5.0",
    "@types/jest": "^26.0.18",
    "@types/node": "^12.19.8",
    "@types/react": "^16.14.2",
    "@types/react-dom": "^16.9.10",
    "react": "^16.13.1",
    "react-dom": "^16.13.1",
    "react-scripts": "3.4.1",
    "typescript": "^4.1.2",
    "web-vitals": "^0.2.4"
  },
  "scripts": {

    "start": "react-scripts start",
    "build": "react-scripts build",
    "test": "react-scripts test",
    "eject": "react-scripts eject"
  },
  "eslintConfig": {

    "extends": [
      "react-app",
      "react-app/jest"
    ]
  },
  "browserslist": {

    "production": [
      ">0.2%",
      "not dead",
      "not op_mini all"
    ],
    "development": [
      "last 1 chrome version",
      "last 1 firefox version",
      "last 1 safari version"
    ]
  }
}
之后终于是能跑了
2.登录表单
引入antd
npm install antd --save
npm install @ant-design/icons --save
然后选择antd的一个表单拿下来
全局引入antd的css
之后的代码
//App.tsx
import React from 'react';
import {
      Form, Input, Button, Checkbox } from 'antd';
import {
      UserOutlined, LockOutlined } from '@ant-design/icons';
import './css/login.css'
const NormalLoginForm = () => {

  const onFinish = (values) => {

    console.log('Received values of form: ', values);
  };

  return (
    <Form
      name="normal_login"
      className="login-form"
      initialValues={
     {
      remember: true }}
      onFinish={
     onFinish}
    >
      {
     /*
        }
          placeholder="账号" />
       */}
      <Form.Item
        name="password"
        rules={
     [{
      required: true, message: '请输入密码!' }]}
      >
        <Input
          prefix={
     <LockOutlined className="site-form-item-icon" />}
          type="password"
          placeholder="密码"
        />
      </Form.Item>
      {
     /*

          Remember me


          Forgot password

       */}

      <Form.Item>
        <Button type="primary" htmlType="submit" className="login-form-button">
          登陆
        </Button>
        {
     /* Or register now! */}
      </Form.Item>
    </Form>
  );
};


function APP(): JSX.Element {

  return (
    <div className="App">
      <div className="login-page">
        <NormalLoginForm />
      </div>
    </div>
  )
}
export default APP;
//login.css
.login-page {

  width: 300px;
  border: 1px solid #ccc;
  padding: 20px 20px 0;
  margin: 100px auto;
}
精简后
另外视频中的版本比较老,介绍了一下class组件传入泛型
3.类型及路由的使用
emmm直接在看,因为现在的antd版本差距很大,而且主用hooks了,还是通过自定义的接口接受类型就可以达到视频中的功能了
这样就保证了values域的接口。。
安装一下前端路由
npm i react-router-dom --save
npm i --save-dev @types/react-router-dom
然后修改一下目录结构,把Login分离出去
之后针对App进行引入router
4.前后端联调实现登录验证及跳转功能
我们之前的后端是7.p,现在正在进行的前端是8.p,考虑一下,拷贝一份后端到8.p中吧,可能会对后端有修改
安装axios作为ajax
的请求工具
npm install axios --save
然后尝试在Home页的生命周期中使用axios
这个时候显示跨域的情况,就使用proxy配置的后端代理
到这里,前后端就打通啦
下面可以完善逻辑了
不能直接引用props
需要使用接口完善React.FC的泛型才能像下面这样
import React, {
      useState, useEffect } from 'react';
import './style.css'
import {
      Button, Divider } from 'antd';
import axios from 'axios'
import {
      Redirect, RouteComponentProps } from 'react-router-dom'
interface PropsInterface extends RouteComponentProps {

}
const Home: React.FC<PropsInterface> = (props) => {

    const [isLogin, setIsLogin] = useState<boolean>(false)
    useEffect(() => {

        axios.get('/api/islogin').then(res => {

            //加载完之后调用axios获取res,这时候要去配置webpack的proxy
            if (res.data?.data) {
     //已登录
                setIsLogin(true)
                console.log('s')
            } else {
     //未登录
                setIsLogin(false)
                console.log('f')
                //props.history.replace('/login')
                //通过函数方法路由跳转,但是,需要React.FC配置才能拿到props的方法
            }
        })
    }, [])
    return (
        isLogin ?
            <div className="home-page">
                home page
            <Divider />
                <Button type="primary">爬取</Button>
                <Button type="primary">展示</Button>
                <Button type="primary">退出</Button>
            </div>
            : <Redirect to="/login" />
        // 通过Redirect跳转,功能和props.history.replace('/login')相同
    )
}
export default Home
两种跳转都实现了
5.登录和退出功能
先修改后端代码都加入接口前缀api
之后对于前段的button写入跳转和逻辑判断功能
//登入
const onFinish = (values: FormFileds): void => {

    //console.log('Received values of form: ', values);
    axios.post('/api/login', {

        password: values.password
    }).then(res => {

        const success = res.data.success
        //console.log(res, props)
        if (success) {

            props.history.push('/')
            console.log(props.history)
            message.success('登录成功')
        } else {

            //console.log('fail_login')
            message.error('登录失败')
        }
    })
};
//登出
<Button type="primary" onClick={
     () => {

    try{

        axios.get('/api/login').then(res => {

            if (res.data?.success) {

                //console.log('success_logout')
                props.history.replace('/login')
                message.success('登出成功')
        }
                                     })
    }catch(e){

        message.error('登出失败')
        console.log(e)
    }

}}>退出</Button>
搞定✔
逻辑还是挺简单的
不过重点主要是看一下怎么应用结合React、ts、Router
首先想用props,ts不如js灵活,会报错,需要内置接口
在使用函数式组件的时候,变量类型为React.FC
其中import { RouteComponentProps } from 'react-router-dom'
这样我们就可以获取到props的history了
如果有自定义的props,请通过interface PropsInterface extends RouteComponentProps的接口代替
并且由于我们的routerprops是层层需要手动向下传递的,应通过如下两种方法处理
import {
RouteComponentProps } from 'react-router-dom'
interface FormFileds {
//表单提交的接口
password: string
}
const LoginForm: React.FC<RouteComponentProps> = (props) => {
......
};
// const Login: React.FC> = (props) => {
// return (
//
// 6.爬取和展示功能
后端代码修改根路径
    const handleClickShowdata = () => {
     //展示数据
        axios.get('/api/crowller/showdata').then(res => {

            console.log(res.data)
        })
    }
    const handleClickGetdata = () => {
     //爬取数据
        axios.get('/api/crowller/getdata').then(res => {

            console.log(res.data)
            if(res.data?.success){

                message.success('爬取成功')
            }
        })
    }
就可以用了
之后要引入echarts图表展示折线图
我去修改了一下后端爬虫的utils/myanalyzer里的结构,以确保里面有数字。。
echarts折线图:https://echarts.apache.org/examples/zh/editor.html?c=line-stack
还要下载echarts-for-react和echarts
npm install [email protected] --save
npm install echarts-for-react --save
调了好久的bug,原来是echarts5太苟了,需要下老版本才能用
然后改一下样式
//Home
import React, {
      useState, useEffect } from 'react';
import './style.css'
import {
      Button, Divider, message } from 'antd';
import axios from 'axios'
import {
      Redirect, RouteComponentProps } from 'react-router-dom'
import ReactEcharts from "echarts-for-react";
import {
     data} from './echarts_options'
// import echarts from 'echarts';
interface PropsInterface extends RouteComponentProps<any> {

}
const Home: React.FC<PropsInterface> = (props) => {

    const [isLogin, setIsLogin] = useState<boolean>(true)
    useEffect(() => {

        axios.get('/api/islogin').then(res => {

            //加载完之后调用axios获取res,这时候要去配置webpack的proxy
            if (res.data?.data) {
     //已登录
                setIsLogin(true)
                console.log('s')
            } else {
     //未登录
                setIsLogin(false)
                console.log('f')
                props.history.replace('/login')
                //通过函数方法路由跳转,但是,需要React.FC配置才能拿到props的方法
            }
        })
    }, [props.history])

    const handleClickShowdata = () => {
     //展示数据
        axios.get('/api/crowller/showdata').then(res => {

            console.log(res.data)
        })
    }
    const handleClickGetdata = () => {
     //爬取数据
        axios.get('/api/crowller/getdata').then(res => {

            console.log(res.data)
            if (res.data?.success) {

                message.success('爬取成功')
            }
        })
    }
    const getOption = (): echarts.EChartOption => {
     //echarts的配置参数
        return data
    }
    return (
        isLogin ?
            <div className="home-page">
                <div className="buttons">
                    <Button type="primary" onClick={
     () => {
      handleClickGetdata() }}>爬取</Button>
                    <Button type="primary" onClick={
     handleClickShowdata} >展示  </Button>
                    <Button type="primary" onClick={
     () => {

                        try {

                            axios.get('/api/login').then(res => {

                                if (res.data?.success) {

                                    //console.log('success_logout')
                                    props.history.replace('/login')
                                    message.success('登出成功')
                                }
                            })
                        } catch (e) {

                            message.error('登出失败')
                            console.log(e)
                        }

                    }}>退出</Button>
                </div>
                <Divider />
                <div>
                    <ReactEcharts option={
     getOption()} />
                </div>

            </div>
            : <Redirect to="/login" />
        // 通过Redirect跳转,功能和props.history.replace('/login')相同
    )
}
export default Home
//echarts_options.ts
export const data: echarts.EChartOption = {

    title: {

        text: '折线图堆叠'
    },
    tooltip: {

        trigger: 'axis'
    },
    legend: {

        data: ['邮件营销', '联盟广告', '视频广告', '直接访问', '搜索引擎']
    },
    grid: {

        left: '3%',
        right: '4%',
        bottom: '3%',
        containLabel: true
    },
    toolbox: {

        feature: {

            saveAsImage: {
     }
        }
    },
    xAxis: {

        type: 'category',
        boundaryGap: false,
        data: ['周一', '周二', '周三', '周四', '周五', '周六', '周日']
    },
    yAxis: {

        type: 'value'
    },
    series: [
        {

            name: '邮件营销',
            type: 'line',
            stack: '总量',
            data: [120, 132, 101, 134, 90, 230, 210]
        },
        {

            name: '联盟广告',
            type: 'line',
            stack: '总量',
            data: [220, 182, 191, 234, 290, 330, 310]
        },
        {

            name: '视频广告',
            type: 'line',
            stack: '总量',
            data: [150, 232, 201, 154, 190, 330, 410]
        },
        {

            name: '直接访问',
            type: 'line',
            stack: '总量',
            data: [320, 332, 301, 334, 390, 330, 320]
        },
        {

            name: '搜索引擎',
            type: 'line',
            stack: '总量',
            data: [820, 932, 901, 934, 1290, 1330, 1320]
        }
    ]
}
7.折线图展示
跟着做数据,把数据按照结构整理好放入到options中
import React, {
      useState, useEffect } from 'react';
import './style.css'
import {
      Button, Divider, message } from 'antd';
import axios from 'axios'
import {
      Redirect, RouteComponentProps } from 'react-router-dom'
import ReactEcharts from "echarts-for-react";
// import { data_options } from './echarts_options'
import moment from 'moment'
interface PropsInterface extends RouteComponentProps<any> {

}
interface CourseItem {

    title: string,
    pannel: string,
    index: number,
    n: number,
}
interface Data {

    [key: string]: CourseItem[]
}

const Home: React.FC<PropsInterface> = (props) => {

    const [isLogin, setIsLogin] = useState<boolean>(true)
    const [data, setData] = useState<Data>()
    useEffect(() => {

        axios.get('/api/islogin').then(res => {

            //加载完之后调用axios获取res,这时候要去配置webpack的proxy
            if (res.data?.data) {
     //已登录
                setIsLogin(true)
            } else {
     //未登录
                setIsLogin(false)
                props.history.replace('/login')
                //通过函数方法路由跳转,但是,需要React.FC配置才能拿到props的方法
            }
        })
    }, [props.history])
    function getEC() {
     //刷新数据
        axios.get('/api/crowller/showdata').then((res) => {

            //处理echarts
            setData(res.data.data)
            getOption()
        })
    }
    useEffect(() => {

        getEC()
    }, [])
    const handleClickGetdata = () => {
     //爬取数据
        axios.get('/api/crowller/getdata').then(res => {

            console.log(res.data)
            if (res.data?.success) {

                message.success('爬取成功')
                getEC()
            }
        })
    }
    const getOption = (): echarts.EChartOption => {
     //echarts的配置参数
        const courseNames: string[] = []
        const times: string[] = []
        const tempData: {

            [key: string]: number[];
        } = {
     }
        for (let i in data) {

            times.push(moment(Number(i)).format('MM-DD HH:mm'))
            const item: CourseItem[] = data[i]
            // console.log(item)
            item.forEach(el => {

                const {
      pannel, n } = el
                if (courseNames.indexOf(pannel) === -1) courseNames.push(pannel)

                tempData[pannel] ? tempData[pannel].push(n) : tempData[pannel] = [n]
            });
        }
        const resultData: {

            name: string, type: 'line', data: number[]
        }[] = []
        for (let i in tempData) {

            resultData.push({

                name: i,
                type: 'line',
                data: tempData[i]
            })
        }
        console.log(courseNames, times, tempData)
        return {

            title: {

                text: '课程对应的n'
            },
            tooltip: {

                trigger: 'axis'
            },
            legend: {

                data: courseNames
            },
            grid: {

                left: '3%',
                right: '4%',
                bottom: '3%',
                containLabel: true
            },
            xAxis: {

                type: 'category',
                boundaryGap: false,
                data: times
            },
            yAxis: {

                type: 'value'
            },
            series: resultData
        }
    }
    return (
        isLogin ?
            <div className="home-page">
                <div className="buttons">
                    <Button type="primary" onClick={
     () => {
      handleClickGetdata() }}>爬取</Button>
                    <Button type="primary" onClick={
     () => {

                        try {

                            axios.get('/api/login').then(res => {

                                if (res.data?.success) {

                                    //console.log('success_logout')
                                    props.history.replace('/login')
                                    message.success('登出成功')
                                }
                            })
                        } catch (e) {

                            message.error('登出失败')
                            console.log(e)
                        }

                    }}>退出</Button>
                </div>
                <Divider />
                <div>
                    <ReactEcharts option={
     getOption()} />
                </div>

            </div>
            : <Redirect to="/login" />
        // 通过Redirect跳转,功能和props.history.replace('/login')相同
    )
}
export default Home
8.接口数据类型的冗余定义问题
视频中的自定义request.ts减少data层数的方案我这边报错,res不接受orz,AxiosResponse一直不支持。。
另外后端的其他冗余我已经处理过了
基本上就是AxiosResponse中间解析之后没解决的问题,但是不影响使用
9.解决前后端接口一样
这个略,主要是ajax返回的json数据其实类型很麻烦,而我和视频里当时定义的json结构也不太一样,就不方便改了,主要思路还是知道的,就是把后端想要封装的data数据给一个共享的namespace封起来,代替data:any的情况,并且前端拿到的也是这个data
其实就是前后端用同一份全局的.d.ts文件这样一个思路
但是因为情况不同不太方便去复用。。就没怎么改了
九、小结给的学习网站
ts官网https://www.tslang.cn/
ts-AST语法树https://ts-ast-viewer.com/
第三方库很多都会介绍如何引入ts比如,https://redux.js.org/recipes/usage-with-typescript#overview

