Android第十二讲笔记(视频,音频播放,开源控件)
目录
- 1.播放音频
-
- 1.新建文件夹用来存放音频文件
- 2.配置
- 2.播放视频
- 3.开源控件
-
- 1.drawerlayout实现抽屉效果
- 2.沉浸式状态栏
-
- 1.导入依赖
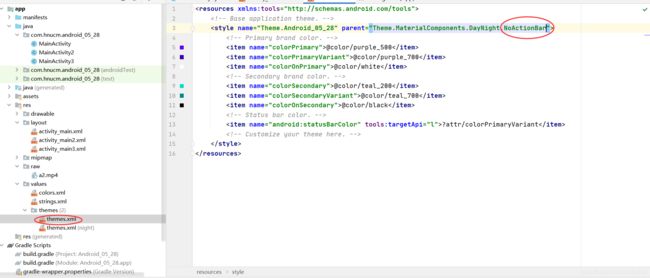
- 2.去掉标题栏
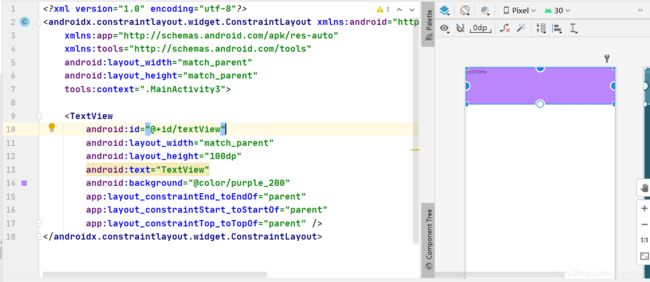
- 3.简单示例(将状态栏和顶层的颜色设置一致)
- 4.将APP顶层的图片延伸到状态栏
- 3.轮播图
-
- 1.导入依赖
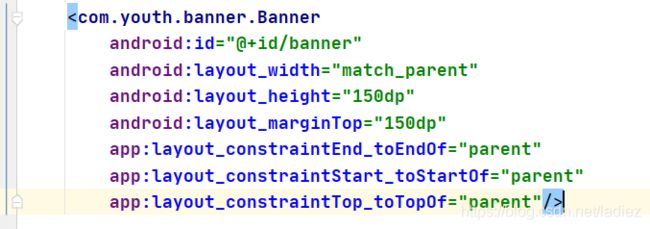
- 2.在布局文件中加入banner
- 3.我们要用到网络图片,所以我们要加入网络访问的权限
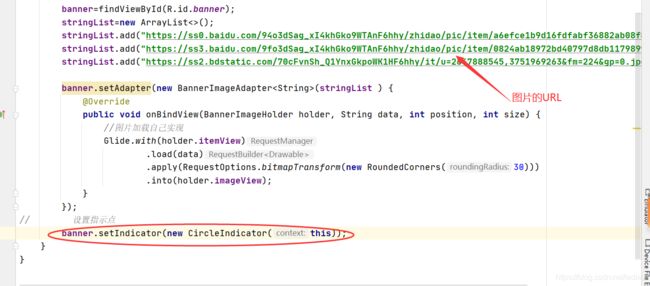
- 4.MainActivity.java中设置轮播图的属性
1.播放音频
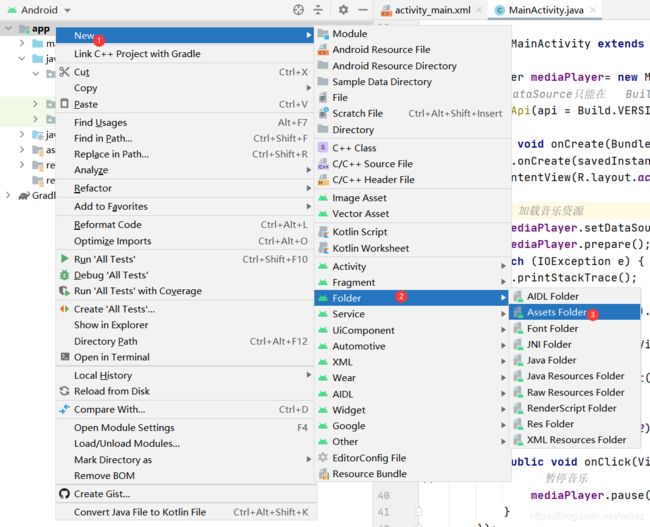
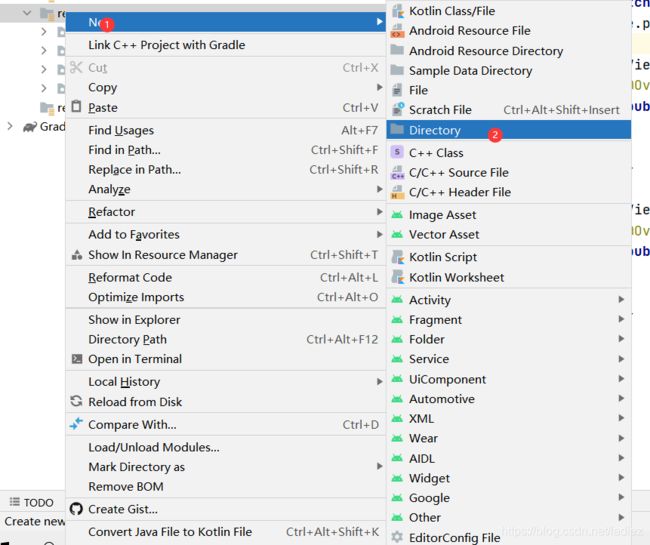
1.新建文件夹用来存放音频文件
2.配置
主要步骤和解释在图中标出
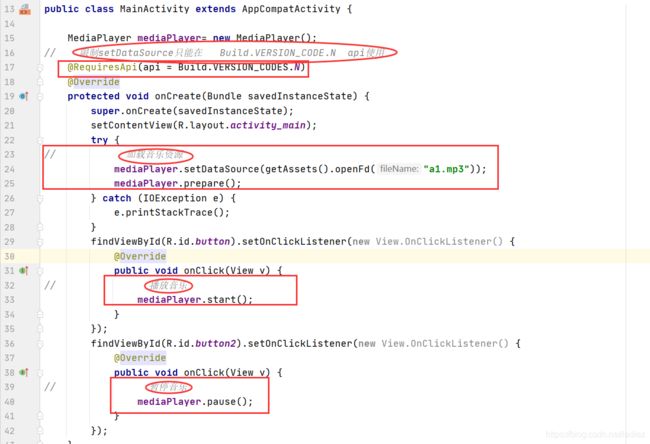
MainActivity.java代码
package com.hnucm.android_05_28;

import androidx.annotation.RequiresApi;
import androidx.appcompat.app.AppCompatActivity;

import android.media.MediaPlayer;
import android.os.Build;
import android.os.Bundle;
import android.view.View;

import java.io.IOException;

public class MainActivity extends AppCompatActivity {


    MediaPlayer mediaPlayer= new MediaPlayer();
//    限制setDataSource只能在   Build.VERSION_CODE.N  api使用
    @RequiresApi(api = Build.VERSION_CODES.N)
    @Override
    protected void onCreate(Bundle savedInstanceState) {

        super.onCreate(savedInstanceState);
        setContentView(R.layout.activity_main);
        try {

//            加载音乐资源
            mediaPlayer.setDataSource(getAssets().openFd("a1.mp3"));
            mediaPlayer.prepare();
        } catch (IOException e) {

            e.printStackTrace();
        }
        findViewById(R.id.button).setOnClickListener(new View.OnClickListener() {

            @Override
            public void onClick(View v) {

//                播放音乐
                mediaPlayer.start();
            }
        });
        findViewById(R.id.button2).setOnClickListener(new View.OnClickListener() {

            @Override
            public void onClick(View v) {

//                暂停音乐
                mediaPlayer.pause();
            }
        });
    }
}
2.播放视频
新建的文件夹名字需要叫做raw

然后在该文件夹种放入视频资源
示例如下
package com.hnucm.android_05_28;

import androidx.annotation.RequiresApi;
import androidx.appcompat.app.AppCompatActivity;

import android.media.MediaPlayer;
import android.os.Build;
import android.os.Bundle;
import android.view.View;
import android.widget.MediaController;
import android.widget.VideoView;

import java.io.IOException;

public class MainActivity extends AppCompatActivity {


    MediaPlayer mediaPlayer= new MediaPlayer();

    VideoView videoView;
//    限制setDataSource只能在   Build.VERSION_CODE.N  api使用
    @RequiresApi(api = Build.VERSION_CODES.N)
    @Override
    protected void onCreate(Bundle savedInstanceState) {

        super.onCreate(savedInstanceState);
        setContentView(R.layout.activity_main);
        videoView=findViewById(R.id.videoView);
        //            加载视频资源
        videoView.setVideoPath("android.resource://" + getPackageName() + "/" + R.raw.a2);
//        添加播放控制
        videoView.setMediaController(new MediaController(this));
        findViewById(R.id.button).setOnClickListener(new View.OnClickListener() {

            @Override
            public void onClick(View v) {

//                播放音乐
//                mediaPlayer.start();
//                播放视频
                videoView.start();
            }
        });
        findViewById(R.id.button2).setOnClickListener(new View.OnClickListener() {

            @Override
            public void onClick(View v) {

//                暂停音乐
//                mediaPlayer.pause();
//                暂停视频
                videoView.pause();
            }
        });
    }
}
3.开源控件
1.drawerlayout实现抽屉效果
我们新建了一个MainActivity2进行演示
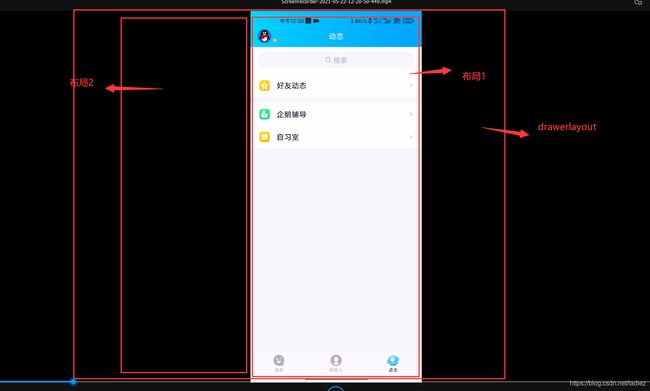
将布局先改为drawerlayout如果不改,则无法实现抽屉效果

在该布局中又放入了两个布局,作为初始界面和点出来的抽屉界面


activity2_main.xml代码如下
<androidx.drawerlayout.widget.DrawerLayout
    xmlns:android="http://schemas.android.com/apk/res/android"
    xmlns:app="http://schemas.android.com/apk/res-auto"
    xmlns:tools="http://schemas.android.com/tools"
    android:id="@+id/drawlayout"
    android:layout_width="match_parent"
    android:layout_height="match_parent"
    tools:context=".MainActivity2">

    <androidx.constraintlayout.widget.ConstraintLayout
        android:layout_width="match_parent"
        android:layout_height="match_parent">

        <Button
            android:id="@+id/button3"
            android:layout_width="wrap_content"
            android:layout_height="wrap_content"
            android:layout_marginTop="144dp"
            android:text="右边布局"
            app:layout_constraintEnd_toEndOf="parent"
            app:layout_constraintStart_toStartOf="parent"
            app:layout_constraintTop_toTopOf="parent">

        Button>

    androidx.constraintlayout.widget.ConstraintLayout>

    <androidx.constraintlayout.widget.ConstraintLayout
        android:layout_width="match_parent"
        android:layout_gravity="left"
        android:background="@color/purple_200"
        android:layout_height="match_parent">
        <TextView
            android:id="@+id/text3"
            android:layout_width="wrap_content"
            android:layout_height="wrap_content"
            app:layout_constraintEnd_toEndOf="parent"
            app:layout_constraintStart_toStartOf="parent"
            app:layout_constraintTop_toTopOf="parent"
            android:text="左边布局"
            android:layout_marginTop="344dp">

        TextView>

    androidx.constraintlayout.widget.ConstraintLayout>

androidx.drawerlayout.widget.DrawerLayout>
package com.hnucm.android_05_28;

import androidx.appcompat.app.AppCompatActivity;
import androidx.drawerlayout.widget.DrawerLayout;

import android.os.Bundle;
import android.view.Gravity;
import android.view.View;
import android.widget.Button;

public class MainActivity2 extends AppCompatActivity {


    DrawerLayout drawerLayout;
    @Override
    protected void onCreate(Bundle savedInstanceState) {

        super.onCreate(savedInstanceState);
        setContentView(R.layout.activity_main2);
        drawerLayout = findViewById(R.id.drawlayout);
        findViewById(R.id.button3).setOnClickListener(new View.OnClickListener() {

            @Override
            public void onClick(View v) {

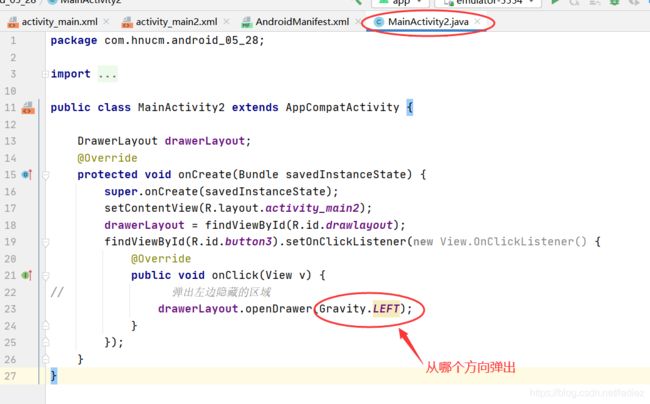
//                弹出左边隐藏的区域
                drawerLayout.openDrawer(Gravity.LEFT);
            }
        });
    }
}
效果
2.沉浸式状态栏
开源代码官网
1.导入依赖
implementation 'com.jaeger.statusbarutil:library:1.5.1'
2.去掉标题栏
3.简单示例(将状态栏和顶层的颜色设置一致)
StatusBarUtil.setColor(this,getColor(R.color.purple_200));
MainActivity3.java
package com.hnucm.android_05_28;

import androidx.annotation.RequiresApi;
import androidx.appcompat.app.AppCompatActivity;

import android.os.Build;
import android.os.Bundle;

import com.jaeger.library.StatusBarUtil;

public class MainActivity3 extends AppCompatActivity {


    @RequiresApi(api = Build.VERSION_CODES.M)
    @Override
    protected void onCreate(Bundle savedInstanceState) {

        super.onCreate(savedInstanceState);
        setContentView(R.layout.activity_main3);
        StatusBarUtil.setColor(this,getColor(R.color.purple_200));
    }
}
4.将APP顶层的图片延伸到状态栏
activity_main3.xml
界面要展示的内容需要用一个布局包起来,这里使用的是约束布局
<androidx.constraintlayout.widget.ConstraintLayout xmlns:android="http://schemas.android.com/apk/res/android"
    xmlns:app="http://schemas.android.com/apk/res-auto"
    xmlns:tools="http://schemas.android.com/tools"
    android:layout_width="match_parent"
    android:layout_height="match_parent"
    tools:context=".MainActivity3">


    <ImageView
        android:id="@+id/textView"
        android:layout_width="match_parent"
        android:layout_height="100dp"
        android:background="@drawable/tri"
        app:layout_constraintEnd_toEndOf="parent"
        app:layout_constraintStart_toStartOf="parent"
        app:layout_constraintTop_toTopOf="parent" />

    <androidx.constraintlayout.widget.ConstraintLayout
        android:id="@+id/layout"
        android:layout_width="match_parent"
        android:layout_height="match_parent"
        app:layout_constraintEnd_toEndOf="parent"
        app:layout_constraintStart_toStartOf="parent"
        app:layout_constraintTop_toBottomOf="@+id/textView" >
        <Button
            android:id="@+id/button4"
            android:layout_width="wrap_content"
            android:layout_height="wrap_content"
            app:layout_constraintEnd_toEndOf="parent"
            app:layout_constraintStart_toStartOf="parent"
            app:layout_constraintBottom_toBottomOf="parent"
            app:layout_constraintTop_toTopOf="parent">
        Button>

        <Button
            android:id="@+id/button5"
            android:layout_width="wrap_content"
            android:layout_height="wrap_content"
            app:layout_constraintEnd_toEndOf="parent"
            app:layout_constraintStart_toStartOf="parent"
            app:layout_constraintBottom_toBottomOf="parent"
            app:layout_constraintTop_toTopOf="@id/button4">
        Button>
    androidx.constraintlayout.widget.ConstraintLayout>

androidx.constraintlayout.widget.ConstraintLayout>
核心代码
StatusBarUtil.setTransparentForImageView(this,constraintLayout);
3.轮播图
开源代码官网
1.导入依赖
implementation 'com.youth.banner:banner:2.1.0'
implementation 'com.github.bumptech.glide:glide:4.12.0'
2.在布局文件中加入banner
3.我们要用到网络图片,所以我们要加入网络访问的权限
<uses-permission android:name="android.permission.INTERNET" />
4.MainActivity.java中设置轮播图的属性
最后就可以完成了!
开源框架在这里只介绍了部分,在后续的学习过程中会不断补充!
