同时多个axios请求_Vue 3.x 配置axios及路由
Vue 3.x 配置axios及路由
编者: wRitchie(吴理琪) 来源:http://www.bj9420.com
概述:目前,Vue3.x已于2020年9月19日发布,但实际项目中使用的也许不是很多,网上资料相对较少,而与2.x又有些变化,对于初步准备使用Vue3.x的初涉开发人员,还是比较麻烦,本文亦是做为新人,实际项目搭建使用中,短期内要完成项目的开发,遇到很多问题,通过不断查找,实践而成的记录,希望阅读到的人员能减少摸索的时间,快速使用,本文主要解决配置及使用axios、路由以及后端解决接口访问跨域的问题。
一、 安装axios
使用yarn:yarn add axiosyarn add vue-axios使用npmnpm install axiosnpm install vue-axios1、安装命令npm install axios -S
2、安装成功
二、安装vue-axios
1、安装命令npm install vue-axios -S
2、安装成功
3、全局配置axios
在main.js全局配置axios(在vue3.x中引入了一个新的函数名createApp,会把容器挂载到上面,因此会新命名一个变量const app = createApp(App),方便后期挂载依赖,createApp(App)类似于2.x中的Vue,同时vue2.x中是通过Vue.prototype.a x i o s = a x i o s 进 行 挂 载 的 ,vue3.x要通过app.config.globalProperties.axios = axios进行挂载)
main.js配置如图:
三 、使用axios
- · axios无参get请求
let {data:res}=await axios.get("http://bj9420.com/api/iCommonController/listDeliveryByPager")//或者:axios({ url:"http://bj9420.com/api/iProductController/findProduct", method:'get', }).then(res=>{ console.log(res) }) - · axios无参post请求
axios({url:"http://bj9420.com/api/iCommonController/listDeliveryByPager", method:'post' }).then(res=>{ console.log(res) })- · axios带参数get请求方式一
axios({ url:"http://bj9420.com/api/iProductController/findProduct", params:{ barCode:'900101000001', orgId:1 }, method:'get', }).then(res=>{ console.log(res) })或者
axios.get("http://bj9420.com/api/iProductController/findProduct",{params:{barCode:900101000001}}).then(res=>{ console.log(res) })- · axios post 带参数请求方式一(只需修改前端代码)
axios.post("http://bj9420.com/api/iProductController/findProduct","barCode=900101000001").then(res=>{ console.log(res) })注:发送post请求携带参数 直接使用"barCode=1&orgId=1"
- · axios post 带参数请求方式二(需修改后端代码)
axios.post("http://bj9420.com/api/iProductController/findProduct",{barCode:’900101000001’}).then(res=>{ console.log(res) })注:使用data传递数据,"{barCode:'900101000001',orgId:1}"后台需将axios自动封装的json数据转换成Java对象,即在后台方法接收参数添加@requestBody注解。
注:http://bj9420.com接口请求域名在main.js配置了axios.defaults.baseURL = 'http://bj9420.com/',则直接传参"api/iProductController/findProduct"即可。
四、路由
1、安装路由命令
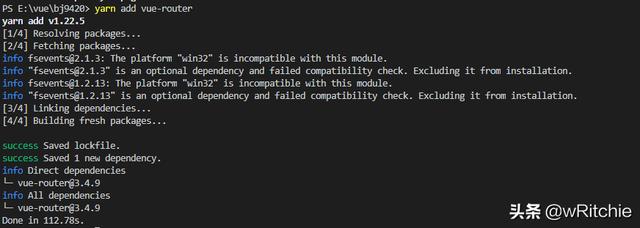
yarn add [email protected] 或选最新的稳定版本
2、安装成功
3、全局配置
- · 在src目录下,新建router文件夹,然后新建index.js,内容示例如下:Main.vue、About.vue为具体的页面模块,自行编写
import Main from '../views/Main.vue'const routes = [ { path: '/', name: 'Main', component: Main }, { path: '/about', name: 'About', // route level code-splitting // this generates a separate chunk (about.[hash].js) for this route // which is lazy-loaded when the route is visited. component: () => import(/* webpackChunkName: "about" */ '../views/About.vue') }]const router = createRouter({ history: createWebHistory(process.env.BASE_URL), routes})export default router- · 在main.js中,增加
//路由import router from './router'app.use(router)- · 路由的使用
- · 效果
附:npm安装与yarn安装,在实际开发中,建议使用yarn,也可以两者混用
- · npm与yarn命令对照:
npm init ---- yarn initnpm install ---- yarnnpm install [email protected] -g ---- yarn global add [email protected] install [email protected] --save ---- yarn add [email protected] install [email protected] --save-dev ---- yarn add [email protected] --devnpm uninstall xxx --save(-dev) ----yarn remove xxxnpm run xxx ---- yarn run xxxx- · npm install -S -D -g 有什么区别:
npm install module_name -S 即 npm install module_name --save 写入dependenciesnpm install module_name -D 即npm install module_name --save-dev 写入devDependenciesnpm install module_name -g 全局安装(命令行使用)npm install module_name 本地安装(将安装包放在 ./node_modules 下)- · Vue官方网站
https://vue3js.cn/https://vuejs.org/- · Vant官方网站
https://vant-contrib.gitee.io/vant/next/#/zh-CN/home- · 跨域问题:前端可以解决,为省事,对本人而言,但由于后端解决起来很方便,不管是SSM框架或Springboot后台项目中,因此采用后端方案跨域问题。
1、SSM中,在spring配置文件中,增加如下配置即可
2、Springboot中,添加个配置类即可:
package com.bj9420.config;import org.springframework.context.annotation.Bean;import org.springframework.context.annotation.Configuration;import org.springframework.web.cors.CorsConfiguration;import org.springframework.web.cors.UrlBasedCorsConfigurationSource;import org.springframework.web.filter.CorsFilter;import javax.servlet.MultipartConfigElement;/** * @Title: WebMvcConfig.java * @Description: 解决跨域问题 * @author: wRitchie * @date: 2019/3/15 11:31 * @version: V1.0 * @Copyright (c): 2019 http://bj9420.com All rights reserved. */@Configurationpublic class WebMvcConfig { private CorsConfiguration buildConfig() { CorsConfiguration corsConfiguration = new CorsConfiguration(); corsConfiguration.addAllowedOrigin("*"); //允许任何域名 corsConfiguration.addAllowedHeader("*"); //允许任何头 corsConfiguration.addAllowedMethod("*"); //允许任何方法 return corsConfiguration; } @Bean public CorsFilter corsFilter() { UrlBasedCorsConfigurationSource source = new UrlBasedCorsConfigurationSource(); source.registerCorsConfiguration("/**", buildConfig()); //注册 return new CorsFilter(source); }}


