以下小技巧都是本人在开发中得出的小经验,如有错误欢迎指教,有更好的技巧欢迎留言交流,以下如有雷同,纯属巧合,谢谢!
1.给新建工程中的storyboard添加navigationbar
2.在Nib中选中UIImageView之后,勾选Clip Subviews将会裁剪掉超出UIImageView的范围外的内容
3.开发中的编码与解码
- 1>上传汉字到服务器,服务器那边要是没有做编码的话,汉字是乱码,此时需要由程序员转码成UTF-8,用到的方法是:
NSString * encodingString = [@"你需要上传转码的字符串" stringByAddingPercentEscapesUsingEncoding:NSUTF8StringEncoding];
- 2>通过接口请求后,返回的数据,格式显示如为:%3A%2F%2F样式,此时需要我们进行UTF-8解码,用到的方法是:
NSString *nameString = [model.album_name(你从服务器请求下来的数据,如名字) stringByReplacingPercentEscapesUsingEncoding:NSUTF8StringEncoding];
4.弧度与角度互转(宏)
// 弧度转角度
#define RADIANS_TO_DEGREES(radians) ((radians) * (180.0 / M_PI))

// 角度转弧度
#define DEGREES_TO_RADIANS(angle) ((angle) / 180.0 * M_PI)
4.判断控件是否在某个试图上
if ([_label isDescendantOfView: self.testView]) {
    NSLog(@"在视图上");
}
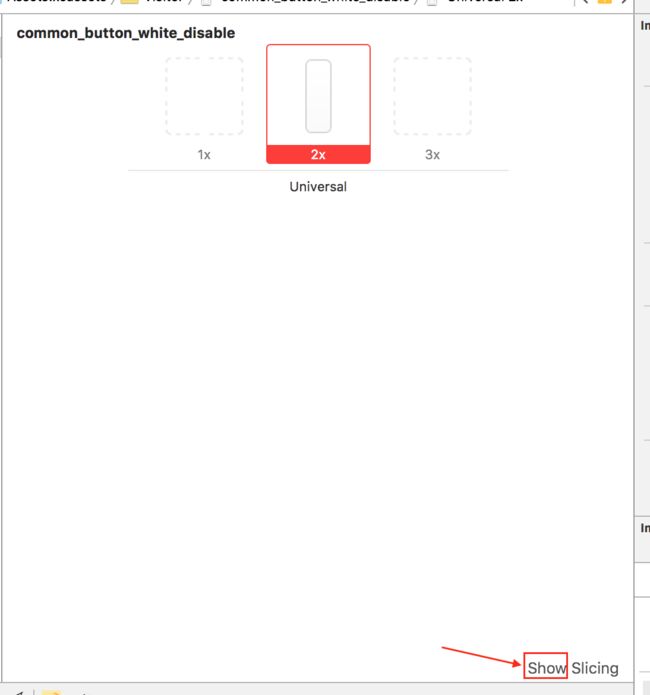
5.设置图片不被拉伸
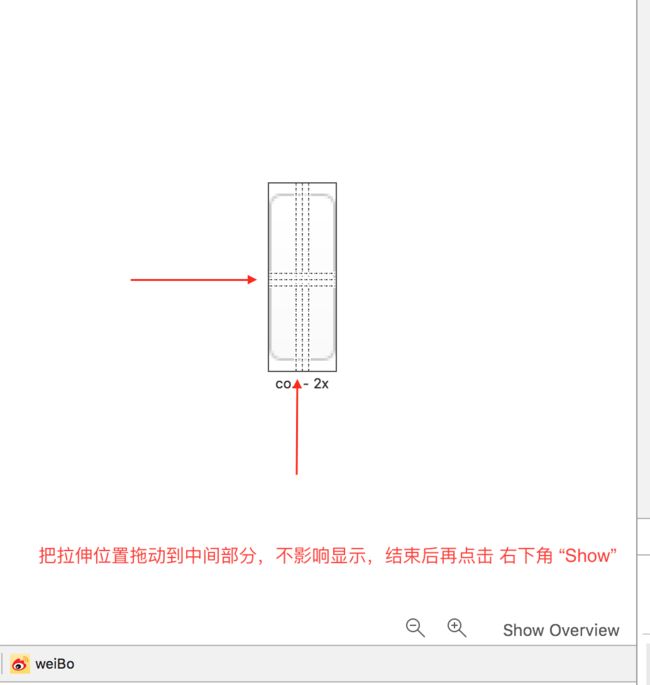
6.设置图片拉伸方式
7.Nib中设置Aspect Fit之后设置高度,图片会动设置宽高比
(如:图片原本size为 100 x 45,但你使用的时候感觉宽度太窄想要200,此时就可进行设置,当设置宽度为200时,高度自动跟随宽度设置)
8.通知系统,马上更新布局([self.view layoutIfNeeded])
9.文件夹改为.bundle包
10.在桌面创建一个.plist文件,方便查看请求数据(在AF请求成功的Block中写)
// responseObject为AF请求下来的数据   参数一:你随便从你电脑桌面上拉取一个东西放此处就能得到路径,然后起个你喜欢的名字后缀为.plist
[responseObject writeToFile:@"/Users/xxxxxxx/Desktop/xxxx.plist" atomically:YES];
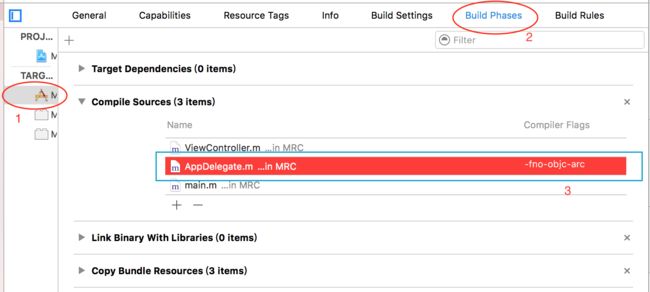
11.ARC工程更改为MRC
目前都是自动内存管理,但想深入了解引用计数器的+1 、 -1 、释放回收的机制,可以一试
12.使用cocoapods中...Podfile like so报错
13.debug模式的运用
- 定义debug宏(测试):
#ifdef DEBUG
# define DLog(fmt, ...) NSLog((@"%s [Line %d] " fmt), __PRETTY_FUNCTION__, __LINE__, ##__VA_ARGS__);
#else
# define DLog(...)
#endif
-
关闭debug宏(发布):
14.iOS launch启动界面全屏
1.在
-info.list文件中,加上“Status bar is initially hidden”选项,选择yes
2在程序里面添加 [[UIApplication sharedApplication]setStatusBarHidden:NO withAnimation:UIStatusBarAnimationNone];
即可
15.layout、drawRect的调用
[self setNeedsLayout] 会在恰当的时候调用 layoutSubviews 方法
[self setNeedsDisplay] 会在恰当的时候调用 drawRect 方法
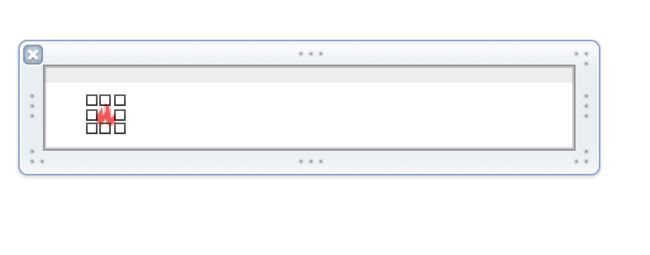
16.Nib按钮设置内容偏移
Edge 选择你要移动的内容,可以是文字、图片、或者是整体
17.Nib中按钮设置圆角
18.Xib中label如何换行?
在nib或者SB中,一个labe要求显示多行的时候,在换行的地方使用 option + enter 即可实现换行
19.自动缩放到图片原本尺寸大小:command 加 =
使用之前
使用之后
20.swift3.0延迟执行代码
DispatchQueue.main.asyncAfter(deadline: DispatchTime.now() + 3.0) {
        print(要执行的代码)
}
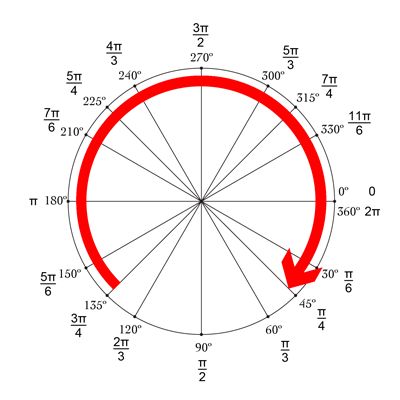
21.贝塞尔曲线角度参考图
22.自定义代码片段
@property (nonatomic, retain) <#type#> *<#name#>
※号代表一个空格
代码片段的路径
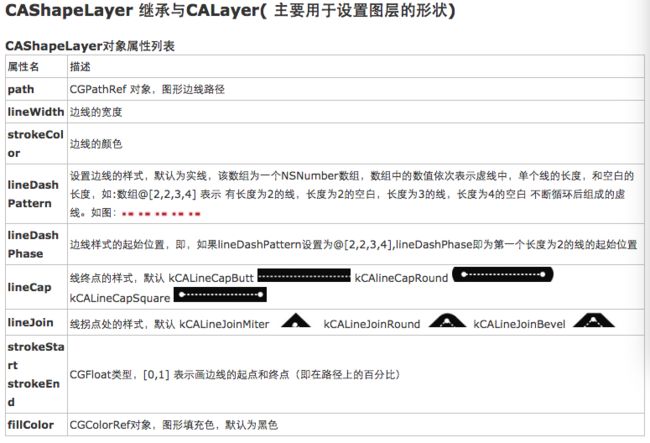
23.CAShapeLayer属性图
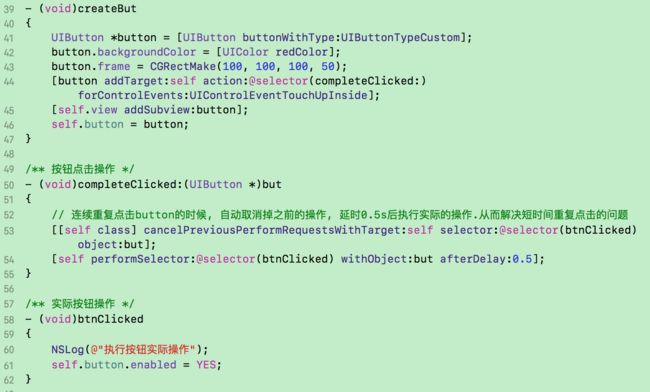
24.Button防止短时间内重复点击
25.计算最大行数
// 总行数 = (总个数 + 每行的最大数 - 1) / 每行最大数
NSUInteger rows = (dataArr.count + maxCols - 1) / maxCols;
26.修改项目名及脚本替换类名
https://blog.csdn.net/qq_23292307/article/details/80915654
27.修改SearchBar占位文字颜色及大小
    UISearchBar *serchBar = [[UISearchBar alloc] initWithFrame:CGRectMake(58, 10, SCREEN_W-58*2, 30)];
    serchBar.placeholder = @"输入症状、疾病、医生、科室、医院";
    // 修改占位文字
    UITextField * searchField = [serchBar valueForKey:@"_searchField"];
    [searchField setValue:Font_Shallow_999999 forKeyPath:@"_placeholderLabel.textColor"];
    [searchField setValue:[UIFont boldSystemFontOfSize:11] forKeyPath:@"_placeholderLabel.font"];
    serchBar.barTintColor = [UIColor whiteColor];
    serchBar.layer.borderColor = Line_e0e0e0.CGColor;
    serchBar.layer.borderWidth = 1;
    serchBar.layer.masksToBounds = YES;
    serchBar.layer.cornerRadius = 15;
    [upView addSubview:serchBar];

###兼容iOS13(iOS13使用kvc获取会奔溃)
    UISearchBar *serchBar = [[UISearchBar alloc] initWithFrame:CGRectMake(58, 10, SCREEN_W-58*2, 30)];
    serchBar.placeholder = @"输入症状、疾病、医生、科室、医院";
    serchBar.barTintColor = [UIColor whiteColor];
    serchBar.layer.borderColor = Line_e0e0e0.CGColor;
    serchBar.layer.borderWidth = 1;
    serchBar.layer.masksToBounds = YES;
    serchBar.layer.cornerRadius = 15;
    [self addSubview:serchBar];

    UITextField * searchField = nil;
    if (@available(iOS 13.0, *)) {
        searchField = serchBar.searchTextField;
    }else {
        searchField = [serchBar valueForKey:@"_searchField"];
    }
    NSMutableAttributedString *arrStr = [[NSMutableAttributedString alloc] initWithString:searchField.placeholder attributes:@{NSFontAttributeName:[UIFont systemFontOfSize:13],NSForegroundColorAttributeName:Font_Shallow_999999}];
    searchField.attributedPlaceholder = arrStr;
28.从数组中删除,防止重复添加
// 从父类中抹掉之前创建标签,防止重复添加
[self.labelArr makeObjectsPerformSelector:@selector(removeFromSuperview)];
[self.labelArr removeAllObjects];
29.返回到指定页面
for (UIViewController *controller in self.navigationController.viewControllers) {
    if ([controller isKindOfClass:[ChatViewController class]]) {
         [self.navigationController popToViewController:controller animated:YES];
       }
 }
30.A(带Nav) present B(B不需要Nav), B push C(需要Nav) A->B ->C
1、在A中Push B时用Nav包装B,present时使用nav
let nav = NavgationViewController.init(rootViewController: B_ViewController())
            self.present(nav, animated: true, completion: nil)
2、在B中设置加载隐藏Nav,结束显示Nav
override func viewWillAppear(_ animated: Bool) {
        super.viewWillAppear(animated)
        navigationController?.setNavigationBarHidden(true, animated: true)
    }

    override func viewWillDisappear(_ animated: Bool) {
        super.viewWillDisappear(animated)
        navigationController?.setNavigationBarHidden(false, animated: true)
    }
3、B正常push C即可
let vc = C_ViewController()
self?.navigationController?.pushViewController(vc, animated: true)
注:如B可push到C,但C中不显示Nav,设置C显示时不隐藏Nav
override func viewWillAppear(_ animated: Bool) {
        super.viewWillAppear(animated)
        navigationController?.setNavigationBarHidden(true, animated: false)
    }
最后附带一些常用的快捷键
| 名称 | 快捷键 注:0 为数字/ O为字母 |
|---|---|
| 显示/隐藏 左侧 工具面板 | Command + 0 |
| 显示/隐藏 右侧 工具面板 | Command + Option + 0 |
| Nib或者SB中快速打开关联类 | Command + Option + enter |
| 方法查找 | Control + 6 |
| 快速打开查找 | Command + Shift + O |
| 文档和参考 | Command + Shift + 0 |
| 收起/展开方法实现 | Command + Option + ⬅️ / ➡️ |
| 返回/前进上次打开的界面 | Command + Control + ⬅️ / ➡️ |
| 打开 | Command + O |
| 关闭窗口 | Command + W |
| 上/下移动代码 | Command + Option + [ / ] |


