Maven+SpringMvc+MultipartFile实现文件的上传
前言
又很久没有写博客了,最近在恶补springmvc框架,刚开始用Dymanic web project建立的,但是可能是下载的jar包不合适还是什么原因,一直都报错,改了一天还是错误,后来看到别人说maven可以包你管理包,所以就放弃了Dymanic web project,开始使用maven来建立,发现同样的代码没有出错,那么基本可以确定Dymanic web project建立的时候是jar下载的问题。这就体现了maven的优势了,不用你自己去下载包,而是直接早pom.xml里面写上包就可以了,这在多人开发的时候,优势表现的特别明显,因为多人开发,就得保证那些jar包都是相同的,其实是很麻烦的,所以建议大家还是学maven比较靠谱。
建立maven项目
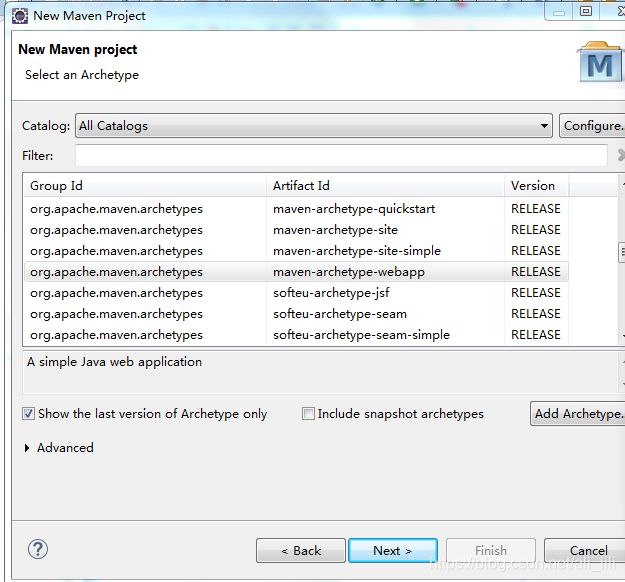
新建->maven project,如果没有这个选项,就得去下载,这里就不细说了,网上应该又很多教程。
接着勾选第二个,记住不要勾选create a simple project,因为这里是要建立web:

然后继续next

选择上图这个,然后继续next

然后填上项目名字,就可以finish了。
建立后的目录是长这样子的:

其中,java resources里面的image文件是我自己建立的,因为在后面的上传文件的时候,我是把文件上传到这个位置。可能有些人建立的里面没有src/main/java,src/main/resources,src/test/java,src/test/resources中的一个或者几个,这个时候你可以自己建立,他可能就会显示,该文件已经存在,并且就会自己出现了。
然后再进行简单的配置,右击项目名,然后选择bulid path的configure bulid path,点击order and export,利用up和down键进行排序,如图:

排序后是这样子的,然后点击libraries,点击JRE那一项,然后Edit,进行修改,修改后是这样的


这样子基本就配置好了,可能还有其他的一些小问题,可能又针对性地上网搜索。
然后就可以开始写代码了,先是再pom.xml中进行jar包的引入,我先给出自己的代码:
  4.0.0

  newSpringMvc
  newSpringMvc
  0.0.1-SNAPSHOT
  war

  newSpringMvc Maven Webapp

  http://www.example.com


    UTF-8
    1.7
    1.7


            commons-io
            commons-io
            2.5


        commons-fileupload
        commons-fileupload
        1.2.2


      junit
      junit
      4.11
      test


        org.springframework
        spring-aop
        3.2.4.RELEASE


        org.springframework
        spring-core
        3.2.4.RELEASE


        org.springframework
        spring-context
        3.2.4.RELEASE


        org.springframework
        spring-context-support
        3.2.4.RELEASE


        org.springframework
        spring-aspects
        3.2.4.RELEASE


        org.springframework
        spring-orm
        3.2.4.RELEASE


        org.springframework
        spring-jdbc
        3.2.4.RELEASE


        org.springframework
        spring-jms
        3.2.4.RELEASE


        org.springframework
        spring-webmvc
        3.2.4.RELEASE


        org.springframework.security
        spring-security-ldap
        3.2.4.RELEASE


        org.springframework
        spring-test
        3.2.4.RELEASE
        provided


        com.googlecode.ehcache-spring-annotations
        ehcache-spring-annotations
        1.2.0


        org.springframework.data
        spring-data-mongodb
        1.5.4.RELEASE


        org.springframework.data
        spring-data-redis
        1.2.0.RELEASE


        javax.servlet
        javax.servlet-api
        3.0.1


    newSpringMvc


          maven-clean-plugin
          3.1.0


          maven-resources-plugin
          3.0.2


          maven-compiler-plugin
          3.8.0


          maven-surefire-plugin
          2.22.1


          maven-war-plugin
          3.2.2


          maven-install-plugin
          2.5.2


          maven-deploy-plugin
          2.8.2
这里面有些代码我是直接再网上copy然后自己再增加一些的,所以,可能会引入一些多余的包,但是没关系,只要不要少了包就好了。简单说明一下这些包都是要去哪里找,除了有些可以直接copy别人的代码,还有一些是不容易copy的,那你就得自己找。
            commons-io
            commons-io
            2.5
像上面这个包,是上传文件需要用的包,这个包其实是在maven的中央仓库里面找的,直接报读搜索maven仓库,然后找到这个:

再搜索栏里面搜索需要的jar包名称:

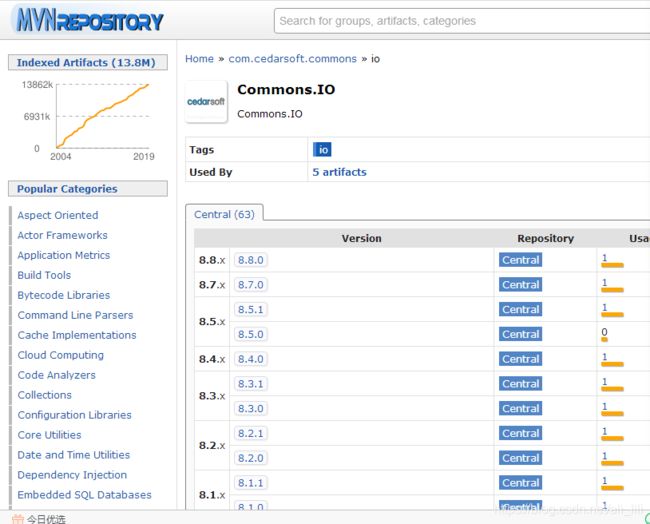
会出现结果,点击进去

你就会看到很多版本,而且碧海能看到每个版本又多少人用,选一个多人用的,点击进去

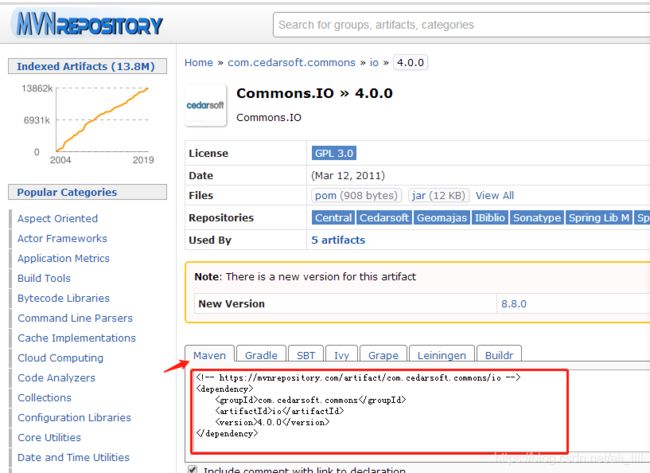
方框里面就是可以直接复制到pom.xml文件的代码。
接下来在src/main/resources里面建立两个xml文件,newSpringMvc-root-servlet.xml和newSpringMvc-servlet.xml文件,下面直接附上代码:
newSpringMvc-root-servlet.xml
Spring公共配置
newSpringMvc-servlet.xml代码:
newSpringMva
其中,org.springframework.web.multipart.commons.CommonsMultipartResolver是上传文件需要引入的类。其他两个bean都是控制器。
然后就是web.xml的代码:
    newSpringMvc


        contextConfigLocation

        classpath:newSpringMvc-root-servlet.xml


        log4jExposeWebAppRoot
        false


        characterEncodingFilter
        org.springframework.web.filter.CharacterEncodingFilter

            encoding
            UTF-8


            forceEncoding
            true


        characterEncodingFilter
        /


        gameLiveServlet
        org.springframework.web.servlet.DispatcherServlet

            contextConfigLocation
            classpath:newSpringMvc-servlet.xml

        1


        gameLiveServlet
        /


        org.springframework.web.util.Log4jConfigListener


        org.springframework.web.context.ContextLoaderListener
接着就可以自洁看java类的代码了,在src/main/java里面建立类HelloWorld,这只是起到一个控制器的作用
package newSpringMvc;
import java.io.IOException;

import javax.servlet.http.HttpServletRequest;
import javax.servlet.http.HttpServletResponse;

import org.springframework.stereotype.Controller;
import org.springframework.web.bind.annotation.RequestMapping;
import org.springframework.web.servlet.ModelAndView;
import org.springframework.web.servlet.mvc.support.RedirectAttributes;
@Controller
public class HelloWorld {
    @RequestMapping("/hello")
    public ModelAndView index(HttpServletRequest request, HttpServletResponse response) throws IOException
    {
      //  return "redirect:hello";
     return new ModelAndView("index.jsp");

    }
}
这里我像说一下我自己发现的坑,就是@RequestMapping("/hello"),我一开始是把它放在class外面的,可是这样子房输入网址一直都跳转不成功,而且还会出错。
这只是起到一个转发的作用,所以接下来看看index.jsp
<%@ page language="java" contentType="text/html; charset=UTF-8"
    pageEncoding="UTF-8"%>
    <%@page import="newSpringMvc.*" %>


Insert title here
这是一个上传文件的表单,表单里面一定要添加enctype=“multipart/form-data”,因为action=“hello2”,即转发到、hello2的网页,所以这里我又添加了一个控制器,还是在src/main/java里面建立一个类aaa,因为当时是抱着试一试的想法写的代码,所以类的名称都没有写好,aaa的代码为:
package newSpringMvc;

import java.io.File;
import java.io.IOException;
import java.util.UUID;

import javax.servlet.http.HttpServlet;
import javax.servlet.http.HttpServletRequest;
import javax.servlet.http.HttpServletResponse;
import javax.servlet.http.HttpSession;

import org.springframework.stereotype.Controller;
import org.springframework.ui.Model;
import org.springframework.web.bind.annotation.RequestMapping;
import org.springframework.web.bind.annotation.RequestMethod;
import org.springframework.web.bind.annotation.RequestParam;
import org.springframework.web.multipart.MultipartFile;
import org.springframework.web.servlet.ModelAndView;

import com.jspsmart.upload.Request;
@Controller

public class aaa {
	@RequestMapping(value = "hello2",method = RequestMethod.POST)
	  public ModelAndView  pictureUpload(@RequestParam MultipartFile pictureFile, Model model,HttpServletRequest request, HttpServletResponse response) throws IOException {
		String newName = UUID.randomUUID().toString();
        // 图片原来的名字
     String oldName = pictureFile.getOriginalFilename();
      // 后缀
    String sux = oldName.substring(oldName.lastIndexOf("."));
         //新建本地文件流

       File file = new File("F:\\javaEE_workspace\\newSpringMvc\\image",oldName);
        // 写入本地磁盘
       try{
      pictureFile.transferTo(file);}
       catch(IOException  e){
    	   e.printStackTrace();
       }

      response.setContentType("text/html;charSet=UtF-8");
      HttpSession session = request.getSession();
      session.setAttribute("message", newName);
    return new ModelAndView("index1.jsp");

}

}
这里我也要分享一下要注意的几点:
RequestMapping里面要又method这一值,因为表单里面的动作是post,所以这里也要添加这一个动作,然后就是MultipartFile 参数的名称要和表单中file的名称一致,还有一点一定要注意的就是 MultipartFile 之前一定要加@RequestParam ,不然会出错,我是出错了很多次后在网上看到别人分享才改正过来的。然后最后是转发到index1.jsp,其实这一步完全恶意省略了,因为我的index1.jsp里面完全都是空的,这一个控制器主要的目的就是对上传的文件进行保存, File file = new File(“F:\javaEE_workspace\newSpringMvc\image”,oldName);这一句话就是对文件进行保存,北欧村的路径为F:\javaEE_workspace\newSpringMvc\image,这个就是一开始我所得image文件是用来保存上传的文件的。这个时候就可以去指定的位置查看文件了,是可以查看到的。注意,得直接打开F盘找,在eclipse里面的image里面是找不到的。这就完成了springmvc+maven+MultipartFile实现文件上传的功能。