目录
nodejs是什么
使用nodejs创建一个服务器(接口)
nodejs的模块系统
nodejs文件系统
路径模块path
npm相关
-
nodejs的koa框架
- 创建第一个koa服务
-
koa路由
- 静态服务
跨域
ql框架
(一) nodejs是什么
- 运行在服务器的JavaScript代码
- 可以写服务接口
- nodejs可以操作本地文件
(二) 使用nodejs创建一个服务器(接口)
app.js 代码如下
var http = require('http');

/或去http的createServer方法  传参传进一个函数这个函数分别传进请求数据(request)和发送数据(response)
http.createServer(function (request, response) {

    // 发送 HTTP 头部
    // HTTP 状态值: 200 : OK
    // 内容类型: text/plain
    response.writeHead(200, {
        'Content-Type': 'text/plain'
    });

    response.end('Hello World');
}).listen(8888);

// 终端打印如下信息
console.log('Server running at http://127.0.0.1:8888/');
运行 nodejs app.js 启动服务
(三) nodejs的模块系统
导出模块和导入模块
导出用module.exports
导入用require
例子1: 导出一个数组
   // m1.js
   module.exports = [];
   // index1.js
   let list = require('./m1');
   console.log(list);
运行index1.js
node index1.js
例子2: 导出一个函数
   // m2.js
   function add(a,b) {
       return a+b;
   }
   module.exports = add;
   // index2.js
   let add = require('./m2');
   let sum = add(100, 200);
   console.log('sum', sum);
运行index2.js
node index2.js
例子3: 导出一个对象
   // m3.js
   var username = '张三';
   var age = 100;

   function say() {
       console.log('我是' + username);
   }

   module.exports = {
       username,
       age,
       say
   }
   // index3.js
   let obj = require('./m3');
   console.log('用户名', obj.username);

   obj.say();
运行index3.js
node index3.js
(四) nodejs文件系统
- 读取文件
// 例子1 异步读取
新建input.txt文件,内容随意
// index1.js
var fs = require("fs");
console.log(1);
// 异步读取
fs.readFile('input.txt', function (err, data) {
console.log(2);
if (err) {
return console.error(err);
}
console.log("异步读取: " + data.toString());
});
console.log(3);
// 例子2
 var fs = require('fs');
 // 同步读取
 var data = fs.readFileSync('input.txt');
 console.log("同步读取: " + data.toString());
 console.log("程序执行完毕。");
-
写入文件
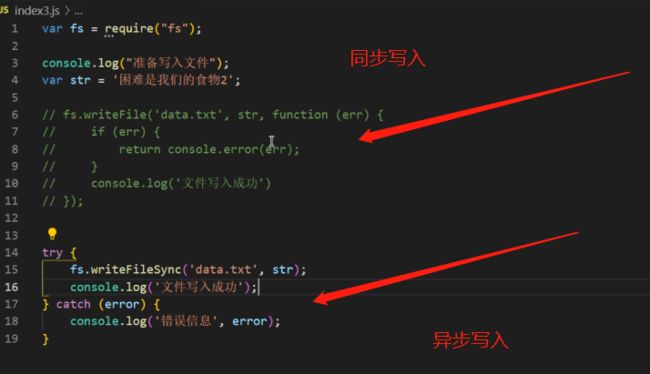
// 例子1 异步写入 var fs = require("fs"); console.log("准备写入文件"); var str = '困难是我们的食物'; fs.writeFile('data.txt', str, function (err) { /读取文件进行判断,如果是错误的时候,那么if里面的代码 if (err) { return console.error(err); } console.log('文件写入成功') });
// 例子2 同步读取
var fs = require("fs");
var str = '困难是我们的食物';
fs.writeFileSync2('data.txt', str);
console.log('文件写入成功');

// 添加trycatch可以捕捉写入过程中发生的错误
try {
fs.writeFileSync2('data.txt', str);
console.log('文件写入成功');
} catch (error) {
console.log('错误信息', error);
}
(五) 路径模块path
-
path.join() 路径连接,能够起到兼容作用,以下两个打印的结果都是 '\nodejs\dist';
let path = require('path');

let str1 = path.join('/nodejs','dist');
console.log(str1);

let str2 = path.join('\\nodejs','dist');
console.log(str2);
-
path.resolve() 把路径变成绝对路径
let path = require('path') let str1 = path.resolve('nodejs', 'dist'); console.log('str1', str1); let str2 = path.join('\\nodejs', 'dist'); console.log('str2', str2); -
__dirname
let path = require('path');
console.log(__dirname);  // 显示当前目录
let str = path.resolve(__dirname, 'dist');
console.log('str', str);
(六) npm相关
目录
-
npm是什么
npm是nodejs模块(包)管理工具
模块存放网站 https://www.npmjs.com/
-
npm常用操作
- 初始化package.json
npm init // 或 npm init -y- 安装一个nodejs模块
npm i xxx // 记录在 dependencies
npm i xxx -S // 同上
npm i xxx --save-dev // 记录devDependencies
npm i xxx -D // 同上
npm i xxx -g // 全局
npm i // 当我们把node_modules删掉,使用npm i 可以把所有依赖都安装回来
- 更新nodejs模块
npm update xxx
- 删除nodejs模块
npm uninstall xxx
- 运行指令
npm run xxx
(七) Class类
-
定义一个"人类"
class People {
//constructor构造器 构造函数
constructor(name, age, sex) {
this.name = name;
this.age = age;
this.sex = sex;
}
// 定义一个方法
writeCode() {
console.log(this.name + " " + this.age + " " + this.sex)
}
say() {
console.log("他的名字是" + " " + this.name)
}
}
let p = new People("阿华", 21, "男")
console.log(p)
p.say()
p.writeCode()
class Man extends People {
constructor(name, age, sex) {
super(name, age, sex)
this.have = true
}
}
/*let man = new Man('靓仔', 18 + '岁',"男")
man.say()
man.writeCode()
console.log(man)*/
-
继承
// 男人类继承人类
class Man extends Person {
constructor(name, age, sex) {
// 调用父类的构造器(构造方法)
super(name, age, sex);
this.haveBeard = true;
}
}
let man = new Man('陈灿', 18, '男');
console.log(man);
man.say();
man.writeCode();
(八) nodejs的koa框架
文档地址: https://koa.bootcss.com/
https://www.npmjs.com/package/koa
-
koa框架以及其他的nodejs框架
express.js框架和koa.js框架是同一个团队做的
egg.js 阿里
hapi.js
-
hello world
初始化package.json
安装
npm i koa- 创建app.js,代码如下
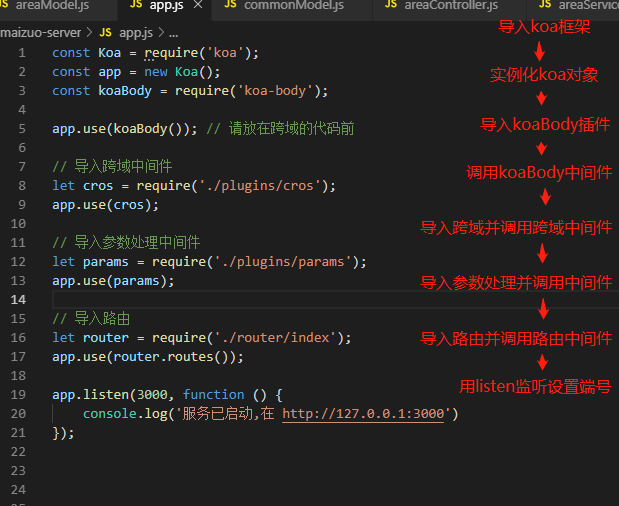
// 导入koa框架 const Koa = require('koa'); // 创建实例 const app = new Koa(); // ctx上下文,use里的函数成为中间件(插件) app.use(ctx => { // ctx.body用来给前端返回数据 ctx.body = 'Hello Koa'; }); app.listen(3000);-
启动服务
node app.js
-
服务器自动重启
-
全局安装nodemon模块
npm i nodemon -g -
启动项目的时候,使用
nodemon app.js 代替 node app.js
-
-
koa路由
-
安装
npm install koa-router -
app.js的代码如下
const Koa = require('koa'); const Router = require('koa-router'); const app = new Koa(); const router = new Router(); // 增加 router.all('/city/add', (ctx, next) => { ctx.body = '添加城市'; }); router.all('/city/getList', (ctx, next) => { ctx.body = '城市列表'; }); router.all('/city/update', (ctx, next) => { ctx.body = '更新城市'; }); router.all('/city/del', (ctx, next) => { ctx.body = '删除城市'; }); // 使用之后路由才生效 app.use(router.routes()); app.listen(3000, () => { console.log('服务已启动,在 http://localhost:3000') }); -
运行
nodemon app.js
-
-
跨域
在app.js里添加下面这句话,即可进行简单的跨域设置
app.use((ctx, next) => { ctx.set("Access-Control-Allow-Origin", "*"); ctx.set("Access-Control-Allow-Methods", "PUT, POST, GET, DELETE, OPTIONS"); // 请求头设置 ctx.set( "Access-Control-Allow-Headers", `Content-Type, Content-Length, Authorization, Accept, X-Requested-With , yourHeaderFeild,x-token,sessionToken,token` ); if (ctx.method == "OPTIONS") { ctx.body = 200; } else { next(); } }) -
中间件
-
中间件从上到下执行
- 需要调用next() 去执行下一个中间件
// 中间件(插件)
app.use((ctx, next) => {
ctx.username = 'lao hu';
console.log(1);
next();
})
app.use((ctx, next) => {
console.log(2);
console.log(ctx.username);
next();
})
app.use((ctx, next) => {
console.log(3);
next();
})
7. 获取请求参数
-
获取get请求参数
// 前端get请求传过来的参数,放在ctx.request.query对象内 (ctx, next) => { // let name = ctx.request.query.name; // let isHot = ctx.request.query.isHot; // 或者使用解构的方式来取 let {name,isHot} = ctx.request.query; }- 获取post请求参数
-
安装koa-body
npm i koa-body -
在app.js添加以下代码
const koaBody = require('koa-body'); app.use(koaBody()); // 请放在跨域的代码前 -
获取post请求参数
// 前端post请求传过来的参数,全部放入ctx.request.body对象里 let { pageNum } = ctx.request.body; console.log('pageNum', pageNum); -
为了方便获取参数,可以自定义一个中间件
// 兼容get和post请求的中间件
app.use((ctx, next) => {
 ctx.params = {
 ...ctx.request.query,
 ...ctx.request.body
 }
 next();
 })


