Unity3D--用2D图片实现3D轮转图
3D轮转图
- 一、效果图
- 二、实现步骤--准备工作
-
- 1.先创建Unity工程
- 2.在Hierarchy下右键-->UI-->Canvas
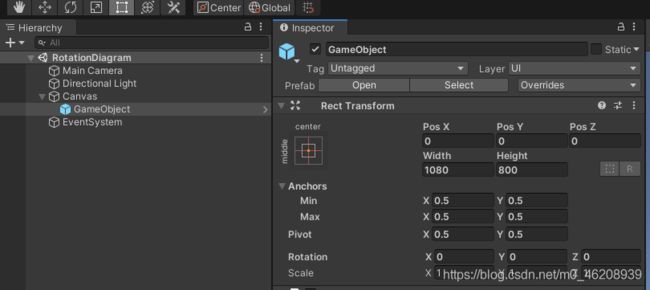
- 3.在Canvas下创建空物体对象
- 4.如图
- 三、代码步骤--核心
-
- 1.先创建RotationDiagramItem脚本
- 2.其次创建RotationDiagram2D脚本
- 四、Hierarchy面板讲解
- 总结
# 前言
用2D图片实现3D轮转图,
一、效果图

二、实现步骤–准备工作
1.先创建Unity工程

2.在Hierarchy下右键–>UI–>Canvas

3.在Canvas下创建空物体对象

4.如图
三、代码步骤–核心
1.先创建RotationDiagramItem脚本
代码如下(示例):
using DG.Tweening;
using System;
using System.Collections;
using UnityEngine;
using UnityEngine.EventSystems;
using UnityEngine.UI;

namespace HKZ
{

    public class RotationDiagramItem : MonoBehaviour, IDragHandler, IEndDragHandler
    {

        public int PosId;
        private float offset;
        private float aniTime = 0.5f;

        private Action<float> moveAction;

        private Image image;
        private Image Image
        {

            get
            {

                if (image == null)
                {

                    image = GetComponent<Image>();
                }
                return image;
            }
        }

        private RectTransform rect;
        private RectTransform Rect
        {

            get
            {

                if (rect == null)
                {

                    rect = GetComponent<RectTransform>();
                }
                return rect;
            }
        }

        private void Change(int index)
        {

            Debug.Log(index);
        }

        public void SetParent(Transform parent)
        {

            transform.SetParent(parent);
        }

        public void SetSprite(Sprite sprite)
        {

            Image.sprite = sprite;
        }

        public void SetPosDate(ItemPosDate date)
        {

            Rect.DOAnchorPos(Vector2.right * date.X, aniTime);
            Rect.DOScale(Vector3.one * date.ScaleTimes, aniTime);
            //Rect.anchoredPosition = Vector2.right*date.X;
            //Rect.localScale = Vector3.one * date.ScaleTimes;
            StartCoroutine(Wait(date));
        }

        private IEnumerator Wait(ItemPosDate date)
        {

            yield return new WaitForSeconds(aniTime * 0.5f);
            transform.SetSiblingIndex(date.Order);
        }

        public void OnDrag(PointerEventData eventData)
        {

            offset += eventData.delta.x;
        }

        public void OnEndDrag(PointerEventData eventData)
        {

            moveAction(offset);
            offset = 0;
        }

        public void AddMoveListener(Action<float> onMove)
        {

            moveAction = onMove;
        }

        public void ChangeId(int symbol, int totalItemNum)
        {

            int id = PosId;
            id += symbol;
            if (id < 0)
            {

                id += totalItemNum;
            }
            PosId = id % totalItemNum;
        }
    }
}
2.其次创建RotationDiagram2D脚本
把此脚本挂在空物体身上
代码如下(示例):
using System.Collections.Generic;
using System.Linq;
using UnityEngine;
using UnityEngine.UI;
namespace HKZ
{
public class RotationDiagram2D : MonoBehaviour
{
public Vector2 ItemSize;
public Sprite[] ItemSprites;
public float offset;
public float ScaleTimesMin;
public float ScaleTimesMax;
private List<RotationDiagramItem> itemList;
private List<ItemPosDate> posDateList;
private void Awake()
{
itemList = new List<RotationDiagramItem>();
posDateList = new List<ItemPosDate>();
CreateItem();
CalulateDate();
SetItemDate();
}
private void Start()
{
///btns = transform.GetComponentInChildren
}
private GameObject CreateTemplate()
{
GameObject item = new GameObject("Template");
item.AddComponent<RectTransform>().sizeDelta = ItemSize;
item.AddComponent<Image>();
item.AddComponent<RotationDiagramItem>();
item.AddComponent<Button>();
return item;
}
private void CreateItem()
{
GameObject template = CreateTemplate();
RotationDiagramItem itemTemplate = null;
//Resurces->prefab->实例化->gameObject
foreach (Sprite sprite in ItemSprites)
{
itemTemplate = Instantiate(template).GetComponent<RotationDiagramItem>();
itemTemplate.SetParent(transform);
itemTemplate.SetSprite(sprite);
itemTemplate.AddMoveListener(Change);
itemList.Add(itemTemplate);
}
Destroy(template);
}
private void Change(float offsetX)
{
int symbol = offsetX > 0 ? 1 : -1;
Change(symbol);
}
private void Change(int symbol)
{
foreach (RotationDiagramItem item in itemList)
{
item.ChangeId(symbol, itemList.Count);
}
for (int i = 0; i < posDateList.Count; i++)
{
itemList[i].SetPosDate(posDateList[itemList[i].PosId]);
}
}
private void CalulateDate()
{
List<ItemDate> itemDateList = new List<ItemDate>();
float length = (ItemSize.x + offset)*itemList.Count;
float radioOffset = 1 / (float)itemList.Count;
float radio = 0;
for (int i = 0; i < itemList.Count; i++)
{
ItemDate itemDate = new ItemDate();
itemDate.PosId = i;
itemDateList.Add(itemDate);
itemList[i].PosId = i;
ItemPosDate date = new ItemPosDate();
date.X = GetX(radio, length);
date.ScaleTimes = GetScaleTimes(radio, ScaleTimesMin, ScaleTimesMax);
radio += radioOffset;
posDateList.Add(date);
}
itemDateList = itemDateList.OrderBy(u => posDateList[u.PosId].ScaleTimes).ToList();
for (int i = 0; i < itemDateList.Count; i++)
{
posDateList[itemDateList[i].PosId].Order = i;
}
}
private void SetItemDate()
{
for (int i = 0; i < posDateList.Count; i++)
{
itemList[i].SetPosDate(posDateList[i]);
}
}
private float GetX(float radio, float length)
{
if (radio > 1 || radio < 0)
{
Debug.LogError("当前比例必须是0-1");
return 0;
}
if (radio >= 0 && radio < 0.25f)
{
return length * radio;
}
else if (radio >= 0.25f && radio < 0.75f)
{
return length * (0.5f - radio);
}
else
{
return length * (radio - 1);
}
}
private float GetScaleTimes(float radio, float min, float max)
{
if (radio > 1 || radio < 0)
{
Debug.LogError("当前比例必须是0-1");
return 0;
}
float scaleOffset = (max - min) / 0.5f;
if (radio < 0.5f)
{
return max - scaleOffset * radio;
}
else
{
return max - scaleOffset * (1 - radio);
}
}
}
public class ItemPosDate
{
public float X;
public float ScaleTimes;
public int Order;
};
public struct ItemDate
{
public int PosId;
};
}
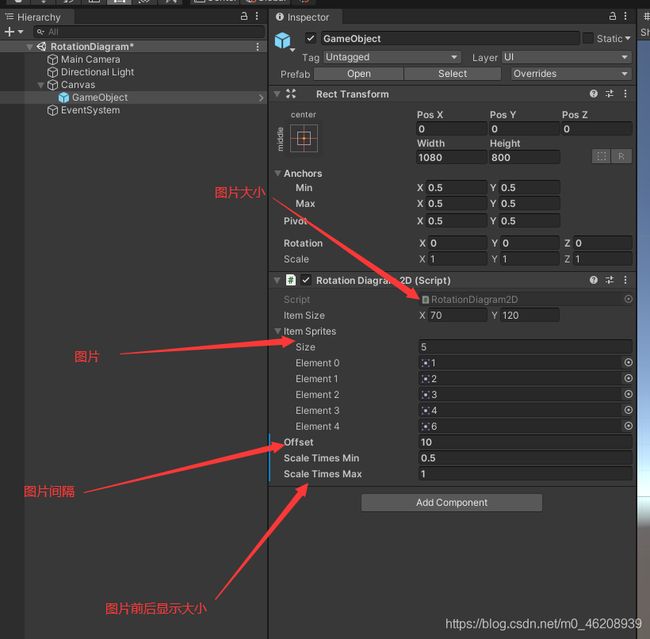
四、Hierarchy面板讲解
总结
Unity工程中人物图片来源网络,侵权必删
![]()