在忙碌完毕业设计的事情之后打算把《TensorFlow-实战Google深度学习框架》中六到十二章节的内容在这篇博客中整理完毕。主要涉及图像识别、图像处理与卷积神经网络;自然语言处理与循环神经网络。前面部分都是基于TensorFlow1.12版本,后面才会介绍TensorFlow2.0版本的特性。
卷积神经网
这一节对应书中第六章的内容,关于卷积神经网络的原理已经在之前的博客中提到过在这里不再重复,主要侧重于TensorFlow上的代码构建和其他注意点。
神经网络与深度学习
卷积层
以输入层维度为,第一层卷积层使用尺寸为,深度为16的过滤器为例,介绍Tensorflow中卷积层的前向传播过程。
filter_weights = tf.get_variable("weights", [5,5,3,16], initializer = tf.truncated_normal(stddev = 0.1))

biases = tf.get_variable("biases", [16], initializer = tf.constant_initializer(0.1))

conv = tf.nn.conv2d(input, filter_weight, strides=[1, 1, 1, 1], padding='SAME')

bias = tf.nn.bias_add(conv, biases)

actived_conv = tf.nn.relu(bias)
tf.nn.conv2d的参数说明
input: 第一个参数是一个四维矩阵。第一个维度代表每一个输入的batch,在图片处理上也就是代表一个图片,
input[0,:,:,:]表示第一张图片。后面三个维度是图片对应的节点矩阵的三个维度,也就是长、宽和深度。strides: 提供不同维度上的步长(跨距)。同时值得注意的是虽然参数提供的是一个长度为4的数组,但是第一维和第四维必须为1。应为在卷积层中,步长对于图片的长和宽才有意义。
padding: 选择填充的方法,提供
SAME和VALID两种选择,其中SAME表示添加全0填充,valid表示不添加。使用零填充的也叫做泛卷积,不适用零填充的叫做严格卷积。
全0填充(zero-padding)
由于过滤器一般不为1×1,所以卷积层前向传播之后得到的矩阵会变小,如果想让矩阵纬度大小保证不变,就需要在原来的矩阵周围添补0。
对于不同的原始矩阵大小和不同的过滤器尺寸,添补0的方式都不一样,关键在于需要计算需要在原始矩阵边上padding的圈数。
这个在TensorFlow中的Padding到底是怎么在填充?这篇博客中介绍了。
卷积层前向传播矩阵大小
当
padding = 'SAME'时:
当
padding = 'valid'时:
池化层
池化的方式分成使用最大值操作的最大池化层(max pooling)和使用平均值操作的平均池化层(average pooling)。最大池化层相对来讲使用的会多一些。在TensorFlow中tf.nn.max_pool函数实现了最大池化层的前向传播过程。
pool = tf.nn.max_pool(active_conv, ksize=[1, 3, 3, 1], strides=[1, 2, 2, 1], padding='SAME')
tf.nn.max_pool的参数说明
ksize: 池化层过滤器大小。虽然给出的是一个长度为4的一维数组,但是这个数组的第一个和最后一个数必须为1。这意味着池化层的过滤器是不可以跨不同输入样例或者节点矩阵深度的。在实际的应用中[1,2,2,1]和[1,3,3,1]的尺寸用的最多。
strides: 和上面卷积层一样,这个参数也是步长的概念。同样的第一位和最后第四位只能为1。这说明池化层并不能在节点矩阵的深度和输入样例的个数这两个维度上缩小矩阵尺寸,使得最后全连接的参数减少。
padding: 同样提供了两种填充方式,
SAME和valid。
经典卷积网络模型
下面主要介绍书中的一个经典卷积网络模型LeNet-5,之后会提到Inception-v4模型。
LeNet-5模型
模型的结构图如下

- 第一层,卷积层:第一层的卷积层使用了尺寸为5×5,深度为6,不使用全0填充,步长为1的过滤器。这一层输入是32×32×1大小的原始图像。因为不是全0填充,输出的尺寸为32-5+1=28,深度为6。这一层的卷积层总共有5×5×1×6+6=156个参数。因为下一层的节点矩阵有28×28×6=4704个节点,每个节点和5×5=25个当前层节点相连,所以本层卷积层总共有4704×(25+1)=122304个连接。(或者计算方式用156个参数数目乘以28×28)
- 第二层,池化层:过滤器大小为2×2,长和宽的步长为2,所以输出矩阵的大小为14×14×6。
- 第三层,卷积层:过滤器尺寸为5×5,深度为16,不使用全0填充,步长为1。本层应该有5×5×6×16+16=2416个参数。2416×(14-5+1)×(14-5+1)=241600个链接。
- 第四层,池化层:过滤器大小为2×2,步长为2,本层的输出矩阵大小为5×5×16。
- 第五层,全连接层:本层输出节点个数为120,总共有5×5×16×120+120=48120个参数。
- 第六层,全连接层:本层输出节点个数为84个,总共参数为120×84+84=10164个。
- 第七层,全连接层:本层输出节点个数为10个,总共参数为84×10+10=850个。
之前的博客里面提供了mnist数据集的改进版本,地址
把其中的inference部分稍作修改,就能得到LeNet-5模型版本的mnist手写数字检测模型。
import tensorflow as tf

# MNIST数据集相关常数

INPUT_NODE = 784 # 输入层的节点数,对于MNIST数据集,就是28*28的图片
OUTPUT_NODE = 10 # 输出层的节点数,因为需要用0-9标注手写数字的结果

# 神经网络的一些配置参数

IMAGE_SIZE = 28
NUM_CHANNELS = 1
NUM_LABELS = 10 # 0-9的数字识别,共有10个label

LAYER1_NODE = 500 # 本例子使用只有一层500个节点的隐藏层的网络结构作为样例

BATCH_SIZE = 100 # 一个batch中的数据量,越小越接近随机梯度下降,越大越接近梯度下降

CONV1_DEEP = 32; CONV1_SIZE = 5 #第一层卷积层的参数
CONV2_DEEP = 64; CONV2_SIZE = 5 #第二层卷积层的参数

FC_SIZE = 512

def inference(input_tensor, train, regularizer):
    #添加了一个参数train,用于区分训练过程和测试过程。
    with tf.variable_scope('layer1-conv1'):
        conv1_weights = tf.get_variable(
            "weight", [CONV1_SIZE, CONV1_SIZE, NUM_CHANNELS, CONV1_DEEP], initializer=tf.truncated_normal_initializer(stddev=0.1)
        )
        conv1_biases = tf.get_variable(
            "bias", [CONV1_DEEP], initializer=tf.constant_initializer(0.0)
        )
        conv1 = tf.nn.conv2d(input_tensor, conv1_weights, strides=[1, 1, 1, 1], padding='SAME')
        relu1 = tf.nn.relu(tf.nn.bias_add(conv1, conv1_biases))

    with tf.variable_scope('layer2-pool1'):
        pool1 = tf.nn.max_pool(relu1, ksize=[1, 2, 2, 1], strides=[1, 2, 2, 1], padding='SAME')

    with tf.variable_scope('layer3-conv2'):
        conv2_weights = tf.get_variable(
            "weight", [CONV2_SIZE, CONV2_SIZE, CONV1_DEEP, CONV2_DEEP], initializer=tf.truncated_normal_initializer(stddev=0.1)
        )
        conv2_biases = tf.get_variable(
            "bias", [CONV2_DEEP], initializer=tf.constant_initializer(0.0)
        )
    with tf.variable_scope('layer4-pool2'):
        pool2 = tf.nn.max_pool(relu2, ksize=[1, 2, 2, 1], strides=[1, 2, 2, 1], padding='SAME')

    #第四层的输出为7×7×64的矩阵,然而第五层全连接的输入格式为一个向量
    #get_shape()得到矩阵的维度,返回的值是一个元组
    pool_shape = pool2.get_shape()
    #计算将矩阵拉长成向量的长度,数值为矩阵的长、宽和深度的乘积。这里pool_shape[0]为一个batch中数据的个数,其中每个数据的长度为FC_SIZE的值,也就是512.
    nodes = pool_shape[1] * pool_shape[2] * pool_shape[3]
    #通过tf.reshape函数将第四层输出变为一个batch的向量
    reshaped = tf.reshape(pool2, [pool_shape[0], nodes])

    with tf.variable_scope('layer5-fc1'):
        fc1_weights = tf.get_variable(
            "weight", [nodes, FC_SIZE], initializer=tf.truncated_normal_initializer(stddev=0.1)
        )
        #只有全连接层的权重需要加入正则化
        if regularizer != None:
            tf.add_to_collection('losses', regularizer(fc1_weights))
        fc1_biases = tf.get_variable(
            "bias", [FC_SIZE], initializer=tf.constant_initializer(0.1)
        )
        fc1 = tf.nn.relu(tf.matmul(reshaped, fc1_weights) + fc1_biases)
        #在训练过程中加入弃权机制
        if train: fc1 = tf.nn.dropout(fc1, 0.5)

    with tf.variable_scope('layer6-fc2'):
        fc2_weights = tf.get_variable(
            "weight", [FC_SIZE, NUM_LABELS], initializer=tf.truncated_normal_initializer(stddev=0.1)
        )
        if regularizer != None:
            tf.add_to_collection('losses', regularizer(fc2_weights))
        fc2_biases = tf.get_variable(
            "bias", [NUM_LABELS], initializer=tf.constant_initializer(0.1)
        )
        logit = tf.mutmul(fc1, fc2_weights) + fc2_biases
    return logit
Inception-v4
LetNet5、AlexNet、VGGNet等模型都满足下面的正则化表示的公式
'+'代表一个或多个,'?'代表零个或一个。
LeNet-5、AlexNet、VGG-16模型介绍
Inception结构是另一种完全不同的结构,在LeNet-5模型中,不同的卷积层是通过串联的方式链接在一起的,而Inception结构则是通过并联的方式。
在前文中,一个卷积层我们一般会确定使用一定尺寸的过滤器,如边长为1、3或者5,那么在设计网络结构的时候就会面临如何选择过滤器边长的问题。Inception模块给出了一个方式就是同时使用所有不同尺寸的过滤器,然后再将每个卷积层输出的矩阵拼接起来。虽然过滤器的大小不同,但是如果所有过滤器都使用全0填充且步长为1,那么前向传播得到的结果矩阵的长和宽都与输入矩阵一致。具体的原理解释可以参考下文。
Inception-v4与Inception-ResNet结构图解
卷积神经网络的迁移学习
所谓迁移学习就是将一个问题上训练好的模型通过简单的调整使其适用于一个新的问题。这里给出一个使用ImageNet数据集训练好的Inception-v3模型来解决一个全新的图像分类问题。
可以保留训练好的Inception-v3模型中所有卷积层的参数,只是替换最后一层全连接层。在最后一层全连接层之前的网络层称之为瓶颈层(bottleneck)。卷积神经网络可以看做对新的图像进行特征提取的过程。在训练好的Inception-v3模型中,因为将瓶颈层的输出再通过一个单层的全连接层神经网络可以很好地区分1000种类别的图像,所以有理由认为瓶颈层输出的节点向量可以被作为任何图像的一个更加精简且表达能力更强的特征向量。基于这种方式方式,我们可以认为在新的数据集上可以直接使用Inception-v3里的卷积层对图像进行特征提取,保留这些层已经训练完成的参数,只是最后的全连接层进行重新的训练。
原始数据处理(data_divide.py)
把原始的图片数据处理成模型需要的输入数据。运行下面代码把所有的图片数据划分成训练、验证和测试三个数据集,并且把图片从原始的jpg格式转化为inception-v3模型需要的299×299×3的数字矩阵。
import glob
import os.path
import MacOSFile
import numpy as np
import tensorflow as tf
from tensorflow.python.platform import gfile

#原始输入数据的目录
INPUT_DATA = 'flower_photos'
#处理过的数据的输出,先存储为numpy格式
OUTPUT_FILE = 'flower_processed_data.pkl'


#测试数据和验证数据比例
VALIDATION_PERCENTAGE = 10
TEST_PERCENTAGE = 10

#读取数据并将数据分割成训练数据、验证数据和测试数据

def create_image_lists(sess, testing_percentage, validation_percentage):
    sub_dirs = [x[0] for x in os.walk(INPUT_DATA)]
    is_root_dir = True

    #初始化各个数据集
    training_images = []
    training_labels = []
    validation_images = []
    validation_labels = []
    testing_images = []
    testing_labels = []
    current_label = 0

    #读取所有子目录

    for sub_dir in sub_dirs:
        if is_root_dir:
            is_root_dir = False
            continue
        extensions = ['jpg', 'jpeg', 'JPG', 'JPEG']
        file_list = []
        dir_name = os.path.basename(sub_dir)
        for extension in extensions:
            #使用glob和简单的*正则把每个子文件下的所有图片抓起出来
            file_glob = os.path.join(INPUT_DATA, dir_name, '*.' + extension)
            #多个子文件夹中的图片统一保存在file_glob这个list里
            #extend()函数用于在列表末尾一次性追加另一个序列中的多个值(用新列表扩展原来的列表)。
            file_list.extend(glob.glob(file_glob))
        if not file_list: continue

        print("processing", dir_name)

        i = 0
        for file_name in file_list:
            #读取并解析图片,将图片转化为299×299以便Inception-v3模型来处理
            #使用Gfile方法读取图片
            i+=1
            image_raw_data = gfile.GFile(file_name, 'rb').read()
            image = tf.image.decode_jpeg(image_raw_data)
            if image.dtype != tf.float32:
                image = tf.image.convert_image_dtype(image, dtype = tf.float32)
            image = tf.image.resize_images(image, [299, 299])
            #使用gfile读图片,decode输出是Tensor
            image_value = sess.run(image)

            #随机划分数据集
            chance = np.random.randint(100)
            if chance < validation_percentage:
                validation_images.append(image_value)
                validation_labels.append(current_label)
            elif chance < (testing_percentage + validation_percentage):
                testing_images.append(image_value)
                testing_labels.append(current_label)
            else:
                training_images.append(image_value)
                training_labels.append(current_label)
            if i%200 == 0:
                print("processing...")
        current_label += 1

        #将训练数据随机打乱以获得更好的训练效果
    state = np.random.get_state()
    np.random.shuffle(training_images)
    np.random.set_state(state)
    np.random.shuffle(training_labels)
    return np.asarray([training_images, training_labels,
                validation_images, validation_labels, testing_images, testing_labels])

def main():
    with tf.Session() as sess:
        processed_data = create_image_lists(sess, TEST_PERCENTAGE, VALIDATION_PERCENTAGE)
        MacOSFile.pickle_dump(processed_data, OUTPUT_FILE)


if __name__ == '__main__':
    main()
一些功能函数的注解:
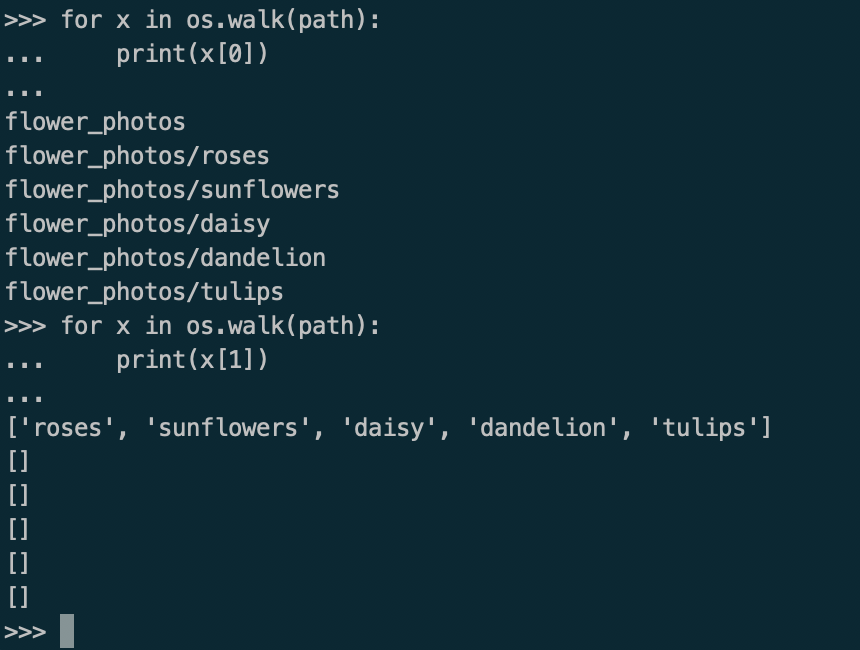
1、os.walk
os.walk() 方法是一个简单易用的文件、目录遍历器,可以帮助我们查看整理子目录和子文件。
os.walk(top, topdown=True, onerror=None, followlinks=False)
top -- 是你所要遍历的目录的地址。
topdown -- 可选,为 True,则优先遍历 top 目录,否则优先遍历 top 的子目录(默认为开启)。如果 topdown 参数为 True,walk 会遍历top文件夹,与top 文件夹中每一个子目录。
onerror -- 可选,需要一个 callable 对象,当 walk 需要异常时,会调用。
返回的是三元组turple(dirpath, dirname, filenames)
dirpath是一个string,代表了目录的路径
dirnames是一个list,包含了dirpath下所有子目录的名字
filenames是一个list,包含了非目录文件的名字
下面是运行了之后的截图,filenames项中图片名字太多就不作展示
2、glob
glob模块用来查找文件目录和文件,它属于gfile模块,常见的两个方法有glob.glob()和glob.iglob(),iglob与glob的作用类似,但是返回值为迭代器,更加省内存。
可以和常用的find功能进行类比,glob支持*?[]这三种通配符
*代表0个或多个字符
?代表一个字符
[]匹配指定范围内的字符,如[0-9]匹配数字
输出上面展示例子中flower_photos中所有的子目录,用相对路径
all_subfolder_paths = list(glob.glob('flower_photos/*'))
输出上面展示例子中flower_photos中所有的图片路径
all_image_paths = list(glob.glob('flower_photos/*/*'))
还有一种方法是使用Pathlib,构建一个Path类,使用绝对路径和相对路径构建都可以。
data_root = pathlib.Path('flower_photos')
all_image_paths = list(data_root.glob('*/*'))
pathlib库的Path类的使用
3、random.randint()
random.randint(a,b)用于生成一个指定范围内的整数。其中参数a是下限,参数b是上限,生成的随机数n: a <= n <= b。
4、np.random.get_state()与np.random.set_state()
state = np.random.get_state()
np.random.shuffle(training_images)H
np.random.set_state(state)
np.random.shuffle(training_labels)
get_state():可理解为设定随机状态,记录下数组被打乱的操作
set_state():接收get_state()返回的值,并进行同样的操作
一般结合random.shuffle()函数使用
将实例与标签两个数组打乱,由于记录并进行了同样的操作,所以打乱后,实例与标签仍然是一一对应的关系。
5、macOS上使用书本原始代码的报错原因
使用书上的原始代码在macOS上会对np.save()报错
pickle.dump(array, fp, protocol=2, **pickle_kwargs)
OSError: [Errno 22] Invalid argument
出现该问题的原因是Pickle的对象太大,超过2G,在macOS系统中无法直接dump。此问题issue24658在Python社区被讨论过,由文件过大引起。只需要使用bytearray将字节对象分为几个块,每个块大小为2^31 - 1。
后来借鉴OSError: [Errno 22] Invalid argument解决方法这篇博客,添加了MacOSFile类,使用pickle_dump替代pickle默认的pickle.dump,使用pickle_load替代pickle默认的pickle.load
import pickle

class MacOSFile(object):

    def __init__(self, f):
        self.f = f

    def __getattr__(self, item):
        return getattr(self.f, item)

    def read(self, n):
        # print("reading total_bytes=%s" % n, flush=True)
        if n >= (1 << 31):
            buffer = bytearray(n)
            idx = 0
            while idx < n:
                batch_size = min(n - idx, 1 << 31 - 1)
                # print("reading bytes [%s,%s)..." % (idx, idx + batch_size), end="", flush=True)
                buffer[idx:idx + batch_size] = self.f.read(batch_size)
                # print("done.", flush=True)
                idx += batch_size
            return buffer
        return self.f.read(n)

    def write(self, buffer):
        n = len(buffer)
        print("writing total_bytes=%s..." % n, flush=True)
        idx = 0
        while idx < n:
            batch_size = min(n - idx, 1 << 31 - 1)
            print("writing bytes [%s, %s)... " % (idx, idx + batch_size), end="", flush=True)
            self.f.write(buffer[idx:idx + batch_size])
            print("done.", flush=True)
            idx += batch_size


def pickle_dump(obj, file_path):
    with open(file_path, "wb") as f:
        return pickle.dump(obj, MacOSFile(f), protocol=pickle.HIGHEST_PROTOCOL)


def pickle_load(file_path):
    with open(file_path, "rb") as f:
        return pickle.load(MacOSFile(f))
下载谷歌训练好的模型
wget http://download.tensorflow.org/models/inception_v3_2016_08_28.tar.gz

tar xvf inception_v3_2016_08_28.tar.gz
解压后得到一个inception_v3.ckpt
加载模型并训练(inception.py)
在mac上用CPU版本的TensorFlow跑起来会很慢,所以只是测试运行一下前几轮的效果。
import os.path
import glob
import pickle
import tensorflow as tf
import MacOSFile
import tensorflow.contrib.slim as slim
from tensorflow.python.platform import gfile
# 加载通过slim定义好的resnet_v1模型
import tensorflow.contrib.slim.python.slim.nets.inception_v3 as inception_v3

# 数据文件
INPUT_DATA = "./flower_processed_data.pkl"
# 保存训练好的模型
TRAIN_FILE = "./saved_model"
# 提供的已经训练好的模型
CKPT_FILE = "./inception_v3.ckpt"

# 定义训练所用参数
LEARNING_RATE = 0.0001
STEPS = 300
BATCH = 32
N_CLASSES = 5

# 这里指出了不需要从训练好的模型中加载的参数,就是最后的自定义的全连接层
CHECKPOINT_EXCLUDE_SCOPES = 'InceptionV3/Logits,InceptionV3/AuxLogits'
# 指定最后的全连接层为可训练的参数
TRAINABLE_SCOPES = 'InceptionV3/Logits,InceptionV3/AuxLogits'


# 加载所有需要从训练好的模型加载的参数
def get_tuned_variables():
    ##不需要加载的范围
    exclusions = [scope.strip() for scope in CHECKPOINT_EXCLUDE_SCOPES.split(",")]
    # 初始化需要加载的参数
    variables_to_restore = []

    # 遍历模型中的所有参数
    for var in slim.get_model_variables():
        # 先指定为不需要移除
        excluded = False
        # 遍历exclusions,如果在exclusions中,就指定为需要移除
        for exclusion in exclusions:
            if var.op.name.startswith(exclusion):
                excluded = True
                break
        # 如果遍历完后还是不需要移除,就把参数加到列表里
        if not excluded:
            variables_to_restore.append(var)
    return variables_to_restore


# 获取所有需要训练的参数
def get_trainable_variables():
    # 同上
    scopes = [scope.strip() for scope in TRAINABLE_SCOPES.split(",")]
    variables_to_train = []
    # 枚举所有需要训练的参数的前缀,并找到这些前缀的所有参数
    for scope in scopes:
        variables = tf.get_collection(tf.GraphKeys.TRAINABLE_VARIABLES, scope)
        variables_to_train.extend(variables)
    return variables_to_train


def main():
    # 加载数据
    processed_data = MacOSFile.pickle_load(INPUT_DATA)
    training_images = processed_data[0]
    n_training_example = len(training_images)
    training_labels = processed_data[1]
    validation_images = processed_data[2]
    validation_labels = processed_data[3]
    testing_images = processed_data[4]
    testing_labels = processed_data[5]

    print("there is %d training examples, %d validation examples, %d testing examples" %
          (n_training_example, len(validation_labels), len(testing_labels)))

    # 定义数据格式
    images = tf.placeholder(tf.float32, [None, 299, 299, 3], name='input_images')
    labels = tf.placeholder(tf.int64, [None], name='labels')

    # 定义模型,因为给出的只有参数,并没有模型,这里需要指定模型的具体结构
    with slim.arg_scope(inception_v3.inception_v3_arg_scope()):
        # logits就是最后预测值,images就是输入数据,指定num_classes=None是为了使resnet模型最后的输出层禁用
        logits, _ = inception_v3.inception_v3(images, num_classes=N_CLASSES)

    # 获取需要训练的变量
    trainable_variables = get_trainable_variables()

    # 定义损失,模型定义的时候已经考虑了正则化了
    tf.losses.softmax_cross_entropy(tf.one_hot(labels, N_CLASSES), logits, weights=1.0)
    # 定义训练过程
    train_step = tf.train.RMSPropOptimizer(LEARNING_RATE).minimize(tf.losses.get_total_loss())

    # 定义测试和验证过程
    with tf.name_scope('evaluation'):
        correct_prediction = tf.equal(tf.argmax(logits, 1), labels)
        evaluation_step = tf.reduce_mean(tf.cast(correct_prediction, tf.float32))

    # 定义加载模型的函数,就是重新定义load_fn函数,从文件中获取参数,获取指定的变量,忽略缺省值
    load_fn = slim.assign_from_checkpoint_fn(CKPT_FILE, get_tuned_variables(), ignore_missing_vars=True)

    # 定义保存新的训练好的模型的函数
    saver = tf.train.Saver()
    with tf.Session() as sess:
        # 初始化没有加载进来的变量,一定要在模型加载之前,否则会将训练好的参数重新赋值
        init = tf.global_variables_initializer()
        sess.run(init)

        # 加载训练好的模型
        print("加载谷歌训练好的模型...")
        load_fn(sess)

        start = 0
        end = BATCH
        for i in range(STEPS):
            # 训练...
            sess.run(train_step, feed_dict={images: training_images[start:end],
                                            labels: training_labels[start:end]})
            # 间断地保存模型,并在验证集上验证
            if i % 30 == 0 or i + 1 == STEPS:
                saver.save(sess, TRAIN_FILE, global_step=i)
                validation_accuracy = sess.run(evaluation_step, feed_dict={images: validation_images,
                                                                           labels: validation_labels})
                print("经过%d次训练后,在验证集上的正确率为%.3f" % (i, validation_accuracy))

            # 更新起始和末尾
            start = end
            if start == n_training_example:
                start = 0
            end = start + BATCH
            if end > n_training_example:
                end = n_training_example

        # 训练完了在测试集上测试正确率
        testing_accuracy = sess.run(evaluation_step, feed_dict={images: testing_images,
                                                                labels: testing_labels})
        print("最后在测试集上的正确率为%.3f" % testing_accuracy)


if __name__ == '__main__':
    main()
最后的运行结果如下,Inception模型用于这个花朵识别的迁移学习,收敛很快并且仅仅300轮之后就在测试集上达到了不错的准确率。

图像数据处理
统一输入数据的格式
TFRecord是一种统一的数据存储格式。在上面的迁移学习例子中使用了一个从类别名称到所有数据列表的字典来维护图像和类别的关系。这种方式的可扩展性非常差,当数据来源更加复杂、每个样例中的信息更加丰富之后,这种方式就很难有效记录输入数据中的信息了。
TFRecord格式介绍
正常情况下我们训练文件夹经常会生成 train, test 或者val文件夹,这些文件夹内部往往会存着成千上万的图片或文本等文件,这些文件被散列存着,这样不仅占用磁盘空间,并且再被一个个读取的时候会非常慢,繁琐。占用大量内存空间(有的大型数据不足以一次性加载)。此时我们TFRecord格式的文件存储形式会很合理的帮我们存储数据。TFRecord内部使用了“Protocol Buffer”二进制数据编码方案,它只占用一个内存块,只需要一次性加载一个二进制文件的方式即可,简单,快速,尤其对大型训练数据很友好。而且当我们的训练数据量比较大的时候,可以将数据分成多个TFRecord文件,来提高处理效率。
下面给出tf.train.Example的定义。
message Example {
    Features feature = 1;
};

message Features {
    map feature = 1;
};

message Feature {
    oneof kind {
        BytesList bytes_list = 1;
        FloatList float_list = 2;
        Int64List int_list = 3;
    }
};
tf.train.Example的数据结构包含了一个从属性名称到取值的一层层下去的字典。其中属性的取值有三种可能,可以是字符串(ByteList)、实数列表(FloatList)、整数列表(Int64List)。下面给出一个构建tf_example的例子:
def int64_feature(value):
    return tf.train.Feature(int64_list=tf.train.Int64List(value=[value]))

def bytes_feature(value):
    return tf.train.Feature(bytes_list=tf.train.BytesList(value=[value]))

tf_example = tf.train.Example(
        features=tf.train.Features(feature={
            'pixels': _int64_feature(pixels),
            'label': _int64_feature(np.argmax(labels[index])),
            'image_raw': _bytes_feature(image_raw)}))
之后是创建TFRecord生成器的关键代码。
writer = tf.python_io.TFRecordWriter(record_path)
writer.write(tf_example.SerializeToString())
writer.close()
进行读取的关键部分
_, serialized_example = reader.read(filename_queue)
features = tf.parse_single_example(
    serialized_example,
    features={
        'image_raw': tf.FixedLenFeature([], tf.string),
        'pixels': tf.FixedLenFeature([], tf.int64),
        'label': tf.FixedLenFeature([], tf.int64),
    })
TensorFlow提供两种不同的属性解析方法。一种是tf.FixedLenFeature,这种方法解析的结果为一个Tensor。另一种方法是tf.VarLenFeature,这种方法得到的解析结果为SparseTensor,用于处理稀疏数据。
对于完整TFRecord创建和读取过程,可以参考下面两篇文章:
TFRecord参考链接1
TFRecord参考链接2
TensorFlow里的图像处理
图片读取
tf.gfile是tf中的文件IO操作库,和Python中的File有类似的功能,所以基本上tf.gfile.FastGFile()出现的地方用Python自带的open()也是可以的,但速度tf.gfile会比Python自带的文件操作块。
tf.gfile.FastGFile()和tf.gile.GFile()的差别仅仅在于“无阻塞”,即该函数会无阻赛以较快的方式获取文本操作句柄。不过FastGFile()在之后的TensorFlow版本中不被建议使用,离剔除也不远了。
所以下面代码中的三种写法本质上没有太大区别
对于gfile模块,除了有class FastGFile和class GFile这两个类,还有其他12个函数
12个gfile函数参考链接
FastGFile类的函数参考
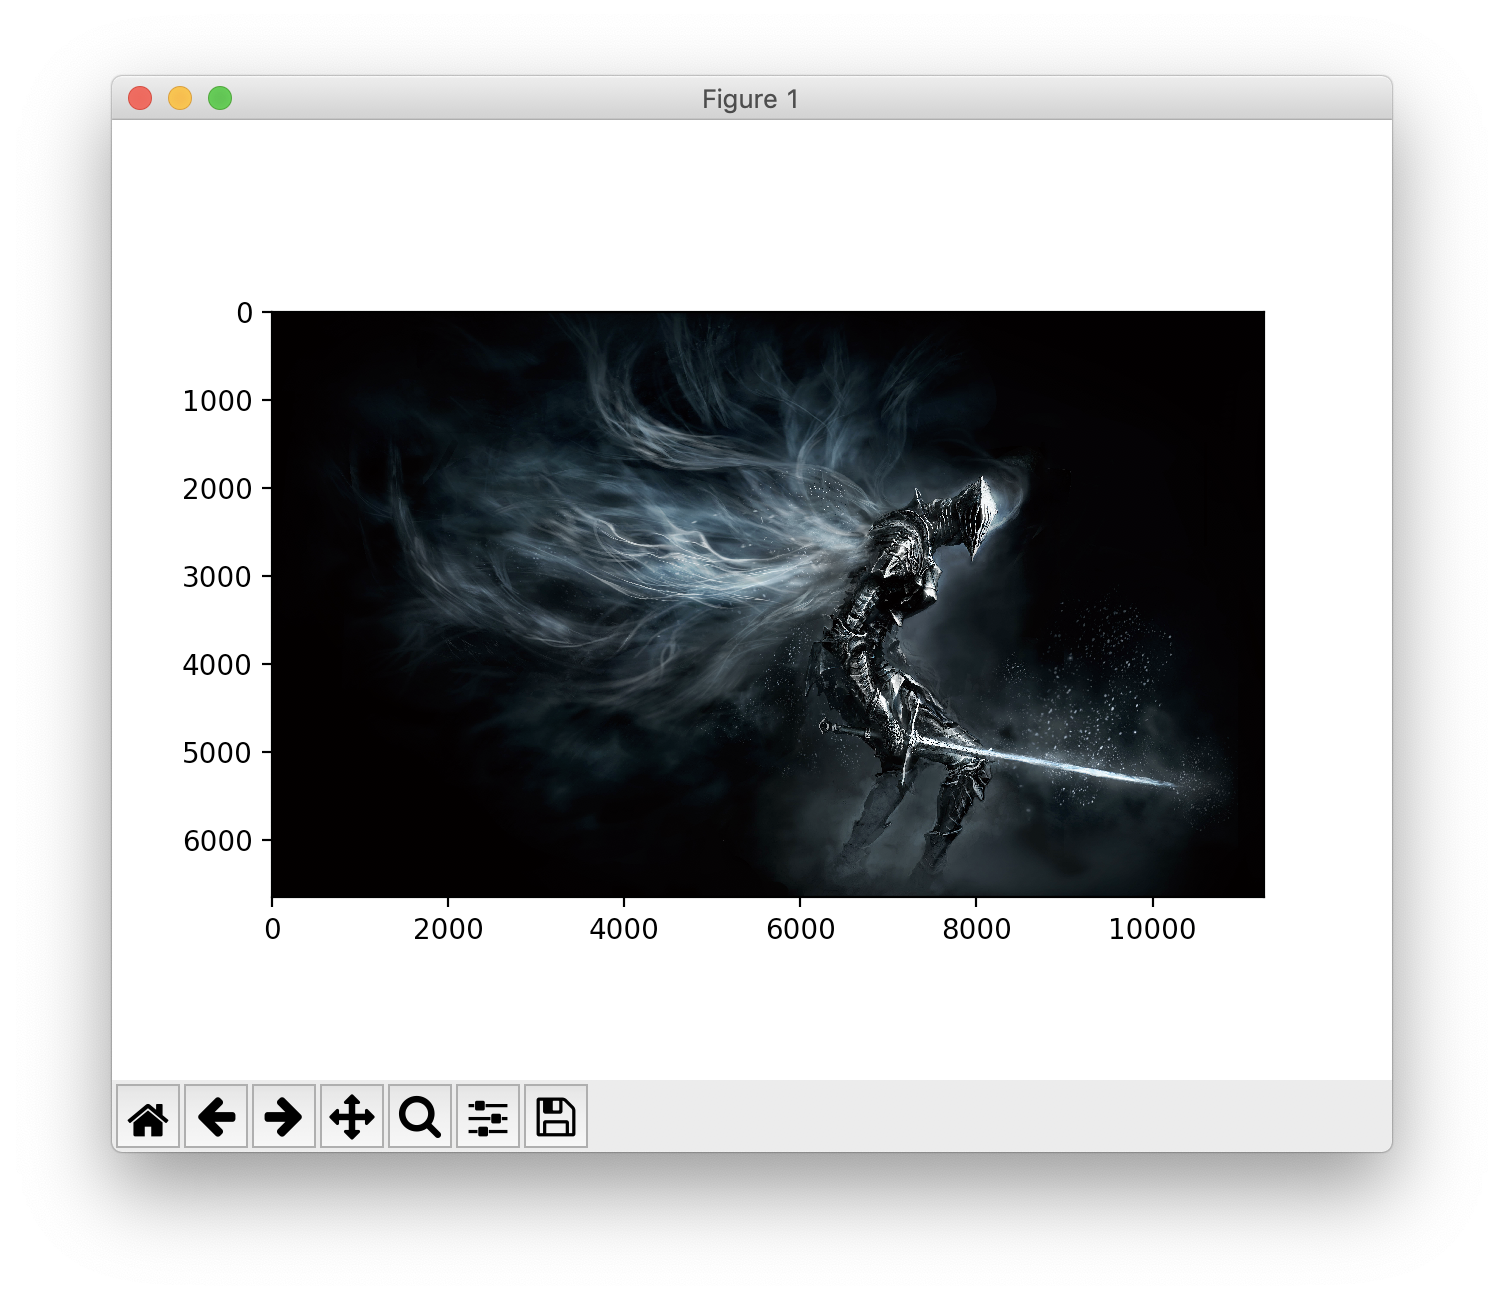
下面三种获取文件句柄并读的写法都可以,没有本质区别:
import matplotlib.pyplot as plt
import tensorflow as tf

image_raw_data = tf.gfile.FastGFile("darksoul.jpg", 'rb').read()

# with tf.gfile.GFile('darksoul.jpg', 'rb') as f:
#     image_raw_data = f.read()

#image_raw_data = open('darksoul.jpg', 'rb').read()

with tf.Session() as sess:
    img_data = tf.image.decode_jpeg(image_raw_data)
    img = img_data.eval()

plt.figure()
plt.imshow(img)
plt.show()

#进行存储,令存成png格式
encode_image = tf.image.encode_png(img_data)
tf.gfile.FastGFile('.', 'wb').write(encode_image.eval())
图像处理
1.图片大小修改
resized = tf.image.resize_images(img_data, [1000, 1000], method=0)
| Method取值 | 图像大小调整算法 |
|---|---|
| 0 | 双线性插值(Bilinear interpolation) |
| 1 | 最近邻居法(Nearest neighbor interpolation) |
| 2 | 双三次插值法(Bicubic interpolation) |
| 3 | 面积插值法(Area interpolation) |
croped = tf.image.resize_image_with_crop_or_pad(img_data, 800, 800)
padded = tf.image.resize_image_with_crop_or_pad(img_data, 1200, 1200)
central_cropped = tf.image.central_crop(image_data, 0.5) 按照比例剪切
这几个函数都会自动截取原始图片中居中的部分,也有tf.image.crop_to_bounding_box和tf.image.pad_to_bounding_box这类函数可以供选择。
2.图像翻转
上下翻转 flipped = tf.image.flip_up_down(img_data)
左右翻转 flipped = tf.image.flip_left_right(img_data)
对角线翻转 transposed = tf.image.transpose_image(img_data)
在图像识别中翻转一般不会影响识别的结果。不过以一个识别猫的模型为例,如果训练集合中很多猫的头或者主体都在左,那么识别头在右的猫可能效果不是那么好,随机翻转可以很好地改变和丰富训练集的全面性。
以百分之50的概率上下翻转 fliped = tf.image.random_flip_up_down(img_data)
以百分之50的概率左右翻转 fliped = tf.image.random_flip_left_right(img_data)
3.色彩调整
图像的亮度、对比度、饱和色度等颜色信息不应该称为物体识别的干扰因素,可以对训练集合的图片进行预处理尽量削减这些因素的影响。
adjusted = tf.image.adjust_brightness(img_data, -0.5) #亮度减少0.5

#亮度值需要截断在 0.0-1.0 之间,所以用下面的操作。

adjusted = tf.clip_by_value(adjusted, 0.0, 1.0)

#在[-max_delta, max_delta]的范围随机调整图像的亮度
adjusted = tf.image.random_brightness(img_data, max_delta)

#图像对比度减少到0.5倍

adjusted = tf.image.adjust_contrast(img_data, 0.5)

#在[lower, upper]的范围随即调整图的对比度。
adjusted = tf.image.random_contrast(image, lower, upper)

#色相加0.3

adjusted = tf.image.adjust_hue(img_data, 0.3)

#图像饱和度+5

adjusted = tf.image.adjust_saturation(img_data, 5)

#图像标准化,具体操作是将图像的亮度均值变为0,方差变为1
adjusted = tf.image.per_image_standardization(img_data)
4.处理标注框
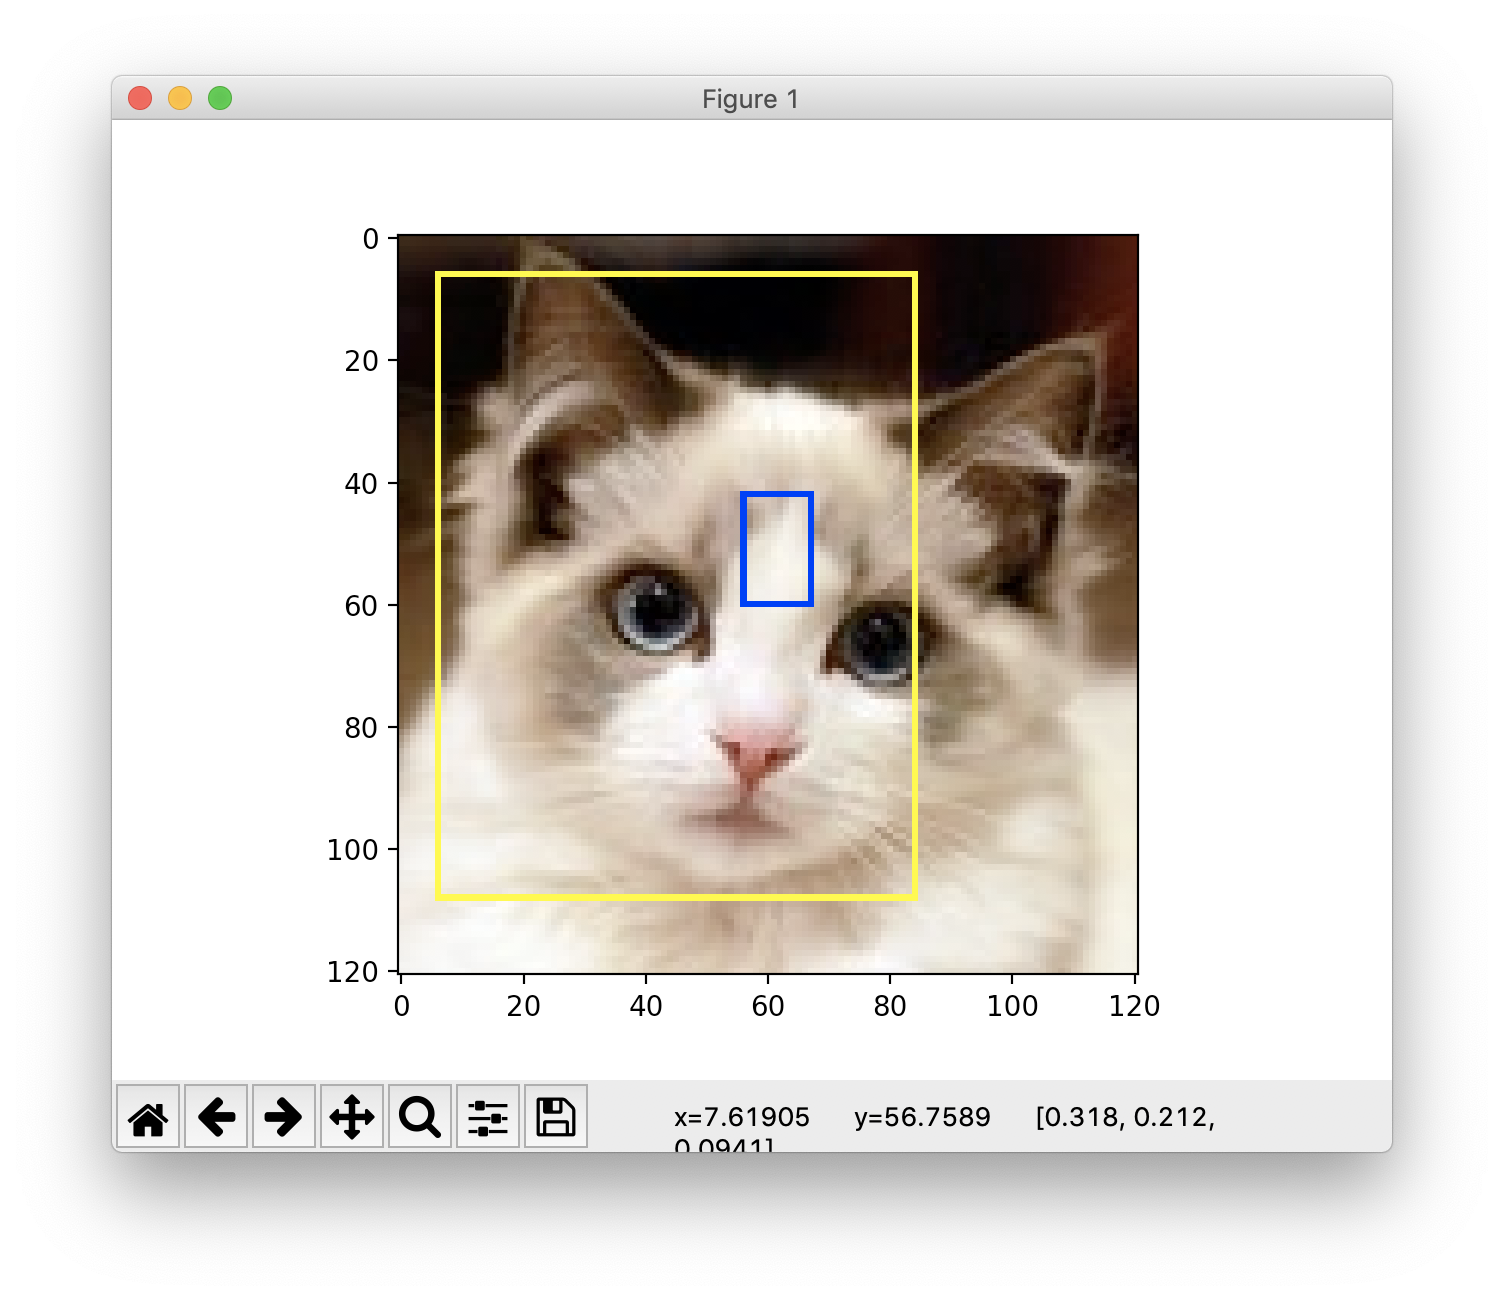
使用tf.image.draw_bounding_boxes函数在图片中加入标注框
import matplotlib.pyplot as plt
import tensorflow as tf

image_raw_data = tf.gfile.FastGFile("cat.jpg", 'rb').read()

with tf.Session() as sess:
    img_data = tf.image.decode_jpeg(image_raw_data)

    #tf.image.draw_bounding_boxes函数要求图像矩阵中的数字为实数,所以先将图像矩阵转化为实数类型。
    #tf.image.draw_bounding_boxes函数图像的输入是一个batch,所以是多张图像组成的四维矩阵,所以需要将解码后
    #的图像矩阵加一维。

    img_data = tf.image.convert_image_dtype(img_data, dtype=tf.float32)
    batched = tf.expand_dims(img_data, 0)

    #给出每一张图像的标注框。一个标注框四个数字代表[y_min, x_min, y_max, x_max].
    #这里的数字都是图像的相对位置,比如在180 * 267的图像中,[0.35, 0.47, 0.5, 0.56]代表了
    #(63,125)到(90,150)的图像区域
    boxes = tf.constant([[[0.05, 0.05, 0.9, 0.7], [0.35, 0.47, 0.5, 0.56]]])

    result = tf.image.draw_bounding_boxes(batched, boxes)
    result = tf.reduce_sum(result, 0)  # 这里显示的时候需要进行降维处理
    plt.figure()
    plt.imshow(result.eval())
    plt.show()
TensorFlow图片处理与tf.data.Dataset
在上文介绍了众多的图片预处理方法,这些预处理可以减少无关因素对图像识别模型效果的干扰。但是这些繁复的预处理也会减慢整个训练的过程。为了避免这种情况,TensorFlow提供了基于队列的多线程处理流程,使得训练的同时,能够读数据并且预处理数据。
在TensorFlow1.13版本之后基于队列的pipelines载入方法已经不被提倡,推荐使用的是tf.data模块。(运行时候会提示:Queue-based input pipelines have been replaced by tf.data。)书上的版本比较老,所以这边根据TensorFlow2.0的官方图片加载教程进行整理
google官方tutorial
三、示例程序
这里继续使用之前Inception迁移程序实例中使用的图片库(这个图片库基本上也是google官方的示例程序中通用的)
预处理、整理图片与标签database、整合成batch并设置prefetch。
读取并构建Dataset简化例子:
def _parse_function(filename, label):
    image_string = tf.io.read_file(filename)
    image_decoded = tf.image.decode_jpeg(image_string, channels=3)
    image = tf.cast(image_decoded, tf.float32)
    image = tf.image.resize_images(image, [224, 224])
    return image, filename, label

images = tf.constant(image_names)
labels = tf.constant(labels)
images = tf.random_shuffle(images, seed=0)
labels = tf.random_shuffle(labels, seed=0)
data = tf.data.Dataset.from_tensor_slices((images, labels))

data = data.map(_parse_function, num_parallel_calls=4)
data = data.prefetch(buffer_size=batch_size * 10)
data = data.batch(batch_size)

iterator = tf.data.Iterator.from_structure(data.output_types,
data.output_shapes)

init_op = iterator.make_initializer(data)
with tf.Session()  as sess:
    sess.run(init_op)
    try:
        images, filenames, labels = iterator.get_next()
    except tf.errors.OutOfRangeError:
        sess.run(init_op)
import tensorflow as tf
import random
import pathlib
import os

AUTOTUNE = tf.data.experimental.AUTOTUNE

def preprocess_image(image):
  image = tf.image.decode_jpeg(image, channels=3)
  image = tf.image.resize(image, [192, 192])
  image /= 255.0  # normalize to [0,1] range

  return image

def load_and_preprocess_image(path):
  image = tf.io.read_file(path)
  return preprocess_image(image)

def load_and_preprocess_from_path_label(path, label):
  return load_and_preprocess_image(path), label

data_root = pathlib.Path('flower_photos')
all_image_paths = list(data_root.glob('*/*'))
all_image_paths = [str(path) for path in all_image_paths]
random.shuffle(all_image_paths)
image_count = len(all_image_paths)


label_names = sorted(item.name for item in data_root.glob('*/') if item.is_dir())
#print(label_names)
label_to_index = dict((name, index) for index, name in enumerate(label_names))

all_image_labels = [label_to_index[pathlib.Path(path).parent.name]
                    for path in all_image_paths]

#print("First 10 labels indices: ", all_image_labels[:10])

path_ds = tf.data.Dataset.from_tensor_slices(all_image_paths)

#导入图片,mapping preprocess_image over the dataset of paths.
image_ds = path_ds.map(load_and_preprocess_image, num_parallel_calls=AUTOTUNE)

# import IPython.display as display

# def caption_image(image_path):
#     image_rel = pathlib.Path(image_path).relative_to(data_root)
#     return "Image (CC BY 2.0) " + ' - '.join(attributions[str(image_rel)].split(' - ')[:-1])

# attributions = (data_root/"LICENSE.txt").open(encoding='utf-8').readlines()[4:]
# attributions = [line.split(' CC-BY') for line in attributions]
# attributions = dict(attributions)

# import matplotlib.pyplot as plt

# plt.figure(figsize=(8,8))

# for n, image in enumerate(image_ds.take(4)):
#     plt.subplot(2,2,n+1)
#     plt.imshow(image)
#     plt.grid(False)
#     plt.xticks([])
#     plt.yticks([])
#     plt.xlabel(caption_image(all_image_paths[n]))
#     plt.show()

#导入标签
label_ds = tf.data.Dataset.from_tensor_slices(tf.cast(all_image_labels, tf.int64))

image_label_ds = tf.data.Dataset.zip((image_ds, label_ds))

ds = tf.data.Dataset.from_tensor_slices((all_image_paths, all_image_labels))
image_label_ds = ds.map(load_and_preprocess_from_path_label)

#print(image_label_ds)

BATCH_SIZE = 32

# Setting a shuffle buffer size as large as the dataset ensures that the data is
# completely shuffled.
ds = image_label_ds.shuffle(buffer_size=image_count)
ds = ds.repeat()
ds = ds.batch(BATCH_SIZE)
# `prefetch` lets the dataset fetch batches in the background while the model is training.
ds = ds.prefetch(buffer_size=AUTOTUNE)
使用上面部分的Dataset,下载MobileNet v2模型进行简单的迁移学习效果测试。
mobile_net = tf.keras.applications.MobileNetV2(input_shape=(192, 192, 3), include_top=False)
mobile_net.trainable=False

'''
This function applies the "Inception" preprocessing which converts
the RGB values from [0, 255] to [-1, 1]
Before you pass the input to the MobilNet model, you need to convert it from a range of [0,1] to [-1,1]:
'''
def change_range(image,label):
  return 2*image-1, label

keras_ds = ds.map(change_range)

image_batch, label_batch = next(iter(keras_ds))
feature_map_batch = mobile_net(image_batch)
print(feature_map_batch.shape)

model = tf.keras.Sequential([
    mobile_net,
    tf.keras.layers.GlobalAveragePooling2D(),
    tf.keras.layers.Dense(len(label_names), activation = 'softmax')])

logit_batch = model(image_batch).numpy()

print("min logit:", logit_batch.min())
print("max logit:", logit_batch.max())
print()

print("Shape:", logit_batch.shape)

model.compile(optimizer=tf.keras.optimizers.Adam(),
              loss='sparse_categorical_crossentropy',
              metrics=["accuracy"])

print(model.summary())

steps_per_epoch=tf.math.ceil(len(all_image_paths)/BATCH_SIZE).numpy()

model.fit(ds, epochs=1, steps_per_epoch=3)
只训练了三个step,两部分拼接起来的运行结果

如果在mobile_net = tf.keras.applications.MobileNetV2命令中报了ssl的错误,这是由于python ssl的证书验证依赖于本地的证书数据库。一般是机器系统本身提供的数据库,如果找不到数据库或数据库中没有匹配的证书,将会是一个错误,需要用户定位来修复它。
简单点的方法是全局禁用证书验证,该方法等同于在urllib2.urlopen方法中将context参数赋值为ssl._create_unverified_context(),requests库的方法中将verify参数设置为false。
import ssl

try:
    _create_unverified_https_context = ssl._create_unverified_context
except AttributeError:
    # Legacy Python that doesn't verify HTTPS certificates by default
    pass
else:
    # Handle target environment that doesn't support HTTPS verification
    ssl._create_default_https_context = _create_unverified_https_context
循环神经网络(Recurrent neural network, RNN)
原理介绍
循环神经网络的主要用途是处理和预测序列数据,所以比较适合语音序列数据,也就是和自然语言处理相结合。在之前的全连接网络和卷积神经网络中,网络结构都是从输入层到隐层到输出层,层与层之间是连接的,但是每层之间的节点是无连接的。在自然语言处理中,预测句子的下一个单词是什么,一般需要用到当前的单词和之前的单词通过语义进行预测。循环神经网络就是为了刻画一个序列当前的输出和之前信息的关系。从网络结构上说,循环神经网络会记忆之前的信息,并利用之前的信息影响后面节点的输出。
在每一个时刻t,循环神经网络会针对该时刻的输出结合当前模型的状态给出一个输出,并更新模型的状态。对于循环神经网络的主体A,输入除了来自输入层, 还有上一个时刻的隐藏状态(hidden state)。A在读取了 和之后会生成新的隐藏状态,并产生本时刻的输出。
循环神经网络可以看作是同一个神经网络结构被无限复制的结果。如果我们说卷积神经网络是在不同的空间位置上共享参数,那么循环神经网络就是在不同时间位置共享参数。循环神经网络对长度为N的序列上展开之后,可以被视作一个有N个中间层的前馈神经网络。(下图来自colah's blog)

传统RNN使用隐藏状态,也就是一个向量来表示目前状态,这个向量的维度也被称为循环神经网络隐藏层的大小,假设其为n。假设输入向量的维度为x(也就是的向量大小),那么每个A中全连接层神经网络的输入大小为n+x。因为该全连接层的输出为当前时刻的状态,所以也为n长度的向量,所以循环体中的参数个数为(n+x)\timesn+n。注意这时候输出的向量长度为n,这个代表的是当前时刻的状态,但是我们的输入是x长度,输出值也应该保持一致是x长度的向量,这一步通过一个额外的全连接神经网络完成转化,这和卷积神经网络中最后的全连接层的意义是一样的。类似的,不同时刻用于输出的全连接神经网络中的参数也是一致的。同时由于循环神经网络每时每刻都有一个输出,所以最后的总损失是所有时刻(或者规定的部分时刻)上的损失函数的总和。
但是传统RNN中对于一个循环体A,里面的隐藏层大小n是固定的,也就是隐藏状态的长度表示是固定的,意味着每次都会记忆之前n长度的值。以语言预测为例子,有些时候推测下一个单词可能需要结合很久之前的语义,n需要特别大,这就带来了长期依赖的问题(long-term dependencies)问题。但在有些简单的情况下,推测下一个单词仅仅需要前几个单词就够了。在复杂的语言场景中,有用信息的间隔有大有小、长短不一,不够灵活的传统循环神经网络的表现会受到限制。
这时候一个重要的结构,长短时记忆网络(long short-term memory, LSTM)被提出来优化RNN, 对于这部分可以参考
colah's blog.
其余参考链接
结合medium上一篇文章的图,捋一捋LSTM中的结构和输入输出,这篇博客其实讲的很清楚。
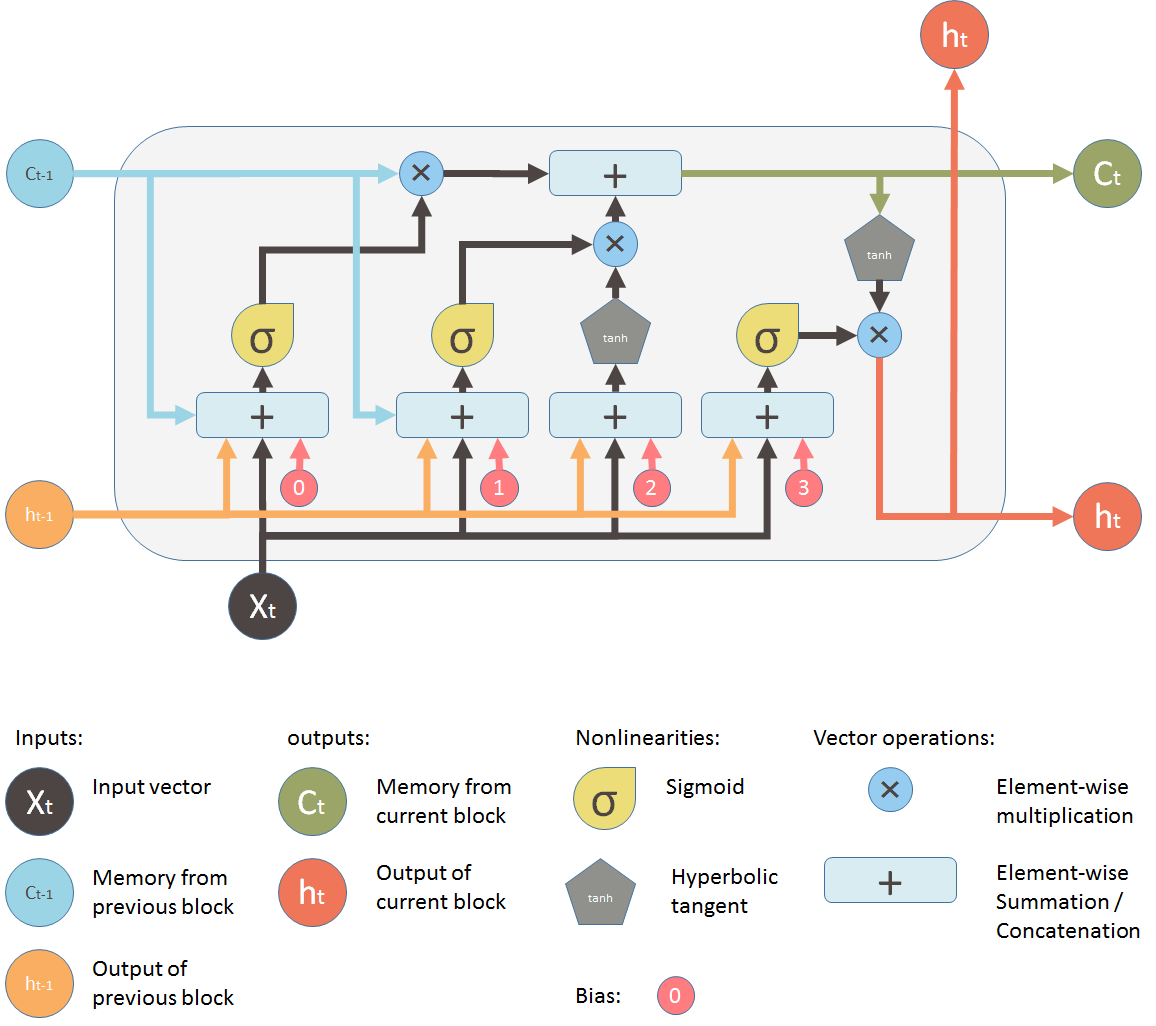
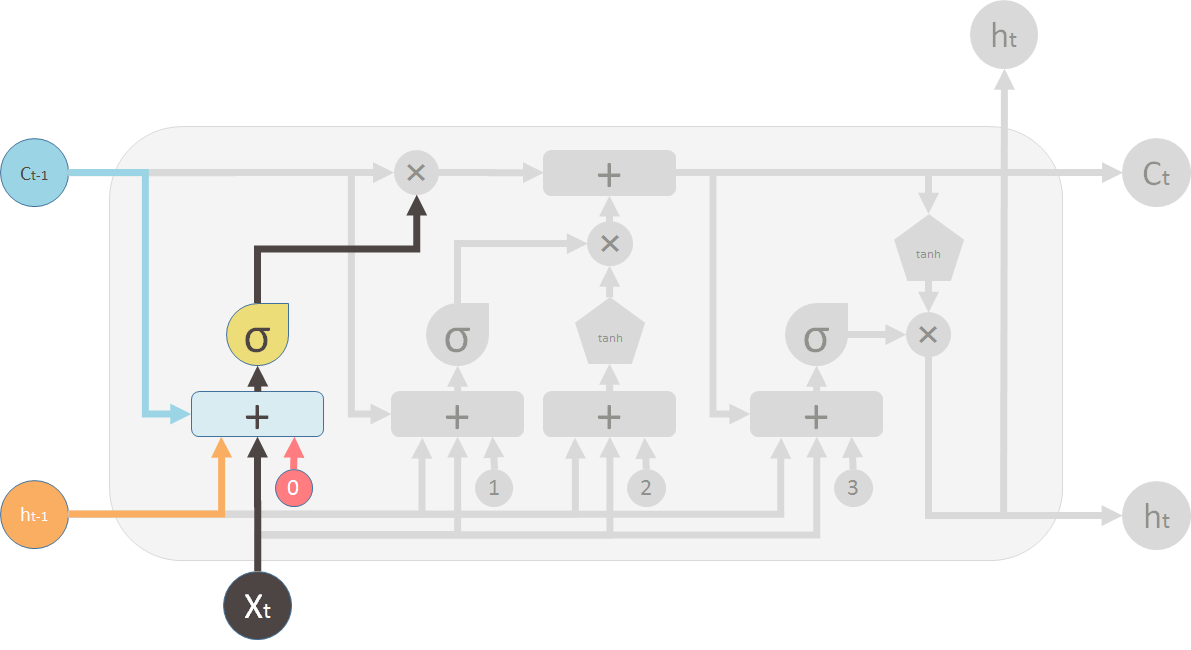
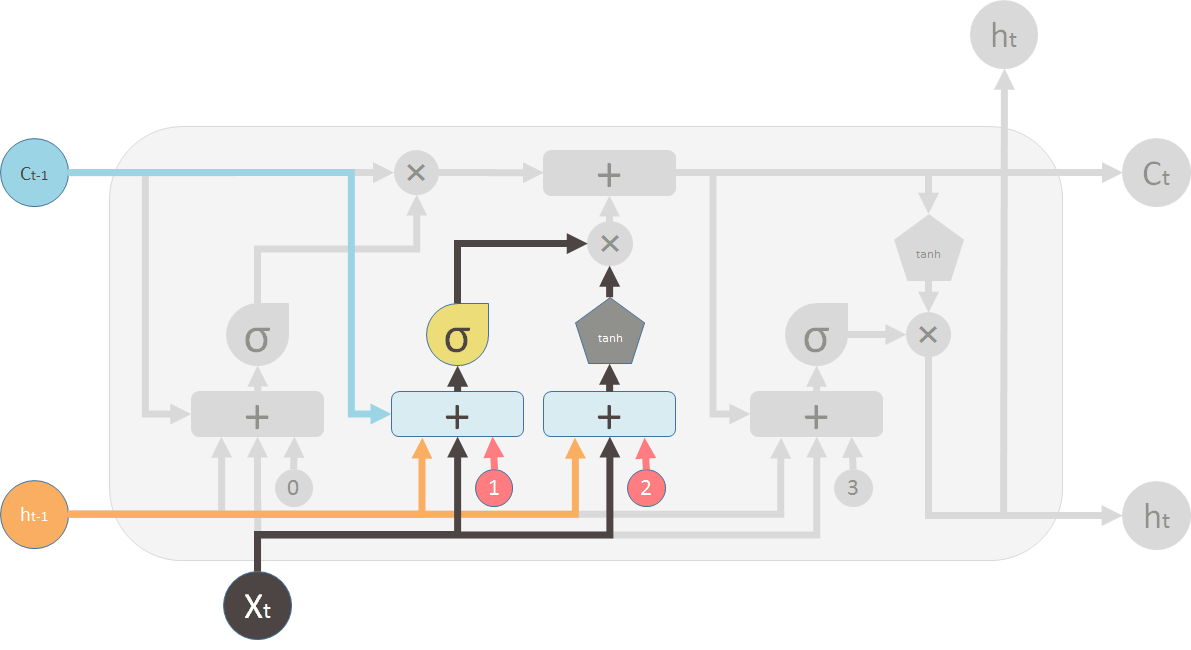
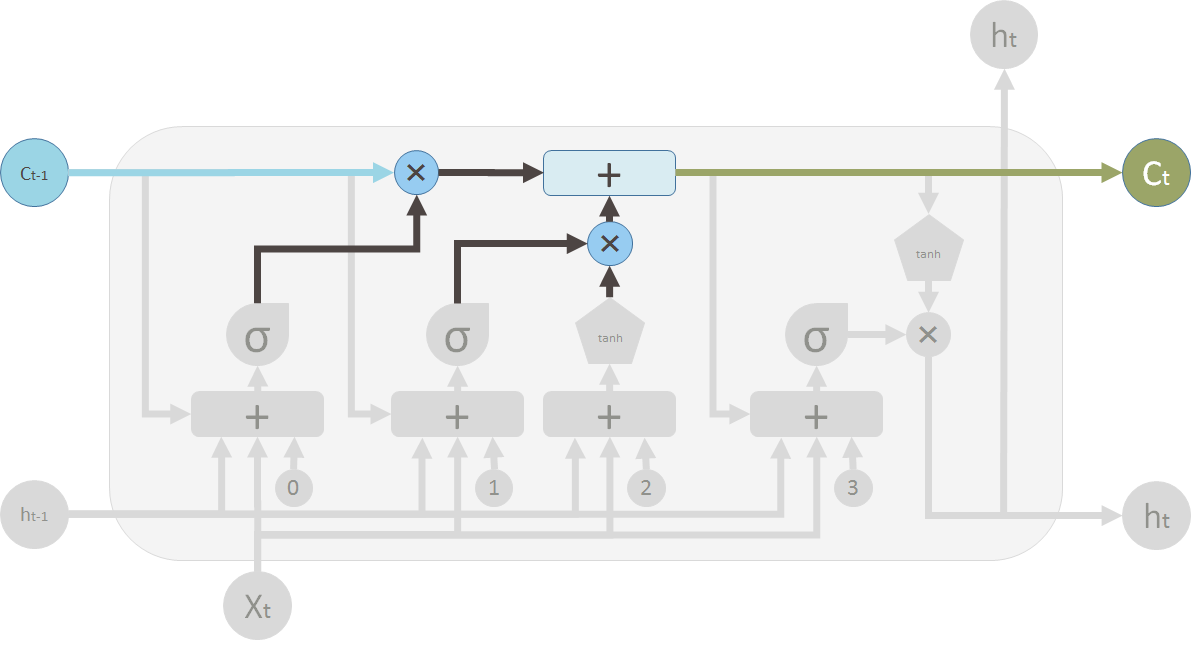
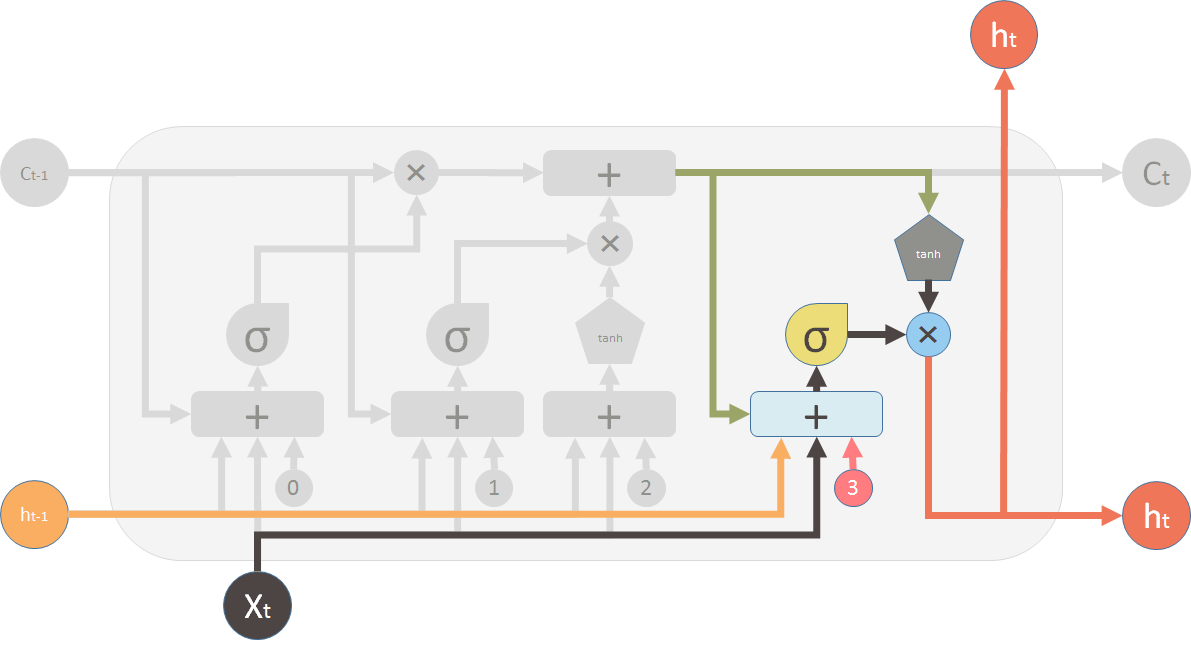
上图是一个LSTM单元的完整的构造,这幅图比较侧重于表述流程,也比较容易理解。LSTM主要有三个门结构,遗忘门和输入门和输出门,使得它能够根据上一个时间点的memory信息和当前的输入有选择性的构建出当前时间点的memory信息和输出值。门结构是一个使用单层神经网络(sigmoid函数作激活值)和一个按位乘法的操作,因为sigmoid激活函数的值在0-1之间,相当于描述了当前输入有多少信息量可以通过这个结构。
首选介绍遗忘门,下图就是流程图中属于遗忘门的部分。遗忘门的作用是让循环神经网络“忘记”之前没有用信息。它根据当前的输入和上一个时刻的输出计算一个维度为n的向量 ,它在每一个维度上的值都在(0,1)范围内。这边图中的 + 是联结,就是把和拼接成一个更长的向量。之后再将上一个时刻的memory状态 与 向量按位相乘,那么取值接近0的维度上的信息就会被忘记,而取值接近1的维度上的信息会被保留。
其次是输入门,在循环神经网络“忘记”了部分之前的状态后,它还需要从当前的输入补充最新的记忆。这个过程就是输入门完成的。值得注意的输入门和遗忘门都是以sigmoid为激活函数,但是需要写入的新memory信息是有另一个单独的单层神经网络生成的,并且使用tanh作为激活函数。之后这两个向量进行按位相乘来决定新生成的memory有多少需要添加。
在这两部分计算完成后我们就可以计算出的值。这边的+是按位加操作。
这时候我们已经计算出了此刻新的memory数值, 需要计算新的输出值是什么,这部分需要输出门进行计算。输出门决定刚刚计算出的新memory信息有多少需要被输出到下一个LSTM单元。
LSTM的TensorFlow实现和其他演变模型
LSTM的TensorFlow实现
在TensorFlow中,LSTM结构可以被很简单地实现。
#定义一个LSTM结构
lstm = tf.nn.rnn_cell.BasicLSTMCell(lstm_hidden_size)

#将LSTM中的状态初始化为全0的数组。BasicLSTMCell类提供了 zero_state 函数来生成全零的初始状态。
#state是一个包含两个张量的LSTMStateTurple类,其中state.c 和 state.h 分别对应上文的 c 状态 和 h 状态。

state = lstm.zero_state(batch_size, tf.float32)

#定义损失函数

loss = 0.0

#用num_steps来表示循环深度,将循环神经网络展开成n层的前馈神经网络。

for i in range(nums_steps):
    if i > 0: tf.get_variable_scope().reuse_variables()

    lstm_output, state = lstm(current_input, state)
    final_output = fully_connected(lstm_output)

    loss += calc_loss(final_output, expected_output)
具体会在后面一个详细的例子里展示。
双向循环神经网络和深层循环神经网络
在传统RNN中,都是从前向后传输状态,也就是预测下文的时候会用到上文的信息。但实际上就像翻译的时候我们会结合上下文,一些问题中,当前时刻的输出不仅仅需要根据前文来判断,也需要根据后面的内容。这时候就需要双向循环神经网络(bidirectional RNN)。
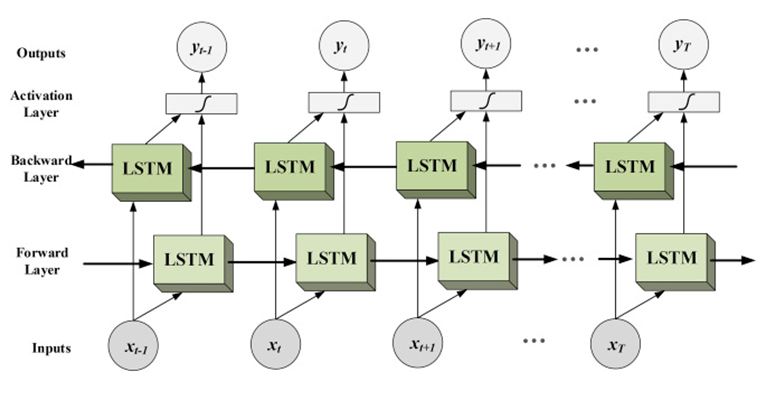
双向循环网络的最终输出是这两个单向循环神经网络的输出的简单拼接。两个循环神经网络除了方向不同,其余结构完全对称。每一层网络中的循环体可以自由选择结构,如RNN或者LSTM。
深层循环神经网络(Deep RNN)的概念也很简单,之前描述的LSTM和传统RNN结构中,基本上每个小结构内部都只设置了一层全连接层,这是一个很浅的网络,特征提取能力并不强。深度循环神经网络就是加深了这部分网络的深度。
在TensorFlow中,提供了MultiRNNCell类来实现深层循环神经网络的前向传播过程。
#定义一个基本的LSTM结构最为循环体的基本结构。

lstm_cell = tf.nn.rnn_cell.BasicLSTMCell

#通过MultiRNNCell类实现深层循环神经网络中每一时刻的前向传播,number_of_layers代表深度

stacked_lstm = tf.nn.rnn_cell.MultiRNNCell(
    [lstm_cell(lstm_size) for _ in range(number_of_layers)])

state = stacked_lstm.zero_state(batch_size, tf.float32)

for i in range(nums_steps):
    if i > 0: tf.get_variable_scope().reuse_variables()

    stacked_lstm_output, state = stacked_lstm(current_input, state)
    final_output = fully_connected(stacked_lstm_output)

    loss += calc_loss(final_output, expected_output)
RNN的dropout
dropout一般只在全连接层使用,对于深度循环神经网络来讲,从时刻t-1传递到时刻t时,深度循环神经网络不会进行状态的dropout;在同一时刻t中,不同循环体之间会使用dropout。也就是dropout只会用在非循环链接上,即下图的虚线。粗线是LSTM中使用了dropout之后一个可能的信息流。

在TensorFlow中,使用tf.nn.rnn_cell.DropoutWrapper类实现dropout的功能。
lstm_cell = tf.nn.rnn_cell.BasicLSTMCell

stacked_lstm = tf.nn.rnn_cell.MultiRNNCell(
    [tf.nn.rnn_cell.DropoutWrapper(lstm_cell(lstm_size)) for _ in range(number_of_layers)])
RNN例子
书中利用LSTM来预测sin的数值
import tensorflow as tf
import numpy as np

import matplotlib as mpl
mpl.use('TkAgg')
from matplotlib import pyplot as plt

HIDDEN_SIZE = 30  #lstm中隐藏节点个数
NUM_LAYERS =2   #lstm的层数

TIMESTEPS =10;      #RNN训练序列长度
TRAINING_STEPS = 10000      #训练轮数
BATCH_SIZE= 32          #batch大小

TRAINING_EXAMPLES = 10000
TESTING_EXAMPLES =1000
SAMPLE_GAP = 0.01 #采样间隔

def generate_data(seq):
    X=[]
    y=[]
    for i in range(len(seq)-TIMESTEPS):
        X.append([seq[i:i+TIMESTEPS]])
        y.append([seq[i+TIMESTEPS]])
    return np.array(X,dtype=np.float32),np.array(y,dtype=np.float32)

def lstm_model(X,y,is_training):
    #建立多层lstm
    cell = tf.nn.rnn_cell.MultiRNNCell([
        tf.nn.rnn_cell.BasicLSTMCell(HIDDEN_SIZE) for _ in range(NUM_LAYERS)
    ])
    outputs,_ = tf.nn.dynamic_rnn(cell,X,dtype = tf.float32) #outputs 输出维度是[batch_size,time,hidden_size]
    output = outputs[:,-1,:]

    #再加一层全连接层
    predictions = tf.layers.dense(output,1,activation=None)

    if not is_training:
        return predictions,None,None

    loss = tf.losses.mean_squared_error(labels=y,predictions=predictions)

    op = tf.train.AdamOptimizer(learning_rate=0.1)
    train_op = op.minimize(loss,tf.train.get_global_step())
    return predictions,loss,train_op

def trains(sess,train_X,train_y):
    ds = tf.data.Dataset.from_tensor_slices((train_X,train_y))
    ds = ds.repeat().shuffle(1000).batch(BATCH_SIZE)
    X,y = ds.make_one_shot_iterator().get_next()

    with tf.variable_scope("model"):
        predictions,loss,train_op = lstm_model(X,y,True)

    sess.run(tf.global_variables_initializer())
    for i in range(TRAINING_STEPS):
        _,l = sess.run([train_op,loss])
        if i % 100 == 0:
            print("train step: " + str(i)+ ", loss: "+str(l))

def run_eval(sess,test_X,test_y):
    ds = tf.data.Dataset.from_tensor_slices((test_X, test_y))
    ds = ds.batch(1)
    X, y = ds.make_one_shot_iterator().get_next()

    with tf.variable_scope("model",reuse=True):
        prediction,_,_ = lstm_model(X,[0.0],False)

    predictions =[]
    labels = []
    for i in range(TESTING_EXAMPLES):
        p,l = sess.run([prediction,y])
        predictions.append(p)
        labels.append(l)

    #计算rmse作为评价指标
    predictions = np.array(predictions).squeeze()
    labels = np.array(labels).squeeze()
    rmse = np.sqrt(((predictions-labels)**2).mean(axis=0))
    print("Mean Square Error is : %f"%rmse)

    plt.figure()
    plt.plot(predictions,label = "predictions")#labels="predictions"
    plt.plot(labels,label='labels')
    plt.legend()
    plt.show()

def MAIN():
    test_start = (TRAINING_EXAMPLES+TIMESTEPS)*SAMPLE_GAP
    test_end = test_start+(TESTING_EXAMPLES+TIMESTEPS)*SAMPLE_GAP
    train_X,train_y=generate_data(np.sin(np.linspace(0,test_start,TRAINING_EXAMPLES+TIMESTEPS,dtype=np.float32)))
    test_X, test_y = generate_data(np.sin(np.linspace(test_start, test_end, TESTING_EXAMPLES + TIMESTEPS, dtype=np.float32)))

    with tf.Session() as sess:
        trains(sess,train_X,train_y)
        run_eval(sess,test_X,test_y)

if __name__ == '__main__':
    MAIN()
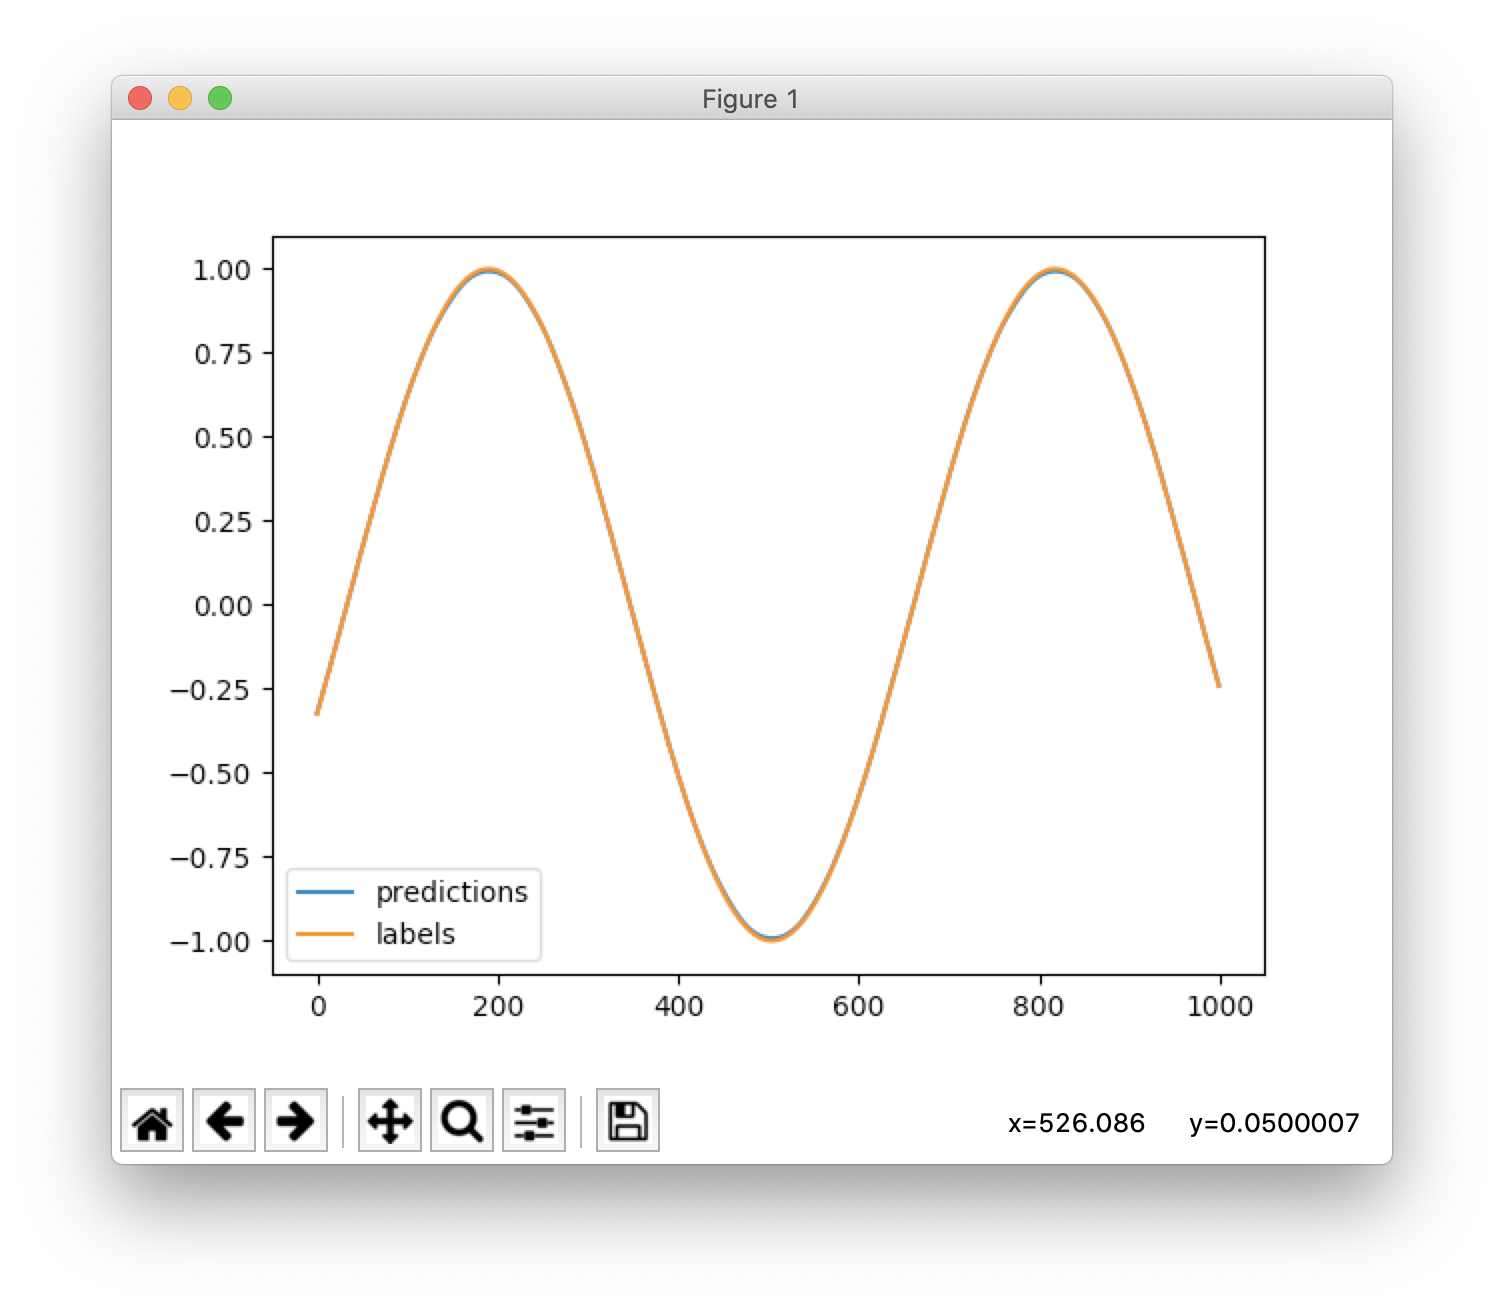
可以看到结果预测拟合的很好:
TensorFlow2.0版本新特性
TensorFlow2.0rc的API文档
TensorFlow2.0的指导文档
1.在TensorFlow2.0中有许多1.X的API被删除或移动了,其中主要的改动是Keras这个higher level API已经加入了官方API,同时tf.contrib下面的各个API被全面移除。
2.除此之外,不需要再自己开Session进行张量的计算。
3.加入了tf.function()这个特性,某种程度上继承了session的模块化优点。
具体的从1.x迁移到2.0的注意点可以参考
Migrate your TensorFlow 1 code to TensorFlow 2
同时TensorFlow2.0也提供了tf_upgrade_v2这个指令工具帮助把1.x的代码修改升级。
Automatically upgrade code to TensorFlow 2
Keras的使用的和相关API
关于Keras,可以计划再开一个博客进行整理。这里仅仅使用Keras对上面LSTM预测sin的代码进行修改,使得能够在TensorFlow2.0的环境下跑通。