1.基于XML的AOP实现事务控制
2.基于注解的AOP实现事务控制
基于注解的AOP实现事务控制,方便演示,我们新建一个工程,复制上spring03_eesy_03account的代码,进行改造。
原来的bean.xml,beanFactory和代理Service这些配置可以不再需要,为类打上注解代替bean.xml的功能,然后就根据注解功能的标注逐一替代删除即可,为了展示有效代码,我删除了一些Dao和Service用不上的方法。
- AccountServiceImpl
package com.itheima.service.impl;

import com.itheima.dao.IAccountDao;
import com.itheima.domain.Account;
import com.itheima.service.IAccountService;
import com.itheima.util.TransationManager;
import org.springframework.beans.factory.annotation.Autowired;
import org.springframework.stereotype.Service;

import java.util.List;

@Service
public class AccountServiceImpl implements IAccountService {
    @Autowired
    private IAccountDao accountDao;
    @Autowired
    private TransationManager transationManager;

    /**
     * 1.根据名称查询转出账户
     * 2.根据名称查询转入账户
     * 3.转出账户减钱
     * 4.转入账户加钱
     * 5.更新转出账户
     * 6.更新转入账户
     *
     * @param SourceName
     * @param targetName
     * @param moeny
     */
    @Override
    public void transfer(String SourceName, String targetName, Float moeny) {
        //2执行操作
        //2.1 据名称查询转出账户
        Account payUser = accountDao.findAccountbyname(SourceName);
        //2.2 根据名称查询转入账户
        Account recvUser = accountDao.findAccountbyname(targetName);
        //2.3 转出账户减钱
        payUser.setMoney(payUser.getMoney() - moeny);
        //2.4 转入账户加钱
        recvUser.setMoney(recvUser.getMoney() + moeny);
        //更新转出账户
        accountDao.updateAccount(payUser);
        int i = 1 / 0;
        //更新转入账户
        accountDao.updateAccount(recvUser);
    }

}
- AccountDaoImpl
package com.itheima.dao.impl;

import com.itheima.dao.IAccountDao;
import com.itheima.domain.Account;
import com.itheima.util.ConnectionUtils;
import org.apache.commons.dbutils.QueryRunner;
import org.apache.commons.dbutils.handlers.BeanHandler;
import org.apache.commons.dbutils.handlers.BeanListHandler;
import org.springframework.beans.factory.annotation.Autowired;
import org.springframework.stereotype.Repository;

import java.sql.SQLException;
import java.util.List;

@Repository("accountDao")
public class AccountDaoImpl implements IAccountDao {
    @Autowired
    private QueryRunner queryRunner;
    @Autowired
    private ConnectionUtils connectionUtils;

    public void updateAccount(Account account) {
        try {
            // queryRunner.update("update  account set name = ?,money = ? where id = ?",account.getId(),account.getName(),account.getMoney());
            queryRunner.update(connectionUtils.getConnection(), "update account set name=?,money=? where id=?", account.getName(), account.getMoney(), account.getId());
        } catch (SQLException e) {
            throw new RuntimeException();
        }
    }

    /**
     * 根据名称查找账户
     * 如果有唯一的一个结果就返回,如果没有就返回null
     * 如果结果集超过一个就抛异常
     *
     * @param
     * @return
     */
    @Override
    public Account findAccountbyname(String accountName) {
        try {
            List accountList = queryRunner.query(connectionUtils.getConnection(), "select * from account where name= ?", new BeanListHandler(Account.class), accountName);
            if (accountList == null || accountList.size() == 0) {
                return null;
            }
            if (accountList.size() > 1) {
                throw new RuntimeException("结果集不唯一");
            }
            return accountList.get(0);
        } catch (Exception e) {
            throw new RuntimeException();
        }
    }
}
- ConnectionUtils
package com.itheima.util;

import org.springframework.beans.factory.annotation.Autowired;
import org.springframework.stereotype.Component;

import javax.sql.DataSource;
import java.sql.Connection;

@Component("connectionUtils")
public class ConnectionUtils {
    private ThreadLocal tl = new ThreadLocal<>();
    @Autowired
    private DataSource dataSource;

    /**
     * 获取当前线程上的连接
     *
     * @return
     */
    public Connection getConnection() {
        try {
            //先从ThreadLocal上获取
            Connection connection = tl.get();
            //判断当前线程上是否有连接
            if (connection == null) {
                //从数据源中获取一个连接,并且存入ThreadLocal中
                connection = dataSource.getConnection();
                tl.set(connection);
            }
            //返回当前线程上的连接
            return connection;
        } catch (Exception e) {
            throw new RuntimeException(e);
        }
    }

    /**
     * 解绑
     */
    public void RemoveConnection() {
        tl.remove();
    }
}
- TransationManager
package com.itheima.util;

import org.aspectj.lang.ProceedingJoinPoint;
import org.aspectj.lang.annotation.*;
import org.springframework.beans.factory.annotation.Autowired;
import org.springframework.stereotype.Component;

import java.sql.SQLException;
@Component("transationManager")
@Aspect
public class TransationManager {
    @Autowired
    private ConnectionUtils connection;
    @Pointcut("execution(* com.itheima.service.impl.AccountServiceImpl.*(..))")
    public  void pt1(){

    }
    @Before("pt1()")
    //开启事务
    public void beginTransation() {
        try {
            connection.getConnection().setAutoCommit(false);
            System.out.println("---------前置通知---------");
        } catch (SQLException e) {
            e.printStackTrace();
        }
    }
    @AfterReturning("pt1()")
    public void CommitTransation() {
        try {
            connection.getConnection().commit();
            System.out.println("---------后置通知---------");
        } catch (SQLException e) {
            e.printStackTrace();
        }
    }
    @AfterThrowing("pt1()")
    //回滚事务
    public void RollBackTransation() {
        try {
            connection.getConnection().rollback();
            System.out.println("---------异常通知---------");
        } catch (SQLException e) {
            e.printStackTrace();
        }
    }
    @After("pt1()")
    //释放连接
    public void releaseTransation() {
        try {
            connection.RemoveConnection();
            System.out.println("---------最终通知---------");
        } catch (Exception e) {
            e.printStackTrace();
        }
    }
}
最后xml的样子:
当我们配置完成进行Test的时候,我们会发现结果有异常。
这是因为spring基于注解的Aop本来就是有问题的,这个上一章已经讲过,它的执行顺序是有问题的。
comit()或者rollback()的执行必须要由autocommit=true才可以,但因为执行顺序的混乱导致最终通知执行了,释放了连接,得到的连接自动提交就没有设置为false导致的。
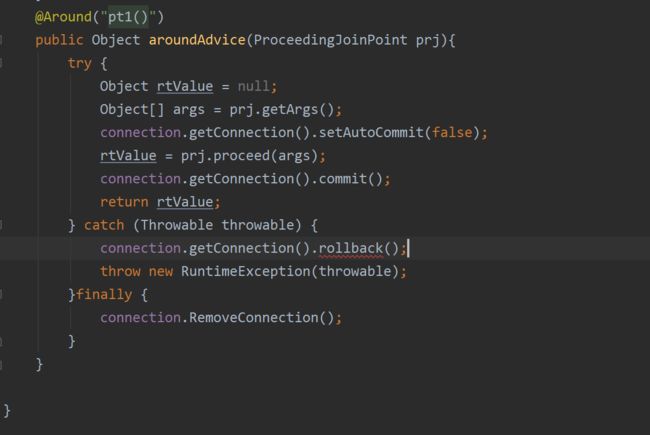
要想使用注解解决这个问题,只能用环绕通知。
环绕通知
 @Around("pt1()")
    public Object aroundAdvice(ProceedingJoinPoint prj){
        try {
            Object rtValue = null;
            Object[] args = prj.getArgs();
            //开启事务
            this.beginTransation();
            //执行业务
            rtValue = prj.proceed(args);
            //提交事务
           this.CommitTransation();

            return rtValue;
        } catch (Throwable throwable) {
            //回滚事务
            this.RollBackTransation();
            throw new RuntimeException(throwable);
        }finally {
            //释放连接
            connection.RemoveConnection();
        }
    }
这是我写的环绕通知 没有像老师一样直接用this. 去调用,所以在catch那里有报错无法解决
接下来删掉TransationManager里的前置后置异常最终通知注解,让环绕通知运行就可以了。
4.spring中事务控制的一组API
我们还欠缺一些事情
只要是事务控制必然少不了提交和回滚,提交和回滚就是我们重复的代码,谁有提交和回滚,谁就是事务的通知。
sprin其实提供了事务管理器
拿基于xml的Aop配置举例,这些通知类型有两个是多余的,分别是前置通知和后置通知,因为一开始就可以在绑定线程的时候设置手动提交,最终通知可以在回滚和提交的时候直接释放。
commit和rollback方法我们再来分析:commit和rollback的通知类型后置和异常能不能互换?当然是不能的,spring也知道这个,所以这些也是多余的。
Spring事务控制我们要明确的
- 第一:JavaEE 体系进行分层开发,事务处理位于业务层,Spring 提供了分层设计业务层的事务处理解决方 案。
- 第二:spring 框架为我们提供了一组事务控制的接口。具体在后面的第二小节介绍。这组接口是在
spring-tx-5.0.2.RELEASE.jar中。 - 第三:spring 的事务控制都是基于 AOP 的,它既可以使用编程的方式实现,也可以使用配置的方式实现。我 们学习的重点是使用配置的方式实现。
Spring中事务控制的 API为我们提供了一个接口 :PlatformTransactionManager
PlatformTransationManager是个接口,我们在开发中都是使用它的实现类,真正管理事务的对象 :
org.springframework.jdbc.datasource.DataSourceTransactionManager -----使用 Spring JDBC 或 iBatis 进行持久化数据时使用
org.springframework.orm.hibernate5.HibernateTransactionManager -----org.springframework.orm.hibernate5.HibernateTransactionManager 使用 Hibernate
5.spring事务控制的代码准备
Create一个新的工程,这个工程主要是环境的配置,将来会复用。
搭环境的时候我们需要的jar包有 spring-context spring-jdbc spring-tx 和数据库驱动 还需要一个aspectJwaver
spring04_eesy_01jdbctemplate 的代码拿过来复制进去 接口类我就不写在这了
AccountDaoImpl
package com.itheima.dao.impl;

import com.itheima.dao.IAccountDao;
import com.itheima.domain.Account;
import org.springframework.jdbc.core.BeanPropertyRowMapper;
import org.springframework.jdbc.core.support.JdbcDaoSupport;

import java.util.List;

/**
 * 账户的持久层实现类
 */
public class AccountDaoImpl extends JdbcDaoSupport implements IAccountDao {

    @Override
    public Account findAccountById(Integer accountId) {
        List accounts = super.getJdbcTemplate().query("select * from account where id = ?",new BeanPropertyRowMapper(Account.class),accountId);
        return accounts.isEmpty()?null:accounts.get(0);
    }

    @Override
    public Account findAccountByName(String accountName) {
        List accounts = super.getJdbcTemplate().query("select * from account where name = ?",new BeanPropertyRowMapper(Account.class),accountName);
        if(accounts.isEmpty()){
            return null;
        }
        if(accounts.size()>1){
            throw new RuntimeException("结果集不唯一");
        }
        return accounts.get(0);
    }

    @Override
    public void updateAccount(Account account) {
        super.getJdbcTemplate().update("update account set name=?,money=? where id=?",account.getName(),account.getMoney(),account.getId());
    }
}
AccountServiceImpl
package com.itheima.service.impl;

import com.itheima.dao.IAccountDao;
import com.itheima.domain.Account;
import com.itheima.service.IAccountService;

/**
 * 账户的业务层实现类
 *
 * 事务控制应该都是在业务层
 */
public class AccountServiceImpl implements IAccountService{

    private IAccountDao accountDao;

    public void setAccountDao(IAccountDao accountDao) {
        this.accountDao = accountDao;
    }

    @Override
    public Account findAccountById(Integer accountId) {
        return accountDao.findAccountById(accountId);

    }


    @Override
    public void transfer(String sourceName, String targetName, Float money) {
        System.out.println("transfer....");
            //2.1根据名称查询转出账户
            Account source = accountDao.findAccountByName(sourceName);
            //2.2根据名称查询转入账户
            Account target = accountDao.findAccountByName(targetName);
            //2.3转出账户减钱
            source.setMoney(source.getMoney()-money);
            //2.4转入账户加钱
            target.setMoney(target.getMoney()+money);
            //2.5更新转出账户
            accountDao.updateAccount(source);

       //     int i=1/0;

            //2.6更新转入账户
            accountDao.updateAccount(target);
    }
}
实体类 Account
package com.itheima.domain;

import java.io.Serializable;

/**
 * 账户的实体类
 */
public class Account implements Serializable {

    private Integer id;
    private String name;
    private Float money;

    public Integer getId() {
        return id;
    }

    public void setId(Integer id) {
        this.id = id;
    }

    public String getName() {
        return name;
    }

    public void setName(String name) {
        this.name = name;
    }

    public Float getMoney() {
        return money;
    }

    public void setMoney(Float money) {
        this.money = money;
    }

    @Override
    public String toString() {
        return "Account{" +
                "id=" + id +
                ", name='" + name + '\'' +
                ", money=" + money +
                '}';
    }
}
bean.xml
6.spring基于XML的声明式事务控制-配置步骤
基于5.spring事务控制的代码准备,我们只需要在bean,xml中配置就好了。
步骤:配置事务管理器-----配置事务的通知----配置切入点表达式----建立切入点表达式与事务通知的关系---配置通知的属性
①配置事务管理器
这里需要注入一个数据,这个数据是我们的dataSource
(我总是记不住事务管理器要注入dataSource,导致我在重新配置代码的时候总是会报错:Caused by: java.lang.IllegalArgumentException: Property 'dataSource' is required)
为了加强记忆我点开源码看了一眼,的确需要一个dataSource的注入
②配置事务的通知
此时我们需要导入事务的约束 tx名称空间和约束,同时也需要aop的
配置事务的通知需要用到的标签叫做
属性:
id:给事务通知一个唯一的标识
transaction-manager:给事务通知提供一个事务管理器引用
③配置AOP中的通用切入点表达式
④建立切入点表达式和事务通知的对应关系
⑤配置事务的属性
- isolation:指定事务的隔离级别,默认值是DEFAULT,表示使用数据库的默认隔离级别。
- propagation:指定事务的传播行为。默认值是REQUIRED,表示一定会有事务。增删改的选择。查询事务可以选择SUPPORTS。
- read-only:用于指定事务只是只读,只有查询方法才能设置为ture,默认值是false,表示读写。
- timeout:用于指定事务超时时间,默认值是-1,表示永不超时。如果指定了数值,以秒为单位。
- rollback-for:用于指定一个异常,当产生该异常时,事务回滚,产生其他异常时,事务不回滚,没有默认值,表示任何异常都回滚。
- no-rollback-for:用于指定一个异常,当产生该异常时,事务不回滚,产生其他异常时,事务回滚。没有默认值,表示任何异常都回滚。
如果设定了rollback-for也设定了no-rollback-for 呢?无论什么情况,只要这两个值不指定,都是回滚的。
以后我们会有很多方法 这个时候简单点 可以用*通配符解决,像这样。
但是通配符 * 一下子就把所有的给代替了,查询方法怎么办呢,可以用find * ,但这样的前提是查询方法都以find...命名
这两个的谁的优先级更高呢?* 是全通配 find * 是部分通配,其实是find的优先级更高 但是需要注意 有些方法命名不规范的时候,find 就没有作用了。
完整bean.xml
此时基于测试代码去验证一下,当有异常的时候回滚,无异常的时候正常转账成功
package com.itheima.test;

import com.itheima.domain.Account;
import com.itheima.service.IAccountService;
import org.junit.Test;
import org.junit.runner.RunWith;
import org.springframework.beans.factory.annotation.Autowired;
import org.springframework.test.context.ContextConfiguration;
import org.springframework.test.context.junit4.SpringJUnit4ClassRunner;

/**
 * 使用Junit单元测试:测试我们的配置
 */
@RunWith(SpringJUnit4ClassRunner.class)
@ContextConfiguration(locations = "classpath:bean.xml")
public class AccountServiceTest {

    @Autowired
    private  IAccountService as;

    @Test
    public  void testTransfer(){
        as.transfer("aaa","bbb",100f);

    }
    @Test
    public  void testFind(){
        Account accountById = as.findAccountById(1);
        System.out.println(accountById);

    }
}
7.spring基于注解的声明式事务控制
写在前面,在基于注解时声明式事务控制的时候总是报错如下,检查代码后发现没有任何问题,新建工程好像无异常,再次运行后又报诡异的错误,接着我就基于xml的代码改造成基于注解的代码,仍然报错,我这才相信不是玄学,是代码有问题.
报错如下
java.lang.NoSuchMethodError: org.springframework.core.annotation.AnnotationUtils.isCandidateClass(Ljava/lang/Class;Ljava/lang/Class;)Z
搜索后发现这是因为spring的jar包版本不一致导致的冲突,
我把spring有关的jar包改成一致版本就解决此问题.
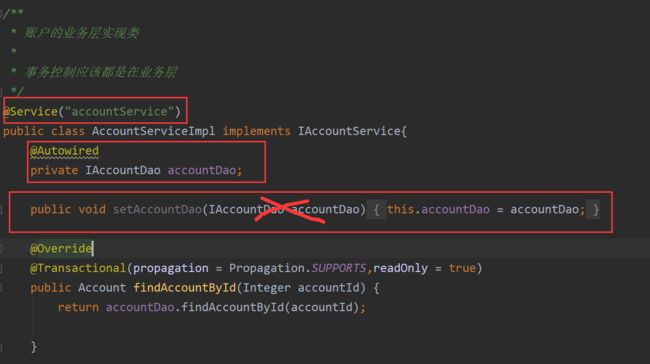
基于上个项目基于xml的声明式事务控制的代码,我们改造成基于注解的代码,首先按照基于注解的方式,原来xml中配置accountService和acountDao的配置就不要了
改造AccountDao,原来的AccountDao继承了JdbcTemplateSupport,我们已经知道了,在使用JdbcTemplateSupport的时候,是不能使用注解的,所以我们不再继承它,必须需要自己定义JdbcTemplate,那么这个JdbcTemplate要打上@Autowired标签,这个时候我们的ioc容器没有JdbcTemplate,需要在xml中配置.
然后改造AccountService
记下来记得要在bean.xml中配置创建Ioc容器时要扫描的包
原来xml基于事务控制的配置就可以不要了
spring基于注解的声明式配置步骤:
以spring基于xml的声明式的代码为基础,进行spring基于注解的声明式配置,步骤简单来说是三步:配置事务管理器------开启spring对注解事务的支持-------在需要事务支持的地方打上@Transaction注解
①配置事务管理器
②开启spring对注解事务的支持
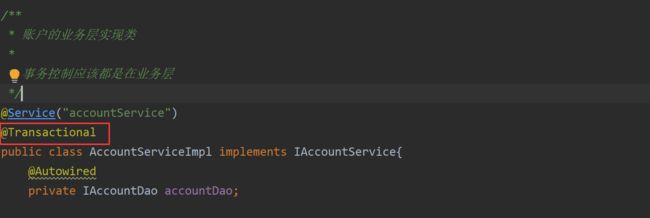
③在需要事务支持的地方打上@Transaction注解
这样里面的方法就支持注解了,如果要加属性,可以直接加,但是这只是只读型的事务配置
transfer作为读写型事务配置要另外配
8.spring基于纯注解的声明式事务控制
config包 SpringConfiguation类 JdbcConfig 连接数据库相关配置类 创建JdbcTemplate 创建数据源对象
TrancationConfig 和事务相关配置类
创建注解类,打上@Configuation标识为一个注解类.
1.创建数据源对象的时候不记得创建对象的类
2.创建TransactionConfig类时不记得该怎么做


