首先安装
第一种方式: 全局安装 (不推荐)
npm install webpack -g
第二种方式 本地安装
npm install webpack webpack-cli -D
-D 缩写 development ,开发阶段
首先创建 package.json 文件. 命令为npm init -y
我是在之前的Angular的项目中直接 install的 效果为:
"devDependencies": {
    "@angular-devkit/build-angular": "~0.7.0",
    "@angular/cli": "~6.1.4",
    ...
    "typescript": "~2.7.2",
    "webpack": "^4.20.2",
    "webpack-cli": "^3.1.2"
  }
在Webpack中所有文件都是模块
-js 模块 模块化(AMD CMD ES6 commonjs);
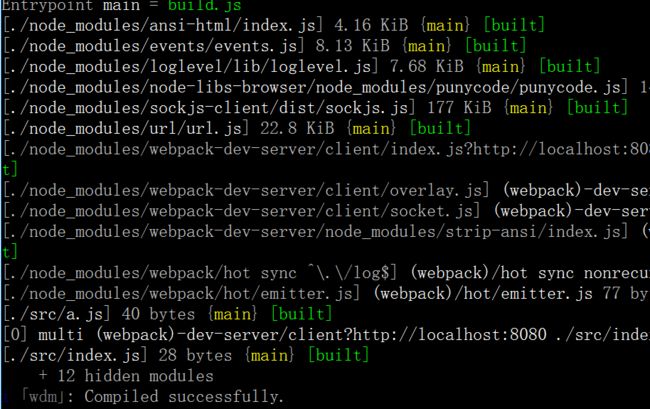
打包命令为: npx webpack 会进行打包.
默认实在dist文件下边打包main.js
新的文件夹中 效果为:
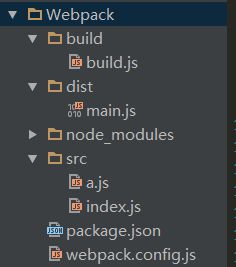
默认打包效果是在dist中打包成main.js 文件.
加了webpack.config.js 文件之后的效果为 build下边的build.js 文件.
//基于node 的遵循commonjs规范
let path = require('path');
module.exports = {
    entry:'./src/index.js',//入口
    output:{
        filename:'build.js', //起个名 默认的是main.js
        //这个路径必须是绝对路径
        path:path.resolve('./build')
    },//出口
    devServer:{},//开发服务器
    module:{},//模块配置
    plugins:[],//插件的配置
    mode:'development',//可以更改模式
    resolve:{}//配置解析
}
我们想动态一点. 首先
然后安装webpack-dev-server
命令为
npm install webpack-dev-server -D
修改package.json文件
{
  "name": "Webpack",
  "version": "1.0.0",
  "description": "",
  "main": "index.js",
  "scripts": {
    "test": "echo \"Error: no test specified\" && exit 1",
    "build":"webpack",
    "start":"webpack-dev-server"

  },
  "keywords": [],
  "author": "",
  "license": "ISC"
}
build 和start 是新加的.
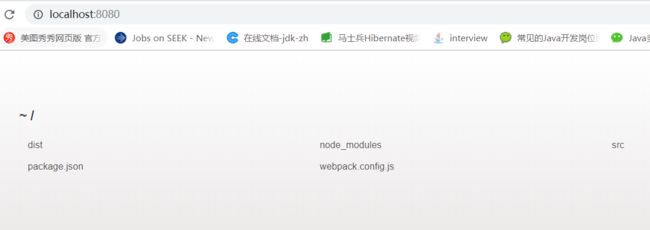
那么在命令行里直接 运行npm run start
有没有感觉很熟悉? 这不就是Angular 里边 的ng serve 之后出来的么...
其实Angular 本身的 打包命令. ng build 也是基于webpack 实现.
然后打开浏览器运行localhost:8080 就是这样
接着对devServer配置
devServer:{
        contentBase:'./build',
        port:3000,
        compress:true,//服务器压缩
        open:true//自动打开浏览器
        //hot:true
    }
这时候再运行npm run start 命令会默认打开浏览器并且是3000端口. 这时候需要在项目中有build 文件夹, 没有的话 显示不了Cannot GET / 并在console中显示 404 请求不到资源
现在还没有html看不见页面 , 需要实现功能是这样, 打包之后的js 文件可以直接被引入到在src 下边创建 的index.html. index.html可以自动的引入打包之后的那个js 文件.
,有需要还可以向index.html中传值 .
src目录中创建index.html
接着安装 npm install html-webpack-plugin -D
let path = require('path');
let HtmlWebpackPlugin = require('html-webpack-plugin');
module.exports = {
    entry:'./src/index.js',//入口
    output:{
        filename:'build.[hash:8].js', //起个名 默认的是main.js .hash 取八位
        //这个路径必须是绝对路径
        path:path.resolve('./build')
    },//出口
    devServer:{
        contentBase:'./build',
        port:3000,
        compress:true,//服务器压缩
        open:true//自动打开浏览器
        //hot:true
    },//开发服务器
    module:{},//模块配置
    plugins:[new HtmlWebpackPlugin({
        //打包html 插件
        template:'./src/index.html',
        hash:true,
        minify:{
          removeAttributeQuotes:true,//移除dom属性的双引号
          collapseWhitespace:true//不换行,
        },
        title:'this is title from webpack configuration'
    })],//插件的配置
    mode:'development',//可以更改模式
    resolve:{}//配置解析
}
index.html 代码如下
    <%=htmlWebpackPlugin.options.title%>


    Welcome to my home
实现效果如下

下一个需求:
目前实现的功能每次打包都生成一个新的js文件, 虽然能引到最新的那个 但是之前生成的那个 没有删除. 按道理说, 打包之后的文件,每次新打包的时候都需要重新生成一遍.
接着引入插件 npm install clean-webpack-plugin -D
引入clean-webpack
let CleanWebpackPlugin = require('clean-webpack-plugin');
在plugins数组里边添加
new CleanWebpackPlugin([
            './build'
        ]),
接着下一个需求.
现在只有一个入口index.js,而且在index.js 中引入了a.js . 如果index.js 和a.js 相互独立, 那么打包之后, 只能把index.js 里边的内容打进去, 结果a.js 的内容就丢了 .咋整 ?
entry:['./src/index.js','./src/a.js'],
换entry 的内容. 这样两个都可以打包进去.
接着下一个需求 ,实现生成两个index.html 名字不一样. 一个叫a.html 另外一个叫b.html, a.html引入a.js, b.html 引入b.js ,但是模板都用的是index.html
首先entry 写多个. output 中 filename改成[name] 其次多个HtmlWebpackPlugin , 并能通过chunks 知道是哪个入口
/**
 * Created by admin on 2018/10/14.
 */
//基于node 的遵循commonjs规范
let path = require('path');
let HtmlWebpackPlugin = require('html-webpack-plugin');
let CleanWebpackPlugin = require('clean-webpack-plugin');
module.exports = {
    //entry:'./src/index.js',//入口
    //entry:['./src/index.js','./src/a.js'],
    entry:{
        index:"./src/index.js",
        a:"./src/a.js"
    },
    output:{
        filename:'[name].[hash:8].js', //起个名 默认的是main.js .hash 取八位 eg: build.e6472a7e.js
        //这个路径必须是绝对路径
        path:path.resolve('./build')
    },//出口
    devServer:{
        contentBase:'./build',
        port:3000,
        compress:true,//服务器压缩
        open:true//自动打开浏览器
        //hot:true
    },//开发服务器
    module:{},//模块配置
    plugins:[
        new CleanWebpackPlugin([
            './build'
        ]),
        new HtmlWebpackPlugin({
            //打包html 插件
            filename:"a.html",
            template:'./src/index.html',
            hash:true,//在打包后的文件加一个后缀: eg: build.e6472a7e.js?e6472a7ea8e1cb380cef
            minify:{
                //removeAttributeQuotes:true,//移除dom属性的双引号
                //collapseWhitespace:true//不换行,
            },
            chunks:["a"],
            title:'this is title from webpack configuration'
        }),
        new HtmlWebpackPlugin({
            //打包html 插件
            filename:"b.html",
            template:'./src/index.html',
            hash:true,//在打包后的文件加一个后缀: eg: build.e6472a7e.js?e6472a7ea8e1cb380cef
            minify:{
              //removeAttributeQuotes:true,//移除dom属性的双引号
              //collapseWhitespace:true//不换行,
            },
            chunks:["index"],
            title:'this is title from webpack configuration'
        })],//插件的配置
    mode:'development',//可以更改模式
    resolve:{}//配置解析
}
下一个需求, 热更新. 不用每次更改一点东西就刷新页面.
配置文件中 导入模块
let webpack = require("webpack");
plugins里边添加
new webpack.HotModuleReplacementPlugin(),
在index.js 代码如下
let str = require("./a.js");
if(module.hot){
   module.hot.accept();
}
document.getElementById("title").innerHTML = str;
下个需求. html里边不可能没有css 文件 ,创建index.css 文件, 然后就是想办法把他引进来.
在index.js里边引入index.css
import './index.css'
结果报错如下

webpack 默认只支持js 模块, 别的不认识
解析模块 需要loader
接着npm install style-loader css-loader
要是用less 就是less-loader
sass sass-loader
引入less 的时候 需要些npm install less less-loader
要不 引的不够.
在index.js 中 引入两个css 文件
import './index.css'
import './style.less'
后引入的会替换之前引入的效果.
在config 文件中对模块进行配置
module:{
        rules:[//从右往左写
            {
                test:/\.css$/,use:[
                    {loader:'style-loader',options:'' }  ,
                    {loader:'css-loader'}
            ]},
            {
                test:/\.less$/,use:[
                {loader:'style-loader',options:'' }  ,
                {loader:'css-loader'},
                {loader:'less-loader'}

            ]}
        ]
    },
这样可以用css 和less 但是有一个问题, 这时候所有的css 样式都打包到了js 文件中,
这不是我们想要的效果 .
接着安装插件:
npm install extract-text-webpack-plugin@next mini-css-extract-plugin -D
版本的问题, 两个都安一下.
主要的目的是为了从js 中抽离出css
/**
 * Created by admin on 2018/10/14.
 */
//基于node 的遵循commonjs规范
let path = require('path');
let HtmlWebpackPlugin = require('html-webpack-plugin');
let CleanWebpackPlugin = require('clean-webpack-plugin');
let webpack = require("webpack");
let ExtractTextWebpackPlugin = require("extract-text-webpack-plugin");
module.exports = {
    entry:'./src/index.js',//入口
    //entry:['./src/index.js','./src/a.js'],
    //entry:{
        //index:"./src/index.js",
        //a:"./src/a.js"
    //},
    output:{
        filename:'[name].[hash:8].js', //起个名 默认的是main.js .hash 取八位 eg: build.e6472a7e.js
        //这个路径必须是绝对路径
        path:path.resolve('./build')
    },//出口
    devServer:{
        contentBase:'./build',
        port:3000,
        compress:true,//服务器压缩
        open:true,//自动打开浏览器
        hot:true
    },//开发服务器
    module:{
        rules:[//从右往左写
            {
                test:/\.css$/, use: ExtractTextWebpackPlugin.extract({
                use:[
                    {loader:'css-loader'}
                ]
            })},
            {
                test:/\.less$/, use: ExtractTextWebpackPlugin.extract({
                use:[
                    {loader:'css-loader'},
                    {loader:'less-loader'}
                ]
            })}
        ]
    },//模块配置
    plugins:[
        new webpack.HotModuleReplacementPlugin(),
        new CleanWebpackPlugin([
            './build'
        ]),
        new ExtractTextWebpackPlugin({
            filename:"css/index.css"
        }),
        new HtmlWebpackPlugin({
            //打包html 插件
            //filename:"b.html",
            template:'./src/index.html',
            hash:true,//在打包后的文件加一个后缀: eg: build.e6472a7e.js?e6472a7ea8e1cb380cef
            minify:{
              //removeAttributeQuotes:true,//移除dom属性的双引号
              //collapseWhitespace:true//不换行,
            },
            //chunks:["index"],
            title:'this is title from webpack configuration'
        })],//插件的配置
    mode:'development',//可以更改模式
    resolve:{}//配置解析
}
成功:
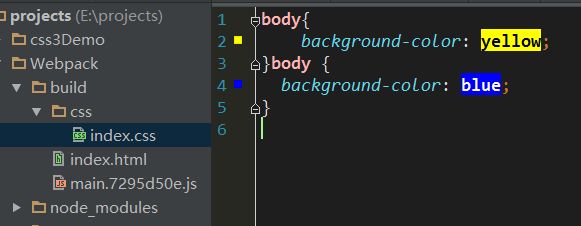
新需求又来了
刚才可以满足css 抽离,但是用户想把css 和less 的样式分开抽离 ,即生成不同的样式文件. css 的css.css , less 的抽离为less.css
配置文件为
/**
 * Created by admin on 2018/10/14.
 */
//基于node 的遵循commonjs规范
let path = require('path');
let HtmlWebpackPlugin = require('html-webpack-plugin');
let CleanWebpackPlugin = require('clean-webpack-plugin');
let webpack = require("webpack");
let ExtractTextWebpackPlugin = require("extract-text-webpack-plugin");
let cssExtract = new ExtractTextWebpackPlugin("css/css.css");
let lessExtract = new ExtractTextWebpackPlugin("css/less.css");
module.exports = {
    entry:'./src/index.js',//入口
    //entry:['./src/index.js','./src/a.js'],
    //entry:{
        //index:"./src/index.js",
        //a:"./src/a.js"
    //},
    output:{
        filename:'[name].[hash:8].js', //起个名 默认的是main.js .hash 取八位 eg: build.e6472a7e.js
        //这个路径必须是绝对路径
        path:path.resolve('./build')
    },//出口
    devServer:{
        contentBase:'./build',
        port:3000,
        compress:true,//服务器压缩
        open:true,//自动打开浏览器
        hot:true
    },//开发服务器
    module:{
        rules:[//从右往左写
            {
                test:/\.css$/, use: cssExtract.extract({
                use:[
                    {loader:'css-loader'}
                ]
            })},
            {
                test:/\.less$/, use: lessExtract.extract({
                use:[
                    {loader:'css-loader'},
                    {loader:'less-loader'}
                ]
            })}
        ]
    },//模块配置
    plugins:[
        new webpack.HotModuleReplacementPlugin(),
        new CleanWebpackPlugin([
            './build'
        ]),
        //new ExtractTextWebpackPlugin({
        //    filename:"css/index.css"
        //}),
        cssExtract,
        lessExtract,

        new HtmlWebpackPlugin({
            //打包html 插件
            //filename:"b.html",
            template:'./src/index.html',
            hash:true,//在打包后的文件加一个后缀: eg: build.e6472a7e.js?e6472a7ea8e1cb380cef
            minify:{
              //removeAttributeQuotes:true,//移除dom属性的双引号
              //collapseWhitespace:true//不换行,
            },
            //chunks:["index"],
            title:'this is title from webpack configuration'
        })],//插件的配置
    mode:'development',//可以更改模式
    resolve:{}//配置解析
}
但是这样还是有一个问题.
因为把css 给抽到不同的文件里边了,并在index.html中引入 不同的css 文件, 热更新就没了 , 只能手动强制刷新.
而且还考虑一个问题. 其实这个抽取出来的过程, 只在上线的时候 需要, 本地的时候最好还是能保持热更新. 那就在dev开发阶段用style.loader 虽然会把样式放到style标签里边.
/**
 * Created by admin on 2018/10/14.
 */
//基于node 的遵循commonjs规范
let path = require('path');
let HtmlWebpackPlugin = require('html-webpack-plugin');
let CleanWebpackPlugin = require('clean-webpack-plugin');
let webpack = require("webpack");
let ExtractTextWebpackPlugin = require("extract-text-webpack-plugin");
let cssExtract = new ExtractTextWebpackPlugin({
    filename:"css/css.css",
    disable:true
});
let lessExtract = new ExtractTextWebpackPlugin({
    filename:"css/less.css",
    disable:true
});
module.exports = {
    entry:'./src/index.js',//入口
    //entry:['./src/index.js','./src/a.js'],
    //entry:{
        //index:"./src/index.js",
        //a:"./src/a.js"
    //},
    output:{
        filename:'[name].[hash:8].js', //起个名 默认的是main.js .hash 取八位 eg: build.e6472a7e.js
        //这个路径必须是绝对路径
        path:path.resolve('./build')
    },//出口
    devServer:{
        contentBase:'./build',
        port:3000,
        compress:true,//服务器压缩
        open:true,//自动打开浏览器
        hot:true
    },//开发服务器
    module:{
        rules:[//从右往左写
            {
                test:/\.css$/, use: cssExtract.extract({
                fallback:'style-loader',
                use:[
                    {loader:'css-loader'}
                ]
            })},
            {
                test:/\.less$/, use: lessExtract.extract({
                fallback:'style-loader',
                use:[
                    {loader:'css-loader'},
                    {loader:'less-loader'}
                ]
            })}
        ]
    },//模块配置
    plugins:[
        new webpack.HotModuleReplacementPlugin(),
        new CleanWebpackPlugin([
            './build'
        ]),
        //new ExtractTextWebpackPlugin({
        //    filename:"css/index.css"
        //}),
        cssExtract,
        lessExtract,

        new HtmlWebpackPlugin({
            //打包html 插件
            //filename:"b.html",
            template:'./src/index.html',
            hash:true,//在打包后的文件加一个后缀: eg: build.e6472a7e.js?e6472a7ea8e1cb380cef
            minify:{
              //removeAttributeQuotes:true,//移除dom属性的双引号
              //collapseWhitespace:true//不换行,
            },
            //chunks:["index"],
            title:'this is title from webpack configuration'
        })],//插件的配置
    mode:'development',//可以更改模式
    resolve:{}//配置解析
}
接着还是不满意.因为css 文件里边可能开发的时候写了很多样式, 但是这些样式 根本没有用到. 打包之后徒增体积,影响速度.
npm install purifycss-webpack purify-css glob -D
配置如下
/**
 * Created by admin on 2018/10/14.
 */
//基于node 的遵循commonjs规范
let path = require('path');
let HtmlWebpackPlugin = require('html-webpack-plugin');
let CleanWebpackPlugin = require('clean-webpack-plugin');
let webpack = require("webpack");
let ExtractTextWebpackPlugin = require("extract-text-webpack-plugin");
let cssExtract = new ExtractTextWebpackPlugin({
    filename:"css/css.css",
    //disable:true
});
let lessExtract = new ExtractTextWebpackPlugin({
    filename:"css/less.css",
    //disable:true
});
let glob = require('glob');
let PurifyCssWebpack = require("purifycss-webpack");
module.exports = {
    entry:'./src/index.js',//入口
    //entry:['./src/index.js','./src/a.js'],
    //entry:{
        //index:"./src/index.js",
        //a:"./src/a.js"
    //},
    output:{
        filename:'[name].[hash:8].js', //起个名 默认的是main.js .hash 取八位 eg: build.e6472a7e.js
        //这个路径必须是绝对路径
        path:path.resolve('./build')
    },//出口
    devServer:{
        contentBase:'./build',
        port:3000,
        compress:true,//服务器压缩
        open:true,//自动打开浏览器
        hot:true
    },//开发服务器
    module:{
        rules:[//从右往左写
            {
                test:/\.css$/, use: cssExtract.extract({
                //fallback:'style-loader',
                use:[
                    {loader:'css-loader'}
                ]
            })},
            {
                test:/\.less$/, use: lessExtract.extract({
                //fallback:'style-loader',
                use:[
                    {loader:'css-loader'},
                    {loader:'less-loader'}
                ]
            })}
        ]
    },//模块配置
    plugins:[
        new webpack.HotModuleReplacementPlugin(),
        new CleanWebpackPlugin([
            './build'
        ]),
        //new ExtractTextWebpackPlugin({
        //    filename:"css/index.css"
        //}),
        cssExtract,
        lessExtract,

        new HtmlWebpackPlugin({
            //打包html 插件
            //filename:"b.html",
            template:'./src/index.html',
            hash:true,//在打包后的文件加一个后缀: eg: build.e6472a7e.js?e6472a7ea8e1cb380cef
            minify:{
              //removeAttributeQuotes:true,//移除dom属性的双引号
              //collapseWhitespace:true//不换行,
            },
            //chunks:["index"],
            title:'this is title from webpack configuration'
        }),
        //没用的css 会消除掉.
        new PurifyCssWebpack({
            paths:glob.sync(path.resolve('src/*.html'))
        })
    ],//插件的配置

    mode:'development',//可以更改模式
    resolve:{}//配置解析
}
下一个需求.
我们之前写过的
transform: translateX(-50%);
-ms-transform: translateX(-50%);
-moz-transform: translateX(-50%);
-webkit-transform: translateX(-50%);
-o-transform: translateX(-50%);
每次都这么写感觉特别费劲. 直接写一个transform:translateX(-50%)这样的多简单
接着装插件 ,需要自动加前缀的功能
npm install postcss-loader autoprefixer -D
需要新建一个postcss.config.js 文件
如下
module.exports = {
    plugins:[
        require("autoprefixer")
    ]
}
webpack 配置文件更新如下
module:{
        rules:[//从右往左写
            {
                test:/\.css$/, use: cssExtract.extract({
                //fallback:'style-loader',
                use:[
                    {loader:'css-loader'},
                    {loader:'postcss-loader'}
                ]
            })},
            {
                test:/\.less$/, use: lessExtract.extract({
                //fallback:'style-loader',
                use:[
                    {loader:'css-loader'},
                    {loader:'less-loader'},
                    {loader:'postcss-loader'}
                ]
            })}
        ]
    },
还有一个需求, 我们项目中有部分的文件不需要打包, 需要保持原样传到server 上.
npm install copy-webpack-plugin -D
今天最后代码
/**
 * Created by admin on 2018/10/14.
 */
//基于node 的遵循commonjs规范
let path = require('path');
let HtmlWebpackPlugin = require('html-webpack-plugin');
let CleanWebpackPlugin = require('clean-webpack-plugin');
let webpack = require("webpack");
let ExtractTextWebpackPlugin = require("extract-text-webpack-plugin");
let cssExtract = new ExtractTextWebpackPlugin({
    filename:"css/css.css",
    //disable:true
});
let lessExtract = new ExtractTextWebpackPlugin({
    filename:"css/less.css",
    //disable:true
});
let glob = require('glob');
let PurifyCssWebpack = require("purifycss-webpack");
let CopyWebpackPlugin = require("copy-webpack-plugin");
module.exports = {
    entry:'./src/index.js',//入口
    //entry:['./src/index.js','./src/a.js'],
    //entry:{
        //index:"./src/index.js",
        //a:"./src/a.js"
    //},
    output:{
        filename:'[name].[hash:8].js', //起个名 默认的是main.js .hash 取八位 eg: build.e6472a7e.js
        //这个路径必须是绝对路径
        path:path.resolve('./build')
    },//出口
    devServer:{
        contentBase:'./build',
        port:3000,
        compress:true,//服务器压缩
        open:true,//自动打开浏览器
        hot:true
    },//开发服务器
    module:{
        rules:[//从右往左写
            {
                test:/\.css$/, use: cssExtract.extract({
                //fallback:'style-loader',
                use:[
                    {loader:'css-loader'},
                    {loader:'postcss-loader'}
                ]
            })},
            {
                test:/\.less$/, use: lessExtract.extract({
                //fallback:'style-loader',
                use:[
                    {loader:'css-loader'},
                    {loader:'less-loader'},
                    {loader:'postcss-loader'}
                ]
            })}
        ]
    },//模块配置
    plugins:[
        new webpack.HotModuleReplacementPlugin(),
        new CleanWebpackPlugin([
            './build'
        ]),
        //new ExtractTextWebpackPlugin({
        //    filename:"css/index.css"
        //}),
        cssExtract,
        lessExtract,

        new HtmlWebpackPlugin({
            //打包html 插件
            //filename:"b.html",
            template:'./src/index.html',
            hash:true,//在打包后的文件加一个后缀: eg: build.e6472a7e.js?e6472a7ea8e1cb380cef
            minify:{
              //removeAttributeQuotes:true,//移除dom属性的双引号
              //collapseWhitespace:true//不换行,
            },
            //chunks:["index"],
            title:'this is title from webpack configuration'
        }),
        //没用的css 会消除掉.
        new PurifyCssWebpack({
            paths:glob.sync(path.resolve('src/*.html'))
        }),
        new CopyWebpackPlugin([
            {
                //告诉从哪考到哪
                from:'./src/doc',
                to:"public"
            }
        ])
    ],//插件的配置

    mode:'development',//可以更改模式
    resolve:{}//配置解析
}