使用Opencv2+Pyqt5实现人脸识别视频马赛克
【视频马赛克系统】使用Opencv2+Pyqt5实现人脸识别视频马赛克功能
- 1.实现背景
- 2.开发资源、环境准备
- 3.实现目标
- 4.开发原理
- 6.编译实现
-
- 1.视频中人脸马赛克
- 2.电脑摄像头进行人脸马赛克并保存
- 3.电脑摄像头进行人脸马赛克并保存
- 6.Pyqt5图形界面实现
- 7.将py文件打包生成exe应用程序
- 8常见错误
- 9结束
1.实现背景
在一些采访视频中,为了保护采访者的安全与隐私,会给他们脸上打上马赛克,但是大多都是使用人工逐帧进行打码,会出现漏打或者打码不全等问题针对上述问题,我们采用人脸检测及识别技术,对视频中目标人脸进行识别、追踪并打码。基于Pyqt5和Openvc来实现人脸识别以及打码功能,配合自带摄像头实现实时人脸打码并保存录像功能。
2.开发资源、环境准备
- 我使用Pycharm进行编程
- Win10系统 64位
- python3.x以上
- Pyqt5进行图形界面的开发使用pip安装:pip install PyQt5
- subprocess 模块 :这个模块允许我们启动一个新进程,并连接到它们的输入/输出/错误管道,从而获取返回值。因此我们可以使用
- ffmpeg多媒体处理工具:FFmpeg是一套可以用来记录、转换数字音频、视频,并能将其转化为流的开源计算机程序。系统默认安装,也可以在官网下载。
ffmpeg的官网地址是:https://www.ffmpeg.org/
ffmpeg的Github项目地址是:https://github.com/FFmpeg/FFmpeg
- 需要的库有
①opencv 使用pip进行安装:pip install opencv-python
②numpy 使用pip进行安装:pip install numpy
③cmake 使用pip进行安装:pip install numpy
④dlib 使用pip进行安装:pip install dlib
⑤face_recognition 使用pip进行安装: pip install face_recognition
#要使用此人脸识别库必须要安装cmake和dlib库
3.实现目标
1.实现对输入人脸后对视频中的对应人脸的马赛克处理
2.实现实时从摄像头获取的人脸的马赛克处理
3.使用pyqt5设计GUI
3.打包生成一个exe可执行程序
4.开发原理
- 思想很简单,我们根据输入图片的人脸就可以获得人脸对应的人脸编码(picture_econding),然后对输入的视频进行逐帧提取,然后对每一帧的人脸我们也做同样的处理得到对应的人脸编码(video_ecoding),然后对比两个编码就可以确定是不是目标人物对应的人脸,之后就可以对目标人脸进行马赛克处理了。
- 对于从摄像头获得图像也可以逐帧提取,不过我们要使用Opencv基于Haar特征的级联分类器来确定摄像头获得的是一张人脸,然后进行相同的马赛克处理即可。Opencv文档中用户指南也有相关介绍和例子
Opencv用户指南
浅析人脸检测之Haar分类器方法
人脸检测之Haar分类器
6.编译实现
1.视频中人脸马赛克
1.首先导入我们所需要的库
import cv2  # 使用opencv导入图像pip install opencv-python
import face_recognition  # 人脸识别库 cmake → dlib
import subprocess  # 模块允许我们启动一个新进程,并连接到它们的输入/输出/错误管道,从而获取返回值。
2.第一步:先将输入的视频中的音频文件提取出来(因为对视频马赛克处理过后的视频文件没有声音),以便后面合成。
    #将视频转为音频
    #file_name:视频文件  如:znl.mp4

    outfile_name = file_name.split('.')[0] + '.mp3'  # 由.分割视频名称和后缀,由此输出音频mp3文件
    cmd = 'ffmpeg -i ' + file_name + ' -f mp3 ' + outfile_name
    #print(cmd)
	#输出一行命令使用ffmpeg将视频和音频分离,得到 znl.mp3 文件
    subprocess.call(cmd, shell=False)
    #使用subprocess模块执行命令,shell=False为不显示窗口
3.第二步,将得到的视频文件进行逐帧打码
 #视频打码
      #input_video: 需要打码的视频 如znl.mp4
      #output_video: 打码后的视频
      #注意这个打码后的视频是没有声音的,所以就需要用到上一步生成的mp3文件

    #读取图片
    mask = cv2.imread('guai.jpg')
    inputvideo = "znl.mp4"
    # 读取视频
    cap = cv2.VideoCapture(inputvideo )
    # 0会打开摄像头
    # 视频 帧率fps 宽度width 高度height
    v_fps = cap.get(5)
    v_width = cap.get(3)
    v_height = cap.get(4)

    # 设置写入参数 格式MP4
    # 画面大小
    size = (int(v_width), int(v_height))
    # 写入,后缀格式
    fourcc = cv2.VideoWriter_fourcc('m', 'p', '4', 'v')  # 四字符码

    # 输出视频  名称为znl-out.MP4
    out = cv2.VideoWriter("znl-out.mp4", fourcc, v_fps, size)

    # 找到已知的人脸数据
    known_image = face_recognition.load_image_file(mask)
	#使用face_recognition加载输入的图片
    biden_encoding = face_recognition.face_encodings(known_image)[-1]  # 获取人脸编码列表
    # 获取一帧帧图像
    cap = cv2.VideoCapture(input_video)

    while (cap.isOpened()):  # 视频结束,循环结束
        ret, frame = cap.read()  # 读取一帧帧图像,ret指true,frame指画面数据
        if ret:
            # 检测人脸
            # 人脸区域
            face_locations = face_recognition.face_locations(frame)  # 找到人脸位置

            for (top_right_y, top_right_x, left_bottom_y, left_bottom_x) in face_locations:  # 得到人脸位置的两个对称点,既左下和右上两点,确定一个矩形

				#输出两个点的坐标
                #print((top_right_y, top_right_x, left_bottom_y, left_bottom_x))

                unknow_image = frame[top_right_y-50:left_bottom_y+50, left_bottom_x-50:top_right_x+50]  # 保证图片规范,切片
                 # 未知人脸

                if face_recognition.face_encodings(unknow_image) != []:
                    unknow_encoding = face_recognition.face_encodings(unknow_image)[0]
                    # 对比人脸编码

                    results = face_recognition.compare_faces([biden_encoding], unknow_encoding)

                    if results == [True]:  # 图像对比成功
                    #进行打码处理
'''
如何对框出的人脸进行马赛克处理?
图像是由一个个的像素所组成的
并且每一个像素都有一个bgr值
要实现图像的马赛克效果
我们只需要设置一个像素块
并将该像素块中的所有像素都使用同一个bgr值来表示即可
'''

                        for (top_right_y, top_right_x, left_bottom_y, left_bottom_x) in face_locations:

                            #cv2.rectangle(frame, (top_right_x, top_right_y), (left_bottom_x, left_bottom_y), (0, 255, 0),2)  # 找出出人脸位置
'''
    假设我们将马赛克大小设置为10个像素宽度,即设置一个10*10的像素块。
    所谓的马赛克效果,就是将这100个像素值全部处理成与矩阵第一个像素值相等的像素值,
    然后重新填充这个10*10的矩阵像素值即可,
    整个图像的马赛克只需要每次从左到右,从上到下以步长为10个像素去处理每个10*10的像素矩阵,
    并且每次都将对应的25个像素值处理成与当前矩阵第一个像素值相等的像素值,
    直到将整个图像的像素处理完成即可生成整个图像的马赛克图像。
'''
                            h = left_bottom_y - top_right_y
                            w = top_right_x - left_bottom_x
                            for m in range(top_right_y, top_right_y+h):  # 马赛克
                                for n in range(left_bottom_x, left_bottom_x+w):
                                    if m % 10 == 0 and n % 10 == 0:
                                        for i in range(10):
                                            for j in range(10):
                                                (b, g, r) = frame[m, n]
                                                frame[m + i, n + j] = (b, g, r)

            out.write(frame)

        else:
            break
4.第三步:将打码后得到的视频文件和音频文件合并成一个文件
	#file_name: 画面文件  如znl-out.mp4
    #mp3_file: 视频的音频文件 如znl.mp3
 	outfile_name = file_name.split('.')[0] + '-f.mp4'#将输入视频文件分割加上-f重新命名为新的打码后的mp4
 	cmd = 'ffmpeg -i ' + file_name + ' -i ' + mp3_file+' -strict -2 -f mp4 ' + outfile_name
    subprocess.call(cmd, shell=False)
2.电脑摄像头进行人脸马赛克并保存
原理和上一步类似,只不过把输入视频换成了摄像头获取到的实时视频
    def opencamera(self):
            fourcc = cv2.VideoWriter_fourcc('m', 'p', '4', 'v')  # 四字符码
            out = cv2.VideoWriter('实时马赛克视频.MP4', fourcc, 20.0, (640, 480))
            cv2.namedWindow("摄像头")
            # 调用摄像头
            cap = cv2.VideoCapture(0)
            # 人脸识别器分类器
            classfier = cv2.CascadeClassifier("D:\python\Lib\site-packages\cv2\data\haarcascade_frontalface_default.xml")
            while cap.isOpened():
                read, frame = cap.read()
                if not read:
                    break
                # 灰度转换
                grey = cv2.cvtColor(frame, cv2.COLOR_BGR2GRAY)
                # 人脸检测
                Rects = classfier.detectMultiScale(grey, scaleFactor=1.05, minNeighbors=3, minSize=(8, 6),
                                                   maxSize=(640, 480))
                #                                  灰度处理图片 scaleFactor表示每次图像尺寸减小的比例  minNeighbors表示每一个目标至少要被检测到3次
                if len(Rects) > 0:
                    for Rect in Rects:
                        x, y, w, h = Rect

                        for m in range(y, y + h):  # y
                            for n in range(x, x + w):  # x
                                if m % 10 == 0 and n % 10 == 0:  # 将10 * 10的方格内的像素颜色,设置与[m,n]点颜色相同
                                    for i in range(10):
                                        for j in range(10):
                                            (b, g, r) = frame[m, n]
                                            frame[i + m, j + n] = (b, g, r)

                cv2.imshow("摄像头", frame)
                if cv2.waitKey(5) & 0xFF == 27:
                    break
                # 保存视频
                out.write(frame)
            QtWidgets.QMessageBox.information(self, "提示", "录像保存成功!")
            # 释放相关资源
            cap.release()
            out.release()
            cv2.destroyAllWindows()
注意一定要释放相关资源,否则在对程序运行的过程中会出现错误,无法打开exe文件。
3.电脑摄像头进行人脸马赛克并保存
6.Pyqt5图形界面实现
1.使用Qtdesigner进行设计
如果要使用Qtdesigner进行设计,就要在安装了Pyqt5后接着安装pyqt5-tools
pip3 install pyqt5-tools
安装完成之后我们就能找到

设计完成后将UI文件通过PyUic转换为py文件就可以进行代码的编写了
转换方法一:
在命令窗口输入 python -m PyQt5.uic.pyuic demo.ui -o demo.py
方法二:
pyuic5 demo.ui -o demo.py
为了方便转换可以直接将这个命令添加到pycharm的External Tools中

Arguments:-m PyQt5.uic.pyuic F i l e N a m e FileName FileName -o F i l e N a m e W i t h o u t E x t e n s i o n FileNameWithoutExtension FileNameWithoutExtension.py
之后在当前文件夹下右键点击ui文件在External Tools中就可以将ui文件转换为py文件了。
2.直接在pycharm中进行代码编写UI界面
由于我是自学pyqt5,所以对于designer不是很熟练,故采用了代码直接写图形界面。
导入所需的库
from PyQt5 import QtCore, QtGui, QtWidgets
from PyQt5.QtWidgets import *
from PyQt5.QtGui import QIcon
from PyQt5.QtCore import Qt
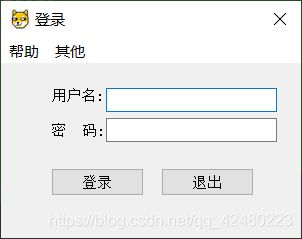
编写登录窗口
class LoginWIn (QMainWindow):
    def __init__(self):
        super().__init__()
        self.initUI()

        # 添加菜单帮助栏
        mymenu = self.menuBar()
        acthelp = QAction('帮助', self)  # 属于当前窗体
        acthelp.triggered.connect(self.Help)
        mymenu.addAction(acthelp)

        #添加其他栏
        mymenu = self.menuBar()
        acthelp = QAction('其他', self)  # 属于当前窗体
        acthelp.triggered.connect(self.other)
        mymenu.addAction(acthelp)

    def initUI(self):
        self.setWindowTitle('登录')
        #设置窗口位置居中
        self.resize(300, 200)
        self.setFixedSize(300, 200)
        self.move(desk.width()/2-self.width()/2, 400)

        myframe = QFrame(self)

        userlb = QLabel('用户名:', myframe)
        passwordlb = QLabel('密  码:', myframe)
        passwordlb.move(0, 35)

        self.userline = QLineEdit(myframe)
        self.passwordline = QLineEdit(myframe)
        self.userline.move(55, 0)
        self.passwordline.move(55, 30)
        #隐藏密码 设置密码模式
        self.passwordline.setEchoMode(QLineEdit.Password)
        #登录按钮
        btnlogin = QPushButton('登录', myframe)
        btnquit = QPushButton('退出', myframe)
        btnlogin.move(0, 80)
        btnquit.move(110, 80)
        #链接到槽实现登录

        btnlogin.clicked.connect(self.myBtnClick)

        btnquit.clicked.connect(self.myBtnClick)

        #设置位置
        myframe.move(50, 50)
        myframe.resize(300, 300)
        #隐藏放大缩小,只显示关闭按钮
        self.setWindowFlags(Qt.WindowCloseButtonHint)

        self.show()
定义所需要的函数
    def myBtnClick(self):
        #获取源
        source = self.sender()
        account_dict = {
     'Admin': '123456'}
        if source.text() == '登录':
            user = self.userline.text()
            password = self.passwordline.text()
            user_keys = list(account_dict.keys())
            if user not in user_keys:
                reply1 = QMessageBox.information(self, '登录出错', '用户不存在', QMessageBox.Yes | QMessageBox.No,
                                                 QMessageBox.Yes)

            elif password == account_dict[user]:
                LoginWIn.close(self)
                demo.show()
            else:
                reply2 = QMessageBox.information(self, '登录出错', '密码错误', QMessageBox.Yes | QMessageBox.No,
                                                 QMessageBox.Yes)
        elif source.text() == '退出':
            QApplication.instance().exit()
 	# 定义帮助函数
    def Help(self):
        msgbox = QMessageBox(QMessageBox.Information, '帮助', '初始用户:Admin \n 初始密码:123456', QMessageBox.Ok, self)
        # 显示提示窗口
        msgbox.show()
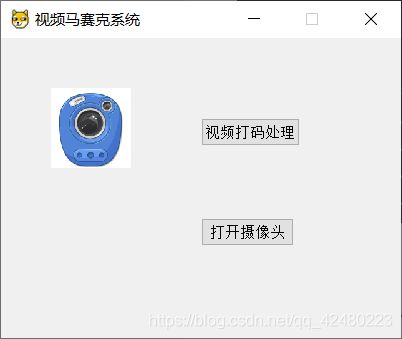
编写主界面
#主界面
class MenuDemo(QWidget):
    def __init__(self):
        super().__init__()
        self.initUI()

        #三个按钮实现三个功能
    def initUI(self):
        self.setWindowTitle("视频马赛克系统")
        self.setFixedSize(400, 300)# 宽×高

        # 设置图片显示区域
        self.label = QLabel(self)
        self.label.setFixedSize(80, 80)
        self.label.move(50, 50)
        # 设置背景颜色
        self.label.setStyleSheet("QLabel{background:white;}")

        jpg = QtGui.QPixmap('./camera.jpg').scaled(self.label.width(), self.label.height())
        self.label.setPixmap(jpg)


        # 设置按钮——导入视频
        btnvideo = QPushButton(self)
        btnvideo.setText('视频打码处理')
        btnvideo.move(200, 80)
        btnvideo.clicked.connect(self.openvideo)


        # 设置按钮——打开摄像头
        btncamera = QPushButton(self)
        btncamera.setText("打开摄像头")
        btncamera.move(200, 180)
        btncamera.clicked.connect(self.opencamera)
实现结果:

根据提示输入图片和视频就可以得到处理过后的视频

这里使用了正能量视频片段和图片

7.将py文件打包生成exe应用程序
使用 pyinstaller -F demo.py 将文件打包生成exe可执行文件
8常见错误
如果生成的exe文件不能打开就使用
pyinstaller -D demo.py
生成打包文件夹,在运行的时候可以看到命令窗口里的错误,然后逐一进行排查
以下给出我打包过程中遇到的错误:
RuntimeError: Unable to open ./shape_predictor_68_face_landmarks.dat导致exe文件闪退
处理方法:
将 .\face_recognition\models文件夹下的四个文件复制到exe同级目录下,然后在pycharm的api.py中将
替换成四个文件即可
不过替换完成之后在pycharm中py程序不能运行,但生成的exe可执行文件可以正常运行
9结束
到此就是我通过学习pyqt5而写的第一个exe可执行程序,文件可以发送给他人正常运行,但请记住打包的时候记得带上所有的图片,以及依赖库!
同时,这也是我写的第一个博客,记录一下,同时也分享一下我在这一过程中遇到的问题。希望可以帮助到你们。


