鸿蒙APP开发基础知识
鸿蒙开发基础知识目录
- DevEco Studio编辑器de使用
-
- 创建新项目
- 打开一个项目
- 新建一个文件夹
- 新建一个布局文件
- 新建一个Page Ability(Feature Ability)
- 配置Ability
- 设置自己的名字和时间
- 设置字体大小
- DevEco Studio编辑器de常用快捷键
-
- 代码查找
- 代码注释
- 手动代码联想
- 快速对代码进行格式化
- 对文件进行重命名
- 鸿蒙项目和Android项目的对比
-
- 资源文件
-
- 资源文件介绍
- 资源文件的使用
-
- elemen元素资源的创建
- XML引用资源文件
- Java引用资源文件
- 为Element资源文件添加注释或特殊标识
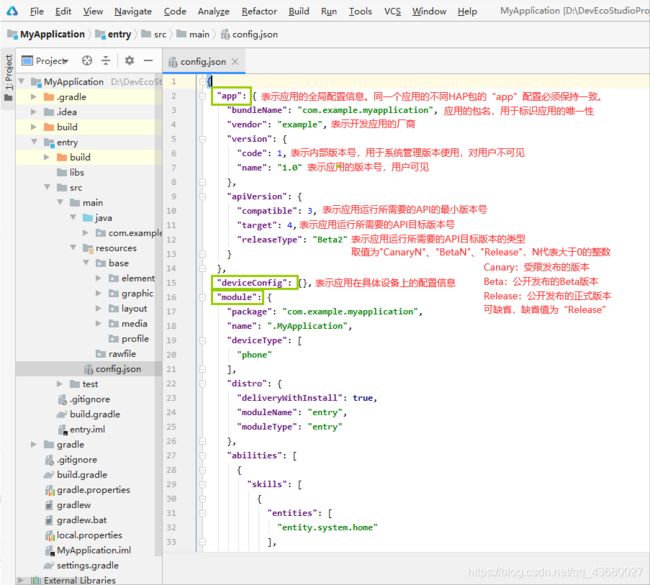
- config.json应用配置文件
-
- "app"、"deviceConfig"
- "module"
- 配置系统的权限
- 限定词目录
-
- 限定词目录的命名
- 限定词目录与设备状态的匹配规则
- 日志工具
-
- 日志工具的使用
- 日志工具类
- 调试
DevEco Studio编辑器de使用
DS与AS在视觉和使用上大同小异,也有代码智能补齐、代码错误检查、代码自动跳转等功能,本节主要就DevEco Studio的使用(或使用技巧)做一个归纳(会一直更新哦~)。
创建新项目
打开一个项目
新建一个文件夹
新建一个布局文件
在 src\main\resources\base\layout 目录下,右键点击 layout 目录 , 在弹出的菜单中选择New选项,再选择Layout Resource File

在弹出的对话框中,输入布局文件名称,以及选择布局类型(目前只能生成DirectionalLayout 线性布局)后,点击Finish完成创建

生成的布局文件如下
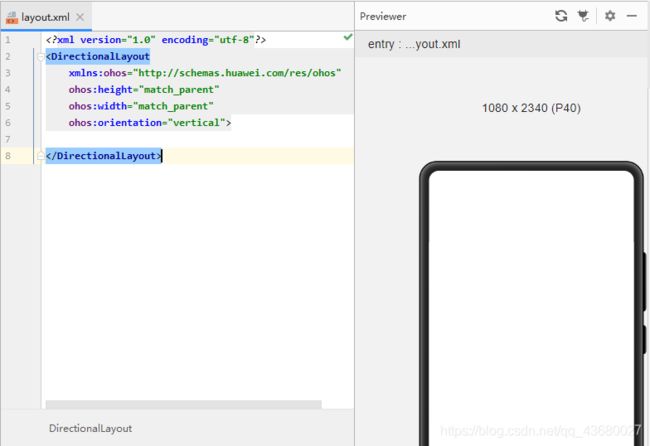
在该布局文件中,自动添加了线性布局 DirectionalLayout 作为根布局
<?xml version="1.0" encoding="utf-8"?>
<DirectionalLayout
    xmlns:ohos="http://schemas.huawei.com/res/ohos"
    ohos:height="match_parent"
    ohos:width="match_parent"
    ohos:orientation="vertical">

</DirectionalLayout>
新建一个Page Ability(Feature Ability)
Page Ability可以理解为安卓的Acitvity
在你想创建Ability的文件上右键,New>Ability>Empty Page Ability(Java)
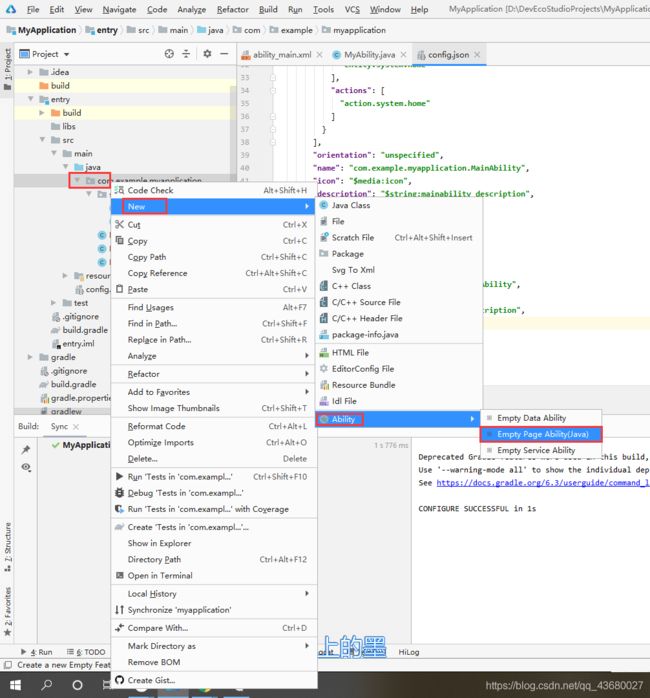
在弹出的对话框中填写相应信息后,点击Finish

新的Page Ability与其对应的layout就创建好了呀

可以看见,在鸿蒙应用中在创建页面时,会生成两个类:“MyAbility”和“MyAbilitySlice”,和一个布局文件“ability_my.xml”。
想了解这三个文件,可以看本人的从零开始看鸿蒙代码文件的文章。
配置Ability
创建了一个新的Ability以后,会在config.json中的"abilities"标签下自动添加新的Ability的配置,如下:
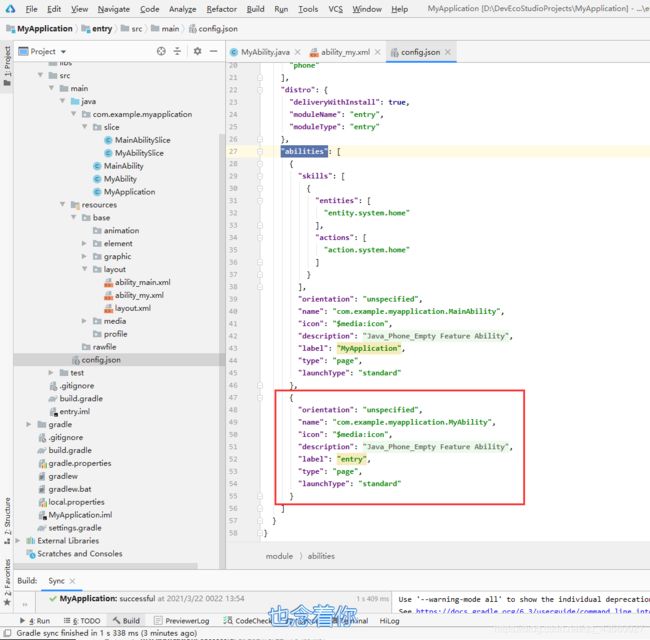
{

        "orientation": "unspecified",
        "name": "com.example.myapplication.MyAbility",
        "icon": "$media:icon",
        "description": "$string:myability_description",
        "label": "entry",
        "type": "page",
        "launchType": "standard"
}
对Ability配置的解读参照本文章后面config.json 应用配置文件。
设置自己的名字和时间
/**
 *
 * @author Xxx
 * @date ${DATE}
 */
设置字体大小
File>Settings…
然后选择Editor>Font

DevEco Studio编辑器de常用快捷键
代码查找
全局查找:ctrl+shift+F
局部查找:ctrl+F
代码注释
注释代码(或者对已注释的代码块取消注释):Ctrl+/
手动代码联想
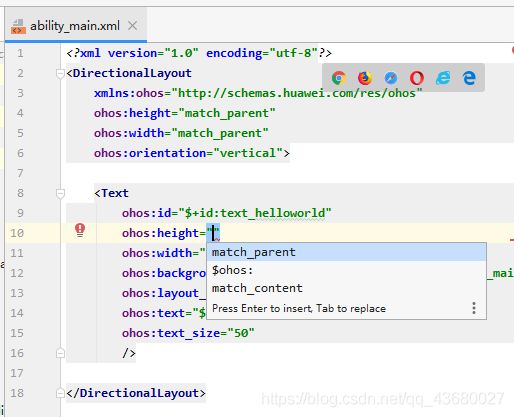
手动代码联想需要重新设置快捷键
File>Settings

Keymap>Main menu>Code>Completion>Basic
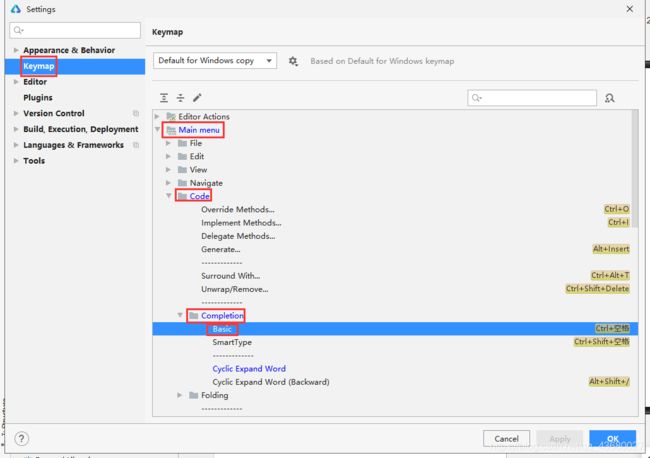
在 Basic 上点击右键,选择Add Keyboard Shortcut添加键盘快捷键

然后在弹窗内,输入快捷键Alt+/后,点击OK(当然你也可以设置自己习惯的快捷键)

这时候你会发现,这里有两个快捷键,所以我们需要删除Ctrl+空格快捷键
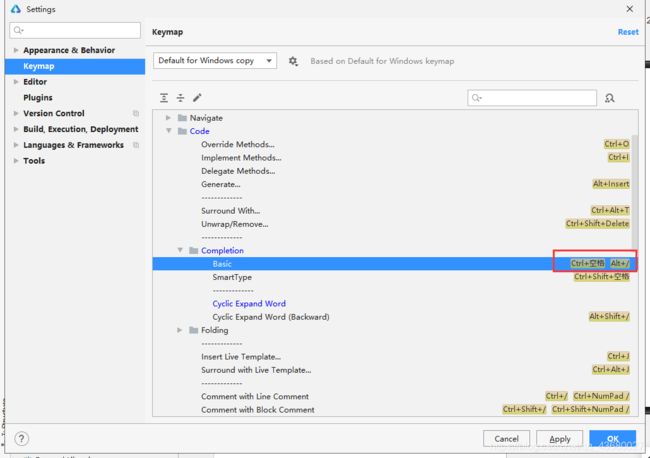
在 Basic 上点击右键,选择Remove Ctrl+空格,删除该快捷键

最后Apply一下就OK啦

快捷键就可以使用了呀
快速对代码进行格式化
Ctrl+Alt+L
对文件进行重命名
Shift+F6
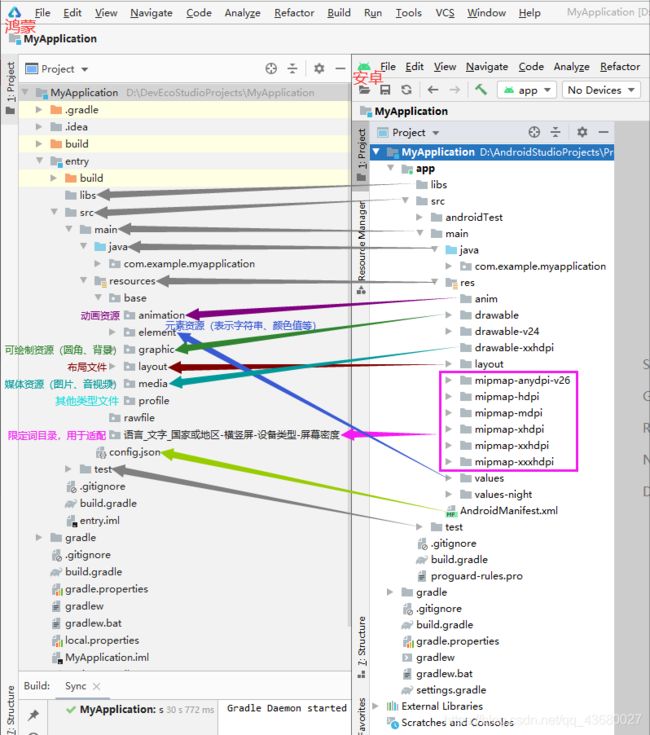
鸿蒙项目和Android项目的对比
资源文件
资源文件介绍
资源文件(官方文档):
https://developer.harmonyos.com/cn/docs/documentation/doc-guides/basic-resource-file-categories-0000001052066099
![]()
资源文件的使用
官方文档:https://developer.harmonyos.com/cn/docs/documentation/doc-guides/basic-resource-file-example-0000001051733014
elemen元素资源的创建
包括字符串、整型数、颜色、样式等资源的json文件。每个资源均由json格式进行定义,例如:
boolean.json:布尔型
color.json:颜色
float.json:浮点型
intarray.json:整型数组
integer.json:整型
pattern.json:样式
plural.json:复数形式
strarray.json:字符串数组
strings.json:字符串值

先在element文件夹下New一个File

然后取好名字点击OK

这样就创建好了一个新的boolean.json

然后模仿原有的string.json写一个存放boolean类型的json
boolean.json(布尔型)示例
{

  "boolean":[
    {

      "name":"boolean_true",
      "value":true
    },
    {

      "name":"boolean_true_copy",
      "value":"$boolean:boolean_true"
    }
  ]
}
其他元素资源也可以模仿着写
color.json(颜色)示例
{

  "color":[
    {

      "name":"cyan",
      "value":"#00FFFF"
    },
    {

      "name":"cyan_copy",
      "value":"$color:cyan"
    },
    {

      "name":"white",
      "value":"#FFFFFFFF"
    }
  ]
}
float.json(浮点型)示例
{

  "float":[
    {

      "name":"float_1",
      "value":"3.19"
    },
    {

      "name":"float_copy",
      "value":"$float:float_1"
    },
    {

      "name":"float_px",
      "value":"100px"
    }
  ]
}
integer.json(整型)示例
{

  "integer":[
    {

      "name":"integer_1",
      "value":1
    },
    {

      "name":"integer_2",
      "value":2
    },
    {

      "name":"integer_3",
      "value":3
    }
  ]
}
intarray.json(整型数组)示例
{

  "intarray":[
    {

      "name":"intarray_1",
      "value":[
        100,
        200,
        "$integer:integer_3"
      ]
    }
  ]
}
strings.json(字符串值)示例
{

  "string": [
    {

      "name": "app_name",
      "value": "MyApplication"
    },
    {

      "name": "mainability_description",
      "value": "Java_Phone_Empty Feature Ability"
    },
    {

      "name": "HelloWorld",
      "value": "Hello World"
    },
    {

      "name": "myability_description",
      "value": "Java_Phone_Empty Feature Ability"
    },
    {

      "name": "page",
      "value": "This is a page."
    },
    {

      "name": "button",
      "value": "This is a button."
    }
  ]
}
strarray.json(字符串数组)示例
{

  "strarray":[
    {

      "name":"strarray_num",
      "value":[
        {

          "value":"one"
        },
        {

          "value":"$string:HelloWorld"
        },
        {

          "value":"two"
        },
        {

          "value":"three"
        }
      ]
    }
  ]
}
pattern.json(样式)示例
{

  "pattern":[
    {

      "name":"base",
      "value":[
        {

          "name":"width",
          "value":"100vp"
        },
        {

          "name":"text_size",
          "value":"100fp"
        },
        {

          "name":"size",
          "value":"25px"
        }
      ]
    },
    {

      "name":"child",
      "parent":"base",
      "value":[
        {

          "name":"noTitile",
          "value":"Yes"
        }
      ]
    }
  ]
}
plural.json(复数形式)示例
{

  "plural":[
    {

      "name":"eat_apple",
      "value":[
        {

          "quantity":"one",
          "value":"%d apple"
        },
        {

          "quantity":"other",
          "value":"%d apples"
        }
      ]
    }
  ]
}
XML引用资源文件
<?xml version="1.0" encoding="utf-8"?>
<DirectionalLayout
    xmlns:ohos="http://schemas.huawei.com/res/ohos"
    ohos:height="match_parent"
    ohos:width="match_parent"
    ohos:orientation="vertical">

    <Text
        ohos:id="$+id:text_helloworld"
        ohos:height="match_content"
        ohos:width="match_content"
        ohos:background_element="$graphic:background_ability_main"
        ohos:layout_alignment="horizontal_center"
        ohos:text="$string:app_name"
        ohos:text_color="$color:white"
        ohos:text_size="50"/>

    <Button
        ohos:id="$+id:button"
        ohos:height="match_content"
        ohos:width="match_content"
        ohos:background_element="$graphic:background_ability_main"
        ohos:layout_alignment="center"
        ohos:padding="10fp"
        ohos:text="$string:button"
        ohos:text_color="$color:white"
        ohos:text_size="19fp"
        ohos:top_margin="10fp"/>
</DirectionalLayout>
图中框出的就是XML引用资源文件的方式(引用的资源文件如前节elemen元素资源的创建)
ohos:text="$string:button"
这句话的意思就是,在XML文件中,引用string.json文件中类型为“String”、名称为“button”的资源
一般来说,XML文件引用资源文件的格式如下:
$type:name
特别地,如果引用的是系统资源,则采用:
$ohos:type:name
        ohos:text="$ohos:string:request_location_reminder_content"
        ohos:text_color="$ohos:color:id_color_bottom_tab_bg_blur"

效果如下:

其实在xml中,点击色块是可以直接选择颜色的哦~

Java引用资源文件
通过一个示例来解释
现有一个MainAbilitySlice.java如下
(ability_main.xml如前节XML引用资源文件,引用的资源文件如前节elemen元素资源的创建)

public class MainAbilitySlice extends AbilitySlice {

    @Override
    public void onStart(Intent intent) {

        super.onStart(intent);
        super.setUIContent(ResourceTable.Layout_ability_main);// 加载XML布局

        Text text = (Text) findComponentById(ResourceTable.Id_text_helloworld);
        Button button = (Button) findComponentById(ResourceTable.Id_button);

        ResourceManager rsManager = this.getResourceManager();

        try {

            int intColor = rsManager.getElement(ResourceTable.Color_cyan).getColor();
            Color color = new Color(intColor);
            text.setTextColor(color);

            text.setText(rsManager.getElement(ResourceTable.String_HelloWorld).getString());

            button.setTextColor(new Color(this.getResourceManager().getElement(ResourceTable.Color_cyan_copy).getColor()));
        } catch (IOException e) {

            e.printStackTrace();
        } catch (NotExistException e) {

            e.printStackTrace();
        } catch (WrongTypeException e) {

            e.printStackTrace();
        }
    }

    @Override
    public void onActive() {

        super.onActive();
    }

    @Override
    public void onForeground(Intent intent) {

        super.onForeground(intent);
    }
}
图中框出的就是JAVA引用资源文件的方式
ResourceManager rsManager = this.getResourceManager();
text.setText(rsManager.getElement(ResourceTable.String_HelloWorld).getString());
这句话的意思就是,在Java文件中,引用string.json文件中类型为“String”、名称为“String_HelloWorld”的资源
注意:
在使用getElement的时候,一定要用try/catch包起来
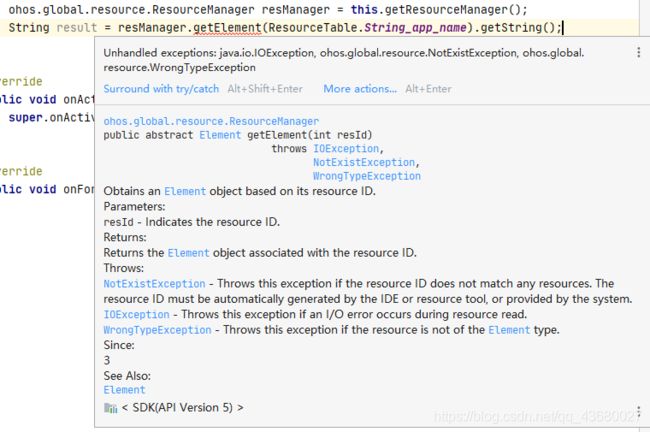
一般来说,Java引用资源文件的格式如下:
ResourceTable.type_name
特别地,如果引用的是系统资源,则采用:
ohos.global.systemres.ResourceTable.type_name

text_ohos.setText(this.getResourceManager().getElement(ohos.global.systemres.ResourceTable.String_request_location_reminder_title).getString());
text_ohos.setTextColor(new Color(this.getResourceManager().getElement(ohos.global.systemres.ResourceTable.Color_id_color_badge_red).getColor()));
效果:

如果你在xml或者java中引用的系统资源显示为一串数字,有可能是你的DS不是最新版本!!!!
截至2021.4.21,官方文档中明确表明目前支持的系统资源文件为:

xml中可以引用到的为:

Java引用profile资源文件,去获取profile中的文件内容:

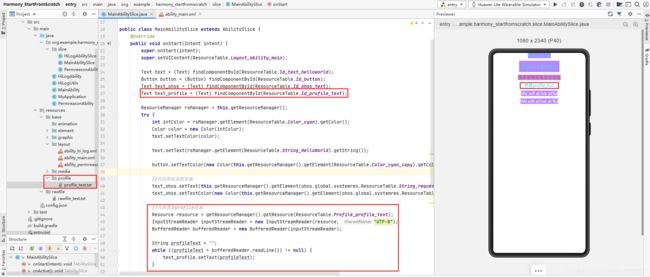

 //代码获取profile资源
            Resource resource = getResourceManager().getResource(ResourceTable.Profile_profile_text);
            InputStreamReader inputStreamReader = new InputStreamReader(resource, "UTF-8");
            BufferedReader bufferedReader = new BufferedReader(inputStreamReader);

            String profileText = "";
            while ((profileText = bufferedReader.readLine()) != null) {

                text_profile.setText(profileText);
            }
Java引用rawfile目录中的资源文件:通过指定文件路径和文件名称来引用。
在Java文件中,引用一个路径为“resources/rawfile/”、名称为“rawfile_text.txt”的资源文件,示例如下:


//代码获取rawfile资源
            ohos.global.resource.ResourceManager resManager = this.getResourceManager();
            ohos.global.resource.RawFileEntry rawFileEntry = resManager.getRawFileEntry("resources/rawfile/rawfile_text.txt");
            InputStreamReader inputStreamReader2 = new InputStreamReader(rawFileEntry.openRawFile(), "UTF-8");
            //也可以使用这个
            //InputStreamReader inputStreamReader2 = new InputStreamReader(getResourceManager().getRawFileEntry("resources/rawfile/rawfile_text.txt").openRawFile(), "UTF-8");
            BufferedReader bufferedReader2 = new BufferedReader(inputStreamReader2);
            String rawfileText = "";
            while ((rawfileText = bufferedReader2.readLine()) != null) {

                text_rawfile.setText(rawfileText);
            }
为Element资源文件添加注释或特殊标识
Element目录下的不同种类元素的资源均采用JSON文件表示,资源的名称“name”和取值“value”是每一条资源的必备字段。如果需要为某一条资源备注信息,以便于资源的理解和使用,可以通过“comment”字段添加注释。
eg:

{

  "string": [
	{

      "name": "button",
      "value": "This is a button.",
      "comment": "button is this."
    }
  ]
}
在string、strarray、plural这三类资源中,可以通过特殊标识来处理无需被翻译的内容。例如,一个字符串资源的Value取值为“We will arrive at %s”,其中的变量“%s”在翻译过程中希望保持不变。
法一:在value字段中添加{}。
{

    "string":[
        {

            "name":"message_arrive",
            "value":["We will arrive at",{

                "id":"time",
                "example":"5:00 am",
                "value":"%s"
            }
            ]
        }
    ]
}
法二:添加xliff:g标记对。
{
"string":[
{
"name":"message_arrive",
"value":"We will arrive at %s "
}
]
}
 <Text
        ohos:id="$+id:string_value"
        ohos:height="match_content"
        ohos:width="match_content"
        ohos:background_element="$graphic:background_ability_main"
        ohos:layout_alignment="horizontal_center"
        ohos:text="$string:message_arrive"
        ohos:text_color="$color:black"
        ohos:text_size="50"
        ohos:top_margin="10vp"/>

    <Text
        ohos:id="$+id:string_value2"
        ohos:height="match_content"
        ohos:width="match_content"
        ohos:layout_alignment="horizontal_center"
        ohos:text="$string:message_arrive2"
        ohos:text_color="$color:black"
        ohos:text_size="50"
        ohos:top_margin="10vp"/>

    <Text
        ohos:id="$+id:string_value3"
        ohos:height="match_content"
        ohos:width="match_content"
        ohos:layout_alignment="horizontal_center"
        ohos:text="$string:message_arrive3"
        ohos:text_color="$color:black"
        ohos:text_size="50"
        ohos:top_margin="10vp"/>

    <Text
        ohos:id="$+id:string_value4"
        ohos:height="match_content"
        ohos:width="match_content"
        ohos:layout_alignment="horizontal_center"
        ohos:text="$string:message_arrive4"
        ohos:text_color="$color:black"
        ohos:text_size="50"
        ohos:top_margin="10vp"/>

    <Text
        ohos:id="$+id:string_value5"
        ohos:height="match_content"
        ohos:width="match_content"
        ohos:layout_alignment="horizontal_center"
        ohos:text="$string:message_arrive5"
        ohos:text_color="$color:black"
        ohos:text_size="50"
        ohos:top_margin="10vp"/>

    <Text
        ohos:id="$+id:string_value6"
        ohos:height="match_content"
        ohos:width="match_content"
        ohos:layout_alignment="horizontal_center"
        ohos:text="$string:message_arrive6"
        ohos:text_color="$color:black"
        ohos:text_size="50"
        ohos:top_margin="10vp"/>

    <Text
        ohos:id="$+id:string_value_xliff"
        ohos:height="match_content"
        ohos:width="match_content"
        ohos:background_element="$graphic:background_ability_main"
        ohos:layout_alignment="horizontal_center"
        ohos:text="$string:message_arrive_xliff"
        ohos:text_color="$color:white"
        ohos:text_size="50"
        ohos:top_margin="10vp"/>
//string的value字段
            text_string_value.setText(rsManager.getElement(ResourceTable.String_message_arrive).getString("20:00"));
            text_string_value2.setText(rsManager.getElement(ResourceTable.String_message_arrive2).getString(6, "7:00"));
            text_string_value3.setText(rsManager.getElement(ResourceTable.String_message_arrive3).getString(10));
            text_string_value4.setText(rsManager.getElement(ResourceTable.String_message_arrive4).getString(1, 2));
            text_string_value5.setText(rsManager.getElement(ResourceTable.String_message_arrive5).getString(5));
            text_string_value6.setText(rsManager.getElement(ResourceTable.String_message_arrive6).getString(3, 4));

            text_string_value_xliff.setText(rsManager.getElement(ResourceTable.String_message_arrive_xliff).getString("000"));
{
"string": [
{
"name": "message_arrive",
"value": [
"1We will arrive at ",
{
"id": "time",
"value": "%s",
"example": "5:00 am"
}
]
},
{
"name": "message_arrive2",
"value": [
"2.1We will arrive at ",
{
"id": "time",
"value": "%s",
"example": "5:00 am"
},
"2.2We will arrive at ",
{
"id": "time",
"value": "%s",
"example": "5:00 am"
}
]
},
{
"name": "message_arrive3",
"value": [
{
"id": "time",
"value": "3We will arrive at %s",
"example": "5:00 am"
}
]
},
{
"name": "message_arrive4",
"value": [
"4.1We will arrive at %s",
{
"id": "time",
"value": "4.2We will arrive at %s",
"example": "5:00 am"
}
]
},
{
"name": "message_arrive5",
"value": [
"5We will arrive at %s"
]
},
{
"name": "message_arrive6",
"value": [
"6.1We will arrive at %s",
"6.2We will arrive at %s"
]
},
{
"name": "message_arrive_xliff",
"value": "We will arrive at %s "
}
]
}
config.json应用配置文件
配置文件的元素(官方文档):https://developer.harmonyos.com/cn/docs/documentation/doc-guides/basic-config-file-elements-0000000000034463
DS的config.json就相当于AS的AndroidManifest.xml

主要的分为三个部分:app、deviceConfig、module
①app表示应用的全局配置信息
②deviceConfig包含在具体设备上的应用配置信息
③module表示HAP包的配置信息(可以理解为当前模块的配置信息)
“app”、“deviceConfig”
“module”

值得一提的是
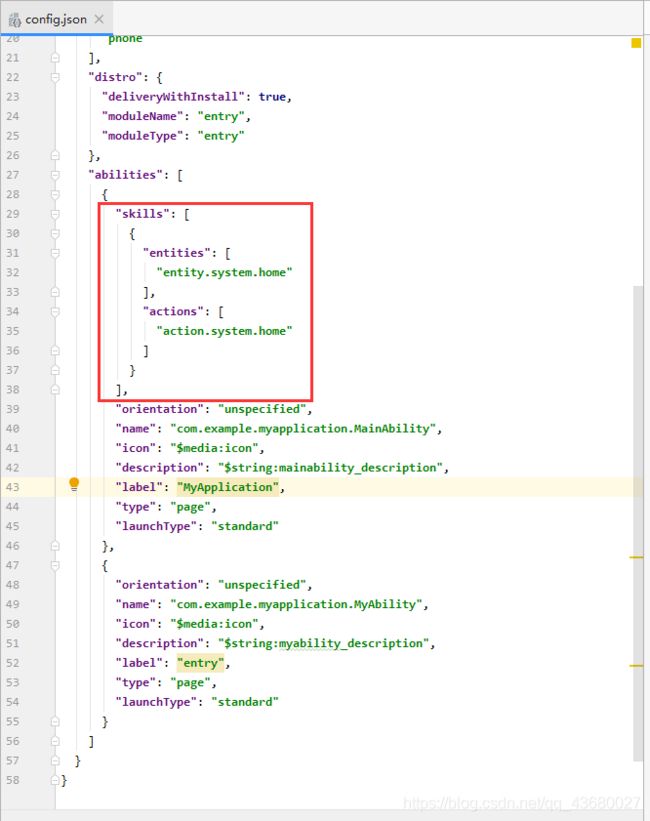
在abilities对象的内部结构中,如果在该Ability的“skills”属性中,“actions”的取值包含 “action.system.home”,“entities”取值中包含“entity.system.home”,则该Ability的icon、label将同时作为应用的icon、label。如果存在多个符合条件的Ability,则取位置靠前的Ability的icon、label作为应用的icon、label。
也就是说,如果你要设置该 Ability 为启动 Ability,将 config.json 中该 Ability 配置放在"abilities"标签中第一个,或者在该Ability的“skills”属性中,“actions”的取值包含 “action.system.home”,“entities”取值中包含“entity.system.home”。
配置系统的权限
在config.json中的"module"下的"reqPermissions"可以配置系统的权限。
权限开发指导官方文档:https://developer.harmonyos.com/cn/docs/documentation/doc-guides/security-permissions-guidelines-0000000000029886
应用权限列表官方文档:https://developer.harmonyos.com/cn/docs/documentation/doc-guides/security-permissions-available-0000001051089272
在安卓中,权限申请过程是:先清单文件静态声明,然后根据是否需要版本适配,在代码中动态申请权限(在Android 6.0之前,只要指明了权限,系统一般都会自动授权,也有需要询问用户是否授权,但是在Android 6.0以及后对于危险权限必须用户同意后才能进行)。
鸿蒙权限申请步骤:
1、静态声明
在config.json文件"module"中的"reqPermissions"静态声明
"reqPermissions": [
      {

        "name": "ohos.permission.CAMERA",
        "reason": "$string:permreason_camera",
        "usedScene": {

          "ability": [
            "com.example.myapplication.MainAbility",
            "com.example.myapplication.MyAbility"
          ],
          "when": "always"
        }
      },{

        ...
      }
    ]
如果需要声明多个权限就用逗号隔开
①name:必须,填写需要声明的权限的名字(可在官方文档中查找)。
②reason:可选,当申请的权限为user_grant权限时此字段必填。描述申请权限的原因。
③usedScene:可选,当申请的权限为user_grant权限时此字段必填。描述权限使用的场景和时机。ability:可以使用的ability的名称,when:使用时间(inuse(使用时)、always(始终))。
2、代码动态申请权限
public class PermreasonAbility extends Ability {


    //这个常量表示相机权限
    private static final String PERMISSION_CAMERA = "ohos.permission.CAMERA";
    //这个常量用来返回的时候找到是申请了哪个权限,用来寻址的
    private static final int MY_PERMISSIONS_REQUEST_CAMERA = 1001;
    //这个常量是设置ToastDialog的持续时间
    private static final int TOAST_DIALOG_DURATION_TIME = 8000;

    //Log
    private static final HiLogLabel LABEL = new HiLogLabel(HiLog.LOG_APP, 0x00201, "resultValue");

    // 当系统首次创建Page实例时,触发该回调
    // 对于一个Page实例,该回调在其生命周期过程中仅触发一次
    @Override
    public void onStart(Intent intent) {

        super.onStart(intent);
        //设置默认展示的AbilitySlice
        super.setMainRoute(PermreasonAbilitySlice.class.getName());
    }

    @Override
    protected void onActive() {

        super.onActive();
        //使用ohos.app.Context.verifySelfPermission接口查询应用是否已被授予该权限
        if (verifySelfPermission(PERMISSION_CAMERA) != IBundleManager.PERMISSION_GRANTED) {

            //如果应用权限未被授予
            //就使用canRequestPermission向系统权限管理模块查询某权限是否不再弹框授权了
            //也就是查询是否可以申请弹窗授权(动态申请)
            if (canRequestPermission(PERMISSION_CAMERA)) {

                //如果可以动态申请(首次申请或者用户未选择禁止且不再提示)
                HiLog.info(LABEL, "授权弹窗");
                //使用requestPermissionFromUser向系统权限管理模块申请权限(动态申请权限)
                //(接口可支持一次申请多个。若下一步操作涉及到多个敏感权限,可以这么用,其他情况建议不要这么用。
                //因为弹框还是按权限组一个个去弹框,耗时比较长。用到哪个权限就去申请哪个)
                requestPermissionsFromUser(new String[]{
     PERMISSION_CAMERA}, MY_PERMISSIONS_REQUEST_CAMERA);
            } else {

                //如果不可动态申请,说明已被用户或系统永久禁止授权,可以结束权限申请流程
                //显示应用权限需要权限的理由,提示用户进入设置授权
                HiLog.info(LABEL, "相机权限已被拒绝,请前往设置授予相机权限");
                new ToastDialog(this).setText("相机权限已被拒绝,请前往设置授予相机权限").setDuration(TOAST_DIALOG_DURATION_TIME).show();
            }
        } else {

            //如果权限已被授予,可以结束权限申请流程。
            HiLog.info(LABEL, "相机权限已被授予");
            new ToastDialog(this).setText("相机权限已被授予").setDuration(TOAST_DIALOG_DURATION_TIME).show();
        }
    }

    //通过重写ohos.aafwk.ability.Ability的回调函数onRequestPermissionsFromUserResult接收授予结果
    /**
     * 调用requestPermissionsFromUser后的应答接口
     *
     * @param requestCode  requestPermission中传入的requestCode
     * @param permissions  申请的权限名
     * @param grantResults 申请权限的结果
     */
    @Override
    public void onRequestPermissionsFromUserResult(int requestCode, String[] permissions, int[] grantResults) {

        switch (requestCode) {

            // 匹配requestPermissions的requestCode
            case MY_PERMISSIONS_REQUEST_CAMERA: {

                if (grantResults.length > 0
                        && grantResults[0] == IBundleManager.PERMISSION_GRANTED) {

                    // 权限被授予
                    // 注意:因时间差导致接口权限检查时有无权限,所以对那些因无权限而抛异常的接口进行异常捕获处理
                    HiLog.info(LABEL, "已授予相机权限");
                } else {

                    // 权限被拒绝
                    HiLog.info(LABEL, "相机权限申请被拒绝");
                }
                return;
            }
        }
    }

    //当Page失去焦点时,系统将调用此回调
    @Override
    protected void onInactive() {

        super.onInactive();
    }
}

值得一提的是,敏感权限的申请需要按照动态申请流程向用户申请授权,非敏感权限不涉及用户的敏感数据或危险操作,仅需在config.json中声明,应用安装后即被授权,受限开放的权限通常是不允许三方应用申请的。
限定词目录
限定词目录可以由一个或多个表征应用场景或设备特征的限定词组合而成(有语言、国家或地区、屏幕密度等维度)。限定词目录需要开发者自行创建,但需要遵循限定词目录的命名要求以及与限定词目录与设备状态的匹配规则。
官方文档:https://developer.harmonyos.com/cn/docs/documentation/doc-guides/basic-resource-file-categories-0000001052066099(进入后搜索限定词目录)
限定词目录的命名
移动国家码_移动网络码-语言_文字_国家或地区-横竖屏-设备类型-深色模式-屏幕密度
开发者可以根据应用的使用场景和设备特征,选择其中的一类或几类限定词组成目录名称。需要注意的是,语言、文字、国家或地区之间采用下划线连接,移动国家码和移动网络码之间也采用下划线连接,除此之外的其他限定词之间均采用中划线连接。eg:zh_CN-phone-ldpi(设备使用的语言类型为中文,用户所在的国家或地区为中国,设备的类型是手机,设备的屏幕密度是大规模的屏幕密度)。限定词取值要求参照官方文档
限定词目录与设备状态的匹配规则
在为设备匹配对应的资源文件时,限定词目录匹配的优先级从高到低依次为:移动国家码和移动网络码 > 区域(语言_文字_国家或地区)> 横竖屏 > 设备类型 > 颜色模式 > 屏幕密度。
如果限定词目录中包含移动国家码和移动网络码、语言、文字、横竖屏、设备类型、颜色模式限定词,则对应限定词的取值必须与当前的设备状态完全一致,该目录才能够参与设备的资源匹配。
日志工具
日志工具的使用
HarmonyOS提供了HiLog日志系统
在输出日志前,需要先调用HiLog的辅助类HiLogLabel定义日志标签。
使用HiLogLabel(int type, int domain, String tag)定义日志标签,其中包括了日志类型、业务领域和TAG。
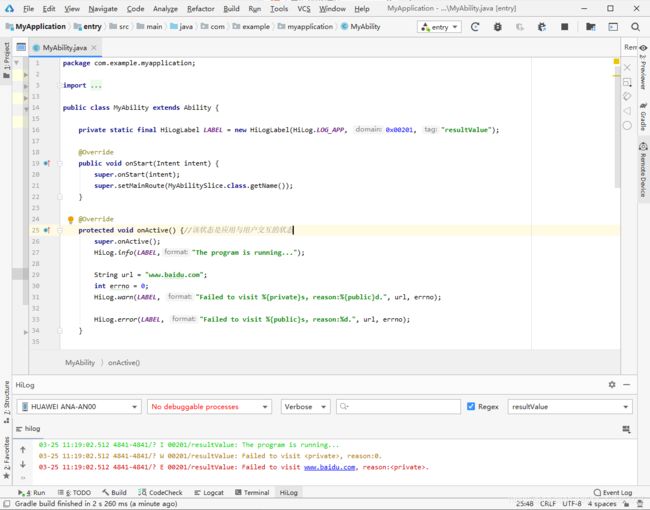
private static final HiLogLabel LABEL = new HiLogLabel(HiLog.LOG_APP, 0x00201, "resultValue");
参数type:用于指定输出日志的类型。HiLog中当前只提供了一种日志类型,即应用日志类型LOG_APP。
参数domain:用于指定输出日志所对应的业务领域,取值范围为0x0~0xFFFFF,开发者可以根据需要进行自定义。一般情况下,我们建议把这 5 个 16 进制数分成两组,前面三个数表示应用中的模块编号,后面两个表示模块中的类的编号。
参数tag:用于指定日志标识,可以为任意字符串,建议标识调用所在的类或者业务行为。
开发者可以根据自定义参数domain和tag来进行日志的筛选和查找。
HiLog中定义了五种日志级别,并提供了对应的方法用于输出不同级别的日志
①DEBUG:调试信息。默认不输出,输出前需要在设备的“开发人员选项”中打开“USB调试”开关。
②INFO:INFO级别日志表示普通的信息。
③WARN:WARN级别日志表示存在警告。
④ERROR:ERROR级别日志表示存在错误。
⑤FATAL:FATAL级别日志表示出现致命错误、不可恢复错误。
例如输出一条INFO级别的信息:
HiLog.info(HiLogLabel label, String format, Object... args)
示例代码:
HiLog.info(LABEL,"The program is running...");

String url = "www.baidu.com";
int errno = 0;
HiLog.warn(LABEL, "Failed to visit %{private}s, reason:%{public}d.", url, errno);

HiLog.error(LABEL, "Failed to visit %{public}s, reason:%d.", url, errno);
参数label:定义好的HiLogLabel标签。
参数format:格式字符串,用于日志的格式化输出。格式字符串中可以设置多个参数,例如格式字符串为“Failed to visit %s”,“%s”为参数类型为string的变参标识,具体取值在args中定义。每个参数需添加隐私标识,分为{public}或{private},默认为{private}。{public}表示日志打印结果可见;{private}表示日志打印结果不可见,输出结果为。
参数args:可以为0个或多个参数,是格式字符串中参数类型对应的参数列表。参数的数量、类型必须与格式字符串中的标识一一对应。
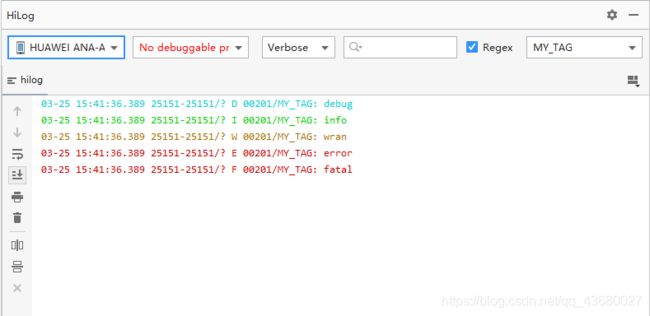
开发者可以在HiLog窗口查看日志信息。可通过设置设备、进程、日志级别和搜索关键词来筛选日志信息。搜索功能支持使用正则表达式,可通过搜索自定义的业务领域值和TAG来筛选日志信息。


日志工具类
在实际开发中,可以写一个工具类来对日志做一个适当封装,方便调用、打印日志和调试程序。
日志封装类
package com.example.myapplication;

import ohos.hiviewdfx.HiLog;
import ohos.hiviewdfx.HiLogLabel;

/**
 * 日志打印
 *
 * @author 舒小羽
 * @date 2021/3/20 0025
 */
public class HiLogUtils {


    //日志标识
    public static final String TAG = "MY_TAG";
    //定义日志标签(日志类型、业务领域和TAG)
    private static final HiLogLabel LABEL = new HiLogLabel(ohos.hiviewdfx.HiLog.LOG_APP, 0x00201, TAG);
    //是否打印日志
    public static boolean flag = true;

    //通过flag来控制是否打开日志
    public static void setPrint(boolean isPrint) {

        flag = isPrint;
    }

    //打印DEBUG类型日志。LABEL为日志标签,msg为日志内容
    public static void d(String msg) {

        if (flag) {

            HiLog.debug(LABEL, msg);
        }
    }

    //打印INFO类型日志。LABEL为日志标签,msg为日志内容
    public static void i(String msg) {

        if (flag) {

            HiLog.info(LABEL, msg);
        }
    }

    //打印WARN类型日志。LABEL为日志标签,msg为日志内容
    public static void w(String msg) {

        if (flag) {

            HiLog.warn(LABEL, msg);
        }
    }

    //打印ERROR类型日志。LABEL为日志标签,msg为日志内容
    public static void e(String msg) {

        if (flag) {

            HiLog.error(LABEL, msg);
        }
    }

    //打印FATAL类型日志。LABEL为日志标签,msg为日志内容
    public static void f(String msg) {

        if (flag) {

            HiLog.fatal(LABEL, msg);
        }
    }
}
实际调用
public class MyAbilitySlice extends AbilitySlice {

    @Override
    public void onStart(Intent intent) {

        super.onStart(intent);
        super.setUIContent(ResourceTable.Layout_ability_my);

        HiLogUtils.d("debug");
        HiLogUtils.i("info");
        HiLogUtils.w("wran");
        HiLogUtils.e("error");
        HiLogUtils.f("fatal");
    }
}
调试
这里介绍的是使用模拟器进行调试。
官方文档:https://developer.harmonyos.com/cn/docs/documentation/doc-guides/ide_debug_emulator-0000001115721921
第一步:调试前的检查
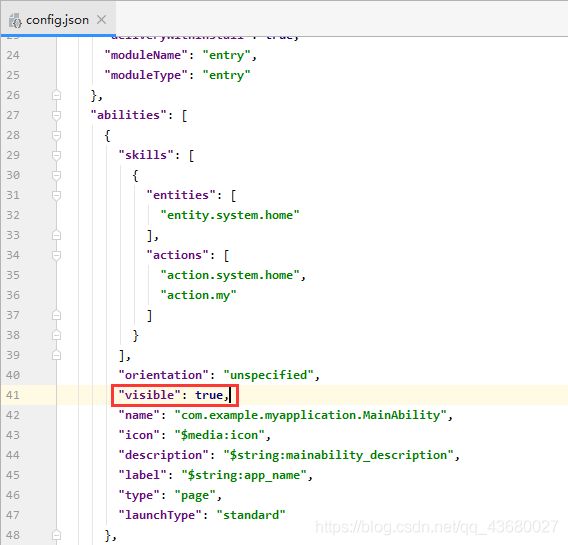
在启动Feature模块的调试前,请检查Feature模块下的config.json文件的abilities数组是否存在“visible”属性,如果不存在,请手动添加,并将该属性取值为true,否则Feature模块的调试无法进入断点。Entry模块的调试不需要做该检查(下图只是示例“visible”属性的位置)。
然后就是需要启动模拟器!!
第二步:设置断点(如果需要设置断点调试的话)
选定要设置断点的有效代码行,在行号(比如:28行、29行)的区域后,单击鼠标左键设置断点(如图示的红点)。

设置断点后,调试能够在正确的断点处中断,并高亮显示该行。
第三步:点击Debug
在工具栏点击Debug

然后在弹窗中,选择设备,点击OK

现在就可以进行调试了呀~
(如果Debug报错,请参考本人的鸿蒙Debug报错:Could not connect to remote process. Aborting debug session.文章)
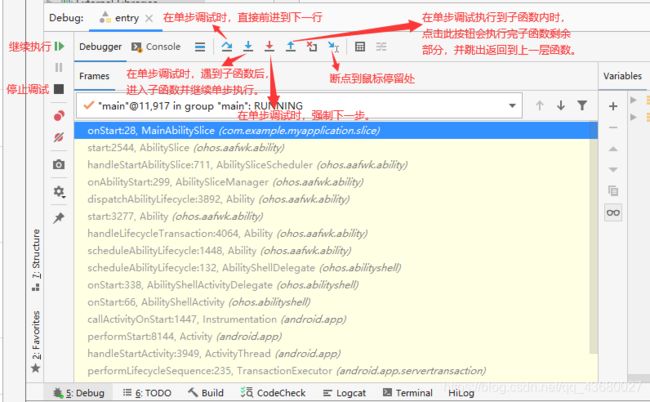
下面是一些调试的按钮说明
在Ability和AbilitySlice中都是可以使用HiLog与调试的
如果需要本文配套代码的可以去本人的上传的资源中下载哦!


