我们都知道AFNetworking是一个非常好用且常见的网络库,那么AFNetworking的开发者是如何做到的呢?AFNetworking中有哪些巧妙设计是我们还不知道,以后开发中可以借鉴的呢?
这篇文章将不定期更新AFNetworking中那些巧妙的设计,如果你觉得有哪些设计是我没收录的,也可留言以告诉我。
一.利用runtime黑魔法
-
1.方法交换(swizzle)
目的:
这里方法替换的目的主要是想在调用系统的NSURLSessionTask 的resume方法时,能够发送AFNSURLSessionTaskDidResumeNotification通知,以达到监测系统方法调用的目的。
实现:
_AFURLSessionTaskSwizzling类在+load方法中将_AFURLSessionTaskSwizzling 中的af_resume方法与NSURLSessionTask的resume方法交换。
@interface _AFURLSessionTaskSwizzling : NSObject

@end

@implementation _AFURLSessionTaskSwizzling
+ (void)load {
    if (NSClassFromString(@"NSURLSessionTask")) {
        NSURLSessionConfiguration *configuration = [NSURLSessionConfiguration ephemeralSessionConfiguration];
        NSURLSession *session = [NSURLSession sessionWithConfiguration:configuration];
#pragma GCC diagnostic push
#pragma GCC diagnostic ignored "-Wnonnull"
        //通过[session dataTaskWithURL:nil]得到一个NSURLSessionDataTask实例
        NSURLSessionDataTask *localDataTask = [session dataTaskWithURL:nil];
#pragma clang diagnostic pop
        IMP originalAFResumeIMP = method_getImplementation(class_getInstanceMethod([self class], @selector(af_resume)));
        //通过NSURLSessionDataTask实例的class获得当前的类
        Class currentClass = [localDataTask class];

        //while循环确保每个类的resume都会被替换。
        while (class_getInstanceMethod(currentClass, @selector(resume))) {
            Class superClass = [currentClass superclass];
            IMP classResumeIMP = method_getImplementation(class_getInstanceMethod(currentClass, @selector(resume)));
            IMP superclassResumeIMP = method_getImplementation(class_getInstanceMethod(superClass, @selector(resume)));
            if (classResumeIMP != superclassResumeIMP &&
                originalAFResumeIMP != classResumeIMP) {
                [self swizzleResumeAndSuspendMethodForClass:currentClass];
            }
            currentClass = [currentClass superclass];
        }

        [localDataTask cancel];
        [session finishTasksAndInvalidate];
    }
}

- (void)af_resume {
    NSAssert([self respondsToSelector:@selector(state)], @"Does not respond to state");
    NSURLSessionTaskState state = [self state];
    [self af_resume];

    if (state != NSURLSessionTaskStateRunning) {
        [[NSNotificationCenter defaultCenter] postNotificationName:AFNSURLSessionTaskDidResumeNotification object:self];
    }
}
疑问
通常我们需要实现这种操作的方式是实现一个子类,然后使用的时候使用子类。但是AFNetworking并不想改变我们使用NSURLSessionTask的方式,所以采用了这种巧妙的方式。
到这里大部分人可能会有以下三个疑问,理解了这几个疑问也就理解了为什么说这里设计很巧妙。
a .为什么要在+load中实现交换?
因为load方法的实现肯定是在方法调用之前,在这里实现交换可以确保调用在交换之后发生。
load方法里实现还有一个好处,那就这个方法由系统自动调用,不用去在乎调用时机和由谁发起调用。_AFURLSessionTaskSwizzling是一个内嵌类,也就是说这个类只在.m中定义和实现不需要暴露给用户,这个类的唯一作用就是替换方法,也不需要被实例化或者被别的实例引用。-
b.af_resume的实现里又调用了[self af_resume],不会造成死循环吗?
解释这个问题很简单,因为知道方法交换的原理就不难理解了。
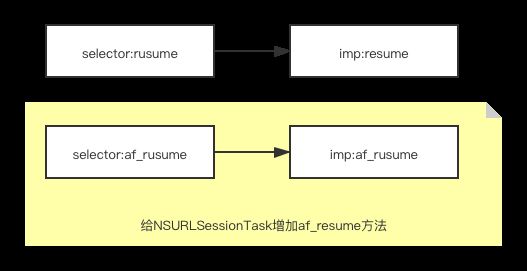
替换之前:
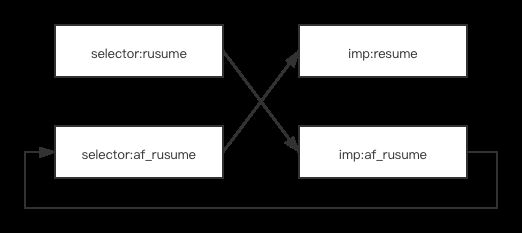
替换之后:
可以看到
1 . 给resume发送消息的时候,实际是调用af_resume的实现。
2 .在af_resume中给af_resume 发送消息,实际是调用resume的实现。
- c.为什么想替换NSURLSessionTask的resume方法没有直接使用NSURLSessionTask类,而是通过遍历localDataTask的父类逐级替换?
这个疑问其实在代码注释中已经给出了解释:
/**
         iOS 7 and iOS 8 differ in NSURLSessionTask implementation, which makes the next bit of code a bit tricky.
         Many Unit Tests have been built to validate as much of this behavior has possible.
         Here is what we know:
            - NSURLSessionTasks are implemented with class clusters, meaning the class you request from the API isn't actually the type of class you will get back.
            - Simply referencing `[NSURLSessionTask class]` will not work. You need to ask an `NSURLSession` to actually create an object, and grab the class from there.
            - On iOS 7, `localDataTask` is a `__NSCFLocalDataTask`, which inherits from `__NSCFLocalSessionTask`, which inherits from `__NSCFURLSessionTask`.
            - On iOS 8, `localDataTask` is a `__NSCFLocalDataTask`, which inherits from `__NSCFLocalSessionTask`, which inherits from `NSURLSessionTask`.
            - On iOS 7, `__NSCFLocalSessionTask` and `__NSCFURLSessionTask` are the only two classes that have their own implementations of `resume` and `suspend`, and `__NSCFLocalSessionTask` DOES NOT CALL SUPER. This means both classes need to be swizzled.
            - On iOS 8, `NSURLSessionTask` is the only class that implements `resume` and `suspend`. This means this is the only class that needs to be swizzled.
            - Because `NSURLSessionTask` is not involved in the class hierarchy for every version of iOS, its easier to add the swizzled methods to a dummy class and manage them there.

         Some Assumptions:
            - No implementations of `resume` or `suspend` call super. If this were to change in a future version of iOS, we'd need to handle it.
            - No background task classes override `resume` or `suspend`

         The current solution:
            1) Grab an instance of `__NSCFLocalDataTask` by asking an instance of `NSURLSession` for a data task.
            2) Grab a pointer to the original implementation of `af_resume`
            3) Check to see if the current class has an implementation of resume. If so, continue to step 4.
            4) Grab the super class of the current class.
            5) Grab a pointer for the current class to the current implementation of `resume`.
            6) Grab a pointer for the super class to the current implementation of `resume`.
            7) If the current class implementation of `resume` is not equal to the super class implementation of `resume` AND the current implementation of `resume` is not equal to the original implementation of `af_resume`, THEN swizzle the methods
            8) Set the current class to the super class, and repeat steps 3-8
         */
大意是:
1. 在OC的实现中,NSURLSessionTask的类并不是NSURLSessionTask而是依靠类族.
也就是[NSURLSessionTask class]返回的结果并不是我们想要的结果,__NSCFURLSessionTask才是实际的类。
2. iOS8中的resmue是唯一的实现,而iOS7中__NSCFLocalSessionTask并没有调用super的resume,__NSCFURLSessionTask和__NSCFLocalSessionTask都实现了resume,所以需要循环调用superclass把两个实现都替换掉。
所以开发者采用了这种方式确保所有版本的所有resume方法都会被替换掉。
关于method swizzle,AFNetworking的作者Mattt大神在这篇文章中已经讲的很清楚了:
https://nshipster.com/method-swizzling/
-
2.关联变量
目的
在UIImageView的分类中的类方法中,给UIImageView的类添加关联变量。
实现
@implementation UIImageView (AFNetworking)
+ (AFImageDownloader *)sharedImageDownloader {
    return objc_getAssociatedObject([UIImageView class], @selector(sharedImageDownloader)) ?: [AFImageDownloader defaultInstance];
}
+ (void)setSharedImageDownloader:(AFImageDownloader *)imageDownloader {
    objc_setAssociatedObject([UIImageView class], @selector(sharedImageDownloader), imageDownloader, OBJC_ASSOCIATION_RETAIN_NONATOMIC);
}
疑问
同样的理解了一下几个疑问的原因,也就知道了设计的巧妙之处。
- a .为什么要用分类和关联变量?
不用改变UIImageView的类,也不用继承。 - b .为什么要在UIImageView类中添加关联变量?
因为这个imageDownloader是属于所有UIImageView的,并不属于某一个UIImageView的实例。也就是说所有UIImageView的实例都是使用这个imageDownloader去请求图片。所以把imageDownloader与UIImageView的类关联是合理的。 - c .这么做的好处?
调用imageDownloader有类似单例的便捷:
- (void)testResponseIsNilWhenLoadedFromCache {
    AFImageDownloader *downloader = [UIImageView sharedImageDownloader];
...
}
其实这里设计的巧妙之处不仅是这些,关联变量的key使用@selector(sharedImageDownloader)也是一个很巧妙的应用,因为这样就不需要单独去声明一个key,而且利用了属性本身的名称,即简单又明了。
关于关联变量的使用,Mattt大神有一篇文章专门讲到了:
https://nshipster.com/associated-objects/
感兴趣的可以去看看。
二.充分利用GCD
我们都知道AFNetworking中使用GCD和NSOpreationQueue来管理多线程的。这么做的原因一是GCD性能强大,内核直接调度线程。二是GCD和NSOpreationQueue使用起来及其简单,编程人员不用直接调度管理线程却可以实现多线程编程。
-
1.图片缓存AFAutoPurgingImageCache的实现
AFAutoPurgingImageCache,是一个可以自动清理的缓存工具。允许我们设置一个最大内存容量和一个刻度容量(刻度容量就是在缓存达到最大容量的时候,触发自动清理内存,清理后剩下的容量小于等于刻度容量)。而且这个工具是支持多线程的。
AFAutoPurgingImageCache看似强大,以为实现起来会很复杂。但是看了源码的代码量时还是被震惊了,内部实现非常简单明了,代码量也很小。建议大家结合源码一起看,因为这里这个类的只用了不到200行代码就实现了!看起来并不会困难。(真正的大神并不是写的代码复杂的让人看不懂,反而是写完之后让人一眼就能看能懂。)
@interface AFAutoPurgingImageCache ()
@property (nonatomic, strong) NSMutableDictionary  *cachedImages;
@property (nonatomic, assign) UInt64 currentMemoryUsage;
@property (nonatomic, strong) dispatch_queue_t synchronizationQueue;
@end
AFAutoPurgingImageCache 有一个叫做synchronizationQueue的私有属性。不用被它的名字欺骗,它并不是一个同步队列,其实它是一个并发队列:
self.synchronizationQueue = dispatch_queue_create([queueName cStringUsingEncoding:NSASCIIStringEncoding], DISPATCH_QUEUE_CONCURRENT);
作者巧妙的利用了GCD的barrier(内存栅栏)来实现读写的同步化。
简单的说内存栅栏的作用就是可以把一个异步队列分隔开,保证在栅栏前的所有追加操作完成之后再执行barrier追加的操作,这个操作执行完成以后,在barrier之后追加的操作继续异步执行。
关于内存栅栏的详细描述我这里就不展开了。
- (void)addImage:(UIImage *)image withIdentifier:(NSString *)identifier {
    //增加一个图片缓存
    dispatch_barrier_async(self.synchronizationQueue, ^{
        AFCachedImage *cacheImage = [[AFCachedImage alloc] initWithImage:image identifier:identifier];

        AFCachedImage *previousCachedImage = self.cachedImages[identifier];
        if (previousCachedImage != nil) {
            self.currentMemoryUsage -= previousCachedImage.totalBytes;
        }

        self.cachedImages[identifier] = cacheImage;
        self.currentMemoryUsage += cacheImage.totalBytes;
    });
    //每次增加的时候检查是否超出了最大容量,如果超出就移除直到内存小于刻度内存容量
    dispatch_barrier_async(self.synchronizationQueue, ^{
        if (self.currentMemoryUsage > self.memoryCapacity) {
            UInt64 bytesToPurge = self.currentMemoryUsage - self.preferredMemoryUsageAfterPurge;
            NSMutableArray  *sortedImages = [NSMutableArray arrayWithArray:self.cachedImages.allValues];
            NSSortDescriptor *sortDescriptor = [[NSSortDescriptor alloc] initWithKey:@"lastAccessDate"
                                                                           ascending:YES];
            [sortedImages sortUsingDescriptors:@[sortDescriptor]];

            UInt64 bytesPurged = 0;

            for (AFCachedImage *cachedImage in sortedImages) {
                [self.cachedImages removeObjectForKey:cachedImage.identifier];
                bytesPurged += cachedImage.totalBytes;
                if (bytesPurged >= bytesToPurge) {
                    break;
                }
            }
            self.currentMemoryUsage -= bytesPurged;
        }
    });
}
- (BOOL)removeImageWithIdentifier:(NSString *)identifier {
    __block BOOL removed = NO;
    dispatch_barrier_sync(self.synchronizationQueue, ^{
        AFCachedImage *cachedImage = self.cachedImages[identifier];
        if (cachedImage != nil) {
            [self.cachedImages removeObjectForKey:identifier];
            self.currentMemoryUsage -= cachedImage.totalBytes;
            removed = YES;
        }
    });
    return removed;
}
作者在增加或减少缓存的时候都使用了dispatch_barrier_(a)sync方法追加操作,确保增加或减少缓存的操作是同步的,并且这个操作是在之前所有异步操作完成之后再执行的。这么做就可以放心的异步读取了:
- (nullable UIImage *)imageWithIdentifier:(NSString *)identifier {
    __block UIImage *image = nil;
    dispatch_sync(self.synchronizationQueue, ^{
        AFCachedImage *cachedImage = self.cachedImages[identifier];
        image = [cachedImage accessImage];
    });
    return image;
}
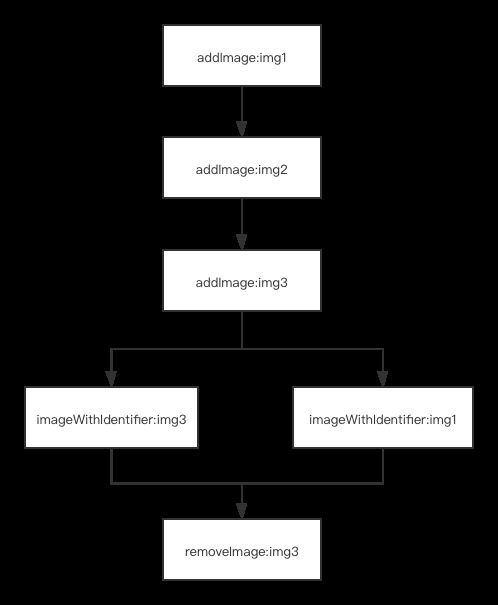
下图大概表示了增加缓存,读取缓存然后删除缓存的一个过程:
使用内存栅栏不仅提高了读写效率,还有个好处是由于增加和减少缓存是同步实现的,所以不需要对缓存的字典用锁,因为内存栅栏本来就是一种同步机制


