Android ViewPager2+Fragment+TabLayout的简单使用
【1】ViewPager的简单使用
来看个ViewPager的简单使用的例子(使用Androidx包下的ViewPager,不是ViewPager2)
看看主界面中的布局:
<androidx.constraintlayout.widget.ConstraintLayout xmlns:android="http://schemas.android.com/apk/res/android"
    xmlns:app="http://schemas.android.com/apk/res-auto"
    xmlns:tools="http://schemas.android.com/tools"
    android:layout_width="match_parent"
    android:layout_height="match_parent"
    tools:context=".MainActivity">


    <androidx.viewpager.widget.ViewPager
        android:id="@+id/vp"
        android:layout_width="match_parent"
        android:layout_height="400dp"
        android:layout_margin="10dp"
        app:layout_constraintBottom_toBottomOf="parent"
        app:layout_constraintEnd_toEndOf="parent"
        app:layout_constraintStart_toStartOf="parent"
        app:layout_constraintTop_toTopOf="parent"
        app:layout_constraintVertical_bias="0.498" />


androidx.constraintlayout.widget.ConstraintLayout>
再来上3个xml,用作填充ViewPager:
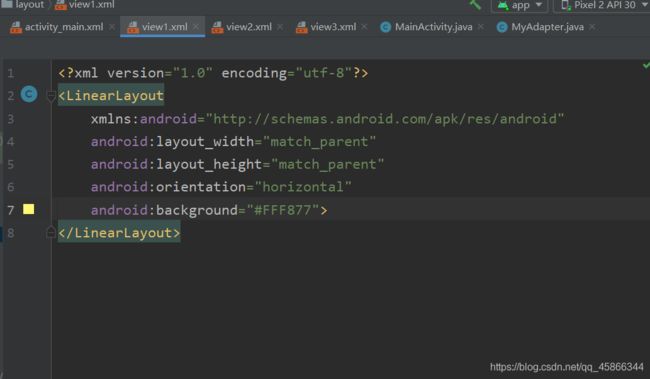
<LinearLayout
    xmlns:android="http://schemas.android.com/apk/res/android"
    android:layout_width="match_parent"
    android:layout_height="match_parent"
    android:orientation="horizontal"
    android:background="#FFF877">
LinearLayout>
来看看适配器:
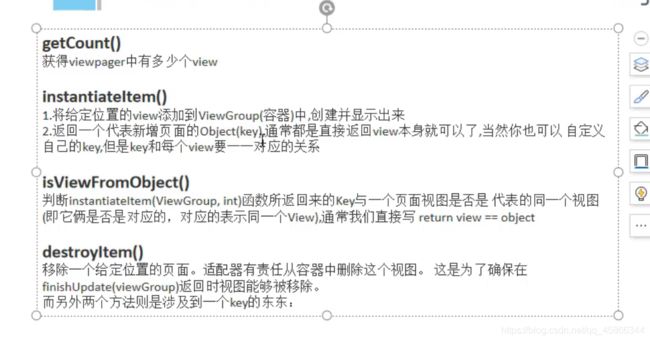
public class MyAdapter extends PagerAdapter {

    private List<View> views;

    public MyAdapter(List<View> views) {

        this.views = views;
    }

    @Override
    public int getCount() {

        return views.size();
    }

    @Override
    public boolean isViewFromObject(@NonNull View view, @NonNull Object object) {

        return view == object;
    }

    @NonNull
    @Override
    public Object instantiateItem(@NonNull ViewGroup container, int position) {

        container.addView(views.get(position),0);
        return views.get(position);
    }

    @Override
    public void destroyItem(@NonNull ViewGroup container, int position, @NonNull Object object) {

        container.removeView(views.get(position));
    }
}
重写了里面的四个方法,这几个是必须的,要不然会报错
来看看主方法中:
public class MainActivity extends AppCompatActivity {

    private List<View> views = new ArrayList<>();
    @Override
    protected void onCreate(Bundle savedInstanceState) {

        super.onCreate(savedInstanceState);
        setContentView(R.layout.activity_main);
        ViewPager viewPager = findViewById(R.id.vp);
        LayoutInflater lf = getLayoutInflater().from(this);
        View view1 = lf.inflate(R.layout.view1,null);
        View view2 = lf.inflate(R.layout.view2,null);
        View view3 = lf.inflate(R.layout.view3,null);
        views.add(view1);
        views.add(view2);
        views.add(view3);
        viewPager.setAdapter(new MyAdapter(views));
    }
}
拿到ViewPager对象,然后将xml转换为View,传到适配器中,最后设置viewPager的适配器就行了。
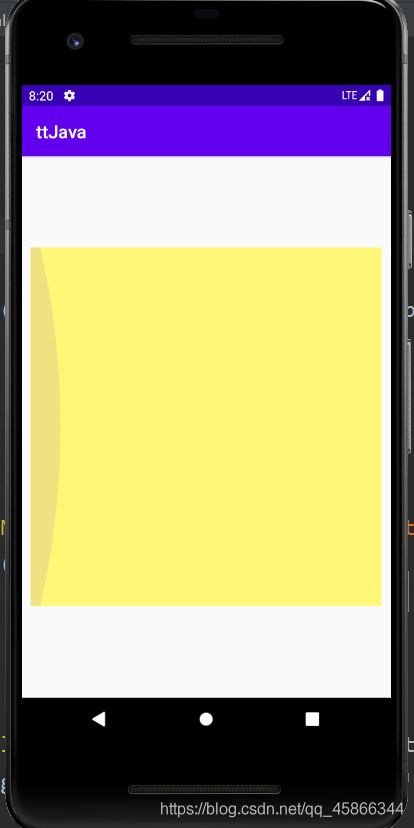
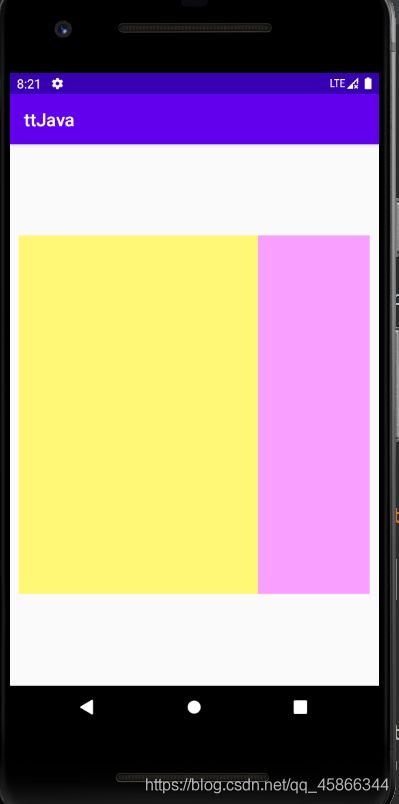
运行效果:

【2】使用ViewPager2+Fragment+tabLayout
- tabLayout 需要用到的工具:
配合 TabLayout使用 所用到的相关辅助类
implementation "com.google.android.material:material:1.1.0" - 下载(导入ViewPager2)
①创建几个Fragment,并配置好xml
我创建了三个,每个xml只有颜色不一样
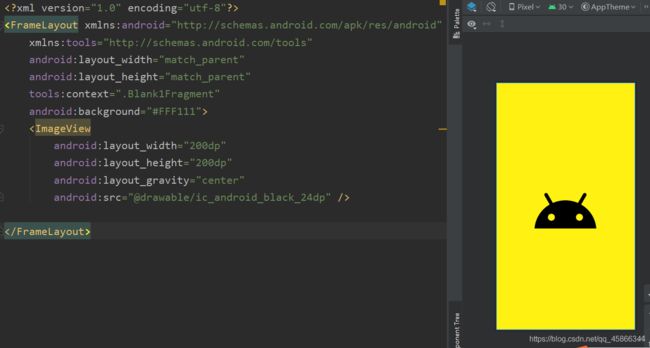
<FrameLayout xmlns:android="http://schemas.android.com/apk/res/android"
    xmlns:tools="http://schemas.android.com/tools"
    android:layout_width="match_parent"
    android:layout_height="match_parent"
    tools:context=".Blank1Fragment"
    android:background="#FFF111">
    <ImageView
        android:layout_width="200dp"
        android:layout_height="200dp"
        android:layout_gravity="center"
        android:src="@drawable/ic_android_black_24dp" />

FrameLayout>
②activity_main.xml中的布局:
<LinearLayout xmlns:android="http://schemas.android.com/apk/res/android"
    xmlns:app="http://schemas.android.com/apk/res-auto"
    xmlns:tools="http://schemas.android.com/tools"
    android:layout_width="match_parent"
    android:layout_height="match_parent"
    tools:context=".MainActivity"
    android:orientation="vertical">

    <com.google.android.material.tabs.TabLayout
        android:id="@+id/tabLayout"
        android:layout_width="match_parent"
        android:layout_height="50dp">

        <com.google.android.material.tabs.TabItem
            android:layout_width="wrap_content"
            android:layout_height="wrap_content"
            android:text="Monday" />

        <com.google.android.material.tabs.TabItem
            android:layout_width="wrap_content"
            android:layout_height="wrap_content"
            android:text="Tuesday" />

        <com.google.android.material.tabs.TabItem
            android:layout_width="wrap_content"
            android:layout_height="wrap_content"
            android:text="Wednesday" />
    com.google.android.material.tabs.TabLayout>

    <androidx.viewpager2.widget.ViewPager2
        android:id="@+id/vp2"
        android:layout_width="match_parent"
        android:layout_height="match_parent"
        android:layout_margin="10dp" />


LinearLayout>
LinearLayout布局,加上TabLayout和ViewPager2,再分别设置一下id
③创建adapter:
public class FragmentAdapter extends FragmentStateAdapter {

    public FragmentAdapter(@NonNull FragmentActivity fragmentActivity) {

        super(fragmentActivity);
    }

    @NonNull
    @Override

    public Fragment createFragment(int position) {

        switch (position) {

            case 0:
                return new Blank1Fragment();
            case 1:
                return new Blank2Fragment();
            default:
                return new Blank3Fragment();
        }
    }

        @Override
        public int getItemCount() {

            return 3;
        }
}
createFragment方法是根据position来创建添加对应的Fragment到ViewPager2中去
getItemCount是获取Fragment的个数
④最后来看看MainActivity中的代码:
public class MainActivity extends AppCompatActivity {


    @Override
    protected void onCreate(Bundle savedInstanceState) {

        super.onCreate(savedInstanceState);
        setContentView(R.layout.activity_main);
        TabLayout tl = findViewById(R.id.tabLayout);
        ViewPager2 viewPager2 = findViewById(R.id.vp2);
        viewPager2.setAdapter(new FragmentAdapter(this));
        TabLayoutMediator tab = new TabLayoutMediator(tl, viewPager2, new TabLayoutMediator.TabConfigurationStrategy() {

            @Override
            public void onConfigureTab(@NonNull TabLayout.Tab tab, int position) {

                switch (position){

                    case 0:
                        tab.setText("Fragment1");
                        break;
                    case 1:
                        tab.setText("Fragment2");
                        break;
                    case 2:
                        tab.setText("Fragment3");
                        break;
                }
            }
        });
        tab.attach();
    }
}
先获取tabLayout和ViewPager,然后设置ViewPager的适配器,最后利用TabLayoutMediator 将tabLayout和ViewPager关联,TabLayoutMediator的前两个参数分别是tabLayout和viewPager,第三个是配置的方式,在这里可以设置标签的内容(甚至可以是图片+文字的格式),最后attach一下,引用以上配置。