WCF面向服务应用程序系列之九:绑定-自定义绑定(CustomBinding)
上一章我们介绍了WCF绑定的基本知识,这一章我们通过一个DEMO来介绍如何创建一个自定义绑定(CustomBinding)的程序。从本章起,我们假定读者对WCF一有定的了解,DEMO创建的过程介绍将省略一些简单的步骤。自定义绑定(CustomBinding)与前面介绍的WCF程序的区别主要在于通过修改配置文件来达到创建自定义绑定(CustomBinding)的目的。
开发环境:Visual Studio 2010 + Net Framework 4.0 。
1、创建一个WCF Service,主要代码如下:
 接口代码
接口代码

       [ServiceContract(Namespace

      =


      "

      http://schemas.xinhaijulan.com/demos/CustomBinding

      "

      )]


      public


      interface

       IHelloWCFService
 {
 [OperationContract]


      string

       HelloWCF(

      string

       inputMsg);
 }
实现类代码
      public


      class

       HelloWCFService:IHelloWCFService
 {


      public


      string

       HelloWCF(

      string

       inputMsg)
 {


      return


      "

      The message returned from server:

      "


      +

       inputMsg;
 }
 }
2、修改App.config文件:
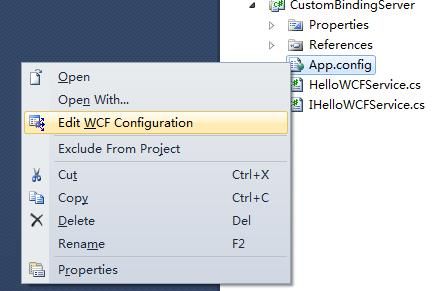
对于WCF Service项目来说我们可以通过配置工具来进行修改App.config。
2.1、右键点击App.config,选中Edit WCF Configuration,如下图:
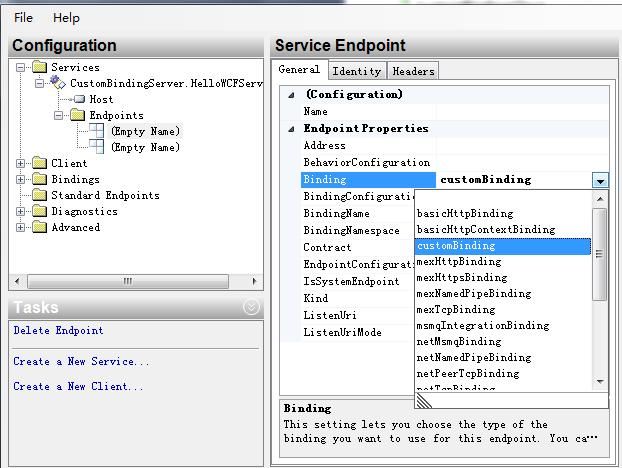
2.2、添加自定义绑定项,如下图:

2.3、修改EndPoint,采用customBinding的方式,修改Binding和BindingConfiguration,如下图:
2.4、关闭配置工具,保存,自定义绑定的配置文件修改完毕。
3、添加客户端项目,并添加对CustomBindingServer的引用,主要代码如下:
客户端代码
      static


      void

       Main(

      string

      [] args)
 {


      using

       (CustomBindingServer.HelloWCFServiceClient client

      =


      new

       CustomBindingServer.HelloWCFServiceClient())
 {
 Console.WriteLine(

      "

      Please input some keys:

      "

      );


      string

       inputMsg

      =

       Console.ReadLine();
 Console.WriteLine(

      "

      The sever will return some message below:

      "

      );
 Console.WriteLine(client.HelloWCF(inputMsg));
 }

 Console.ReadLine();
 }
4、此时我们可以打开客户端的app.config文件,可以看到在此文件中自动生成的配置方式为我们服务端配置的customBinding方式,与服务端是一致的,如下:
客户端生成的配置文件
      <?

      xml version

      =

      "

      1.0

      "

       encoding

      =

      "

      utf-8

      "


      ?>


      <

      configuration

      >


      <

      system.serviceModel

      >


      <

      bindings

      >


      <

      customBinding

      >


      <

      binding name

      =

      "

      CustomBinding_IHelloWCFService

      "

      >


      <

      reliableSession acknowledgementInterval

      =

      "

      00:00:00.2000000

      "

       flowControlEnabled

      =

      "

      true

      "


 inactivityTimeout

      =

      "

      00:10:00

      "

       maxPendingChannels

      =

      "

      4

      "

       maxRetryCount

      =

      "

      8

      "


 maxTransferWindowSize

      =

      "

      8

      "

       ordered

      =

      "

      true

      "

       reliableMessagingVersion

      =

      "

      Default

      "


      />


      <

      binaryMessageEncoding maxReadPoolSize

      =

      "

      64

      "

       maxWritePoolSize

      =

      "

      16

      "


 maxSessionSize

      =

      "

      2048

      "

      >


      <

      readerQuotas maxDepth

      =

      "

      32

      "

       maxStringContentLength

      =

      "

      8192

      "

       maxArrayLength

      =

      "

      16384

      "


 maxBytesPerRead

      =

      "

      4096

      "

       maxNameTableCharCount

      =

      "

      16384

      "


      />


      </

      binaryMessageEncoding

      >


      <

      httpTransport manualAddressing

      =

      "

      false

      "

       maxBufferPoolSize

      =

      "

      524288

      "


 maxReceivedMessageSize

      =

      "

      65536

      "

       allowCookies

      =

      "

      false

      "

       authenticationScheme

      =

      "

      Anonymous

      "


 bypassProxyOnLocal

      =

      "

      false

      "

       decompressionEnabled

      =

      "

      true

      "

       hostNameComparisonMode

      =

      "

      StrongWildcard

      "


 keepAliveEnabled

      =

      "

      true

      "

       maxBufferSize

      =

      "

      65536

      "

       proxyAuthenticationScheme

      =

      "

      Anonymous

      "


 realm

      =

      ""

       transferMode

      =

      "

      Buffered

      "

       unsafeConnectionNtlmAuthentication

      =

      "

      false

      "


 useDefaultWebProxy

      =

      "

      true

      "


      />


      </

      binding

      >


      </

      customBinding

      >


      </

      bindings

      >


      <

      client

      >


      <

      endpoint address

      =

      "

      http://localhost:8732/Design_Time_Addresses/CustomBindingServer/HelloWCFService/

      "


 binding

      =

      "

      customBinding

      "

       bindingConfiguration

      =

      "

      CustomBinding_IHelloWCFService

      "


 contract

      =

      "

      CustomBindingServer.IHelloWCFService

      "

       name

      =

      "

      CustomBinding_IHelloWCFService

      "


      />


      </

      client

      >


      </

      system.serviceModel

      >


      </

      configuration

      >
5、设置客户端为启动项,F5运行,我们将看到此DEMO正常运行,输出如下:
     Please input some keys:
You are a good boy

     !


The sever will

     return

      some message below:
The message returned from server:You are a good boy

     !
至此,自定义绑定(CustomBinding)介绍完毕。
     作者:心海巨澜
出处:http:

     //xinhaijulan.cnblogs.com


     版权归作者和博客园共有,欢迎转载,但未经作者同意必须保留此段声明,且在文章页面明显位置给出原文连接,否则保留追究法律责任的权利。