特别感谢冠军的试炼博主,文章代码全来自于该博主的无私分享
原文链接
https://www.cnblogs.com/skyfsm/p/8051705.html
我做的仅仅是做了一下数据增强,补充匮乏的数据集
数据增强部分可参看我的上一篇博文
详细部分请去原作者文章处。
废话不多说,直接上代码:
训练代码:
# set the matplotlib backend so figures can be saved in the background
import matplotlib
matplotlib.use("Agg")

# import the necessary packages
from keras.preprocessing.image import ImageDataGenerator
from keras.optimizers import Adam
from sklearn.model_selection import train_test_split
from keras.preprocessing.image import img_to_array
from keras.utils import to_categorical
from imutils import paths
import matplotlib.pyplot as plt
import numpy as np
import argparse
import random
import cv2
import os
import sys
sys.path.append('..')
from net.lenet import LeNet


def args_parse():
    # construct the argument parse and parse the arguments
    ap = argparse.ArgumentParser()
    ap.add_argument("-d", "--dataset", required=True,
        help="path to input dataset")
    ap.add_argument("-m", "--model", required=True,
        help="path to output model")
    ap.add_argument("-p", "--plot", type=str, default="plot.png",
        help="path to output accuracy/loss plot")
    args = vars(ap.parse_args())
    return args


args = args_parse()

# initialize the number of epochs to train for, initial learning rate,
# and batch size
EPOCHS = 35
INIT_LR = 1e-3
BS = 32
CLASS_NUM = 4
norm_size = 64
# initialize the data and labels

def load_data2(path):
    print("[INFO] loading images...")
    data = []
    labels = []
    # grab the image paths and randomly shuffle them
    imagePaths = sorted(list(paths.list_images(path)))
    random.seed(42)
    random.shuffle(imagePaths)
    # loop over the input images
    for imagePath in imagePaths:
        # load the image, pre-process it, and store it in the data list
        image = cv2.imread(imagePath)
        image = cv2.resize(image, (norm_size, norm_size))
        image = img_to_array(image)
        data.append(image)

        # extract the class label from the image path and update the
        # labels list
        label = int(imagePath.split(os.path.sep)[-2])
        labels.append(label)

    # scale the raw pixel intensities to the range [0, 1]
    data = np.array(data, dtype="float") / 255.0
    labels = np.array(labels)


    # partition the data into training and testing splits using 75% of
    # the data for training and the remaining 25% for testing
    (trainX, testX, trainY, testY) = train_test_split(data,
            labels, test_size=0.25, random_state=42)

    # convert the labels from integers to vectors
    trainY = to_categorical(trainY, num_classes=CLASS_NUM)
    testY = to_categorical(testY, num_classes=CLASS_NUM)
    return trainX,trainY,testX,testY

def load_data(path):
    print("[INFO] loading images...")
    data = []
    labels = []
    # grab the image paths and randomly shuffle them
    imagePaths = sorted(list(paths.list_images(path)))
    random.seed(42)
    random.shuffle(imagePaths)
    # loop over the input images
    for imagePath in imagePaths:
        # load the image, pre-process it, and store it in the data list
        image = cv2.imread(imagePath)
        image = cv2.resize(image, (norm_size, norm_size))
        image = img_to_array(image)
        data.append(image)

        # extract the class label from the image path and update the
        # labels list
        label = int(imagePath.split(os.path.sep)[-2])
        labels.append(label)

    # scale the raw pixel intensities to the range [0, 1]
    data = np.array(data, dtype="float") / 255.0
    labels = np.array(labels)

    # convert the labels from integers to vectors
    labels = to_categorical(labels, num_classes=CLASS_NUM)
    return data,labels


def train(aug,trainX,trainY,testX,testY,args):
    # initialize the model
    print("[INFO] compiling model...")
    model = LeNet.build(width=norm_size, height=norm_size, depth=3, classes=CLASS_NUM)
    opt = Adam(lr=INIT_LR, decay=INIT_LR / EPOCHS)
    model.compile(loss="categorical_crossentropy", optimizer=opt,
        metrics=["accuracy"])

    # train the network
    print("[INFO] training network...")
    H = model.fit_generator(aug.flow(trainX, trainY, batch_size=BS),
        validation_data=(testX, testY), steps_per_epoch=len(trainX) // BS,
        epochs=EPOCHS, verbose=1)

    # save the model to disk
    print("[INFO] serializing network...")
    model.save(args["model"])

    # plot the training loss and accuracy
    plt.style.use("ggplot")
    plt.figure()
    N = EPOCHS
    plt.plot(np.arange(0, N), H.history["loss"], label="train_loss")
    plt.plot(np.arange(0, N), H.history["val_loss"], label="val_loss")
    plt.plot(np.arange(0, N), H.history["acc"], label="train_acc")
    plt.plot(np.arange(0, N), H.history["val_acc"], label="val_acc")
    plt.title("Training Loss and Accuracy on Invoice classifier")
    plt.xlabel("Epoch #")
    plt.ylabel("Loss/Accuracy")
    plt.legend(loc="lower left")
    plt.savefig(args["plot"])


#python train.py --dataset ../../invoice_all/train  --model invoice.model
if __name__=='__main__':
    args = args_parse()
    file_path = args["dataset"]
    trainX,trainY,testX,testY = load_data2(file_path)
    # construct the image generator for data augmentation
    aug = ImageDataGenerator(rotation_range=30, width_shift_range=0.1,
        height_shift_range=0.1, shear_range=0.2, zoom_range=0.2,
        horizontal_flip=True, fill_mode="nearest")
    train(aug,trainX,trainY,testX,testY,args)
注意修改其中的CLASS_NUM为你的类别数

image.png
我这里仅仅只有四类,所以该值是4
关键代码:lenet.py
# import the necessary packages
from keras.models import Sequential
from keras.layers.convolutional import Conv2D
from keras.layers.convolutional import MaxPooling2D
from keras.layers.core import Activation
from keras.layers.core import Flatten
from keras.layers.core import Dense
from keras import backend as K

class LeNet:
    @staticmethod
    def build(width, height, depth, classes):
        # initialize the model
        model = Sequential()
        inputShape = (height, width, depth)
        # if we are using "channels last", update the input shape
        if K.image_data_format() == "channels_first":   #for tensorflow
            inputShape = (depth, height, width)
        # first set of CONV => RELU => POOL layers
        model.add(Conv2D(20, (5, 5),padding="same",input_shape=inputShape))
        model.add(Activation("relu"))
        model.add(MaxPooling2D(pool_size=(2, 2), strides=(2, 2)))
        #second set of CONV => RELU => POOL layers
        model.add(Conv2D(50, (5, 5), padding="same"))
        model.add(Activation("relu"))
        model.add(MaxPooling2D(pool_size=(2, 2), strides=(2, 2)))
        # first (and only) set of FC => RELU layers
        model.add(Flatten())
        model.add(Dense(500))
        model.add(Activation("relu"))

        # softmax classifier
        model.add(Dense(classes))
        model.add(Activation("softmax"))

        # return the constructed network architecture
        return model
另外训练的时候注意相对路径的问题,我这里刚开始报错就是相对路径写的不对,导致读取出错。
我这里的训练指令如下:
python train.py --dataset ./train --model invoice.model
训练过程如下:
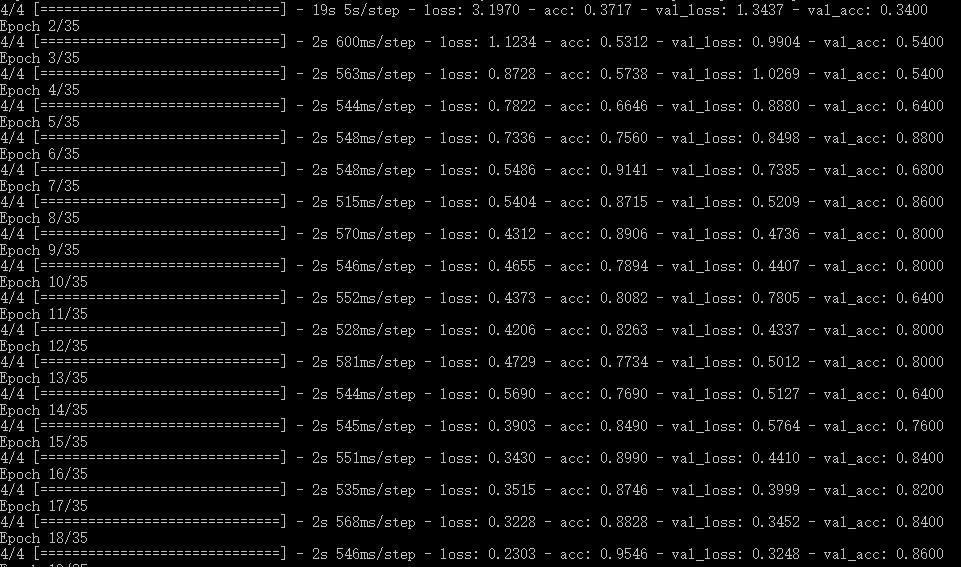
image.png
可以看出准确率迭代还是很好的。总共就全集迭代35次。
最后生成了下面所示的invoice.model文件,就是我们的权重文件了

image.png
测试代码
# import the necessary packages
from keras.preprocessing.image import img_to_array
from keras.models import load_model
import numpy as np
import argparse
import imutils
import cv2

norm_size = 64

def args_parse():
# construct the argument parse and parse the arguments
    ap = argparse.ArgumentParser()
    ap.add_argument("-m", "--model", required=True,
        help="path to trained model model")
    ap.add_argument("-i", "--image", required=True,
        help="path to input image")
    ap.add_argument("-s", "--show", action="store_true",
        help="show predict image",default=False)
    args = vars(ap.parse_args())
    return args


def predict(args):
    # load the trained convolutional neural network
    print("[INFO] loading network...")
    model = load_model(args["model"])

    #load the image
    image = cv2.imread(args["image"])
    orig = image.copy()

    # pre-process the image for classification
    image = cv2.resize(image, (norm_size, norm_size))
    image = image.astype("float") / 255.0
    image = img_to_array(image)
    image = np.expand_dims(image, axis=0)

    # classify the input image
    result = model.predict(image)[0]
    #print (result.shape)
    proba = np.max(result)
    label = str(np.where(result==proba)[0])
    label = "{}: {:.2f}%".format(label, proba * 100)
    print(label)

    if args['show']:
        # draw the label on the image
        output = imutils.resize(orig, width=400)
        cv2.putText(output, label, (10, 25),cv2.FONT_HERSHEY_SIMPLEX,
            0.7, (0, 255, 0), 2)
        # show the output image
        cv2.imshow("Output", output)
        cv2.waitKey(0)


#python predict.py --model invoice.model -i ../10.jpg -s
if __name__ == '__main__':
    args = args_parse()
    predict(args)
效果如下:

image.png
预测正确,done!还是如开篇所说,详细学习请去看原作者文章!